Shaggy9342
-
Posts
93 -
Joined
-
Last visited
Content Type
Profiles
Forums
Events
Everything posted by Shaggy9342
-
Unfortunately, I've been held up by the library that I was going to use for CNC machining. There's about a 3 month wait to get a few hours of machine time, making it impractical for me to say the least. So I'm once again buying more machinery, this time the X-Carve, a CNC catering towards the hobby crowd. I need to get in touch with Dudecon to see how this may affect things, but hopefully having all the machinery in-house will aid me in the long run. Thanks for the continued interest! I'm hesitant to post any sort of timetable for this project as there are so many factors, but I'm still planning on doing at least one run of this costume once I finish, with more runs depending on its approval and demand.
-
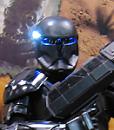
Since more people than just DeathMOS30 have brought this up before I think making a post that gives a quick breakdown between the Sith Trooper and the Sith Trooper Commando is worthwhile. Ok, starting off from the top. Helmet - Shape is similar, but the Commando has a jaw pieces that almost meet instead of jutting out, giving the visor more of a t-shape than the standard troopers full face visor. Also, the side juts out instead of cutting in. Chest - Commando has a Iron Man kind of thing in his chest. Lines are completely different though the general shape is relatively close. Shoulder Bells - Different shapes again, Commando has two black horizontal lines and no indents at the top. Forearms - One piece that appears almost identical. At a glance, it looks like they just moved the two indents from the wrist up towards the elbow and added a plate to cover the wrist on the side. Thigh Plates - Secondary hanging plate is gone, replaced by a padded section on the front of the pants. Otherwise pretty similar. Calf - No rectangular shape at the connection between top and bottom. Connection between armor and boot has been elongated. So there we go. Quick rundown of some differences between the two. I imagine that it wouldn't be too much work to convert the 3D files for the Trooper to fit the Commando, but as this is already a pretty niche costume I likely won't do that unless a lot of people ask me about it.
-
It's possible that I'll do that in the future, but that would require new models for the helmet and chest piece and probably other pieces as they differ from the standard trooper. You could always modify a standard sith trooper, but just pulling the armor in red plastic or painting it red wouldn't be accurate.
-
Finally got the vacuform machine in and put it together over the weekend. It has a forming area of 18" x 27" and can pull up to 7" deep so even larger chest molds should be fine. Once I have the positive molds I'll be able to estimate how many sheets of plastic I'll need per kit. I plan on building one kit first, both to test out the armor for any potential design problems and also so there will be a ready guide on how to put everything together once kits are shipping.
-
Sorry for the slow updates. Vacuform machine is currently being shipped to me, and I've found a fantastic business in town to work with that will be doing the CNC work. The undercuts on the models won't be part of the actual molds, so releasing after pulling the plastic shouldn't be a problem. For the neck I'm still on the fence about using latex or making it jointed. To save having to do it later, the neck is being designed as several jointed pieces right now. So if that doesn't work out, it'll be easy to switch to using something else like latex in the future.
-
There are some smaller printers right now, but they're buying a larger one that has a build area of 18x18x24 inches. But most of these pieces are going to be CNC'd, not 3D printed. Some digital progress pics! The modeler I work with (@dudecon) has been working hard on these, helping me think things out. Working out problems at this stage will save a lot of work in the future. The pieces, from left to right, top to bottom, are as follows: First Row -kidney plate -lower abdomen frame -abdomen plate -chest inset -back plate (upside down in picture) -shoulder bell -backside of shoulder -front side of shoulder Second Row -left and right forearm -elbow -hand plate -kneecap -upper calf front -upper calf back -lower calf front -lower calf back -lower thigh plate -upper thigh plate -front hip plate -butt plate -cod plate -collar -lower neck piece -upper neck piece Due to the movement of the model in game, I've decided to go with making the neck piece with a hinge, copying methods I've seen used with Iron Man costumes. Without this, this suit would have the neck mobility of an Imperial Guard.
-
Ok, still hard at work on figuring this thing out. Making this costume with a CNC machine and a 3D printer is a very different process from pepakura, but will result in a much better costume in the long run. I'm just going to throw a bunch of the current armor breakdown pics up here for people to see as I probably won't have physical pieces cut until the week after DragonCon. The first image is a breakdown of each of the armor pieces as far as how they are going to be cut out/printed. The second one is a comparison between the old 3d models I had access to and the new ones (old right side, new left side).
-
So I just wrote out a long reply to this and hit post but now I'm not seeing anything. It's late and I need to get to bed so I'll just say that no, it was never completed, I've just started looking into finishing it again, I'll be using a 3D printer for everything this time because the thought of doing everything in Pepakura again makes my head hurt.
-
Nope. I am entirely self taught. I unfortunately had to shelve this project as school (and work) had to take a priority over costuming for a while. However, I am now getting back into it and thanks to some of my classes, I'm actually going to be starting a much larger project. As this is a forum that I greatly respect, I am actually going to make this announcement here, albeit hidden in this thread as it's quite premature. I am going to be starting my own armor studio, similar to farawaycreations, mywickedarmor, volpinprops etc. Fairly soon, I'm going to start a rockethub (crowdfunding similar to kickstarter) to get the whole thing started. My entrepreneurship business class has been a large inspiration for this and I've actually been able to work on this idea as a class project for a while. After giving several pitches and really researching it, I realized this is not only something that I could do, but something that I would love to do. Two of my business professors have also been kind enough to help me with planning this out. Instead of doing the Pepakura method, I plan on purchasing a 3D printer to use for most of my initial fabrication. The cost on 3D printers has really started coming down and would allow me very quick turn around time from idea to kit, as well as a whole myriad of other benefits over traditional methods. I already have very large workshop space available to me, someone in mind to help me with prototype armor builds, someone to help with painting show/example costumes, two different 3D printers (I will just be getting one, but which depends on how well the fundraising goes) and last, but perhaps most importantly, an inexhaustible passion for this project. I will mostly be working on Star Wars costumes primarily, but will definitely branch out to other universes at times. I'm going to do my best to not infringe on existing armor markets unless I think I can make improvements to the point where it would be worth it (we REALLY don't need someone else making stormtrooper armor for example). So I'm mostly going to be doing costumes that don't currently have kits. As luck would have it, no one has done the Sith Trooper since I stepped off this project and it's a costume I am *very* familiar with now. So this is almost certainly going to be the first thing I do. Other ideas I have include Shae Vizla/Braden from SWTOR (for those unfamiliar with that game, that's basically the female and male Mandalorian/bounty hunter armor circa 3643 BBY) and the Coruscant Guard armor. Besides just making costumes, I want to make tutorial videos to both explain the process that goes into making the armor, from 3D printing to molding and casting to vacuuforming, and also how to build each kit I start making. Too many sellers that I see just leave it up to the buyers to puzzle out how best to put their kit together and I think that's something that can be improved upon. I feel very strongly about building the cosplay community as a whole, but the 501st especially. There has been a lot of drama in my local squad that has contributed to my pulling away from the costuming world. I want to switch to actively trying to fix things rather than pull back as I know many other people besides myself have done in similar situations. My goal is to have my rockethub page started by the end of November. If everything after that goes according to plan, I hope to bring (and possibly be joined by others) a Sith Trooper to Celebration Europe II next July. If anyone has any questions about absolutely anthing relating to this project, my Sith Trooper armor or anything at all really don't hesitate to ask. Also, any general comments or constructive criticisms are always welcomed.
-
Looks awesome man. I've been caught up with a lot of stuff lately (silly college and job taking all my time) so I haven't been able to work on mine lately, but seeing yours is a real kick to get mine finished. Hope we can both showcase at CVI!!! That'd be awesome. Maybe get a Revan too. Anyways, keep up the great work!
-
I love seeing how far you're getting on this! Looking good!
-
I'll be honest. I am sick of dealing with the helmet right now. So all I did today was make a new shoulder pad. I'm quite happy with how it turned out as I haven't pepped anything in...months. Not sure how many months. Multiple months. But it turned out very symmetrical, better than the last one I made. Good to know pepakura skills don't just atrophy very fast. Not sure if I'm going to work on fiberglassing this before finishing the helmet, but I'm definitely going to be doing a lot of work over the weekend. I might just work on pepping those pieces that I've already successfully sized (left and right arms, calves) and then work on fiberglassing and bondoing everything at the same time so I have something to do while different pieces cure. I'm also toying around with the idea of doing several videos showing my personal process of making armor from Pekura and Bondo. There are approximately 42 million videos like this on youtube, but none of them are what I would consider quality instructional videos. What do you guys think? Would making videos be a good idea? Oh yeah, and here's the shoulder pad.
-
So after many hours of sanding, I give you...the same thing you've seen in previous pictures! Only smoother! And with primer! Frankly, I'm pretty much done with the helmet. It's only possible for me to get this to a certain level before the time spent fixing small errors just isn't worth it. And I'm ready to move on. Next up is either the shoulder pad or the calf piece. Of course it had to chip away in the most visible place. Where else would it chip? With a few small exceptions, this is turning out better than I'd hoped! Except for the chip in the front, the left side turned out very well. The white is just where I sanded through the primer coat (I only did one layer). Left side, not so much. That long skinny area in the front is going to be a total pain to fix. I thought I got it last time, but obviously not. Not too much sanding left on this side. The arcing groove is going to be the real pain though. This side needs a LOT of jaw work. No real problems though. And because at this point, I just couldn't resist... And to finish off the night, I did a paint test. It looks like the Rustoleum beats the Krylon. I'm still planning on doing an aluminum cold cast, but it looks like paint works just fine, not chrome. And to dartoftruth and lunar lord. I plan on making kits That's still a ways off though, so don't get too excited. But...there's a good chance I might sell the helmet and armor separately...
-
Thanks Blackhole : ) Patching is done. For the top anyway. Now just waiting for it to dry.
-
So after a month hiatus doing many fun things and many not so fun things, I've finally found time to get back on this project. Not too much noticeable progress since my last post, but I've put in a good couple hours sanding and patching. I think I might finally be at the point where I'm doing final patches, but I've thought that before lol. Here's how the helmet looks now. All the circled spots are where I'm going to add rondo. All I have on my plate for tomorrow is driving my roommate to the airport, so expect more soon! I've also been playing around with visors. I'm still debating between a flat plastic visor like what's used for almost ever other helmet out there and actually making a visor that I'll cast in a clear resin and tint. I think the cast visor would look a lot better, but I might just call that an upgrade that I'll work on once I have all the armor finished. Here's a few shots of the helmet with the visor. The visor slipped down in the second shot as nothing was holding it in place besides my forehead. Ideally it would be at the same height as in the bottom image.
-
Behold...resolutions!
-
Haha, yeah. Basically it's a combination of a lot of free time at the moment, knowing school this fall is going to take away most of that free time and a desire to have the whole thing done by October 18 for the release of Revan (and my birthday! lol) I'm hoping to have the helmet mostly complete by the end of next week at the very latest. That will leave me with 5 months to get the rest of the armor done. I'm not going to quality if I find I'm running short on time, but I'm definitely going to be putting the hours into this project to avoid the urge to rush things as October nears. I'm also trying to avoid that dry patch I see so many projects run afoul of. It's always frustrating when I'm reading someone else's thread and it stops all of a sudden. I suppose it's similar to the feeling you get when you stat watching a tv show and you finally catch up to the most recent episode and you realize that there isn't anything else.
-
Here's the helmet after some sanding. I'm not going to have any progress posted until Monday as I'm flying out to North Carolina for my sister's wedding When I get badk, I AM GOING TO BUY A CAMERA! So that everyone can actually see what the helmet looks like, because these photos just don't show any detail, which is pretty much all I have left to do.
-
I'm hoping the cold cast will work provided it's buffed and polished, but the Sith troopers have an almost chrome appearance. Not sure what Brian Anderson and Jason think about it but Thomas Spanos suggested using chrome, in which case the aluminum will just help with possible weathering. But as I said earlier, until I have an actual cast piece in hand, I can't know. Didn't get too much sanding done tonight, but before I started sanding I decided to do a rough sketch of how the detail lines on the helmet are gonna look. Even with the skin file, it's pretty hard to figure out just how the lines go in some places. And the back of the helmet For the final version I plan on cutting out templates to make sure both sides are identical. The top parts are just somewhat darker or less shiny areas of the helmet that will have slightly indented lines bordering them.
-
Pretty much done with the rondo stage, now just lots of sanding and filing. Last layer is curing right now, so I'll put up progress pics tomorrow.
-
Did a little paint test on the old helmet. Krylon on one side, Rustoleum on the other. Turns out, both sucked lol. The Rustoleum looks like I covered the helmet with aluminum foil. The Krylon side looks like...well, it looks like a helmet covered silver paint frankly. Not metal. So until I actually cold cast a helmet, I'm not gonna worry about paint. I've got most of the helmet covered in Rondo and did a bit of sanding. I'm gonna put another layer on and then sand. And sand. Then maybe file for a bit to change things up, then do some more sanding. Krylon side Rustoleum side Helmet with some sanding.
-
Yeah, it's still wet in that picture. I found a thread about mixing fiberglass resin with bondo that says that using both the bondo hardener and fiberglass hardener when mixing will help the rondo to set faster. Good to know, as I hate waiting for things to set. Also, I've decided on a resin to cast the helmet with. Most people I've talked to and read about use Smooth-On resin, but I found that Alumilite is nearly half the cost, comes in larger quantities, sets faster and has almost double the tensile strength of the most commonly used Smooth-On resin, Smooth-Cast 320. And Alumilite sells a cold cast powder that comes out closer to silver than the pewter offered by Smooth-On.
-
Yupp, I got the inside with fiberglass resin and I'm starting to put some rondo in it too. Here's what I've done so far this morning. It should be almost finished curing by now, then I'll do the other side.
-
So I think I'm in love with Rondo. Don't tell my girlfriend lol. Seriously though, this stuff is amazing. I just put one thin coat on the helmet after two coats of fiberglass resin and it's like watching dozens of hours of potential sanding disappear before my eyes. I didn't get the hardener ratio quite right so I'm going to wait till tomorrow to do anymore as it's still slightly tacky but here's how the helmet looks right now. You can still see most of the flat surfaces, but again, this was a thin test layer. Putting it on thicker next time should solve everything.
-
Yep, fits perfectly.