

DarthDyer76
-
Posts
82 -
Joined
-
Last visited
About DarthDyer76
SpecOps Info
Support Info
DarthDyer76's Achievements
")
Newbie (1/14)
0
Reputation
-
So after trooping a couple times in armor, I've realized very quick that basic things like stairs become quite a problem when it comes to flexing your knees... some of the other shorter guys like me (I'm around 5-8) have said they trimmed the back of their thighs at the knee into a moon-type shape to allow better movement at that point, but I haven't been able to see any of those guys in armor to see for myself... does anyone here have that problem? I've looked at FISD also and can't immediately find what I'm looking for... Just want to see some photos so I don't butcher anything when I go to cut... it's going to happen, I just need some reference... LOL
-
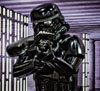
It's like I was born to wear black...
-
And I think I was only called Vader 5 times...
-
First troop in armor Saturday night... Star Wars night at the Knoxville Ice Bears:
-
Congrats, Scott!!
-
Just got word from my GML that my kit was approved! TX 31705 reporting for duty! Just need to make a couple tweaks and will be ready to submit for Specialist!
-
Got everything strapped up, and put the full kit on for the first time yesterday... still some tinkering left, but I think it's looking good...
-
I already had the elastic to attach the boxes to the belt, so I cut those strips and glued them to the inside of the box while the ledge strips were drying... The only mods I had to make for the cover pieces was trimming the length slightly and shaping the corners to fit... I also shaved out a notch at the top for the strap to fit through... it was just coincidence I had a long piece of the extra plastic left after making cover strips, and it was the exact width I needed... I had enough to make both box covers and have some left over... gotta love those extra plastic pieces from ATA... Sanded and glued, and all I need is to clean up the boxes with some polish and attach!
-
While Ed has been tinkering on some of the detail assembly and gluing (sniper plate, ab buttons, etc), I've been working on the drop boxes... to be approved for Specialist, the back of the drop boxes have to be enclosed... I had a couple ideas in mind based on some build-your-own threads I saw... they involved using the excess plastic from the untrimmed belts (ammo pack and large belt), but the ATA belt had very little return edge to cut off on the main belt, so I saved the excess from the ammo pack... The idea was to use the corners and basically make an inner ledge around the box on which to glue a cover... I tried making the corner pieces fit inside the box, but since they were angled slightly I never could get them flush against the side... several attempts at shaving them down and reshaping left me searching for another option... I decided to try using single strips of plastic along the two sides, since the extra plastic for the covers was already the correct width to fill the hole without much (if any) gaps on the sides... so the long strips would create a ledge to rest the cover pieces...
-
Thanks guys!!
-
Working on drop boxes today, and I think Ed and I will be finishing up this weekend.. will post final results!
-
I remember being very impatient in the beginning, wanting it all right now... but there's something to be said for assembling the pieces one at a time, then seeing it all start to come together as you build your armor... I definitely see that now as I'm close to finishing... it's a more rewarding feeling, I think...
-
Ed said we could put snaps on the ab plate to help hold the belt in place... more secure and less likely to shift around... Snaps on the belt to connect to the ab plate... The joint where the two leather belts come together... overlapped and riveted... Drilling holes for the rivets on the ends of the belt... One more session, and we should be ready to go... just some polishing and approval here we come!
-
More work photos, after an impromptu and short visit with Ed on Sunday... we should be getting pretty close.. he did some more gluing of the legs and arms, and got all the snap plates glued on... the only issue was with one of the biceps, which was dramatically different than the other... when assembled, the one bicep had a very narrow opening, so it would be impossible to get my arm through... he used some CA glue and accelerant to reinforce it and took the heat gun to it... we were able to bend it enough to get it closer to the right shape, so it should be fine now... I keep telling him the imperfections and asymmetrical nature of the armor is both cool and weird at the same time... as long as it works, it doesn't matter to me... LOL I hate my camera phone, so some of these pictures suck... I apologize in advance... LOL The corrected bicep... I didn't get a side by side shot of how different they were, but picture the correct one with a horizontal opening, and the other with a vertical egg-shaped opening... pretty crazy... just glad we got it fixed... Completed thigh... we didn't have to do much sizing, because it fit me just right... guess I'm the perfect size for a stormtrooper... Strapping done to connect front and back... Sizing for shoulder straps... Next up was the belt... because I'm going for Specialist, I got a patent leather woman's belt off eBay... by some mistake, they sent me two belts, but it didn't matter because using both proved to be the best method to mount the plastic belt... we riveted the belt to the plastic in the center...
-
If you're talking about the bike, it belongs to Ed... I don't know much about motorcycles... but it looks fast... LOL