

mikedwelle94
-
Posts
370 -
Joined
-
Last visited
-
Days Won
6
Content Type
Profiles
Forums
Events
Everything posted by mikedwelle94
-
My clear parts arrived today! All that's left to do is trim and assemble these parts, mask them off for paint, and install LEDs. I will definitely meet my goal of being approved by May 4th.
-
Hey there, David. For the plastic parts I highly recommend joining the "Walt's Trooper Factory" Facebook group and sending Rocky or Walter a PM. They can hook you up with a box of beautiful black plastic. If you're on the husky side, I think Armor Master does kits in black for those sizes but I am not sure what their contact info is. Since you're going to be waiting a few weeks for the kit to arrive, you'll have time to read up on how to put one of these kits together. It can be intimidating at first, but there's a good network of support here to get you through it. You should also gather your soft parts (boots, undersuit, neckseal, holster, etc) and tools while you wait. Good luck and let us know if you need any assistance!
-
I'll mess around with the LEDs a little bit and see if I can apply it that way. I found out that fabric is the same stuff that's used in bridal veils. Going to see if I can find it in blue and place an order. If not, white should do just fine. --- Note to future self and to anyone looking to build a costume with lighting. If you're going to use USB powerbanks as your LED power supply, only buy ONE just to test it out. Turns out the five I bought from Walmart all have an auto-off "feature" which shuts the powerbank down if the draw isn't strong enough. I have one high-end Insignia LED strip that cost me $30 at Best Buy (the one I use in my helmet) and that works fine with my 5500 mAh bank. The rest of my LEDs are cheap eBay ones at around $5 a pop. I finished up my thermal detonator tube, rigged up the lights, and plugged it into the 4000 mAh Walmart powerbank only to have it shut off after a few seconds. Very annoying setback - I now have to find banks that have a feature disabling auto-off. It could be that the cheaper eBay LEDs aren't as power-hungry as the Insignia strip, or it could be that the different power bank I'm using in my helmet doesn't have an auto-off function. One thing's for sure: I'm not going to buy my power strips at $30 each just to keep my lights from shutting off. Either way, I'm probably going to have to spend a good chunk of cash on a new set of power banks, which is incredibly annoying. I'll be smarter about it this time around.
-
I'm sure that would solve the issue of my face being lit up, but then you would see the LED strip itself stuck on the outside of the helmet. My goal is to keep all the electronics and lights hidden under the costume. Otherwise the illusion can't be as convincing. I posted about this in my garrison forum and someone chimed in with an interesting Youtube video. I think it might be as simple as installing some fabric mesh right inside the helmet over the lenses, but we'll see! I'm not going to stress out too much about it for a while.
-
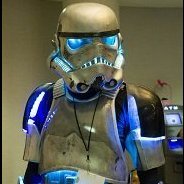
Everything's installed in the bucket except a chin strap and helmet fans. However, it only looks good when I'm not wearing it.....and I kind of knew it would be like that ahead of time. So I guess I'll need some mirrored blue lenses lol. Hopefully light will get through those. The lights are bright enough to look good indoors. Probably out in broad daylight too, but I haven't tested that yet.
-
 I will finish formatting and adding to the second half of the post in a little while. Just wanted to get that posted so I wouldn't lose it. -- Just finished formatting. That's about it for the text. Let me know if you see any glaring issues. I'll add pictures as I finish my costume parts. Thanks for looking!
 -
I conjured this up borrowing elements from Fivezero's TFU Shadow CRL draft, along with text from the Stormtrooper Commander CRL, as that costume is structurally identical to this one. I threw in a few of my own ideas as well and deviated from Fivezero's text for a few of the components to keep requirements more consistent among all variants of TFU troopers. I'll come back to this periodically to add in pictures of my own armor components as well add any Specialist requirements I think are appropriate. Most of the inspiration for the Specialist requirements will come from the Expert Infantry and a few of the Centurion requirements for the FISD's TK Commander. Costume Reference Library Description: TFU Shadow Stormtrooper Prefix: TX Detachment: Spec Ops Detachment Context: Star Wars: The Force Unleashed Shadow Stormtroopers are elite Special Ops operatives deployed on various operations under the command of the Emperor's Shadow Guard and Stormtrooper Commanders. Their armor is enhanced with fibers that allow them to become invisible. The 501st approval requirements are listed in black (just pretend it's black... it doesn't exactly look good on this forum's setup lol) The Spec Ops Detachment defines an additional, optional level of costuming excellence. In the page below, requirements for Level 2 "Specialist" are listed in blue. - Those armor pieces without blue text are by default considered the highest level. - Please visit the Spec Ops website for a full description of these standards. For 501st membership only the requirements in black need to be met. Helmet For 501st approval: - Lenses must be sufficiently dark enough to obscure the costumer's eyes. They may be flat or bubbled. They are backlit with blue lighting. - The body of the "ears" is silver. The bars have three or four bumps and are dark gray in color. - The frown must have either 6 or 8 teeth cut out. There are spaces between the teeth the wearer's face must not be seen. The frown is backlit with blue lighting. - The tube stripes may number between 9 and 15 per side with the curve bends extending backwards. These are backlit with blue lighting. - Vocoder (vertically ribbed chin detail) is black. - The aerators (cylinders on either side of the vocoder) are black, and screening is silver. - Traps (trapezoids on dome of helmet) and tears (area beneath the corners of eye lenses) may be hand painted or decals and are dark gray in color. Rear traps and tears have vertical black lines. - Note: The helmet is accurate in detail and proportion to official references. Many commercially available helmets or those considered disproportionate in size or shape are ineligible. OPTIONAL Level two certification (if applicable): - Ears shall have three screws per side, one above and one below the ear bar and one at the base of the helmet. The screws shall be silver in color to match the helmet. - Ear bars have four bumps only, not three. - Traps/tears and tube stripes shall have the correct ANH TK details - Correct 'Hovi mic' aerator tips. - Helmet and details/paint is lightly scuffed (battle worn), but not weathered like a Sandtrooper (TD). Neck Seal For 501st approval: - Black with horizontal ribs, fitted to the wearer, and extending from the base of the neck to the top of the Adam's apple. Under Suit For 501st approval: - Black non-textured material, either one-piece or two-piece construction with no visible zippers or logos. Shoulder Straps For 501st approval: - These must be securely mounted in front and may free float in back. They may be affixed with rivets, Velcro, or adhesive. - The shoulder straps are silver in color. OPTIONAL Level two certification (if applicable): - No visible rivets are allowed. - The shoulder straps shall not have a flat end at the ends of them. They shall be ribbed 100%. - Shoulder straps are lightly scuffed (battle-worn), but not weathered like a Sandtrooper (TD). - These shall be securely affixed in the front and back. No snaps, rivets, or brads shall be visible. Shoulder Armor For 501st approval: - One on each shoulder. The shoulder bells are considered effectively symmetrical; they may be worn interchangeably on the left and right shoulders. - The shoulder bells are primarily gloss black in color. - The edges of the shoulder bells are transparent and backlit with blue lighting. OPTIONAL Level two certification (if applicable): - Shoulder bells are rounded at the corners. - No elastic straps across the biceps. - Shoulder bells are lightly scuffed (battle-worn), but not weathered like a Sandtrooper (TD). Bicep Armor For 501st approval: - Biceps are fully closed. - Biceps are silver in color. OPTIONAL Level two certification (if applicable): - No elastic straps across the biceps. - Biceps are lightly scuffed (battle-worn), but not weathered like a Sandtrooper (TD) - Biceps are constructed using the overlap method. Butt-join and cover strips are not accurate. Forearm Armor For 501st approval: - Forearms must appear to be fully sealed and enclosed. - Forearms are silver in color. - The top and bottom circumferences of the forearm should be transparent to allow blue lighting to be seen. - The top ridge is backlit with blue lighting. OPTIONAL Level two certification (if applicable): - Forearms are lightly scuffed (battle-worn), but not weathered like a Sandtrooper (TD). - No return edge on the inside of the front of the forearm is allowed. - Forearms are constructed using the overlap method. Butt-join and cover strips are not accurate. Gloves For 501st approval: - Black in color, made of either rubber, nomex, leather, or leather-like material, with no visible straps or logos/designs. The fingers are enclosed, non-textured. OPTIONAL Level two certification (if applicable): - Gloves shall be rubber or rubber-like chemical gloves colored black. Handplates For 501st approval: - Roughly pentagonal in shape, the hand plates are mounted securely over the back of the glove. As an alternative to plastic, these may be made out of latex or latex-like material but must remain glossy. - The handplates are silver in color. OPTIONAL Level two certification (if applicable): - Handplates shall be lightly scuffed (battle-worn), but not weathered like a Sandtrooper (TD). Chest Armor For 501st approval: - Chest plate overlaps the abdominal plate. - The top of the chest plate is semi-gloss gray while the bottom is silver in color. - Blue lighting is present along the bottom edge and shines over the abdominal plate. - A silver flexible U shaped gasket or molded lip is present around all edges. OPTIONAL Level two certification (if applicable): - Chest plate shall be lightly scuffed (battle-worn), but not weathered like a Sandtrooper (TD). Back Armor For 501st approval: - Back plate contains a "O II" design with little or no overlap of the kidney plate. - Back plate is silver in color. - A silver flexible U shaped gasket or molded lip shall be present around all edges. OPTIONAL Level two certification (if applicable): - The back plate shall be lightly scuffed (battle-worn), but not weathered like a Sandtrooper (TD). - Back plate shall have no overlap of the kidney plate. Abdomen Armor For 501st approval: - The ab plate is semi-gloss gray in color. - Ab plate buttons shall be all black. - Abdomen armor center button panel shall be inverted compared to ANH/ESB. - A silver flexible U shaped gasket or molded lip is present around all edges. OPTIONAL Level two certification (if applicable): - Ab plate is lightly scuffed (battle-worn), but not weathered like a Sandtrooper (TD). - There shall be no split rivet or brad visible on the crotch tab of the ab plate. - Left vertical row of ab plate buttons contain five buttons. All buttons are the same size and color and are visible (not covered by the belt). The fifth button is mounted vertically above the standard four buttons. Kidney & Posterior Armor For 501st approval: - A separate kidney/butt plate is not allowed. The kidney and butt shall be combined/fused to a single plate/one piece. - The kidney plate is silver in color while the butt plate is semi-gloss grey. - The transition from silver to grey on the kidney/butt shall be hidden by the fabric belt. - A silver flexible U shaped gasket or molded lip is present around all edges. - The crotch plate of the butt plate area may or may not have visible snaps. OPTIONAL Level two certification (if applicable): - The edges of the hip area are rounded/curved (not like the straight lines found on the ANH/ESB posterior armor). - The kidney/posterior armor is lightly scuffed (battle-worn), but not weathered like a Sandtrooper (TD). - Two rivets shall be present on each side of the kidney plate, approximately 4 mm from the inside edge of the U shaped gasket or molded lip that is adjacent to the ab plate. There will be one rivet near the top and one near the bottom on each side. They shall be painted grey or silver. - There shall be no visible snaps, rivets or brads on the crotch tab of the butt plate tab. Belt For 501st approval: - Belt face is made of plastic (ammo belt). - Two square buttons are present, one on each end. - The soft belt proper is tightly woven nylon/cordura material or canvas. Width can range from 2.25" to 3.5". The color is silver. - Back of the belt has blue lighting that shines onto the butt plate. - The drop boxes dangle from the sides of the plastic belt face via black straps and are aligned under the plastic tabs of the ammo belt. These are semi-gloss gray in color. OPTIONAL Level two certification (if applicable): - Belt face (TX ammo belt) and drop boxes are lightly scuffed (battle worn), but not weathered like a Sandtrooper (TD). - The corners of the plastic ammo belt shall be trimmed at a 45 degree angle. - Drop boxes are closed in the back. - The belt proper shall have (eight total) white rivets. Two rivets close to each side of the thermal detonator, and two rivets approximately an inch away from the edge of the ammo belt (The rivets form a rectangular pattern). - The width of the belt proper shall be restricted to between 2.25'' and 2.5''. Thermal Detonator For 501st approval: - (a.k.a. O2 canister) attaches to the back of the belt. This is a cylinder 2 to 2.5" in diameter with silver end caps and a silver control panel pad, with controls closest to the right end cap. - The main cylinder is transparent, with blue lighting present. - The total length is approximately 7.50'' - The thermal detonator is attached via metal or metallic-appearing clips approximately 1'' in (25mm) wide. OPTIONAL Level two certification (if applicable): - The thermal detonator is lightly scuffed (battle worn), but not weathered like a Sandtrooper (TD). - Thermal detonator belt clips are positioned with little to no gap between the clips and the end caps. Thigh Armor For 501st approval: - The thigh armor may open and firmly close in the back allowing the two halves to appear sealed when viewed by spectators. - The thigh armor is semi-gloss gray in color. - The ammo belt is installed on the bottom of the right thigh and is silver in color. - The ammo belt has blue lighting behind it, shining onto the thigh. OPTIONAL Level two certification (if applicable): - Thighs are lightly scuffed (battle-worn), but not weathered like a Sandtrooper (TD) - Thighs use the overlap construction method. Butt join and cover strip method is not accurate. Shin Armor For 501st approval: - The shin armor is able to open and firmly close in the back allowing the two halves to appear sealed when viewed by spectators. - The trapezoid knee plate is affixed to the top of the left shin with adhesive or rivets. - The shin armor and knee plate are both silver in color. - The bottom edges of the shin armor should be transparent, allowing for blue light to be seen. OPTIONAL Level two certification (if applicable): - Shins are lightly scuffed (battle-worn), but not weathered like a Sandtrooper (TD) - Shins use the overlap construction method. Butt join and cover strip method is not accurate. Boots For 501st approval: - Dark gray leather or leather-like, above ankle height, with a flat sole, and small U-shaped elastic sections on both sides of the ankle with no buckles or laces. - Jodhpur/Chelsea-style boots or an equivalent style boot is acceptable. Elvis / Mariachi boots are not acceptable. - A red stripe is present around the front of the boot. - White or other color boots may be painted dark gray so long as the boots are maintained to remain the proper color. OPTIONAL Level two certification (if applicable): - There is no seam present on the front of the boot. - Boots are lightly scuffed. - - - - - - - - - - - Optional Accessories E-11 Blaster (ESB) For 501st approval: - Based on a real or replica Sterling sub-machine gun, scratch-built, or a modified commercial toy Stormtrooper blaster. OPTIONAL Level two certification (if applicable): - Folding stock is placed in the closed position. - No ammo counter shall be present. - D-ring mounted on the rear. - Sterling based blasters have the correct M-38 or M-19 style scope. - The M-19 scope is preferred. - No power cylinders on the magazine housing. - Scratch-built, resin cast, Hyperfirm rubber cast blasters shall have a total of 6 T-tracks on blaster (leaving the lowest row on the magazine housing side uncovered). - If using the Hasbro E11 toy blaster, it is modified to have the correct number of T-tracks (6 total), with a lower row of open vent holes on the magazine housing side. This is accomplished by covering the pre-existing rows of holes with T-tracks, then grinding off the lower integrated T-track on the magazine housing side, and drilling a new row of holes in its place. E-11 Blaster (ROTJ) For 501st approval: - Based on a real or replica Sterling sub-machine gun, scratch-built, or a modified commercial toy Stormtrooper blaster. OPTIONAL Level two certification (if applicable): - Folding stock is placed in the closed position. - No ammo counter shall be present. - D-ring mounted on the rear. - Correct style scope. - No power cylinders on the magazine housing. - Scratch-built, resin cast, Hyperfirm rubber cast blasters shall have a total of 7 U shaped channels on blaster (all holes on barrel shall be covered). - If using the popular commercially available Stormtrooper blasters, you shall grind off the T-tracks and replace them with U shaped channels and cover the open rows of holes (total of 7 U shaped channels in all). - Correct greeblies on the left rear area shall be present (door catch and two "hammers"). Lightsaber (The Force Unleashed) For 501st approval: - The hilt is Graflex style or has the characteristics of the Graflex, (reference Luke Skywalker's lightsaber from ANH and ESB). - If the lightsaber has a blade, it may be one of the color blades used in the video game, The Force Unleashed. The choice of blade colors are: Black, Blue, Green, Gold, Purple, Red and Yellow. - Note: Double blades, small Yoda style lightsaber, or inexpensive non-FX Hasbro Lightsaber toys are not allowed. OPTIONAL Level two certification (if applicable): - The hilt shall be made to reference Starkiller's lightsaber (as seen in The Force Unleashed). - If the lightsaber has a blade, it may be one of the color blades used in the video game, The Force Unleashed. The choice of blade colors are: Black, Blue, Green, Gold, Purple, Red and Yellow.
-
I just got a surprise in my mailbox. My USB-powered RGB LED strips came in today ahead of schedule. I got ten strips measuring 1.15 ft. and two 3 ft. long strips. For every piece of armor that needs to be lit, I'll have a small smartphone battery bank velcro'd inside to power the light strip. I went with batteries that have a 4000 mAh capacity for the smaller parts, which should sustain the lights at maximum brightness more than long enough for the duration of a troop. The two longer strips will be powered by 6000+ mAh batteries. What's cool about these is I can change the color for some troops. Green for St. Patrick's day, red/green for Xmas, pink for breast cancer awareness, etc. Should be a lot of fun! Plus it looks like I won't run out of things to do for the next couple months. I'm getting a good deal on an Anovos OT TK kit from a local Merc within the next couple weeks. I'll be attempting to build the TFU Kashyyyk Stormtrooper (a legion first) and add a new CRL entry for the FISD. It'll be the same kind of build as this one - only differences being a totally different helmet sculpt, and the need for u-trim on the torso armor because the armor won't have the molded ridges that Rubies has. That build thread will be posted on Whitearmor.net as soon as I receive the kit.
-
Had some (relatively) warm temperatures up here in Maine so I could take some of this plastic outside for spray paint. The chest, back, abdomen, kidney/butt, and belt are all pretty much done pending clear coat. Here are some awkward pictures of me in half a costume to show off the paint job. There's a minor issue with fit, but I can fix that by adjusting the straps connecting the back to the kidney. I'm hoping to bring that armor up high enough so that the transition from silver to grey will be covered up by the canvas belt. I've pretty much come to a standstill with this trooper until more stuff arrives. My LED strips are set to be here sometime before the 2nd week of April, and my WTF parts will be here goodness knows when. Crossing my fingers it gets here next week, because I'm already seeing other people get their clear plastic orders. In the meantime, I'm taking my Black Series helmet and converting it to one of those hybrid clone/TK Kashyyyk Stormtroopers you see in the opening mission of TFU. I'll throw up a pic when it gets to a good point.
-
How's this coming along?
-
Helmet is 90% done. Tried to match the weathering on the video game trooper with paint chips and acrylic black wash. I'll be doing this for the rest of the armor, referring to hi-res images of the game models to figure out exactly where to put all the chips and battle damage. All the bucket needs now is some clear coat, and lenses + LEDs installed.
-
Worked on strapping the torso plates. The Rubies armor fits like a glove now. Please excuse the crappy old cell phone pics... this is what I have to work with until my S7 gets repaired! Also excuse the paintjob on the bucket. I will be totally re-doing that.
-
Rubies armor after mods. - Drilled out all rivets - Filled in holes with ABS paste - Removed velcro from biceps and thighs - Glued both halves of biceps and thighs after trimming - Trimmed down length of plastic shoulder straps - Flipped center ab button panel and added a fifth button to the row of buttons on the right side of the abdomen armor - Removed sniper knee plate from shin. Will attach to WTF shin later - Removed and re-installed thigh ammo strip in correct position (Rubies installs this upside-down) - Marked insides of armor for placement of snap plates - Shoulder bells, forearms, and shins will be replaced with WTF parts formed in transparent plastic. - Thermal detonator to be replaced with ATA parts and clear pipe (pending payment) Still need to sand a few rough edges and give the whole kit a good wetsand before I paint it all silver. I have pretty much everything except the TD parts and a few more LED strips.
-
Shadow Stormtrooper (Force Unleashed) CRL Proposal
mikedwelle94 replied to Fivezero's topic in TFU Shadow Trooper
Saber in use: And on the belt -
Shadow Stormtrooper (Force Unleashed) CRL Proposal
mikedwelle94 replied to Fivezero's topic in TFU Shadow Trooper
The hilt itself doesn't change, but the blade can set to any color once unlocked. When not in combat, the saber is clipped to the belt. I believe I have a picture on my build thread, but I'll throw it up right here after work. -
Shadow Stormtrooper (Force Unleashed) CRL Proposal
mikedwelle94 replied to Fivezero's topic in TFU Shadow Trooper
I really think the Starkiller lightsaber should be included in this CRL as an optional accessory. I thought it was a little unfair and disappointing to see that the two other TFU troopers, the Commander and Incinerator, get to carry and apply with the saber (all the way up to Level 3 Centurion) and the Shadow can't. All three armors can be worn as costumes by the main character, and are seen with sabers. I hope to be able to give my local saber smith my business sometime in the near future. I was planning on picking up a blue-bladed one going into the build of this costume and I was a little heartbroken to see it wasn't in the CRL. -
Hooray for progress. I decided to try and emulate the paint chips on all the Force Unleashed troopers (the Shadow has all the same chips in the same spots as all the other troopers). Just need to finish painting the tears and traps and do an acrylic blackwash to really make the paint chips pop. It would also be cool if I could source some blue bubble lenses... Just wadded up a coil of LEDs under the bucket for fun. Mounting it all will come later.
-
My RS Props helmet arrived today. I already started cutting out the tube stripes with a Dremel cutting bit, and cleaning up with needle files and an x-acto knife. And Ukswrath's Hovi mic audio system! For when the clear parts arrive, I thought I would try using some colored window film to help diffuse the light of the LEDs. When I wear this costume in broad daylight, spectators will still be able to see a shade of blue behind the plastic when the lights don't appear as bright. This website I found gives out up to 5 free samples, which should be enough for what I need them for. https://www.decorativefilm.com/color-transparent-polyester-colors
-
The way you got the light to shine through those parts is spot-on. I may have to pay you to send me some of those prints. My gf recently decided she wanted this costume as well and I'm not sure if WTF is doing another clear plastic run anytime soon.
-
I haven't had much time to work on this armor, but I'm doing little things here and there. Still waiting for my transparent parts so I can prep and paint everything in one go. I extended the ridge on the abdomen plate using a thick slurry of ABS plastic I melted with acetone. I was able to roughly shape it, and once dry, drilled a hole for a Tandy snap to act as the fifth button. I used more ABS slurry to blend the head of the snap with the extended ridge. Once fully dried and hardened, I'll be able to sand everything to a smooth and uniform surface. Flipped the center ab button panel to the correct orientation. I still need to smooth down the edges with some more melted plastic and acetone, followed by a good sanding. My silver belt from TKittell also came in a couple days ago and should work nicely for this costume. I also have the full Hovi tip audio setup w/ iComm on its way from Ukswrath so I'll be able to sound like an actual Stormtrooper when I'm out trooping with this
-
Welcome to Spec Ops! I'd love to know where the guy from GG got that information. Looking at the promotional images of the Shadow Stormtrooper armor on the RS Props website, it looks glossy enough. Even if it's not, you can always polish it with some Turtle Wax or Novus. If you are ordering the completed set, you may only have to make minor adjustments before it is ready for 501st approval. I would buy from RS in confidence if I had the cash. http://www.rspropmasters.com/shadow-trooper/
-
I thought about it, but I figured I'd leave the novelty of having a clear helmet for someone else. Cutting out the tube stripes on my RS will allow for more ventilation anyway. Sent from my SM-G930R4 using Tapatalk
-
No significant updates or pictures, but I decided to scrap my idea of using a Black Series helmet and instead just paid someone for an RS Props helmet. It's gonna be painful cutting those tube stripes out on such a nice piece, but I figure I ought to have a top-of-the-line bucket since that's what people are going to look at first. I don't think the Rubies armor is as bad as people make it out to be. I've taken everything apart and put it back together after re-sizing, and it looks like what a Stormtrooper should look like. It's going to look killer once painted and lit up, and matched with an RS helmet, some WTF parts, and a new canvas belt.
-
Thanks very much for that offer, but I can use the plastic belt that came with the suit. I should be able to melt it down into a slurry with some acetone and fill in these rivet holes.
-
My armor came in! It may look old, yellow, and ugly right now - but that will change once I drill out all those rivets, and give the whole kit a good trim and some coats of paint. The forearms, shoulder bells, and shins are going to be swapped out for WTF parts. Only things left to source are the silver canvas belt, square rivet covers for the belt, LED light strips, and a new TD panel and end caps for the clear acrylic tube.
