


Tiexalan
-
Posts
44 -
Joined
-
Last visited
-
Days Won
2
Content Type
Profiles
Forums
Events
Everything posted by Tiexalan
-
Tiexalan's Shadowtrooper Work in Progress
Tiexalan replied to Tiexalan's topic in Shadow Stormtrooper
Yep, that was me. -
Tiexalan's Shadowtrooper Work in Progress
Tiexalan replied to Tiexalan's topic in Shadow Stormtrooper
TX-76007 Reporting for Duty!!! Just waiting to be added to the Database! -
Tiexalan's Shadowtrooper Work in Progress
Tiexalan replied to Tiexalan's topic in Shadow Stormtrooper
Actually, no....TK 409 gave me a refund, due to not being able to find the material.....Darman on the other hand, is now doing my neck seal. Friend of mine gave me his until I get my own. -
Tiexalan's Shadowtrooper Work in Progress
Tiexalan replied to Tiexalan's topic in Shadow Stormtrooper
Application has been Submitted.....now the wait. https://www.dropbox.com/sh/kqk8eslajf8hosv/AAA40Jsdudv-xlSlDQWb_RWfa?dl=0 -
Tiexalan's Shadowtrooper Work in Progress
Tiexalan replied to Tiexalan's topic in Shadow Stormtrooper
I ordered through their website, and had no contact with them beforehand. I have been sending emails to the email on the website. -
Tiexalan's Shadowtrooper Work in Progress
Tiexalan replied to Tiexalan's topic in Shadow Stormtrooper
ordered a neck seal from TK409....anyone have any dealing with this vendor? I ordered on the 3rd, and have received nothing from them to date. Paypal confirmed that the money was delivered via standard email. I have sent 2 emails....just concerned, but FSID posts recommended her a lot....so, I'm hoping it is just lack of communication. -
Tiexalan's Shadowtrooper Work in Progress
Tiexalan replied to Tiexalan's topic in Shadow Stormtrooper
Yea, that's the thing....I am reading and following both of those, was trying to find clarification...but I got it last night at an event I was at. -
Tiexalan's Shadowtrooper Work in Progress
Tiexalan replied to Tiexalan's topic in Shadow Stormtrooper
I'm working toward specialist.... Maybe not as soon as I get accepted, but it is a goal. -
Tiexalan's Shadowtrooper Work in Progress
Tiexalan replied to Tiexalan's topic in Shadow Stormtrooper
So, new question.....now that I've actually decided to finish everything up..... Drop boxes...how do you align them up? Outside edge lined up with the outside edge of the plastic portion of the ammo belt? (if I read the specialist requirements correctly).... or is it the outside edge lined up with the outside edge of the last ammo pod? (which I've seen in pictures) -
Tiexalan's Shadowtrooper Work in Progress
Tiexalan replied to Tiexalan's topic in Shadow Stormtrooper
So, yea, this happened...... You know, trooping around in this thing showed me all the spots I need to work on.... -
Tiexalan's Shadowtrooper Work in Progress
Tiexalan replied to Tiexalan's topic in Shadow Stormtrooper
Oh, I am, I got it done enough that today (Saturday) I had my first public wear of it at Dallas Alcon.... It showed me a lot of little tweaks I have to do, and even learned emergency maintenance...my Velcro on my calves didn't work at all, so fixed that on the fly, and my left thigh front popped open after about an hour.... All that was fixed, and now I have to shorten down strapping and get it to where it is easier to walk in. But am going out in it again tomorrow. Loved it, and got photo swarmed.... -
Tiexalan's Shadowtrooper Work in Progress
Tiexalan replied to Tiexalan's topic in Shadow Stormtrooper
Crap crap crap.... I just realized, my thighs...... I had been constructing them backwards.... So now I have to take them apart so that I make the correct fronts look correct, and move the correct looking backs to the back.... -
Tiexalan's Shadowtrooper Work in Progress
Tiexalan replied to Tiexalan's topic in Shadow Stormtrooper
So, test fit of the armor, (still missing right thigh, but you can't see that part)...I haven't completed my strapping, so my left forearm and shoulder bell twisted before the picture was taken....but hey, I actually look like a shadow trooper.... I'm hoping by the end of the week I will have it all complete except neck seal and my E-11 (which would be done if I could find the screws to put back together my hasbro conversion) And it needs a really good polish..... -
Tiexalan's Shadowtrooper Work in Progress
Tiexalan replied to Tiexalan's topic in Shadow Stormtrooper
So, its beginning to look like armor....horrid lighting, but eh, it's good enough for now. My button plates are not on yet, and I don't have my belt..... And this last one, bad angle with my shoulder while taking the pic, which makes the shoulder strap look off (it isn't, and I don't have my elastic loops put on yet.) So, any tweaks that anyone can give me at this point? I still need to put on my button plates, and put on my rivits on the left side...and sharpie over the seams on my under suit bottoms. -
Tiexalan's Shadowtrooper Work in Progress
Tiexalan replied to Tiexalan's topic in Shadow Stormtrooper
So just go with the 10mm strip on both side? -
Tiexalan's Shadowtrooper Work in Progress
Tiexalan replied to Tiexalan's topic in Shadow Stormtrooper
Ok...already glued one, using existing bends and a 10mm strip.... My Tony Stark Impression....took gloves off to help with contrast. And this is the one cranked down past the bent portions to make it fit.... -
Tiexalan's Shadowtrooper Work in Progress
Tiexalan replied to Tiexalan's topic in Shadow Stormtrooper
Oh, and a completed Thermal Det.... -
Tiexalan's Shadowtrooper Work in Progress
Tiexalan replied to Tiexalan's topic in Shadow Stormtrooper
Ok....so here is the one that has 10mm strips on both sides already....next few pics showing various angles and such. At rest. Arm pressed up against the side to show how much room I have a wrist. Now, the other side, I have not glued, and to get the following room spacing around the wrist..... I have to put close the piece down to this....... So....does the one that is glued look ok, and just put foam to keep my wrist centered? Or do I go ahead and cut down to beyond the bend area to enclose it even more? as the second one? please ignore the q-tips and sponge in the background. -
Tiexalan's Shadowtrooper Work in Progress
Tiexalan replied to Tiexalan's topic in Shadow Stormtrooper
I went with a rustoleum paint and primer in one gloss black, came out pretty good. I am closing up my forearms and bicep pieces now.... Ran into a problem, I have minimum size strips on my forearms, yet they seem huge.... How can I fix that? I will post pics of what I mean tomorrow. ATA kit, if that helps you without the pics. -
Tiexalan's Shadowtrooper Work in Progress
Tiexalan replied to Tiexalan's topic in Shadow Stormtrooper
So, white pvc for thermal detonator is not black.... What kind of paint would work well to paint this? And match closest to ata shiny black abs.... -
Tiexalan's Shadowtrooper Work in Progress
Tiexalan replied to Tiexalan's topic in Shadow Stormtrooper
And now for the questions....as these pieces are not as cut and dry as the arms. Chest piece....should I trim down the return edge on the sides, or leave them at this width? (I know I need to round them off a bit better) Back Piece....do I leave a return edge to the first lip, or cut down past the lip before the bevel to the back plate? Fit seems to allow for both, as even without trimming this piece on the sides, it seems to fit fairly well. Shoulder straps, where on earth do I cut these down to? do I follow the contour lines of the ribs, or do I cut out to just before the lip? Button panel...do I cut out on the bottom of the first outline, or the second? and the 4 button one, I'm guessing cut out at the bottom of the lip making it a cut, or do I cut out at the top, and make it a flat panel? With using the buttons I got from Dave Mondo, I'm guessing I need to cut it at the bottom of the lip to have room for the back plates of the buttons. -
Tiexalan's Shadowtrooper Work in Progress
Tiexalan replied to Tiexalan's topic in Shadow Stormtrooper
Bucket on the first one, Arm's on this one... Started working on arms, worked on one bicep at the armor party, just to get me on the right track. Ran into a slight snag, however. We incorrectly set the bicep up for the wrong side, so now I have the correct width return edge on the back, I'm hoping when I get my undersuit and fit them to me, I can do it with the correct size return edge, and not have to redo the other side. With the exception of my right forearm, all arm pieces are complete and ready to be sized. (I've just been lazy and not cut the last return edge for the right forearm, it is ready to be glued if I do that) Shoulder bell question. Is this return edge close enough, or should I trim it down a bit closer to the outer shell of the bell? I have not trimmed the sides of the bell yet as I am struggling with indecision on cutting or not any more on this edge. -
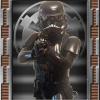
So, I might as well start this up, as I've been actually working on it. So without much more leadup. Here goes. Worked on the bucket at an armor party, first armor party, and first cut into my kit. This was the outcome of my work at the armor party. Bucket almost complete. And...in all it's glory! Just need to perma mount my wireless mic box, and put on the tube stripes and it is fully complete. (for now)
-
Ordered, and in route....also should be getting my iComm Aker set tomorrow....so helmet should be all but finished by end of weekend.
-
I got my mirrored lense material from Trooperbay yesterday...I"m a little concerned. The lense material is the filiment that you use with theatre lighting, very thin....and in my experience of actually using it, not that sturdy. I know that this was the same material that was used in the original TK's but.... So, should I use this material (it looks good in the bucket) or should I go with something else that would last a bit longer. If the latter, where would people suggest to go with...every place I have seen in the forum threads are closed and can't seem to find anything else. (short of football shield inserts) Thanks. John
