

ptbenz
-
Posts
64 -
Joined
-
Last visited
Content Type
Profiles
Forums
Events
Everything posted by ptbenz
-
No harm. In true trooper style you'd miss with the blaster anyway!
-
Sorry Iz, I figured that would get some follow up posts. No disrespect to you intended. I will not take my photos with the pauldron on, but I will troop with it, when permitted
-
I meant Izzi sorry, stupid autocorrect. By visor I meant shield for the lenses
-
I am aware Lizzie, thanks guys for the nice coments. The sound card is a voice changer with static burst. Also has built in modulator so it only picks up my voice when I talk loud enough.
-
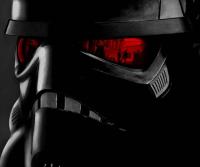
front of helmet. I need to replace the visor I installed (don't ask!) thats why the empty eye sockets. I hand painted the teeth to make them look more like a brushed metal, I think they turned out awesome! used kitched shelf liner for the teeth mesh, a lot more flexible and looks cool (same stuff I used in my Tie helmet) I did not trim each side while screwing the helmet together, might do that differently next time left of helmet rear of helmet helmet inside, you can see the mesh and hard liner installed. Also, installed a heaset underneath liner to make it easy to take helmet on and off and not have to do anything to the sound. close up of the Aker mic installed and Memorex wireless emitter E11 I made by converting a Hasbro. Added DoopyDoos resin upgrade kit and changed out the LED for a more powerful one What's missing? 1) still need holster (working on a deal for that now) 2) visor (on its way!) And finally, a dry fit of the suit (before I had the shoulder bells and biceps completed) Any feedback is appreciated, good, bad, or otherwise. If you have any questions or want more details, feel free to ask that as well. Look forwarded to finishing and adding this to my trooping experiences with you all! Thanks for looking
-
inside of chest where I keep the electronics (my specialty!). left side is wireless mic receiver, then RomFX card, battery holder snapped to the 9V connector to power the sound card. right side inside of chest armor houses Aker amp and Sansa MP3 player (chatter loop I mixed). used the velcro cord tie to keep all the cords organized closer view of electronics close up of amp and MP3 player
-
back and butt plates, hinged inside for flexibility. male ends of parachute clipped elastic suspenders inside back and butt plate. used snaps to hinge to pieces together. Velcro elastic on either side to keep tight together Neckseal nomex flight gloves and handplates attached to velcro straps undersuit. The little starter logo glows in this picture. I used this starter top on these thermal compression pants because it is made of a less reflective material and looks consistent with the screen used suits. Also like these particular pieces because there is no emblem on the neck back like underarmor and no logo on the thigh, nothing to cover up! chest plate back plate
-
inside of ab plate, still have snaps to install, that's why there is nothing to connect the cod piece yet left shoulder bell and bicep left should bell and bicep inside. used some elastic to connect the two and then snap the bell under the chest straps right shoulder bell and bicep right shoulder bell and bicep inside. Used some elastic to connect the two and then snap the bell under the chest armor straps pauldron, courtesy of MightyTank again
-
right shin right forearm right thigh with amo belt again, used the Chicago screws to attach the ammo belt ab plate with belt and buttons attached. Also, the female connectors for the suspenders using parachute clips. The belt is a patent leather, made by MightyTankhttp://www.wigarrison.com/forums/posting.php?mode=post&f=12&sid=2679a5c33a1e1410a94444a554eabc6d# inside of ab plate, still have snaps to install, that's why there is nothing to connect the cod piece yet
-
Hey guys, been hard at work finishing a TX and I'm almost there, should be done next week. I wanted to post some pictures of my progress and get some feedback. This is the first costume that I've built from kit to finish (some of the armor was glued and trimmed before I got it, but I had to do the rest). A few things I've learned while building this armor: 1) Velcro, while necessary for some construction, is not the best to use for everything 2) sewing, assembling snaps, riveting, and gluing, while intimidating, is not as hard as I thought. 3) Novus works great for scratches and minor wear, but PlastX (found at Walmart) is the BEST for shining and protecting ABS. It is designed to clean and shine motorcycle visors, but worked great on the armor. 4) take your time! Seems like things take forever, but it beats redoing things over (which I did a few times during this) 5) Helmets are tough, took me almost 2 days just to assemble the helmet! Here is a few general details: Armor is AM boots are Amsterdam undersuit is Starter top and Down Under compression pants neckseal, pauldron, and vinyl belt from MightyTank Nomex flight gloves Underarmor skull cap RomFX sound card Aker amp Memorex wireless sound Aker headset Sansa Clip MP3 player Everything else - MADE BY ME! Let's start with the boots. Amsterdam boots with fabric hooks sen into my ankles, makes the shin armor fit better Left Thigh left shin with knee plate attached close up of Chicago screws I used to attached the knee plate. I like this option better than rivets because it allows me to easily replace the knee plate if I want to. I have the sniper plate armor also
