

TommyC1138
-
Posts
43 -
Joined
-
Last visited
-
Days Won
9
Content Type
Profiles
Forums
Events
Everything posted by TommyC1138
-
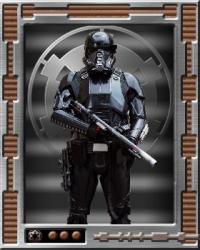
Tommy's Completed Death Trooper Build
TommyC1138 replied to TommyC1138's topic in Imperial Death Trooper
Thanks guys, I really appreciate the kind words and praise Cheers Tom -
Tommy's Completed Death Trooper Build
TommyC1138 replied to TommyC1138's topic in Imperial Death Trooper
Here are some links to my Facebook build videos on painting, strapping, Gaskets and LED's I hope you enjoy. PLEASE NOTE: To view these video's you must be a member of the Death Trooper Build group on Facebook, the link for the group is below and request to join. https://www.facebook.com/groups/DeathTroopersBG/ VIDEO LINKS https://www.facebook...28376190740071/ https://www.facebook...28417284069295/ https://www.facebook...28393757404981/ https://www.facebook...28434987400858/ -
Tommy's Completed Death Trooper Build
TommyC1138 replied to TommyC1138's topic in Imperial Death Trooper
Well after much sanding, filling, primer and paint and then the final weathering I was finally ready to put the strapping on my costume. After a late light on the Tuesday and working all day on the Wednesday we finally finished my Death Trooper about 4 hours before the Midnight Imax screening last Wednesday night. What an effort by some close friends to help me kit up for the first time and finally complete my costume. A couple of last minuet repairs to the gaskets, belt and Blaster and we where ready to go Then I was ready for my close up.....haha I am really proud of how this costume has turned out with around 6 months work put in and the help of a few great friends and family I couldn't have done it without them. Then it was off to the Imax premier with my 501st mates. -
Tommy's Completed Death Trooper Build
TommyC1138 replied to TommyC1138's topic in Imperial Death Trooper
Update Time: Pretty much started again from scratch with the 3D printed parts, the Do3D files just needed to much modifications. So when i got my Death Trooper Hot Toys figure we used this as reference and my good mate Marty and I started rendering the files These are awesome they look perfect. He also did the DT Blaster an man of great skill. So it was off to the printer again and so after sanding and some fiberglass and some sanding a little bit of paint as a test here are the parts so far. And off course my blaster So still on track for the premier I think, but still so much more to do. Cheers Tom -
Tommy's DT Blastech E-11D Blaster build
TommyC1138 replied to TommyC1138's topic in Imperial Death Trooper
Thanks Guys, I appreciate the kind words. -
Hi there, I have loved the look of the Rogue One Death Trooper Blaster ever since I saw the first pics and trailer and also the Death Trooper armour which my build thread is on here also. Anyway I was thinking of ways to get it started, PVC pipe adding some parts from E-11's. Some of the parts are real world found parts such as the rear stock, tactical torch and shoulder strap buckles. Then I thought gee I 3D print stuff why not do that...haha. So I tried my hand at designing it in 123D design and lets just say there were several expletives thrown at the monitor. I have a really good mate Marty who is an Industrial 3D designer who has helped me before with some 3D modelling, he is a massive SW fan and has an eye for designing blasters. So with reference pics in hand and the Hot Toys figure which has a fantastically detailed Blaster, it was off to see the wizard. Here is his awesoke 3D render that he designed, absolutely fantastic job. Here is an exploded view of all the parts. So with these awesome STL files it was off to the printer and much sanding. In the mean time I ordered a torch and the buckles of Ebay however I was not able to get the real stock. Not only did Marty do an awesome job on the model he also put a list of hex screws together so you can assemble it without glue and a PDF for the vinyl stickers that go on the blaster. Here it is assembled with the torch, buckles, 6 mm rod for the stock and hex screws. Next step was to get some paints, always my go to brand is Rustoleum grey primer and for this blaster matt black. I also picked up some Tamiya Metallic Aluminium for the front of the blaster muzzle. Then I had a think about how I was going to weather the burnt metal look onto the front of the barrel. Tamiya make a weathering kit #D it has a burnt Blue and Red I also watched a YouTube video on how to use it. I also needed a metallic violet colour to complete the weathering effect, so I raided my wife's make up and it worked a treat....it really set off my eye's.....Ha Ha just kidding Red is more my colour....no I mean on the barrel. So after a couple of coats of primer and several coats of matt black and some sanding it was time to apply the the metallic aluminium to the front of the muzzle. I just used a light coats of the Aluminium and Black to give it a gradual effect. Then I started on the burnt weathering effect, I just rubbed on the colours with the applicator and then blended them into each other with my finger. I then assembled the blaster using several different sized hex bolts. I bought some red and white vinyl wrap cut out the decals from the PDF that was created and applied them. I also purchased some scrap red and yellow perspex cut and sanded this to fit. Finally I did some dry brush weathering with silver and she was done. Thanks for taking a look and I hope you like it. Cheers Tom
-
Tommy's Completed Death Trooper Build
TommyC1138 replied to TommyC1138's topic in Imperial Death Trooper
Just a quick update. Primer filler on the armour, trimmed the butt plate, printed the ammo clips, more sanding on the helmet and more ribs being sewn.............so many ribs! -
Tommy's Completed Death Trooper Build
TommyC1138 replied to TommyC1138's topic in Imperial Death Trooper
Hey Greg, I think I just answered you on the R1 FB page, but happy to share it here also. This is a black waxy denim material sewn to a cotton duck weave backing but you could use any material. I measured out 9.5 mm and then sewed a heap of hopefully straight rows. Then I purchased some 4 mm irrigation flexible hose cut it to length then pushed it through the holes to make the ribs. Once they are in it pulls the ribs to approximately 8 to 9 mm. It also keeps it's shape extremely well. Hope this helps. Here is some other combinations of material I tried and some rubber bath mate I found, but very happy with what i have come up with. -
Tommy's Completed Death Trooper Build
TommyC1138 replied to TommyC1138's topic in Imperial Death Trooper
Haha yes its a bobble head. That's why we started from scratch and did a 3D render ourselves. Which looks great. -
Hi there, Tom from Terror Australis Garrison "KnightFall Squad" Melbourne. I have been working hard on my Death Trooper costume and I thought it was a good time to share my progress. These boards have been an awesome source of information and help, so thanks guys. All the armour is 3D printed which I purchased from D03D. these files are a great start but they are not perfect and there has been plenty of modification going on. The hardest thing has been scaling them for myself so I don't waist time printing so I have been using my TK armour which has worked out well. All parts have been printed in one piece and some smaller parts I have modeled myself. I have had some great help from a mate of mine who has done his own design of the DT helmet and Barry Watts over on the R1 Trooper FB page has been awesome regarding the ribbed gaskets, under suit, shipping me some hard to get items and general feedback, thanks mate. My next step is reinforcing and smoothing the 3D printed parts ready for paint. I have patterned out the under suit and ribbed gaskets which I should start sewing in a week or two. The belt buckle will be milled from Aluminium and so will be the main barrel of the DT blaster, which will then have the rest of the parts 3D printed. I am patterning out the large belt boxes for sewing tomorrow. So fingers crossed and I am hoping to have all this ready for the Rogue One premier here in Melbourne. Still have soooooooo much to do. Anyway back too it! This was a test fit and the Do3D helmet is way to big and all wrong that is why we did our own version. But very happy with he armour.
