

bensid39999
-
Posts
58 -
Joined
-
Last visited
-
Days Won
5
2 Followers


About bensid39999
SpecOps Info
Support Info
Recent Profile Visitors


bensid39999's Achievements
")


-
 I'm sorry, green boots seem weird. Would Vietnam style jungle boots work? Mostly green, actually military looking. Alternatively they could be spats/leggings over the boots, like mountain troops used to wear.
 -
New CRL Proposal: Imperial Army Officer (Various Sources)
bensid39999 replied to izzi's topic in Imperial Army Officer
The armored officers in Solo ended up very similar. Just add OD green trenchcoat!! -
Future of the Imperial Army *7/10 Update*
bensid39999 replied to izzi's topic in Imperial Army Units
I cant wait to see the mudtrooper and army officer crls based on Solo! I've seen it 3 times and there's tons of variations! I like how Beckett has armor, a rank bar, green raincoat, and an Imperial hat with goggles on it! There's some great looks in those scenes! -
I went with an inch below the shoulder seam, just like on my WWII uniforms, looks good.
-
Imperial Army Trooper Parts List & Resource
bensid39999 replied to Tarrif's topic in Imperial Army Trooper
I am. I have made 4 now, 3 of them for garrison mates. I have the hardware but need more webbing material. Feel free to message me. -
Biscuit's Imperial Army Officer-APPROVED
bensid39999 replied to bensid39999's topic in Imperial Army Officer
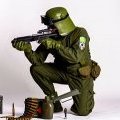
Here are the full body photos of my completed uniform. Really had fun on this build! -
Biscuit's Imperial Army Officer-APPROVED
bensid39999 replied to bensid39999's topic in Imperial Army Officer
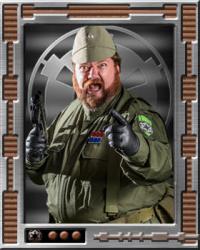
Just got approved! Got this great picture back from my GML, so stoked! I hope to most more of the pictures from that shoot soon! It's a fun one to wear, probably going to unveil it at a troop soon! -
Biscuit's Imperial Army Officer-APPROVED
bensid39999 replied to bensid39999's topic in Imperial Army Officer
FINISHING UP To help keep the collar straight when closed, I added a snap Here I sew on the patches by hand, which I prefer to the machine, adding them one inch from the shoulder seam. Here is the jumpsuit finished. I adjusted my web gear belt so that it naturally covers the elastic waist. I then use tape measure and have my wife measure over my shoulder and across my shoulder blades to make the harness. I decided to make it exact to measure and not adjustable. I have since finished the harness, filled the pouches with foam, and taken submission pictures! When I get those back, I will add them. -
Comlink, Binos, Pack, Telemetry Unit
bensid39999 replied to mattnelson521's topic in Imperial Army Units
Just attached with rivets right? -
Biscuit's Imperial Army Officer-APPROVED
bensid39999 replied to bensid39999's topic in Imperial Army Officer
I love my Singer Heavy Duty, well worth the cost. I've been using this one 6 years. I had to give it a tune up after doing pleather armor, but it can take lots of punishment. -
Biscuit's Imperial Army Officer-APPROVED
bensid39999 replied to bensid39999's topic in Imperial Army Officer
Before we attach the collar tab, sew on the fuzzy side Velcro. You always want the loops to face the skin, not the hooks. Now it's ready to attach. I pin it to check length, and then measure the 'landing zone' on the jumpsuit, so I can add the hook side Velcro. Pin the Velcro in place. Sew. Now notice, I have pinned my collar tab so that it folds over the raw edge when worn. Stitch it down. This is what it looks like done! At this point, before I add the patches, I wash the suit. I will go back later and add a rivet for a snap. -
Biscuit's Imperial Army Officer-APPROVED
bensid39999 replied to bensid39999's topic in Imperial Army Officer
Here's the banded collar, now the tab. I measure the opening to the length of tab I want. You want to have enough tab to stitch down and be able to comfortably wear it velcroed down. I went with 6 inches. I grab some of the spare material from the ankle and measure out 6 inches After I cut the ends, I have a piece about 3 1/4 inches wide. Perfect. I fold to the middle to make a band 1.5 inches wide. I then stitch both long sides. Now, fold two corners in (like a paper airplane) and sew flat. -
Biscuit's Imperial Army Officer-APPROVED
bensid39999 replied to bensid39999's topic in Imperial Army Officer
Making the Mandarin Collar-PIC HEAVY!! This is not the only way to do a collar. You could use your spare material and a pattern and make one from scratch. What I like to do is, it is less work, is to convert the existing collar. That way you waste less material, and half the work is done for you because it's already attached to the suit. Looking at the CRL and my own suit, I have decided I want my banded collar to be 1.5 inches wide. Let me show you what I did: First thing I like to do is square the collar tips off. I could just cut them, but then i'd have these ugly open seams to deal with, so I am going to fold them back. First step is to use a seam ripper and open up the leading edge of the collar tips. There's a plastic stiffener in there, remove it. The ripstop material is thick when doubled, especially when there's also interfacing, so on the wrongside of the collar, cut a triangle out so that the outer material can easily fold in. Pin it. Now sew up on the leading edge. Cut off excess material, repeat other side. Now your collar edges are square. Now I fold my collar over to the inside, measure the outside band to 1.5 inches, pin, and sew 1/8th inch from the top. Here's what it should look like on the outside when you're finished, nice and square. If you're happy with it, turn to the inside and unpin, cut off excess. You should now have a banded 1.5 inch collar. Next we'll make the collar tab. -
Comlink, Binos, Pack, Telemetry Unit
bensid39999 replied to mattnelson521's topic in Imperial Army Units
I gotta save it for next week's paycheck but soon! -
Biscuit's Imperial Army Officer-APPROVED
bensid39999 replied to bensid39999's topic in Imperial Army Officer
I'll go step by step, I've pared the process down to about 25 pictures lol. We'll all get through this together!
