weldingdude
-
Posts
39 -
Joined
-
Last visited
-
Days Won
3
Content Type
Profiles
Forums
Events
Everything posted by weldingdude
-
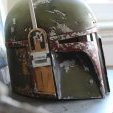
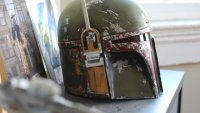
update time, Straps and elastic are on the way from strapworks, and I've got hardware for the respirator and the goggles coming from Darren on the FB builders group and set of vinyl cog patches coming from Jim (also from the builders group). The plash came in (luckily, it has the leather grommets!) planing to spend some time dying it black next weekend. I think I'm going to try the washing machine method, seems like the easiest, going to spend some quality time at a laundromat next weekend. I printed out the shoulders and the helmet. I used an orbital sander with 220 grit to knock down the build lines and seams on the shoulders (printed in PETG) wow, PETG sands like a dream. I used a different material on the bucket, it doesn't sand quite as well so I used Easy Sand 420 body filler, its like Bondo, but less of a pain in the butt, it flows really well. used the easy sand to fill in the larger build lines around the top of the bucket. then the usual filler primer and wet sanding. And the the initial weathering pass
-
I broke down and used the fancy printer for the goggles... wanted to get the rest of the chroming out of the way sooner rather than later.
-
Spent some time this past weekend painting and weathered what I had and cleaned the SMG ammo pouch, man its hard to get that authentic military surplus smell out (AKA mildew...) as for the weathering, I'm planing on doing an initial moderate weathering pass, primarily with brown acrylic paints (and a little black acrylic) then when I have the whole thing assembled, I'll do another weathering pass to kinda tie everything together and bring in the grey mud.
-
The only reason, I'm considering scavenging is cause they're brand new and not vintage... But! in any case, I'm holding off on the goggles anyway, since the word on the FB group is that there should be a new/super accurate mask/goggle file coming out soon. Thanks for the tips! the TAZ seems to be handling the PETG like a champ, nozzle 225-230c (can't remember which) bed at 70c. At this point, the only place where I had bed adhesion issues was that one small section of support to the left, which lifted off and allowed the chest plate to warp a tad. My hunch is that there just isn't enough surface area on those supports to really stick, so I added some base layers to the supports. we'll see how that goes on a reprint. So far, I haven't seen any lifting where the actual part meets the bed. In other news! Chrome!
-
update! made and installed mounts for the hoses. started printing in PETG (really nice to work with, never used it before.) wouldn't call it a failed print, but the part in front on the left lost bed adhesion, and caused the print to flex a little... I might be able to sand it out, but I'm not sure at this point if its worth it, I think I'll wait till I've printed the rest of the chest parts before reprinting that part. also the tall supports seem to be getting a bit wobbly, they seemed to recover, but I'm not terribly pleased. I'm thinking I might try playing with multiple printing processes in the slicer to help sure up the taller supports, need to think on that. the ammo pouches came in today, super stinky, I've got some leather cleaning to do. AND the donor goggles came in. these are some pretty sweet goggles, I may have to see how that bridge adjust comes off the printer, I feel kinda bad scavenging from them.
-
np! happy to help. yes, the Carbon is awesome for some things, but like any resin process that isn't like the 3D systems pro SLA machines, there's issues with warping, and resin is messy. but like with any printing process there are trade offs.
-
Thanks! that is definitely a better printer... I cheated and used the Carbon M2 we have at work for the mask... we happened to have some material that was going bad soon and HAD to be used up... I used Armorsmith designer to check scale, ended up scaling 120% in the XY and about 105% in the Z and it seems to look about right (same for the back, though I haven't printed it yet) and as for parting it out, I had some good luck using the 3D Builder app (built in with windows 10) for simple scaling and slicing up the parts... so far so good... I started printing the chest in PETG today. First time using PETG, man! that stuff is a dream to print with! as for the hoses, I went with the medical gas hose they identified in the FB mudtrooper builder's group. https://www.medicalgassupplier.com/product/belmed-5027-scavenger-corrugated-breathing-tube/ They're pricey, but at 72in I figure one should be more than enough just cut it in half, should still be long enough.
-
spent a little time today, drilling out the filters to accept a hex heads and cut out mesh for them! cut out the mask grill and mounted the mesh OH and the hoses came in! ANNNND I glued up my PLA scale test for the chest plate... I think it looks about right... (fingers crossed...)
-
thanks 87ninefiveone! I've been following your build, seeing yours come together is part of what got me off the couch with this build.
-
ANNNND more progress!
-
finished initial sanding on the biceps (actually, used a file for some of it, worked really well in the corners and flat planes) one heavy coat of filler primer, wet sanding, then a nice coat of flat black primer. (forgot to take pictures of the sanding and filler primer...)
-
Thanks Ensi! got started (technically a few days ago) with the mask (printed in UMA90) and the left bicep (printed in ProHT)
-
I've finally decided to dive into a full build, I'm shooting for a 501st approval with this one. I've done a bunch of prop builds, painted miniatures, some costume builds (I put together an X-Wing pilot and assembled and painted two helmets, one was a wedge paint job and the other was a custom paint job). I’m planning on printing most if not all of the hard parts on my personal printer and taking advantage of some large format printers I have access to at work. So, this is my build list Hard Parts - -I’m using 3D files from Sean Fields in the Mudtrooper Builders group on Facebook. I’m planning on using mostly PETG(for temp resistance) and supplemented with other materials(ProHT, a high temp resistant thermoplastic for the large format printer at work - UMA90, a prototyping resin for a liquid resin printer at work) Soft Parts - Pants and tunic, from Jim Tripon Belts, Gloves, Ammo Pack and Plash from Etsy Shoulder straps from Plastic armes on Etsy Boots - -Custom boots from Crow props (need a custom solution, as I have larger than average calves for a USSR officer… ) Mask Hardware - Yugo small backpack from Etsy Scarf - TBD Weapon - TBD (but I do have a E-22 and a DLT-20A laying around)