ChrisG
-
Posts
27 -
Joined
-
Last visited
Content Type
Profiles
Forums
Events
Everything posted by ChrisG
-
Glad it was helpful!
-
Thanks!
-
Finally got approved yesterday!
-
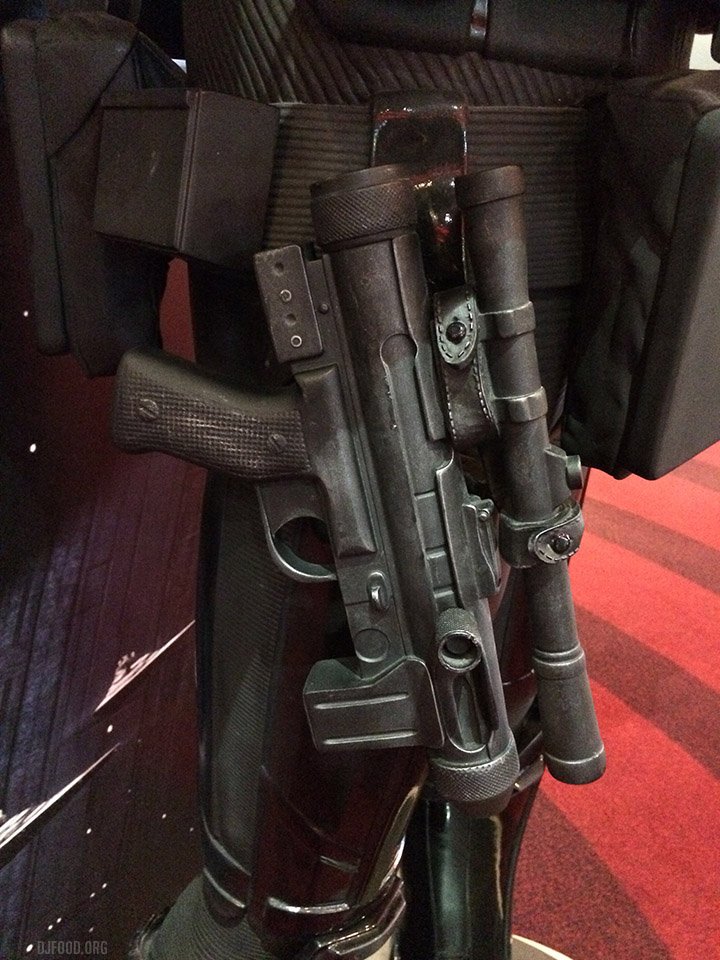
Finally time to apply the decal, which came from Hawaii. Thanks to Chaos for making a great decal and being so reasonable on the price: After letting the decal cure, it was finally time for some flat clear coat: Tamiya TS-80. After three coats of clear, all I had to do was very lightly remove the lettering from the scope with some 400 sandpaper and attach it. I thought about repainting the end of the scope but I decided to keep it in this condition. Done! Overall, I think it looks pretty good. It took an alarming amount of time, and I kind of wish it was metal, but I'm pretty happy with the result. I'm now well into the Airsoft Sterling E-11D all-metal build. Hopefully, this thread will be helpful for people like me who have never tackled a 3D-printed prop before. The before pictures of the parts look really rough. I definitely came away thinking that the Tamiya paints are worth every penny, that spot primer is the best way to resolve bad areas, and that the base aluminum layer was a good idea. Also, when in doubt, sand some more!
-
So, now back to aluminum: Things still needed a little sanding with 400: I then painted 3 coats of the Tamiya matte black: I think things were looking pretty good now. I used some hex screws in the base to fill some holes in an effort to replicate the prop more accurately. I used M2x30mm button head hex screws. They needed to be pretty long to get into the barrel and do much:
-
It was time to paint. I decided to use Tamiya for plastics aluminum spray paint (TS-17) as a base. That way, any scratches or dents will show through to aluminum and hopefully make the whole thing look more like metal. I also thought it might come through the matte black a bit. I used a wooden dowel in a bottle filled with sand to paint: This paint is really easy to use and lays down really flat. It also exposes problem areas rather vividly. After two coats, the upper cover of the barrel was not looking so hot: I decided after a few days of letting things cure to move to a matte black using Tamiya TS-6: This paint is amazing: it covers well and really helps things look smooth. I did three coats. The upper portion of the barrel though needed more work. I tried 400 sandpaper, but it didn't help enough. I needed to use spot putty to even out the whole area. I masked off nearby areas that were acceptable so as not to screw them up: It seemed like a step backwards. I used 400 sandpaper on it and then went and painted it with matte black again, but the coat didn't turn out too even because of the different levels of paint. The grooves, however, were far less visible: I couldn't really get an even surface so I pretty much sanded everything all the way down again on the top barrel cover using 400. I masked off everything that looked ok: I then used spot putty in the really bad areas that were now a bit low so the surface would be straight:
-
I sanded all of the pieces again with 400 to get to this point. I then washed and dried everything. With the bulk of the sanding done, I could then assemble everything. I used small wooden dowels and CA glue to connect the barrel to the base. This would locate the two parts together to keep everything straight. I let it sit overnight. I then used CA glue to attach the remaining pieces: I used 1/2" length #9 brass screws for the handle. They don't actually screw into anything, so they were also set in place with CA glue. The white portion is a bit of PVC pipe to make sure the interior of the barrel was not open. I had to bore out the holes in the scope mount so the screws that came with the scope would easily fit:
-
In the parts I received, the end cap for the rear of the barrel had some printing grooves in it that were pretty deep. The piece that partially covers the barrel also looked a little weak in the middle. For these issues, I used Bondo Spot Putty at the wise recommendation of amcclary on the forums here: It's a 2-part Bondo, but unlike some other forms of Bondo, it's softer and easier to work with. I just applied it with a latex glove and pressed it into the parts that needed it. You can sand it very quickly. I think 30 minutes is all that I waited. I used 220 and then 400-grit sandpaper very softly. I think it worked really well. More primer and sanding to come!
-
The next step is sanding. The idea with filler primer is that it fills the voids between the 3D print layers, and you sand off everything else to end up with a smooth surface that you can paint. I used 120-grit sandpaper. Here's where the filler primer is in the 3D print lines but mostly sanded off the top: It's starting to get smoother, and the lines are definitely looking less prominent. This part took quite some time. I did dry-fit the bottom of the magazine to the magazine to make sanding a little easier. These were the only two parts that I connected at this stage.
-
Before applying the filler primer, I wanted to mask all of the portions of the pieces that had details I did not want to sand. That way, when I did a second round of filler primer coat, I could do it over everything without any need for masking. That was the idea anyway. I did not want to have too many coats of primer over the pieces with fine details as I was afraid I might lose too much of them with too many layers of paint. Next was spraying on Dupli-Color Filler Primer. I followed the instructions on the can and applied three coats over a fairly short time. It went on pretty well. There were no drips, and it appeared to coat pretty evenly. This stuff dries very quickly and has a very flat, slightly rough surface. It sands well, but slowly.
-
I started with 80 grit sandpaper to knock things down a bit to start off. I had to be careful though as many of the pieces have details that I don't want to be removed. I also felt that it would be better at least for now to leave everything unassembled. I also did not sand surfaces that would not be visible. I spent a fair amount of time on each part at the 80-grit stage. Here's how things looked after sanding.
-
Here are the parts that I received. The scope is real and not printed. I don't intend to do anything to it other than attach it. You can really see the 3D print lines in this photo: Lots of sanding is needed.
-
I thought it might be helpful to put together a build thread on the SE-14R. I am in the process of building one based on a 3D print by Jerry Budde. The SE-14R is based on the 1953 Swiss Rexim-Favor, a fairly unsuccessful weapon that has proven to be much more successful in its film iterations. After appearing in modified from in the original Star Wars and Alien, it appeared in s lightly different form in Rogue One. For the film, as far as I can tell, an actual Rexim-Favor was not used and a resin version or some other cast process was used. This SE-14R from Celebration Europe definitely looks like it was pulled from a mold to me: Many people make 3D printed versions of the SE-14R. I don't know anyone who makes a metal version. The one I bought was from Jerry Budde, who is contactable thought the Death Trooper build group on Facebook, and was printed using Tom Campbell's 3D files. I don't know if anyone else's files are used by anyone.

-
ImperialBoots goes up to size 13, and Doc Martin Talibs I believe go up to 14. ImperialBoots might make be able to make a 15 as a custom order.
-
I was considering using the TrooperTalk app for audio. Anyone use it?
-
I have also ordered a replacement helmet form Plastic Arms Dealer since the Anovos lid does not fit.
-
I now have all of the parts to build the 3D-printed SE14R and the all-metal Airsoft-based E-11D. I think I am going to tackle the SE-14R first. My plan is as follows: Sand with 80 Spray Duplicolor Filler Primer Sand with 120 Spray Duplicolor Filler Primer Sand with 220 Sand with 400 Tamiya for Plastics Aluminum Tamiya for Plastics Matte Black Sand some corners with 400 to reveal base coat I would really appreciate everyone's feedback before actually diving in and starting it.
-
The Anovos bucket arrived today but is too small, so I am again in search of a helmet.
-
Just tried on an Anovos helmet today and it would not fit over my head at all. That thing is tiny.
-
I got lucky and got an Anovos helmet on eBay today. Things are startling to come together. My E-11D build is probably going to be the bottleneck. I have ordered the Field Marshall parts. So far, I just have the Airsoft Sterling itself. The parts should be coming in soon. Once I have everything, I will put up a thread about me trying to put it all together. It appears that there is no Airsoft version of the Rexim Favor, so is a resin version of the SE-14R the only choice?
-
I'm starting a build for an all-metal E-11D based on the Airsoft Sterling. I'll post progress about it here. I have already ordered a S&T / Beta Project Full Steel WWII Sterling L2A1 Airsoft AEG and an Element M300A light.
-
Andrew, thanks. I will send you a PM. Chaos, thank you so much for all of your insights and resource ideas. I would then lean to the Talibs on the boots, and I will look into what Christopher Fieldmarshal Vandenberghe has for the weapons.
-
After having my ESB Vader approved a few months ago, I am ready to embark upon my next project. I'm 6'4" so a Death Trooper seemed perfect. Here is what I am thinking so far. I have not purchased anything yet, other than the balaclava, which I have from Vader. I was thinking of starting with the standard, non-specialist version. Any and all input is most welcome. My priority is screen accuracy. It will also be nice to go on troops where another Vader is already signed up. Helmet: I was thinking of an Anovos helmet, which looks the most accurate to me. Does everyone else agree? There are a couple on Ebay that are available. Alternatively, I could order one made by one of the independent armor makers along with my armor:---Received Armor: I don't like the way the 3D printed armor looks like from a sanding perspective, so that leaves me with fiberglass and two vendors as far as I know: Jim and Plastic Arms Dealer. They look very similar to me. Is there any consensus on which is more accurate? Also a factor is that it will need to fit me. I am about the same size as the DT actors in Rogue One. I am not sure if the armor is at that scale or not. I also see that Plastic Arms Dealer offers a finished (painted) set, which would save many hours of sanding, but I would opt for Jim's if it is more accurate: Plastic Arms Dealer---Received Undersuit: DarkSideCloset--Order Placed Shorts: DarkSideCloset--Order Placed Neckseal: DarkSideCloset--Order Placed Elbow, Abdominal, and Knee Gaskets: DarkSideCloset--Order Placed Shoulder Straps: Plastic Arms Dealer--Received Boots: Like everyone else, I cannot find the Jered, leaving me with either the Talib or the recreated Jered from ImperialBoots.com. The latter seems more accurate as far as I can tell. Any reason to get the Talib instead? Elected to get the Talib: Amazon---Received Gloves: I looked at the Imperial Boots and Endor Finders versions, and the Imperial Boots version seems slightly more accurate to me. Is this the consensus? Since Imperial Boots does not make gloves big enough for me, it's an easy decision: Endor Finders--Received Balaclava: UnderArmor HeatGear Tactical Hood (Amazon)--Received Belt: Plastic Arms Dealer--Order Placed 9/22/18 Belt Buckle: Plastic Arms Dealer--Order Placed 9/22/18 Canvas Belt Pouches: TrooperBay.--Received Leather Pouch: Kerry Alan Rowntree--Received Holster: Kerry Alan Rowntree--Received SE-14R and E-11D: Unknown, but I would prefer a metal replica instead of a resin version of each if possible. I have a DH-17 that's metal (Master Replicas), and I love the way it looks and feels. As far as I can tell, no one makes a metal version of either one. Is that true?--Looking into possible Christopher Fieldmarshal Vandenberghe kit to modify an Airsoft for the E-11D. I can't find an Airsoft or other metal version of the Rexim Favor (base for the SE-14R) yet. I ordered a 3D print by Jerry Budde.--Received E-11D: I have ordered an Airsoft Sterling from Evike (S&T / Beta Project Full Steel WWII Sterling L2A1 Airsoft AEG) and an Element M300A flashlight. I think that Christopher Fieldmarshal Vandenberghe makes a kit for the rest. I am going to try to make an all-metal prop. We'll see how it goes. Maybe I should make a separate build thread for that.--Received Sound System: Leaning towards Ukswrath's system. Again, I look forward to everyone's thoughts.