Dishrack
-
Posts
24 -
Joined
-
Last visited
-
Days Won
4
Content Type
Profiles
Forums
Events
Everything posted by Dishrack
-
Jesse has updated the files too, so they're a bit more forgiving than the ones you and I used, Allan. Probably not worth reprinting it though 🤔😅
-
No worries at all. It's good to have some motivation to get back into it. I used Dupli-Color automotive spray paint. In Australia, the colour is called Holden Black Metallic, but Holden likely translates to General Motors in other countries. The colour code is DSH101. The eye lenses are from LED downlights, specifically ones that had three LEDs for that triangular pattern. I picked them up as spare parts from https://au.rs-online.com/ but they don't seem to stock them anymore. You could probably buy the lights from hardware and butcher them for the lenses but it might be pricey? Hope that's helpful.
-
Hey mate, great to see you're back looking at this. I've not updated my thread for months but really should get around to it. For the pistons, I tried using the ones from the jesse_m files but without being able to get the inside super smooth, things kept catching. I ended up buying an aluminium tube and rod and then printing the rings to go on the outside. I'll get some pictures and post it when I can. The shoulder bearings were a PITA too but did manage to make some based on this design on Thingiverse: https://www.thingiverse.com/thing:4875708 - I had to mod it a fair bit to get it to work though but I was happy enough until I broke it..need to print more of those 😅 No plans to sell the rubber feet as it costs a small fortune to make them and they're not good enough to sell in my opinion. I need to go back to the drawing board on these. The idea is there but my execution was trial and error. Be careful with the rubber shorts as the CRL requires them to be made from a hard material (even though C3PO only had hard shorts in ep.IV and rubber in every movie after that but we're not really building C3PO, are we ). I've been experimenting with casting them in a rigid polyurethane - same material old car bumper bars were made from. It's hard to the touch, but impact resistant. Kinda makes me want to go back and cast the whole costume the same way for longevity. Again, I must get around to taking some more photos and updating my build thread. Thanks for the nudge
-
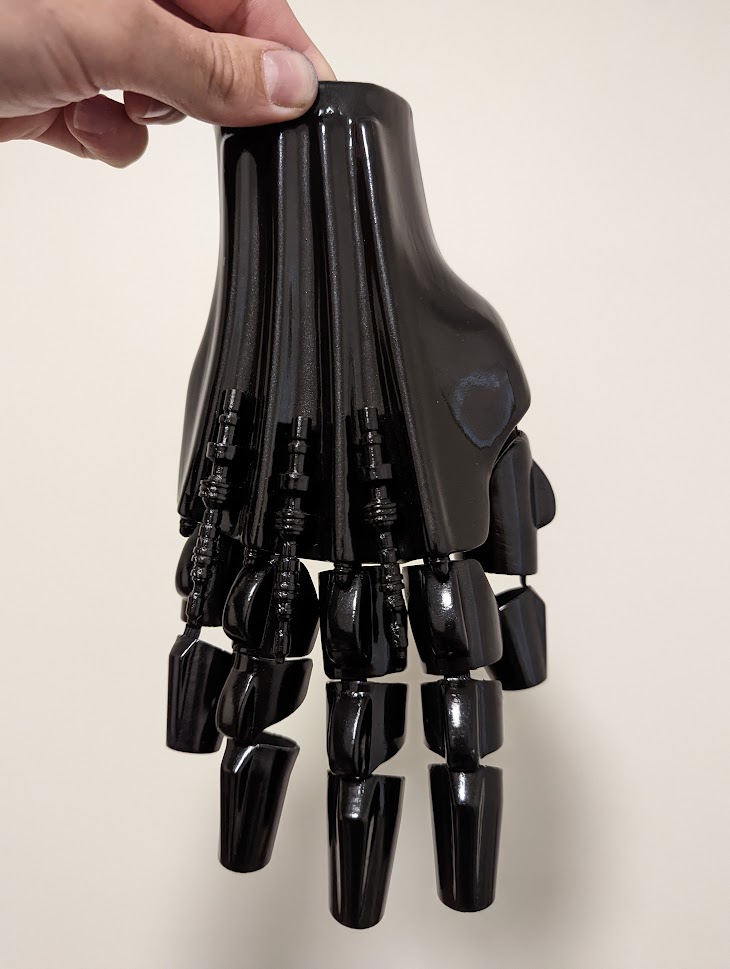
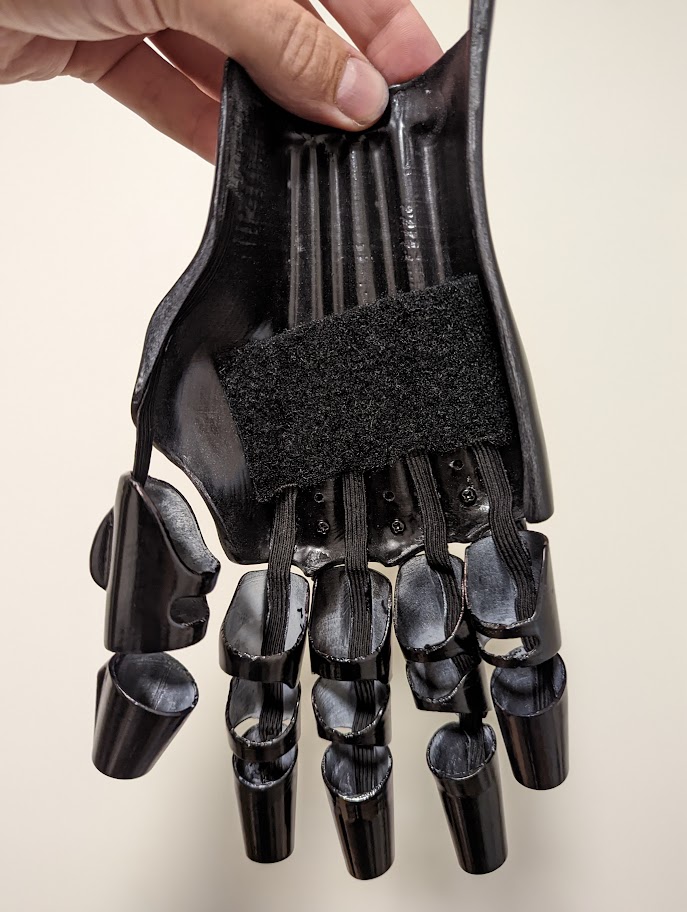
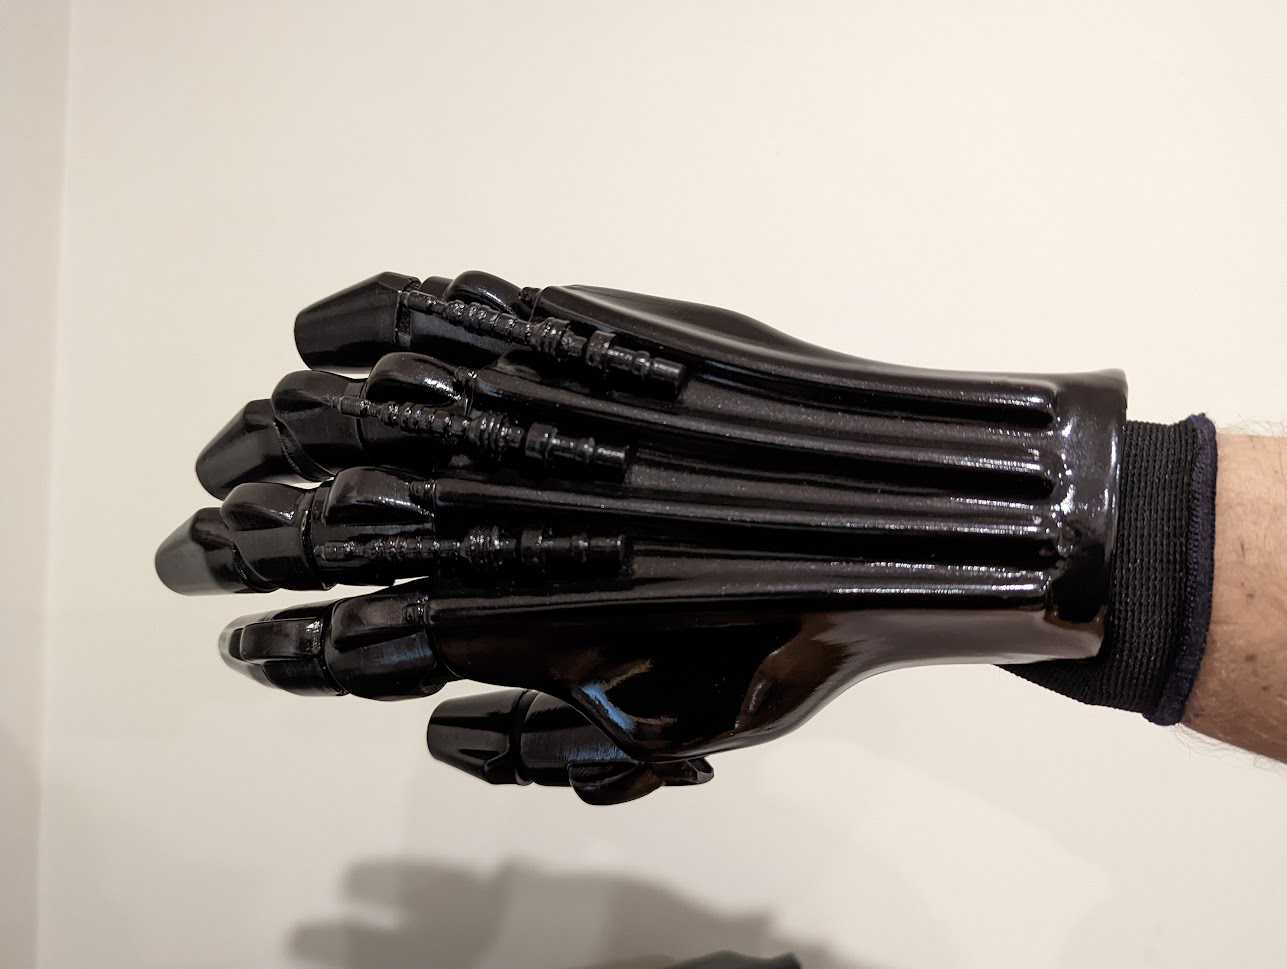
Owing to some nicer weather here - however fleeting - I got back outside for a bit more sanding and painting. After several frustrating and futile attempts to hide the join lines on the leg parts, I shelved them in favour of a quick win: Hands. In order to maintain maximum dexterity without fear of the fingers falling off, I have suspended each digit on elastic attached back to the hand plate. I also added Velcro to the back of the hand plate and the underglove to hold it in place, however this has proved unnecessary and honestly bothersome as it holds the hand in place too well. I think I'll get away with the cuff of the arm keeping the hand plate in place. A small update but good to be back at it.

-
Yeah, you'd think that but here we are ? I'll find my way back to this project over the end-of-year break and keep you updated.
-
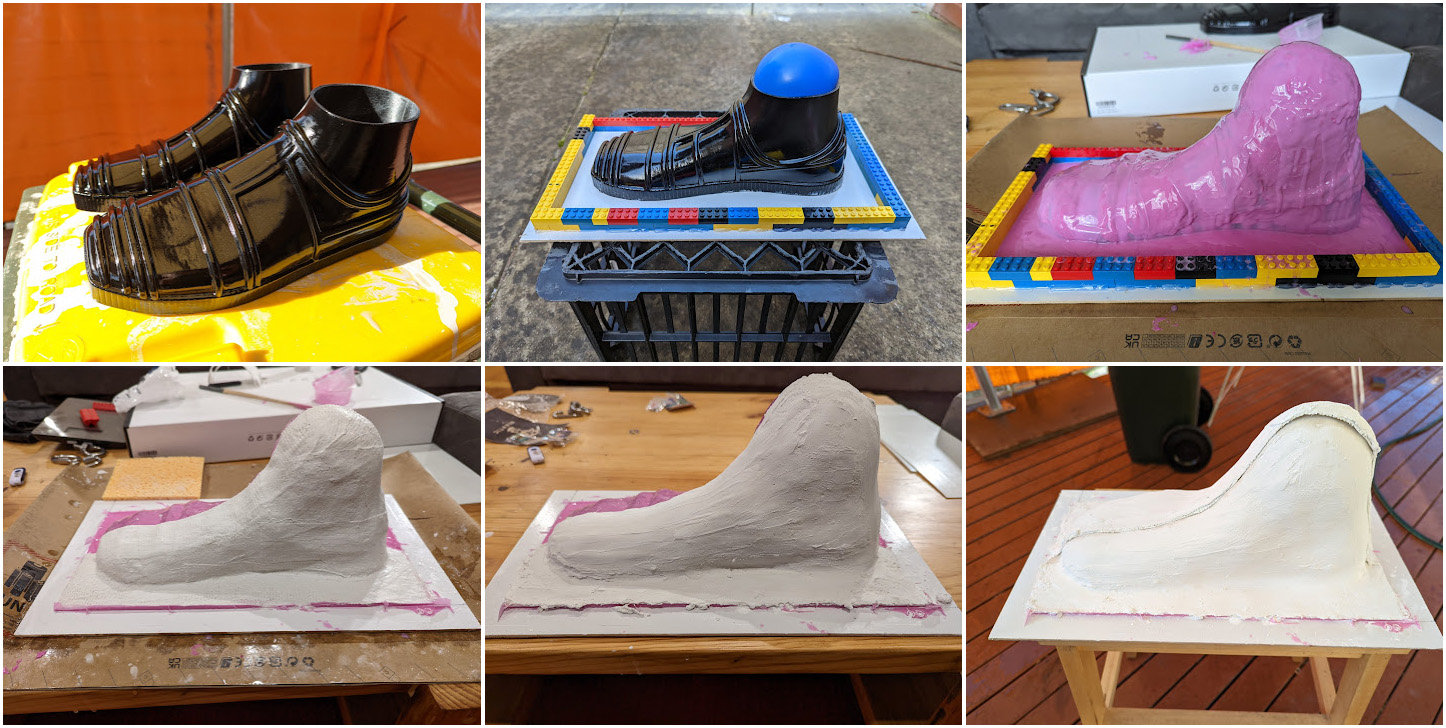
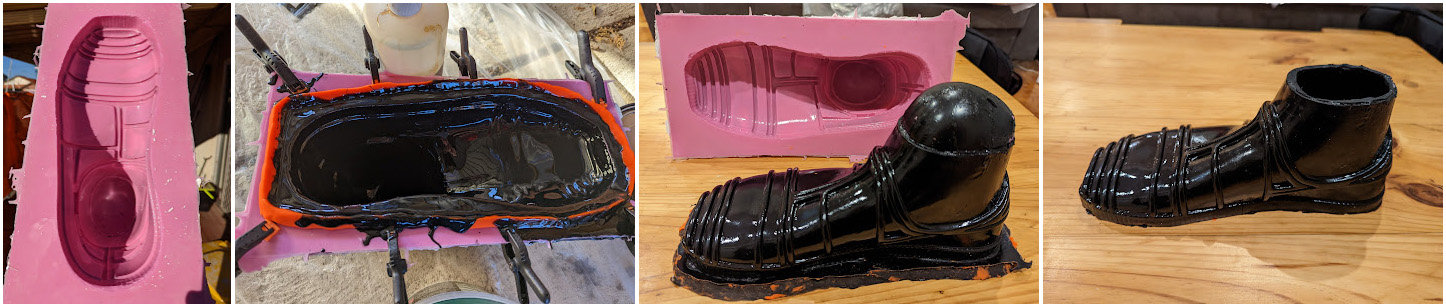
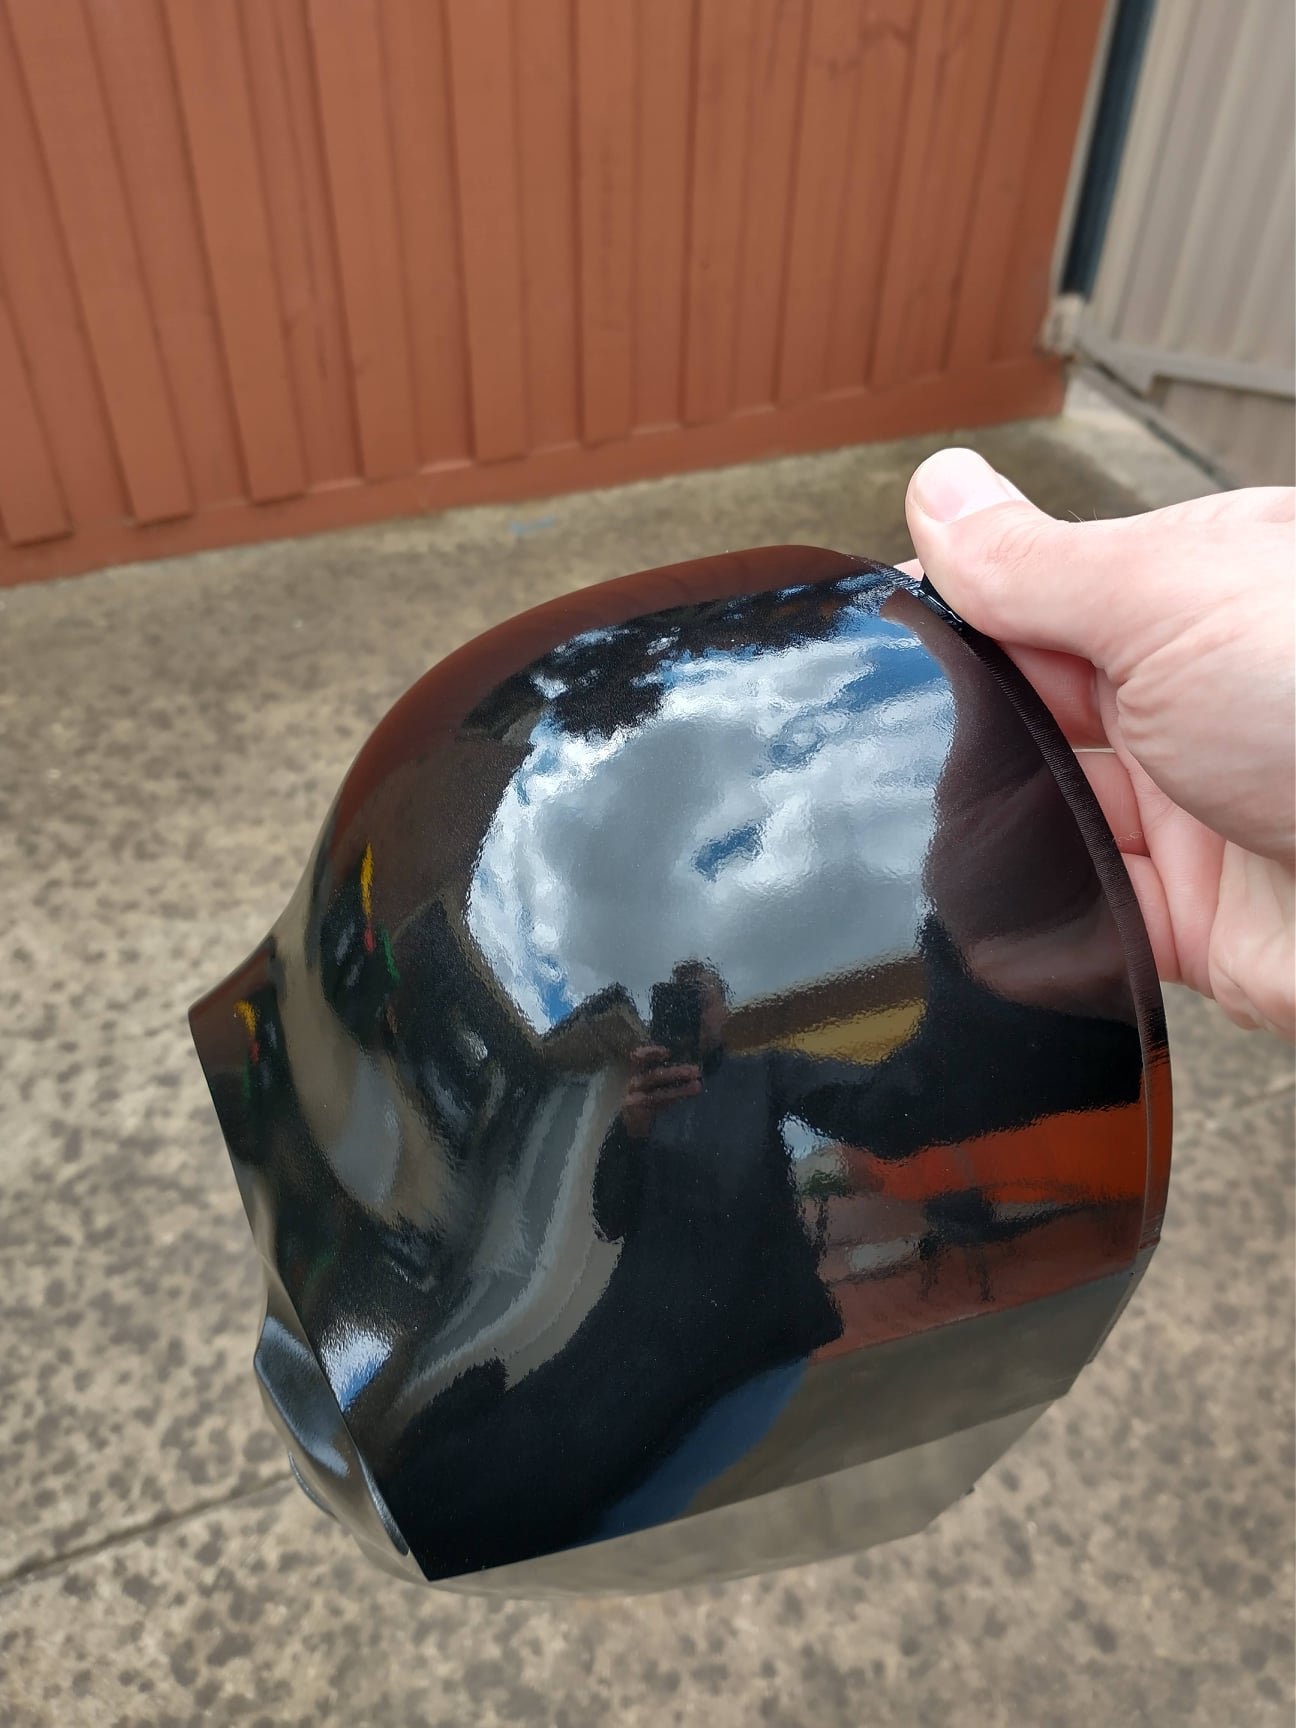
With concern about how I was possibly going to fit my foot inside the rigid print, let alone walk without it flexing and snapping, I decided to slush cast the feet in flexible urethane. I'd never worked with urethane or silicone before so a bit of YouTube watching set me on my way. I know there are more experienced builders here, so some of my mistakes will be glaringly obvious to you, but I'll explain my process all the same. Starting with the sanded print, primed and painted in cheap gloss paint (that was actually a dream to work with compared to the top coats I've been using on the other parts), I glued the foot to some scrap melamine board and built a wall around it with my childhood LEGO bricks, hot glued in place (Oh no, not the kragle!). I knew I wanted to create a reservoir for the excess urethane to pool in during casting, so I sealed the ankle with a balloon. My rationale was that it could be inflated to the exact size to create an airtight seal, whilst its dome shape would create a bowl in the inversed-mould to catch the surplus urethane. Next, I covered it in plaster bandage and gypsum for strength, and let it set. When I pulled the silicone mould out of the plaster however, something wasn't right. What I didn't account for was a chemical reaction between the rubber of the balloon and the silicone I used for the mould. Where the silicone contacted the balloon, it didn't cure, instead turning into a gluggy paste that spoiled the end result and was still tacky to the touch. Fortunately all the areas that are affected will be covered by the shin piece, so I decided to proceed. For the tint, I made up some test swatches using a combination of metallic powder and opaque gel to get a colour close to the paint on the other parts. Using a small silicone cupcake mould, I tried the following combinations: 1. Just metallic powder mixed in urethane 2. Just opaque gel mixed in urethane 3. A mixture of powder and gel mixed in urethane 4. Brushing the powder into the mould first and pouring in untinted urethane 5. Brushing the powder into the mould first and pouring in gel tinted urethane #3 gave a result closest to the paint, and so I proceeded. To avoid the urethane spilling out during the slush process, I applied some orange Playdough around the edge to create a lip on what was otherwise just a flat area. This gave a watertight seal and was easy to remove after the urethane had set. Tonight, I pulled it out of the mould. It's black, it's glossy and it's flexible. For a material I'd never worked with, I'm pretty happy with the results. I imagine I'll still need to slice the urethane down the back of the shoe to be able to get my foot in, with the urethane ultimately glued onto a flat deck shoe. Alright, now that you've all seen my mould technique, what should I do differently for the other foot?
-
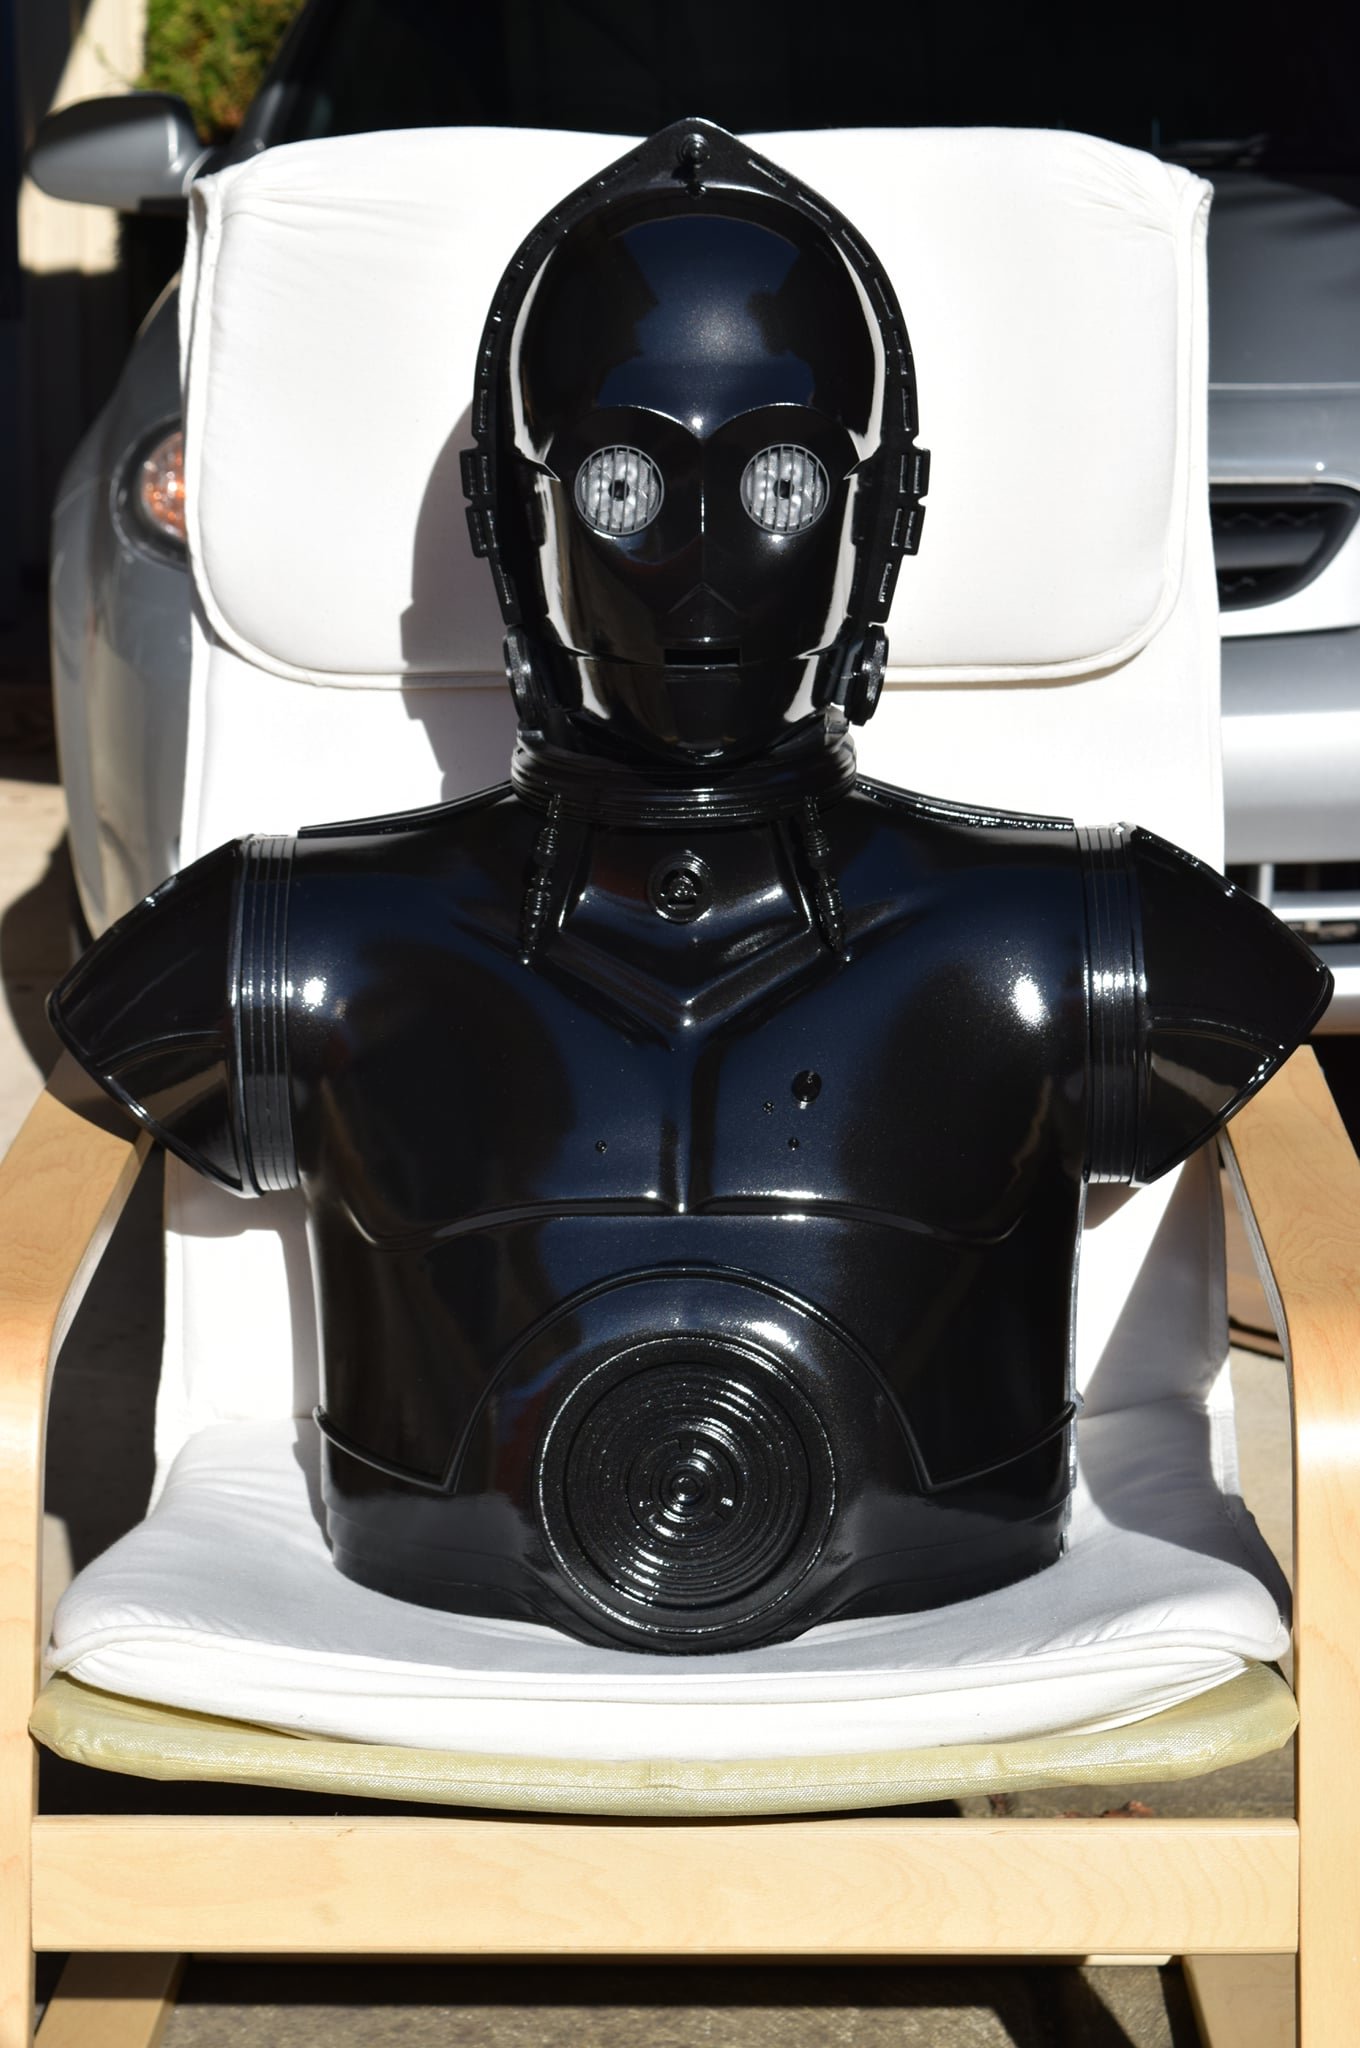
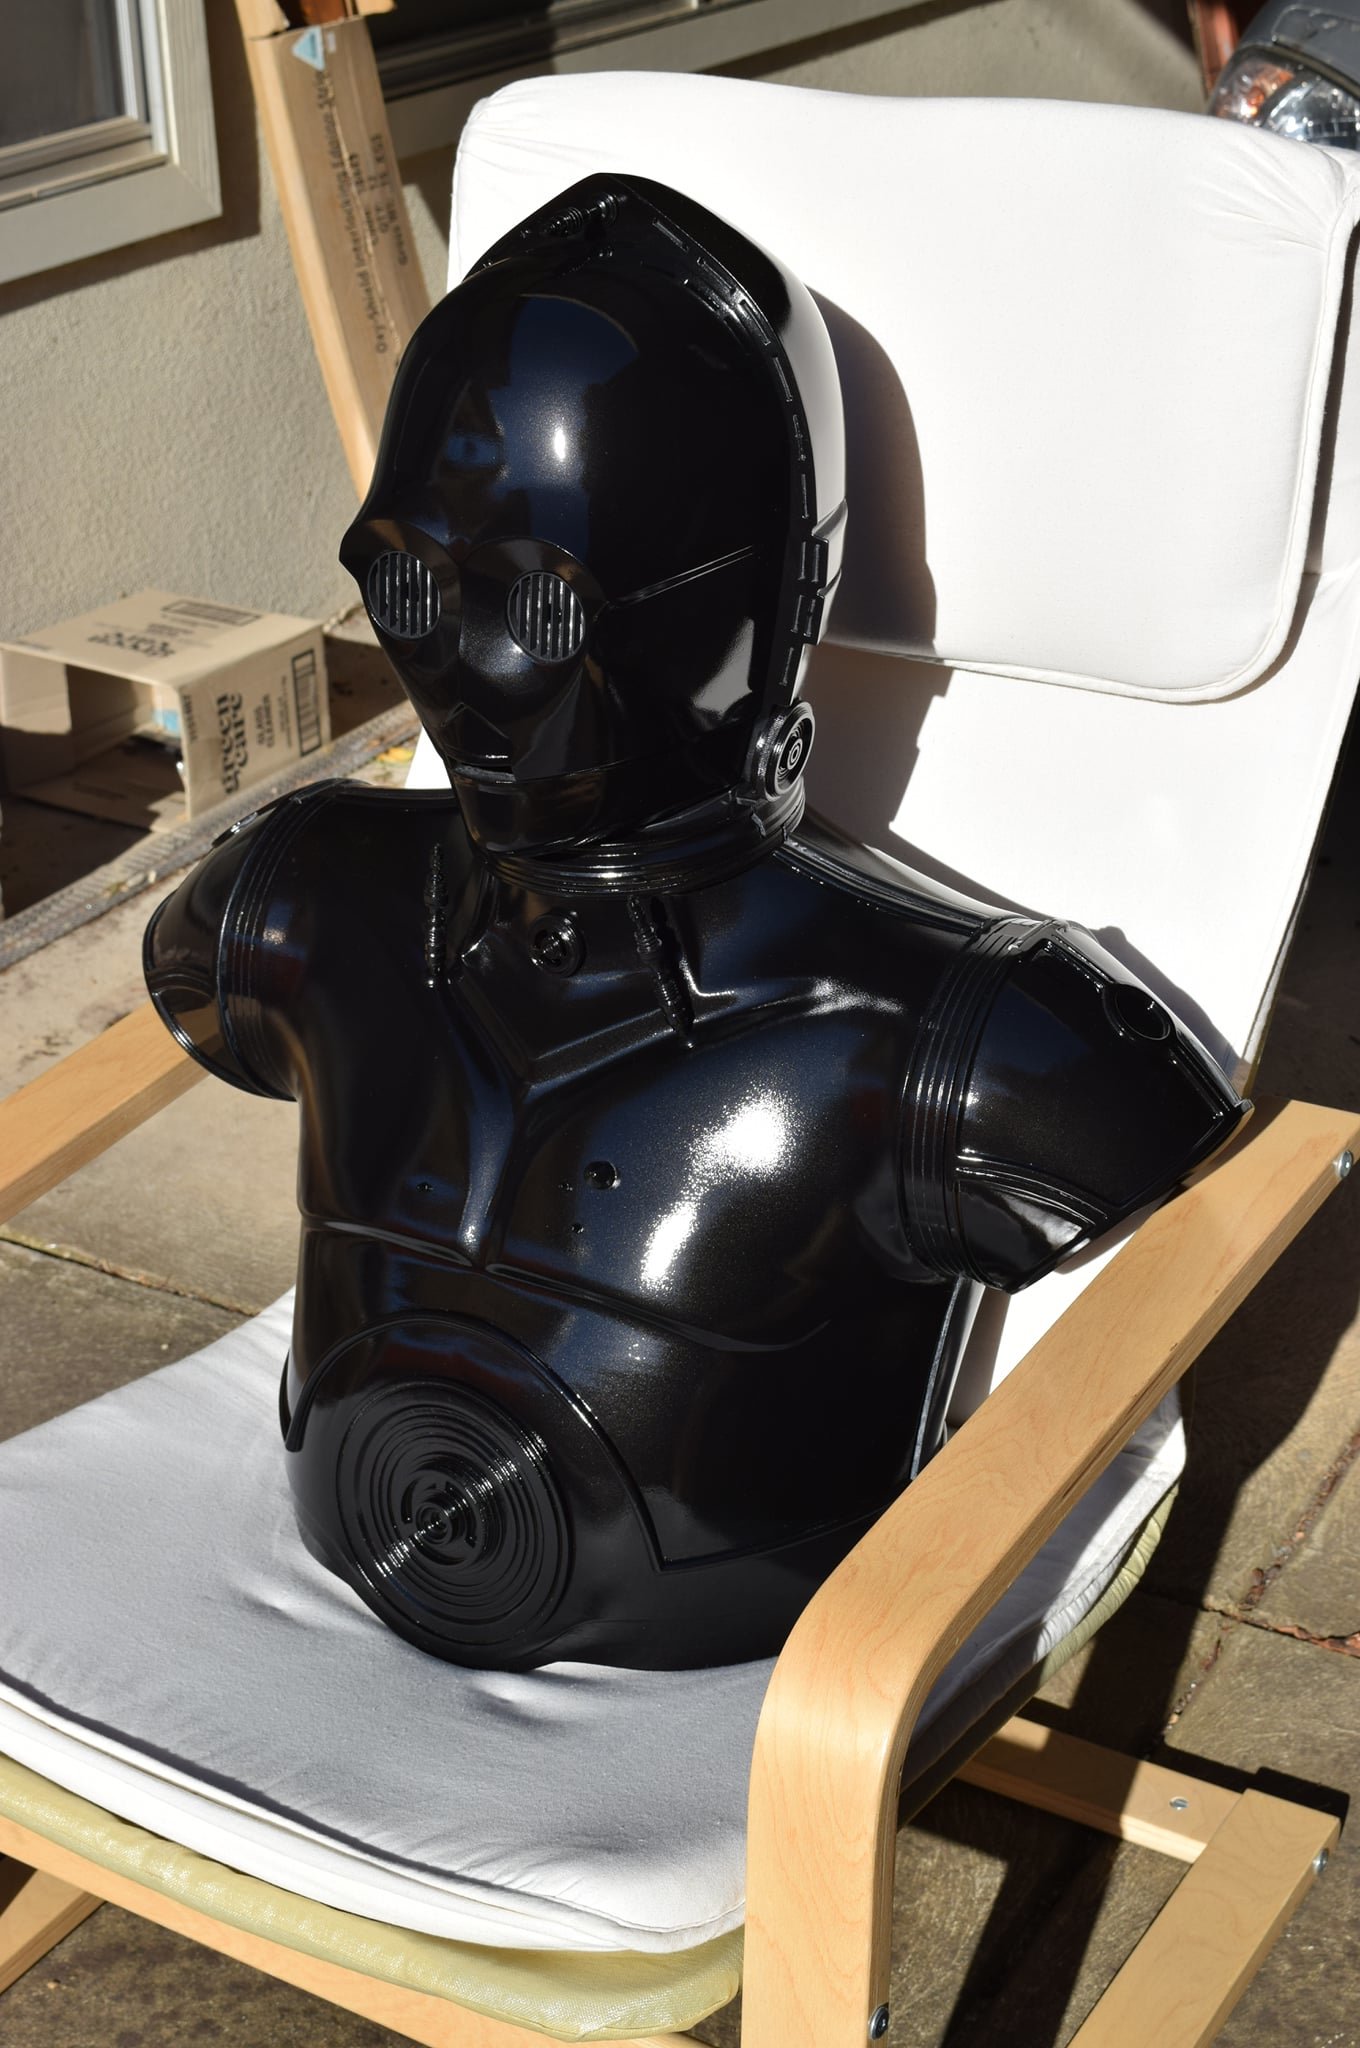
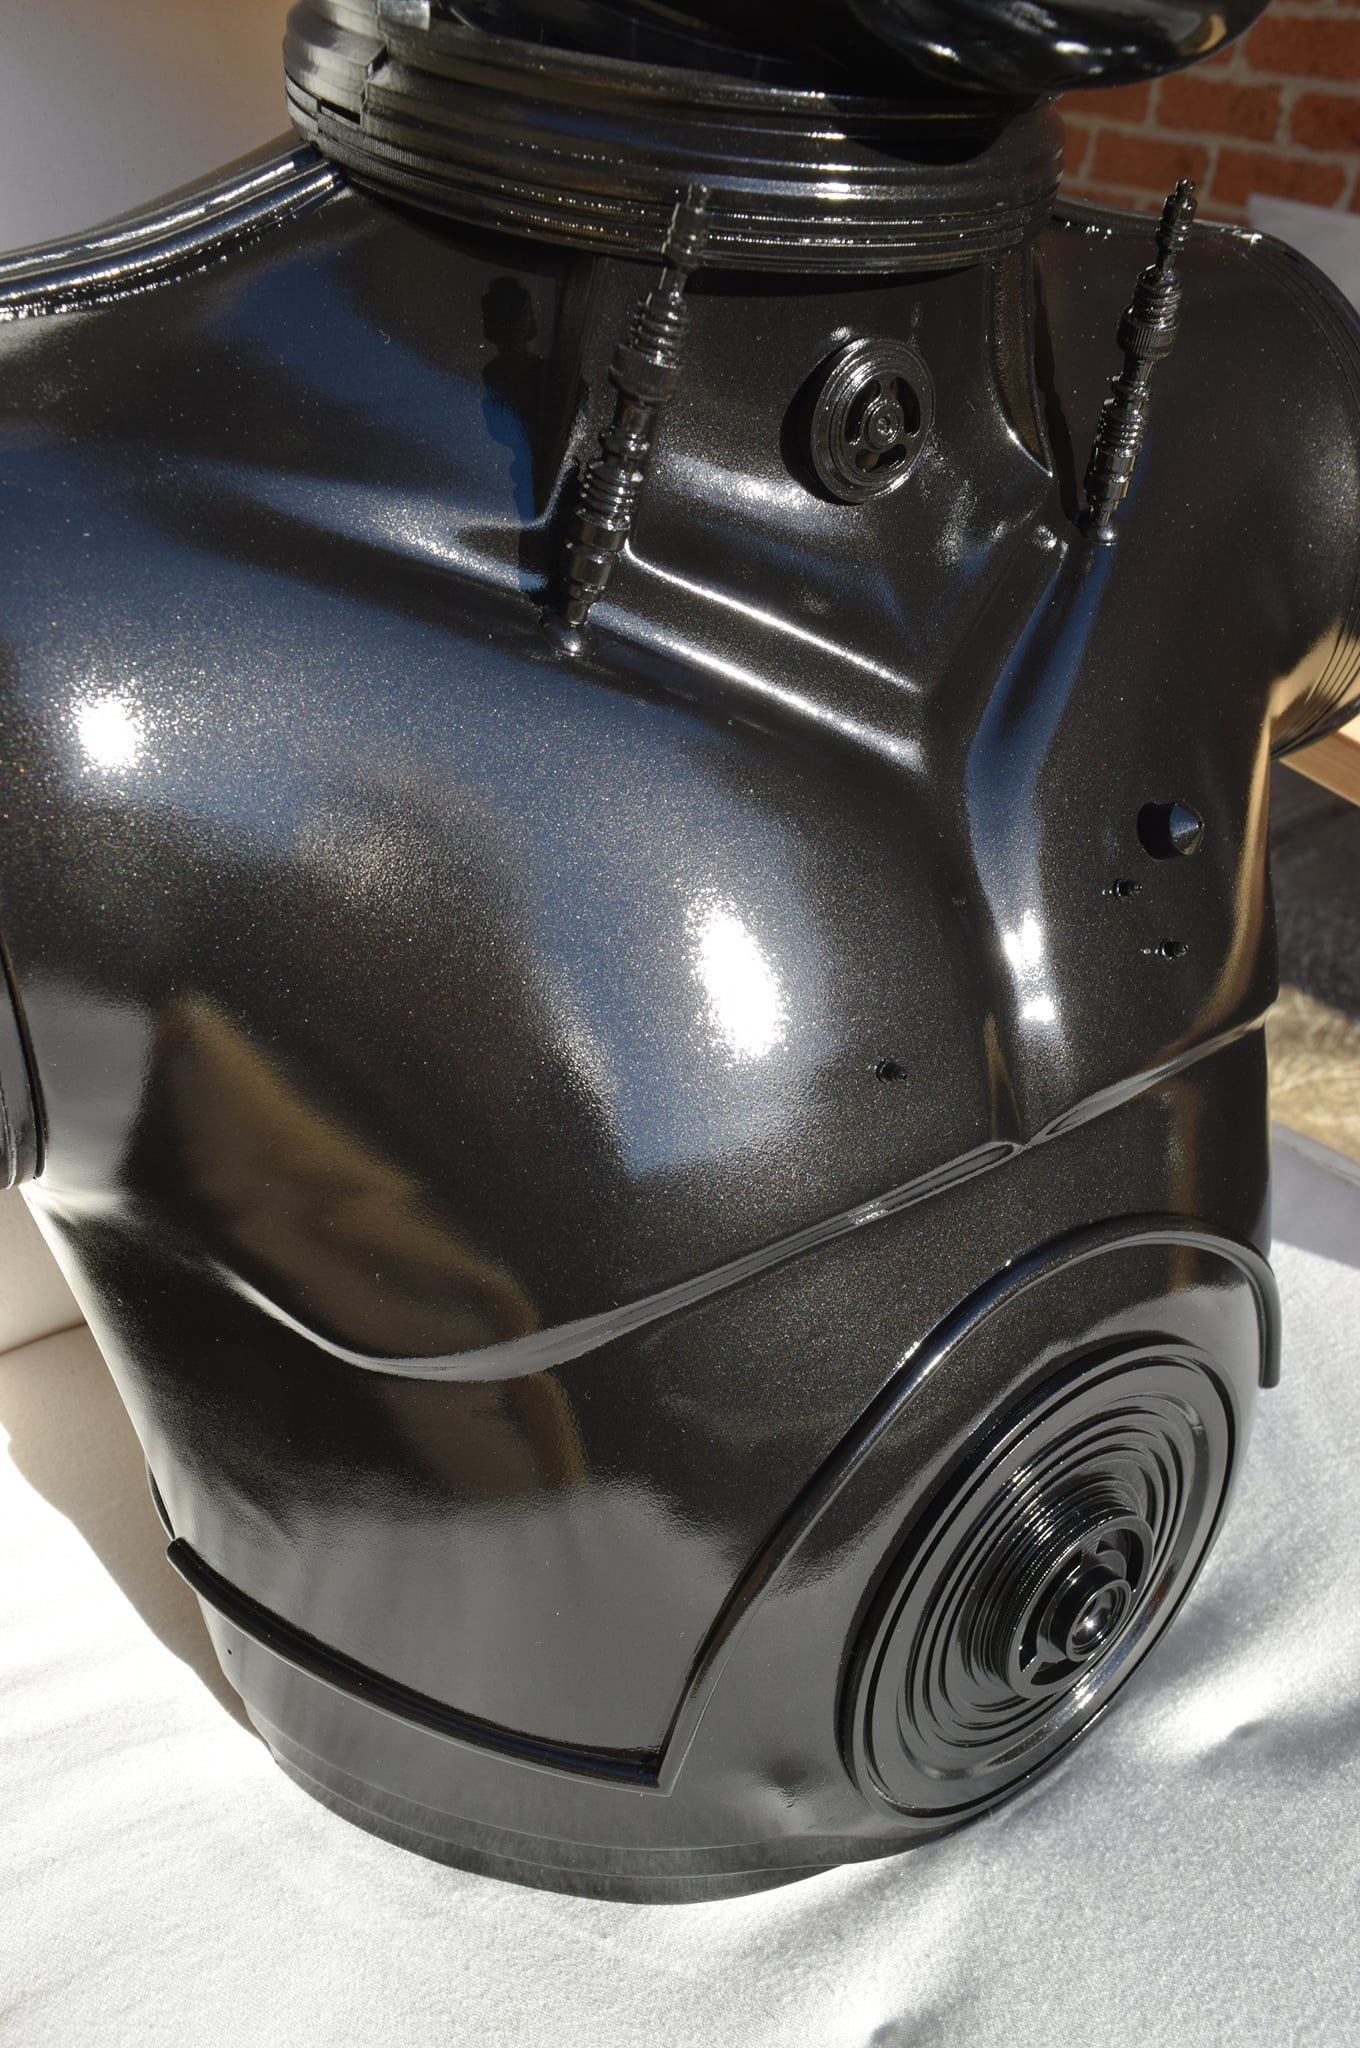
Nicer weather has given me a couple of opportunities to progress with painting. "You probably didn't recognise me because of the red arm" ... or lack of arms. I enjoy that the metallic base under the gloss layer gives a slightly grey tone in certain light, consistent with how Triple Zero changed between grey and black in different frames of the comic. The perfectionists will see the orange peel; I just see my reflection and I couldn't be happier given this was 3D printed. Overall, very happy with how the paint turned out. Definitely some inconsistencies between cans/batches though but overall everything matches closely enough. Next focus will be the arms.
-
We've had some nice weather in my part of the universe and I got some painting done. Quick question about the CRL: Should the vertical eye slat coverings be black or silver? The text doesn't specify the colour other than a general statement of "armor parts are gloss black", however the photo displays silver coverings. Is this correct and/or a requirement? Not invested either way, just want to get it right.
-
Unsure whether to go with C3PO's "That’s funny, the damage doesn’t look as bad from out here", or Han Solo's "She may not look like much, but she's got it where it counts, kid". Either way, I'm happy to report that all major printing is complete with only a handful of pistons/greeblies to go. Parts are at various stages, with some untouched, others sanded/primed, some have been fiberglassed on the inside for strength and others have been completely painted (not that you can tell here; the black paint looks just like the raw print). Fair to say if you can see a print line or glue seam, that part hasn't been sanded yet as I plan to leave no trace that this was 3D printed. Honestly, I'm happy to be moving to the next phase of bringing everything to life. Heaps of preparatory work to go and still waiting on some specialty hardware to arrive over the next couple of weeks but it's coming together. Next will be the full test fit for mobility. I plan to cast the feet in flexible urethane eventually too.
-
After a few months away from it, I've finally found my way back. I had been sanding parts in my lunch breaks but once winter hit here, being outdoors wasn't viable. That also hampered resin, fiberglass and painting efforts. I have had a chance to process a few parts this week due to a brief break in rain. I've also tweaked the legs and started the long journey of reprinting them, as I wasn't happy with the fit previously. All things considered, I should be done printing all large parts by the end of next week with only some small greeblies to go after that. I had accidentally printed two left shoulder bells (or was it two right shoulder bells? I get them confused all the time) so I used one of them as a test piece for paint. Overall, fairly happy with the outcome. Hopefully there will be a more steady stream of updates from here.
-
Oh no, you've caught me! I don't have much of an update, I'm afraid. Things have stalled slightly due to life circumstances. That said, I have sanded and prepped some parts. Reprinted others. Essentially I got stumped by the shins which are going to need heavy modification. Rest assured, I'm still very much committed to finishing this and will be back on track as soon as I can. Sorry for being a slowpoke!
-
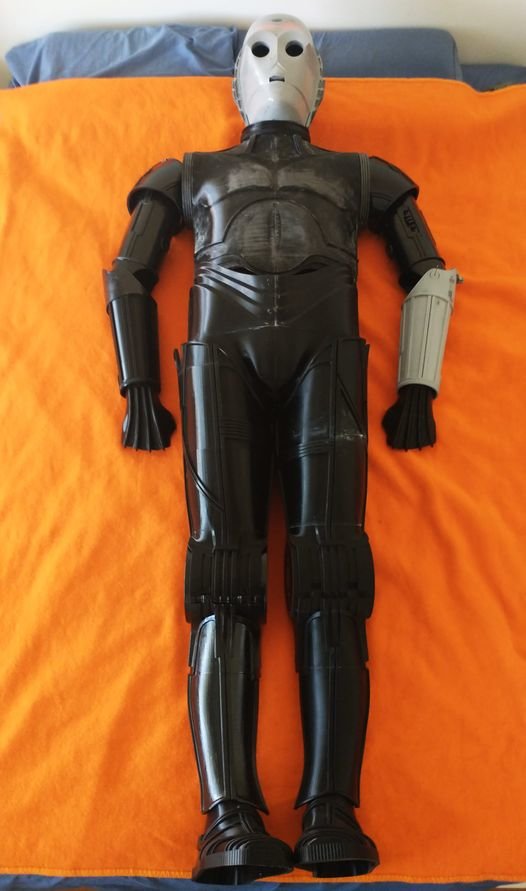
Why yes, there is! Good timing ...a month since my last update and a bit has happened. Printed the shorts in a number of pieces and glued together. I'll keep these as front and back pieces and attach them with elastic to allow the two halves to stretch apart during donning and doffing. These fit surprisingly comfortably and provide support in, uh, all the right places. They were tricky to glue/tack together because of their size and shape. Traditional clamps didn't provide enough three dimensional support so I employed the use of straps from my roof racks to provide cross-axis tension. Next came the dreaded thighs. I've been following a lot of protocol droid builds and the legs seem to be consistently regarded as the hardest bit to fit correctly. The issue being that unlike most armoured costumes, the knees on this are hinged together so if the thigh is too long, the knee isn't in the right spot to bend. Accordingly, this is the first piece I've had to skew to fit. It's about 4% shorter than it is wide. Not a huge different to look at but certainly a huge improvement to wear. It's also a really big piece so again, split it into three pieces. As you can see, it's pushing the bed size of my Ender 3 to the absolute limit but we got there. Here's the final thing which is huge. This alone has around 100 hours of print time in it. Those of you with sharp eyes might notice that even though I said I printed it in three pieces, it's actually in four pieces. Well, that's what happens when your bed is held down by a handful of rare earth magnets and the print catches on the extruder causing the bed to slip, 25 hours into a 30 hour print...No way was I letting that go to waste so reprinted just the top bit and attached it, thus four parts all up. And here he is so far! Triple Zero taking shape as the months tick by. I couldn't be happier I've also replaced the screws that held the head together with the now spare rare earth magnets. This means that I can just snap the bucket on/off as needed without having to awkwardly unscrew the toggles (before and after pics below) Next we keep pushing on with the legs. Phew!
-
Probably won't get back to this until next year so thought I'd close out 2020 with a progress marker for my own records and a bit of forum spam. Upper body now printed (re-printed in some cases, after upscaling) but arm greeblies and pistons still to be added.
-
Thanks for the advice on fibreglass and resin. I'll look into that down the track. It's certainly been a rough fortnight with a bit of personal injury and property damage but let's see what I actually managed to achieve on the costume...not much! I've drilled out the centre of the eye lenses (posted previously) to accommodate the tube that I'll actually be looking through when wearing the costume. I designed a backing piece for it to fit the three red LEDs in each eye. It came out pretty well. Unfortunately the eye holes don't line up with my eyes but I'm investigating a sort of periscope arrangement inside the mask. I've bunged in some 3mm red LEDs but haven't wired them yet. Still, they look plenty menacing even when not illuminated. Test fitted to the mask (without LEDs) Certainly taking on the protocol droid look that we're all familiar with. I wish I had more to report but hopefully my run of bad luck is over and this week will yield better outcomes ?
-
Thanks for the advice - I really appreciate it. The overwhelming advice from my garrison mates is that fiberglass is the way to go. I think it'll be a combination of internal cover strips and maybe one or two layers of fiberglass as I don't want to add any more bulk that I've already got.
-
Ahh, I was too new to printing to know the difference between PETG and PLA when I started and now I feel somewhat committed. I was leaning towards aluminium strips on the inside as it's relatively shapeable, light weight and yet rigid metal; I'll do some tests with ABS though, thanks. What did you actually use to join the pieces? Thanks for that; great to see what the inside looks like! I was planning to cover the lenses on their backs so I think my set up will look similar to yours on the inside when complete. The lenses were more to diffuse the red LEDs when viewed from the front. I'm just experimenting though; this is all a journey for me Yeah, this is concerning to me too. I'm currently printing the Jesse M files at 110%. I'll know more once I get the shorts done but I really don't want to go much larger. Thanks for your advice. It's good having someone who's already walked this path to point out some of the issues I'm facing.
-
Crunch time (or is that crack time? More on this in a moment...) for trying on the resized torso. I'm calling it a success. It was certainly a lot more comfortable and featured less swearing and skin pinches that the first version. Hilariously, the rigidity of it forces my arms to hang in a very natural protocol droid fashion. It also pulls my posture up a bit. On the down side, I'm going to have to be very careful not to slouch and put undue pressure on the joins because it all feel very fragile. It was still very tight on my sternum and did make an audible cracking noise when I tried to take a deep breath. Bearing in mind that I've only joined the pieces by melting/welding them with a soldering iron, I should probably look to reinforce this. I'm certainly open to advice here. @Allan1313 maybe? Looking at the photos now, I think there's room for improvement in the placing of the torso - perhaps I can bring it forward to take up some of the gap behind my arms? Maybe I need to wear a back brace or tape my shoulders before I suit up. Maybe just suck in the gut or wear a girdle. These are all things I will play with. I've started spray putty and sanding the head. It's still a way off being perfect but it's getting there. I thought I'd throw it on for effect and I'm pretty happy with how it's all looking.
-
This week saw v2 of the torso completed. Like v1, it's sliced into eight pieces (four on front and four on back), although I took more care in slicing this time to ensure the joins weren't on stress points. Like other pieces, I tacked with superglue and then "welded" on the inside with a soldering iron and spare filament. Those who are following along know that v1 was too tight to wear comfortably across my upper body, so v2 is was scaled to better accommodate my chest. Obviously this means everything else is scaled up so it's suddenly become a very large torso and I hope it doesn't look too bulky but at least everything will be scaled the same. I also made the decision to keep the back of the torso open on this print as it's covered by another piece anyhow. I figure this will allow easy access to electronics/battery, or even just a removable panel to cool off a bit backstage. Also this week, I managed to find some loose LED downlight lenses with the correct arrangement to install the tri-lights of a protocol droid's eyes. I'm really happy that they have the correct diameter (35mm) to fit inside the eye sockets without modification. Those unfamiliar with this build might be pondering how I'm going to see through these lenses. Basically there's a 10mm hole that gets drilled in the middle and that's all there is...two pin point tubes to look through. Unfortunately they won't both line up with my eyes at the same time so it'll be one eye at a time, unless I can rig some sort of horizontal periscope to fit my face... ? It doesn't look like much progress but that's a good 130+ hours of (re)printing just to get back to where I was, so it's slow going. I did manage to get some priming and sanding of the head done during the week too but I'll save that for when it's in a more presentable state.
-
Printing in PLA so not a lot of room for flex ?. I never really planned this; I just started one day to see if I could do it...and here we are.
-
Thanks for that; I appreciate that it's a change that's even potentially on the table. I'll have to print the shorts in order to create a mould for casting anyhow, so in terms of timing, I'll proceed with hard shorts for approval and then perhaps we can revisit this down the line.
-
As I plan ahead, I'm keen for some advice. What's the feeling on wearing rubber shorts? Noting that the CRL calls for a hard construction (fiberglass, ABS, HIPS) of parts with the only exception being "rubber style" feet, would rubber style shorts (either cast or printed with flexible filament) be approvable? My understanding is that the screen used C3PO costume utilised hard shorts in episode IV only, using rubber shorts in V & VI, as well as the prequels (and probably the sequels too but I don't know). I expect there's a reason for that that we can all appreciate. Whilst 000 obviously isn't C3PO, the same parts are utilised so I thought I'd seek some advice as I ponder how to get the most movement out of the costume.
-
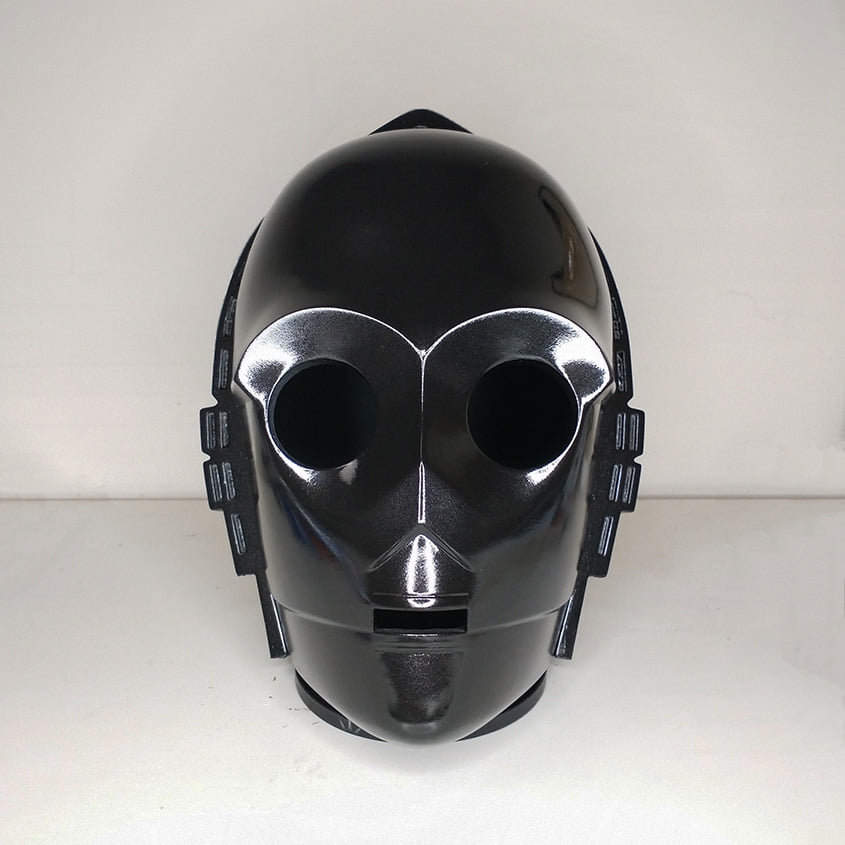
Finished the torso a few weeks ago. Despite taking and checking my measurements several times, I had to concede that the assembled torso was simply too tight across my chest to wear comfortably. I've been using Armorsmith to scale the costume but even so, I guess it's a fine line between form fitting and form functional. In any case, I've scaled up appropriately and started reprinting. Ho hum. To spin this into a positive, I was going to print the head next anyway and by increasing the torso size, I had to scale up the head to match which has then provided more room for padding, electronics, etc. so that's a plus. It's a surprisingly comfortable mask to wear (I won't call it a bucket as it can't be pulled over the head but rather sits as two pieces that bolt together in order to encapsulate my unpleasantly shaped skull). Had to split the print to fit on the bed but nothing that won't sand out. The antenna is removable for transport - it slots into place. I modified the file to accept a 2mm brass rod down its centre for reinforcement/longevity, as well as a magnet at its base to ensure it stays in place. The large greeblie spans over the join where I sliced the model. When glued, this should add some strength. TK bucket for scale.
-
Hello, I'm Jon from Knightfall Garrison in Australia. Earlier this year, a mate lent me his spare printer as a way of luring me into the 3D print world. I guess it worked because I've been printing little bits of this psychopathic protocol droid ever since. It's been a learning curve for me - especially starting out with the borrowed Cocoon Create Model Maker (hint: don't). With no heating element and a print bed limited to 10x10x10 cm (approx 4x4x4"), it was often a choice between brims to maintain print adhesion, or no brims and get a piece to actually fit on the bed! A hair dryer became essential to heat the bed. I printed all of the small parts that would fit - namely hands, fingers, forearms and various greeblies - with high levels of success. Where I couldn't fit the pieces, I opted to slice them in software and print in pieces and then join them by melting with a soldering iron. At some point, I realised I needed more space so I opted for an Ender 3 that was on sale for a couple of bucks. Still not big enough to print a single piece of the torso but more than enough for everything else. Scaling/sizing has been a fine line here. I wanted it to be snug to maintain the lean lines of a protocol droid that are instantly recognisable, whilst also maintaining wearability. Many hours/days/months still to print...