
SirCalcium
-
Posts
84 -
Joined
-
Last visited
-
Days Won
5
1 Follower
About SirCalcium
SpecOps Info
-

-
Costumes
Imperial Army Trooper
SirCalcium's Achievements
")


-
After another time away from this project, I've got more to show at last. First I've managed to get that indent m the backplate done, what kept me was cracks kept appearing when I thought it was done. Everything else has been painted with 350U. Frontplate Backplate Respirator with added darker grey tusks Goggled with brass addition Redone shoulder bells Biceps Shins I'm guessing the next step is applying the grey paint 433U. Could I get confirmation if the grey covers the green completely or lightly applied?
-
Finally an update! Most of the work has been on that indent in the backplate, after some grinding, filling, and learning some new skills (trying my hand at using UV resin to fill in large gaps). After some priming Better look at the indent, and I'm hopeful that it can be marked as done! Sadly when looking at ,my shoulder bells, and I noticed a seam opening up on them, and some print lines have become visible again. Still a long way to go. In some more optimistic news, my boots from Crowprops have arrived (I haven't got a photo yet)
-
I'll.get onto brassing the adjustment. Sadly the link to the respirator image is broken
-
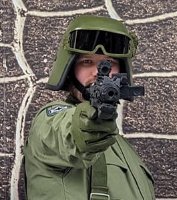
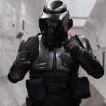
Hello again. Once again I apologise for my absence. I was away in Australia for all of April, which meant no progress could happen, but I did meet and troop with the Desert Scorpion Garrison (although I was trooping through the RL) Anyways now that I've been home for a few weeks I can continue. First I bought some bigger gloves (no photos yet), and I ordered some CrowProp Mudtrooper boots, these would be my 4th set of boots I've purchased from them, if anyone's been considering them, well there's your testimony. I've also been working more on that groove on the back plate, I refuse to be beaten! Some things I have photos of. I bought the paint @minimo recommended and got the goggles and tusks painted Obvious flaw is they're not flawless yet, but once I've painted everything else, I'll get them weathered. Going back to my blaster of choice. When looking at the CRL for the E-10 I decided to add the M4 x 25mm screws, but I'd like to check to see if these are acceptable?
-
Some more updates to make. First up will be the biceps, and thanks to @minimo I can see what the CRL means by the hooks must face outward (away from the body) Next thing to do with them is weather the green one, and add the yellow stripes on the red one. When the GML for my Garrison had a look at the goggles and respirator he noticed some print lines that needed filling. I got to work on the goggles and respirator (photos of that to come later), now I'm at the stage to paint the goggles. The CRL requests the frames be an aged chrome, any recommended paints for that? One of the scarfs I looked at was offered to me at a better price, so I bit the bullet and bought it, just need to see if it was correct or not? For reference my foot is a size UK12 or US13 I've been working on an E-10 to accompany the kit, I think it's a Sean Fields model, I'm not sure I asked someone in my Garrison who makes and sells 3D prints to print it. What I noticed was the muzzle doesn't recess itself into the barrel. Will it matter if it's stuck on the barrel, or does it need to be recessed in? And finally, whilst at a convention I looked at a Shoretroopers back plate and noticed the indent in the backplate isn't a groove like I thought it was. Using a rotary tool I've carved out the excess, and will use fillers to smooth it out again. Not sure how much more progress I'll be able to make since I'm going on an lengthy holiday to Australia for 4 weeks in April.
-
Whilst looking at the CRL I see the biceps requirements. Each bicep may feature a slanted fishhook detail that is inset into the bicep top facing outward. I'm double checking that the fishhook is facing forwards towards the chest and not the back, correct?
-
Done some painting (at last) Shoulder Bells Bicep Shin Buckles and Boxes Whilst looking at a Shoretrooper backplate, I saw what the indent is mean't to be, not a groove but an actual recessed part. Got a plan to fix that. Still waiting to see if those scarfs I linked earlier will work? Also got to buy new gloves, Highland Spec Ops.
-
I've done some looking across the web, and found something that looks similar to the one lonnolan linked. Scarf Like that one I may need to dye it the right colour Quick edit, I found another one on ebay that also looks the part. scarf 2
-
Thinking about some other soft parts, as mentioned the gloves I got with the kit may be too small for my hands, however I know what gloves to get and an eBay/amazon search yeilded results. The scarf on the other hand, I can't seem to find it on eBay or Amazon (maybe I should try Etsy?), best results I find are the mesh sniper scarfs, which based on the CRL image aren't the right product. Any advice for the scarf? May as well ask if there's any vendors that make the ammo pouch bandolier?
-
Soft parts from Jim Tripon
-
Yep. It was. Here's hoping I've passed this stage.
-
Whats this? Am no deid! Clearly I'm not, and neither is this build. Basically I've been spending the last months trying (and failing) to get that indent done. The original plan was to just use a rotary tool and carve the indent out, and to skip the unneccesary baggage of the attempt, it didn't work well enough Note the rather crunchy looking result. Anyways, fill it in and try again. This time after asking some friends in the garrison I went for using an older soldering iron to burn the indent in, but also using half a large washer as a guide. Hot glue the wsher down, heat the iron up, then draw the indent on. Easy right? Yeah, this took multiple attempts, I kept filling it in, regluing the washer down, re-burning the grove, prime, sand, and repeat the process. Eventually I got it to this level which I think looks "acceptable. I can see some imperfections on it which I may be able to fix with sandpaper and some more filler applied with a toothpick Honestly this was hard, but does show it can be done, but better just to have the indent on the piece from the start. Other things to mention just without pictures. I got a 3D printed kit for an E-10 that I've also been slowly chipping away at, and I ordered the soft parts from Jim Tripon. Photo's of that caming soon.
-
How picky are they about the harness
SirCalcium replied to StangAce20's topic in Imperial Army Trooper
I know there is a vendor on Etsy that sold them, called Spatcave. https://www.etsy.com/uk/listing/1430704966/imperial-army-trooper-web-harness Listing says sold out, but might be worth a go message him? -
How picky are they about the harness
SirCalcium replied to StangAce20's topic in Imperial Army Trooper
It would have to be the CRL version. Honestly it's not hard to make. You need a length of 2 inch (or 55mm) wide olive green nylon webbing, some adjustment slides, and at least 2 hooks from the front. The back can attach to the belt from loops made from the vertical webbing -
Been off working, and simply priming the parts before painting, however I'd rather get the semi circle carved in before I make that step with the backplate. After doing some measuring, and taking note of given advice, here's what I've sketched Heres hopefully I've got that looking right before I go carving

