
TK 21814
-
Posts
119 -
Joined
-
Last visited
-
Days Won
8
Content Type
Profiles
Forums
Events
Everything posted by TK 21814
-
 Here are the wonderful boots I got from Crowprops. I will be wearing 1" lifts in them. Soles painted to match the game. The black stripes on the soles are missing from the CRL.
 -
Here's the undersuit at 80% complete. Once I've sized my armor, I can then go back and cut in mesh where it will not be seen. The bottom edge of the shirt is currently not finished, so I'll have to finalize the length as well. I may have to bring the shoulders of the bib in too, but I'll have to see how the armor interacts with it. It's comfortable and not being pleather, it's not brutally hot either. Time to trim some ABS and suit up with some painters tape!
-
Below is the basis for my undersuit design. A few of us compiled our thoughts over on the Clone Detachment to finalize this one
-
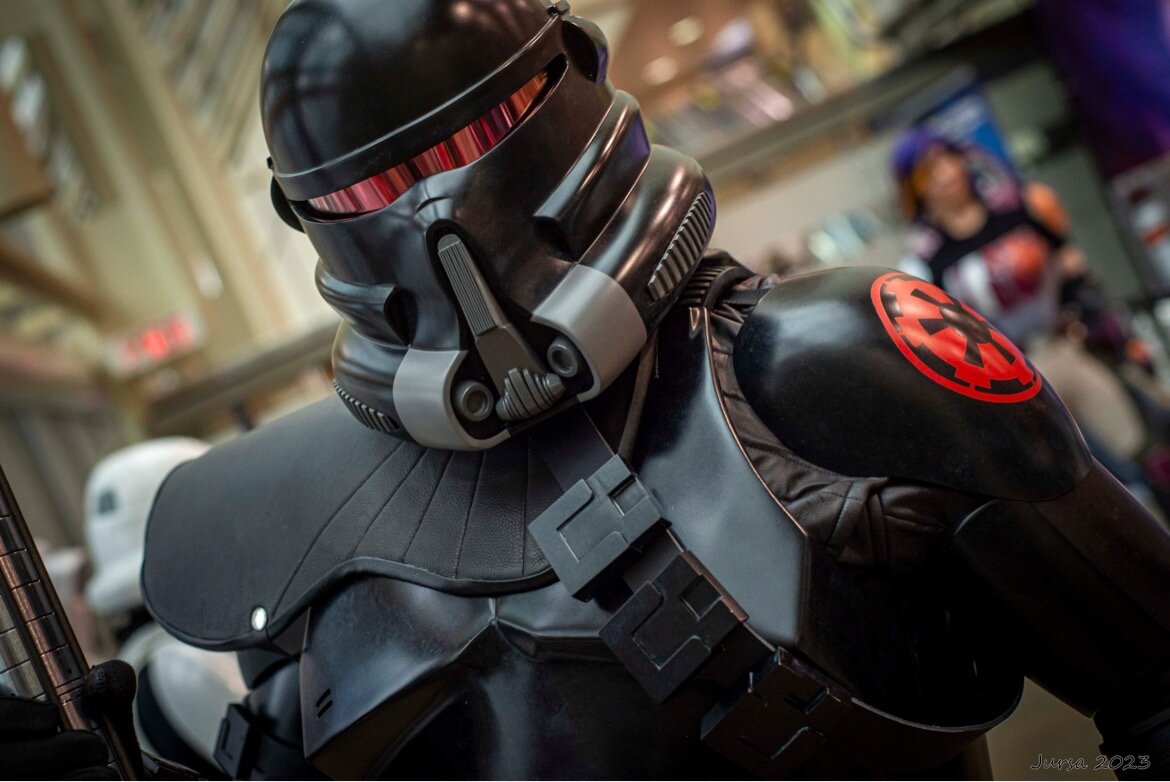
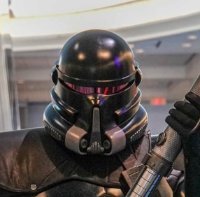
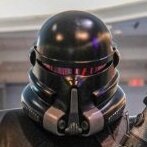
Also, working on the bucket. Smoothing 3D printed items is a onerous task, but I am getting very close to paint now. I found this drywall patch screen that is perfect for reinforcing the joint in by helmet (printed in 2 pieces). It's now bondo's, smoothed, and plasti-dipped black. Visor mounts are also installed. Here's a picture of the drywall repair patch before all the interior helmet finish work. Here's a side by side of my two buckets. On the left is the Galactic Armory printed at 100%. On the right is the Calvin Kam printed at 110%. I will finish both, but will only be installing helmet fans etc in the GA bucket, as I will be wearing that one. The GA bucket is ready for it's first coat of paint. The CK bucket needs finish sanding.
-
For an easy start, I'm bringing the shoulder bells into spec. Bell on the left is as supplied. Bell on the right is trimmed (oversized) and sanded, ready for primer. I'll trim it down to final once I have more complete. The tailored shoulder bell shape is missing from the CRL. Completing some surface work on the abs armor, as every piece has imperfections. The satin black paint will show ripples, indents, bumps, etc, so I'm looking to get all the individual parts smooth before joining them together. I can't do that until my under suit is done.
-
I originally had a 3D printed helmet from Calvin Kam, however it needed to be printed at 110% sizing to pit my head. It ended up looking way too big, so I switched to files from Galactic Armory. Unboxing of the BBB ... 850 Armor Works Realistic Clone kit in Black ABS with Black Rubber Belt. I will begin some general shaping, trimming, and edge softening while My undersuit comes together.
-
Deciding the route of electricity. Got to finalize the route before painting & weathering can be completed. Yes, I plan to have lighted purple-electricity! Electrostaff is nearing completion. Only wiring is left. I also have to determine a transportation case. It breaks down into 3 pieces. The ends are 1/2" thick rubber instead of an accurate material and size (which would have been 1/8" steel/aluminum). I did this to allow me to set the staff on the ground or lean it or hit something without damaging something, or injuring someone should the end ever come into contact with someone. #consafety
-
Below is a mock-up of the staff. Not all the elements are there, so this is just a dry fit check.
-
To begin my Electrostaff, I grabbed some screen shots, and other pics I found online. Thankfully folks are taking some good shots of this trooper! Below are some of the images I am using to build my Electrostaff. With some scaling and tracing, I created a CAD file for basic layout and sizing, so I could go shopping in my local Plumbing Supply shop for parts. My staff will be close to this, but the sizing of available fittings and parts will dictate the ultimate length and details, so don't take what's below as 100% accurate.
-
This post is to catalogue my build of the Purge Trooper Electrostaff Variant. This character proved difficult in Jedi Fallen Order and I am drawn to bringing it to life. I am a Centurion Level ANH Stunt TK and this is my first 'Clone' build. I will gladly accept any hints, advice, or links to other posts to guide me in building a proper Clone. My Build was originally posted on the Clone Trooper Detachment but will now be hosted here. My build goal is to correct errors in the current CRL and build the finest Electrostall Purge Trooper possible. Below are my Parts List: Armor: 850 Armorworks Handplates and Knee clips: Imperial Surplus Boots: Crowprops Helmet: Galactic Armory Helmet Vovoder: Calvin Kam file, scaled to fit GA Bucket Undersuit: Custom Build Ammo Boxes: Ruthar's files from Clone Detachment Gloves: Amazon Red Visor: Kalevala Suspenders: Amazon Belt for Thigh Straps: Amazon Visor light: Amazon Clear shield: Amazon Helmet padding: Amazon Pauldron: Christopher Speer Fans: ukswrath's Cooling Fan Kit from whitearmor.net My pictures from the Clone Detachment that contains the reference pictures from the game have been moved to this forum. Cheers, Brad
