

Aesmodan
-
Posts
61 -
Joined
-
Last visited
-
Days Won
5
About Aesmodan
- Currently Using Personal Messenger
SpecOps Info
-

-
Costumes
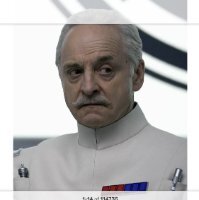
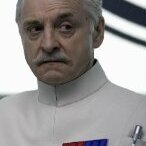
General Weir
Recent Profile Visitors
380 profile views


Aesmodan's Achievements
")


-
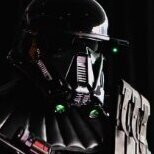
ISB Tactical Agent - CRL Discussion
Aesmodan replied to IcyTrooper's topic in Imperial Security Bureau
@Blackwatch, would you mind if l adapt your text for the ISB Tactical (for the 'Heert armour' component), for the purposes of writing the IOC ISB Marshal CRL? Cheers, Aes -
(No hurry at all, cut-pasting an old draft I had...) Some time ago this thread below discussed the possibility of a Weir "version 2" without bucket: ...As he appears throughout X-Wing: Rogue Leader #3 (and the action figure has a removable bucket): I'm bald, so I can help! (Do we want such a CRL?) Perhaps some modest text, modeled on Baron Fel? Face 1. Head must be clean shaven with no visible facial hair. 2. Eyes are brown. 3. Helmet will not be required if the appropriate shaven appearance is present. (Arrrg put the helmet back on!)
- 1 reply
-
- 1
-

-
ISB Tactical Agent - CRL Discussion
Aesmodan replied to IcyTrooper's topic in Imperial Security Bureau
Following the thread with interest, only a couple extra pieces I'd need to print! The ISB Marshal is always watching: -
I've sent for approval! Cheers and thanks to all that helped out in this WIP thread! @RAIDER @IcyTrooper @Chaos @Blackwatch @Dropkick
-
Update! The finish line is in sight -- I'm finalizing the bucket and will then be ready for approval pics. I hope my first troop in General Weir will be comic cons occurring here between 3rd week of August and second week of September. I've printed and painted the DLT-20a for Weir, and a DLT-19x for the future approval of the Shadow Scout. Every good general needs his optics, so there's a SpecOps-themed macrobinocular as well! I also just finished printing an E-11. Just a word the Weir CRL appears to link an ANH Stunt TK version of the E-11: Whereas in timeline and reference pics, the E-11 Weir is using is ROTJ with the flat front (posting this as I printed both types and may think about a way to make this modular so the barrel can be switched out): I hope to post for member access soon, I need some merch! Cheers, -T
-
Never tried warming the cans, but will try that right away... I'm anxious to get approved! Thanks for that!
-
@IcyTrooper @Dropkick Everything is good to go for my Weir save.... the bucket paint. I've been playing with this on and off for the last three months! It's still cold with high humidity here in Ottawa, and I am still seeing orange peeling. Any advice on this? (Just wait for hotter weather? I don't have a heated place to paint indoors...)
-
ha ha Awesome. Did we all appreciate this special context? We all know that one lunatic that never wants to wear the helmet! 🤦♂️ Oh wait, they are all lunatics... armoured, no brain buckets.
-
@IcyTrooper I ordered a silver lens from TrooperBay at the same time (for the Shadow Scout), and had tried putting that in behind...It improves things, but is perhaps too dark. Ordered several pairs of cheap red and mirrored lens ski goggles that are flexible, we'll see how that works out... Completed the bondo, put on two coats of primer... and then the bondo raised in 3 small and 1 large chip and flaked off (at really weird places on the top and back ridge of the crown, where I haven't worked for days...) It's been -20 to -24ish C here and I have an uninsulated garage, so I imagine that was temperature flux (wet sanding indoors and then painting it outdoors too quickly... (?) I think I didn't sand enough of the shiny layer off the helmet around the trapezoids on the back, as the primer dried but left a weird lightning bolts / 'crows' feet' pattern... sanded it off and will move to acetone/bondo paint, I think.
-
All pieces complete save the bucket, and submitted to my GML! 5th application of bondo on the helm, will be the last one, I think... Meanwhile, there's this: Where do purge troopers etc. get a mirrored red lens? (not seeing other sources on our forums...) This is the lens from TrooperBay, and I like the colour, but as you notice with the paint can behind it, you can see right through it... Might try repurposing the lens in a set of red mirrored ski goggles... Cheers!
-
@RAIDER thank you bud. I hadn't attached it and won't. Earlier in the thread we were unclear whether it referred to the greeblie, or the "thin line decal" that passes over the tank. (I accidently broke my tank greeblie and would have had to print a new one, so this is good news!)
-
@RAIDER Sorry bud… what I mean is that I don’t know what the “tank topper” is…
-
@RAIDER Haven't driven those knee rivets yet, no worries and will do! (Sorry -- by tank topper do we mean the thin line decal that passes over the tank? Or the greeblie that sits on the top and should be riveted in as well?)
-
Biceps ready and modular! (velcro on T-bits to make red/black swapable): Forearms strapped up with velcro on each side of elastic as well, will place a piece on the flightsuit to anchor them. Belt rivets and velcro in:
-
Bandolier a bit fiddlie to mount, but I've established the way it will work: (Thermal det is done and on the side there). Velcro added to the back breastplate's base, and the cummerbund just below the forward plate to hold the 2" webbing. Added more black to the bandolier to make it look weathered/battle-damaged on the lower, plain boxes there but I'm not sure I like it and will probably re-paint them. Velcro added (hidden) to the front and back of the small rectangular box below the box with the backwards "L" to keep the crossed bandoliers in place -- works well. I tried suiting up and this layout is solid and it won't rattle around. The bandolier boxes have all been backed with thick red felt. Need to bring in the flight suit (black Red Cap) so it's less baggy before I start on the suede saddle -- this guidance from PFs is great: https://forum.501stpathfinders.com/topic/19259-undersuit-mods/