Grandmoshtarkin
-
Posts
23 -
Joined
-
Last visited
Content Type
Profiles
Forums
Events
Everything posted by Grandmoshtarkin
-

Grand Mosh Tarkin's Death Trooper WIP
Grandmoshtarkin replied to Grandmoshtarkin's topic in Imperial Death Trooper
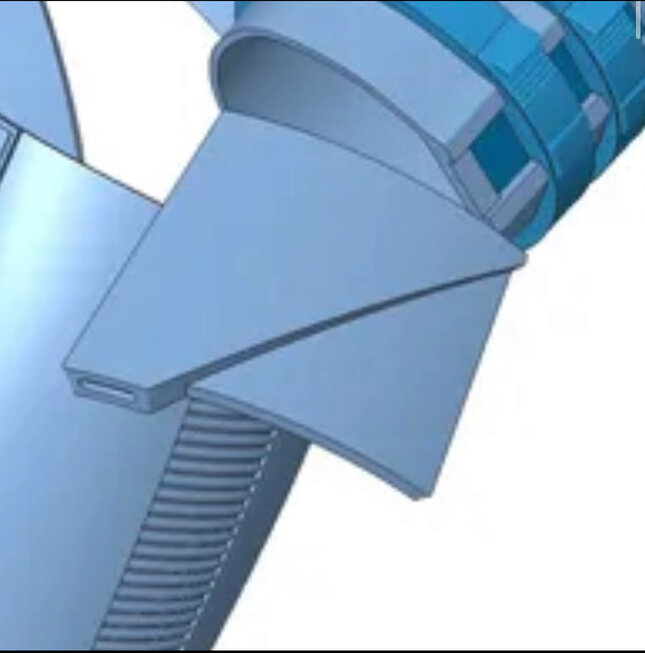
Out of curiosity- does anyone have any views of the helmet from the underside? I’m working on a trim of all of the excess/flashing on my cast helmet but there isn’t quite clear delineation around the front tusks etc. of how that should look. This is what I have at the moment, but will need to clean it up just a touch more. It seems like kind of a narrow rim around the base. I didn’t take any off in the majority of the ring, just ground down some pieces that stuck up vertically. -
Dogb's Deathtrooper WIP
Grandmoshtarkin replied to dogbertwrldrulr's topic in Imperial Death Trooper
The threaded inserts seem like a great idea. I haven’t gotten anywhere close to worrying about my detonator, but it is one long bracket on mine and I was on the fence about how to attach it. Maybe I’ll do something similar and screw it in from the back of the lower back plate. Let me know it holds up for you! -
SE-14R - Circuit card sticker / decal providers or file?
Grandmoshtarkin replied to MarcG's topic in Imperial Death Trooper
@Chaos, any chance you could share this with me as well? I've been scouring for the RFID tags it's based on, and saw a post of this next to a roll of them, but cannot find it again for the life of me. I've got a small Cricut so it would great to be able to cut a small stencil when I paint mine up! EDIT- Saw your note about the PM, will do the same! -
Grand Mosh Tarkin's Death Trooper WIP
Grandmoshtarkin replied to Grandmoshtarkin's topic in Imperial Death Trooper
Yeah, so the velcro on the boots appears to be sewn AND glued to them. I took apart the cover itself layer by layer and just resewed the velcro on it closer to the outer edge. Just take your time because it is a pain in the ass. 😂 But it looks and feels a lot better now. It looks like they used 1” strips on the underside of the covers, and 1.5” or so on the boots, which seems like a weird move in my opinion. And yeah, the tongue is just some scrap leather that I cleaned up and dyed before sewing on. Just made it about a 1/4” narrower than the top of the cover. My hope is it’ll help it stay tucked in under the shins and maybe add some coverage so the front of my legs take a little less abuse from the trimmed edge. -
Grand Mosh Tarkin's Death Trooper WIP
Grandmoshtarkin replied to Grandmoshtarkin's topic in Imperial Death Trooper
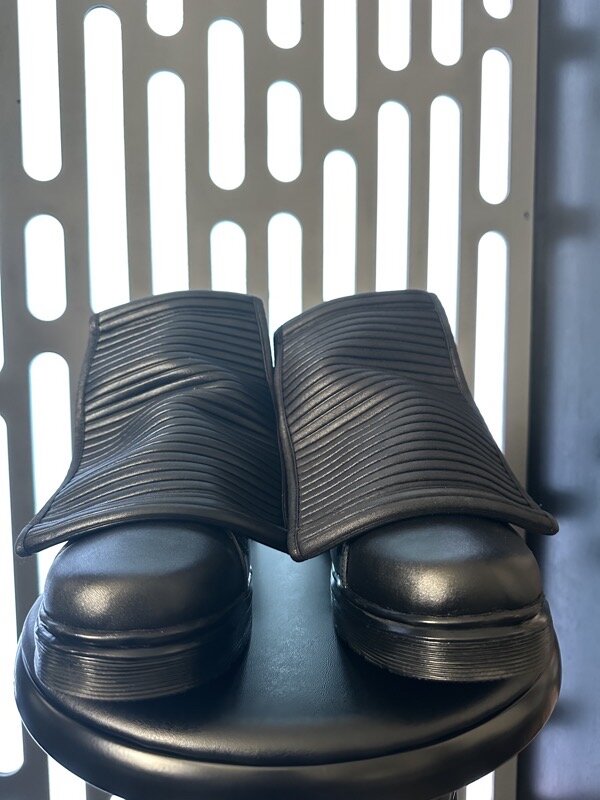
1ST UPDATE: ✓ Armor- 850 Armorworks Untrimmed but looks good overall. Have all of the details required in the CRL from what I can tell (with some cleanup to sharpen them) Will need to add groove on the bottom of the shins to make it Level 2 compliant, just need to track down better reference photos ✓ Helmet- 850 Armorworks Will need to reinforce some thin spots and do some serious detail cleanup around the cheek hoses, vents, sharp corners, etc. Had a friend print an accurate nose bridge with the 8th fin to make it Level 2 compliant NSM Monitor included to go for the specialist build, resin printed so hopefully not much cleanup there ✓ Boots- Keep Trooping Rebuilt the lace covers as they were sticking out WAY too much. Pulled the threads and moved the velcro closer to the edges, as well as added a leather tongue at the top to help keep it tucked under the shins. Undersuit- The Dark Side Closet In progress right now, due early September if my math is correct Accessories like the frag grenades and chest rig will probably be added later on or as a small side-project when I'm burnt out on trimming and prepping armor. Some photos of the changes to the boots: Before: The velcro was too far from the edge of the cover and stuck out almost horizontally unless I kept pushing it down. After: Sewing that spandexy material they used as a covering/edge tape is the worst thing ever. 10 outta 10- do not recommend doing. -
Grand Mosh Tarkin's Death Trooper WIP
Grandmoshtarkin replied to Grandmoshtarkin's topic in Imperial Death Trooper
I figured as much, but figured I should confirm first before telling someone they're wrong. Especially if accuracy is the whole game here! -
Grand Mosh Tarkin's Death Trooper WIP
Grandmoshtarkin replied to Grandmoshtarkin's topic in Imperial Death Trooper
Out of curiosity- someone on the 501st subreddit mentioned that blasters aren’t approvable with a trigger. This feels incorrect as there’s nothing in the CRLs, but can someone confirm? They’re referencing the scout trooper blaster so I’m wondering if it’s just for that style blaster? -
Grand Mosh Tarkin's Death Trooper WIP
Grandmoshtarkin replied to Grandmoshtarkin's topic in Imperial Death Trooper
Honestly, I might go this route at first… I’m finding myself wanting detail and accuracy on the kit, and everything is adding up quickly. So I may hold off on submitting the E-11D for approval until I know I can do it the right way and get it looking perfect. I’ve got a galactic armory print, but recently discovered the Blaster Factory and those replica parts are looking too enticing. -
Grand Mosh Tarkin's Death Trooper WIP
Grandmoshtarkin replied to Grandmoshtarkin's topic in Imperial Death Trooper
Not at all! The more the merrier, because chances are you’re going to ask something I wondered as well. 😂 -
Grand Mosh Tarkin's Death Trooper WIP
Grandmoshtarkin replied to Grandmoshtarkin's topic in Imperial Death Trooper
Somewhat off topic- but just want to shout out the CMD’s in here answering all these questions. Thank you!! -
Grand Mosh Tarkin's Death Trooper WIP
Grandmoshtarkin replied to Grandmoshtarkin's topic in Imperial Death Trooper
Hey there! I’m still learning too, but I’m pretty sure it means that the LEDs must be included and work. Since Level 2 is striving for as close to screen-used as possible, they probably want to have all light options included and functioning to give it that more realistic appearance. However, I’ll let someone more knowledgeable jump in! -
Grand Mosh Tarkin's Death Trooper WIP
Grandmoshtarkin replied to Grandmoshtarkin's topic in Imperial Death Trooper
Too late! 😂 One has been redone with velcro moved out towards the edges and reassembled, and the other is apart enough that I can start pulling stitching out of the velcro to move it further out. Honestly thinking about adding a longer leather tongue behind it to help it stay tucked under the shin armor. Pics to follow! -
Grand Mosh Tarkin's Death Trooper WIP
Grandmoshtarkin replied to Grandmoshtarkin's topic in Imperial Death Trooper
Just got my boots in from Keep Trooping, and for the most part, they look good. The covers however don’t seem too well thought out/executed. The Velcro underneath is about an inch and some change from the edge of the cover on both sides, causing it to stick out pretty noticeably and show a lot of Velcro. Obviously no one will probably see it from down there and the shins might help keep it down- but I’m definitely about to take out some seams and see if I can sew it closer to the edge.
-
Grand Mosh Tarkin's Death Trooper WIP
Grandmoshtarkin replied to Grandmoshtarkin's topic in Imperial Death Trooper
Oh, trust me- I'll be investing in plenty of it. Also hitting legs harddd in the gym right now. 😅 -
Grand Mosh Tarkin's Death Trooper WIP
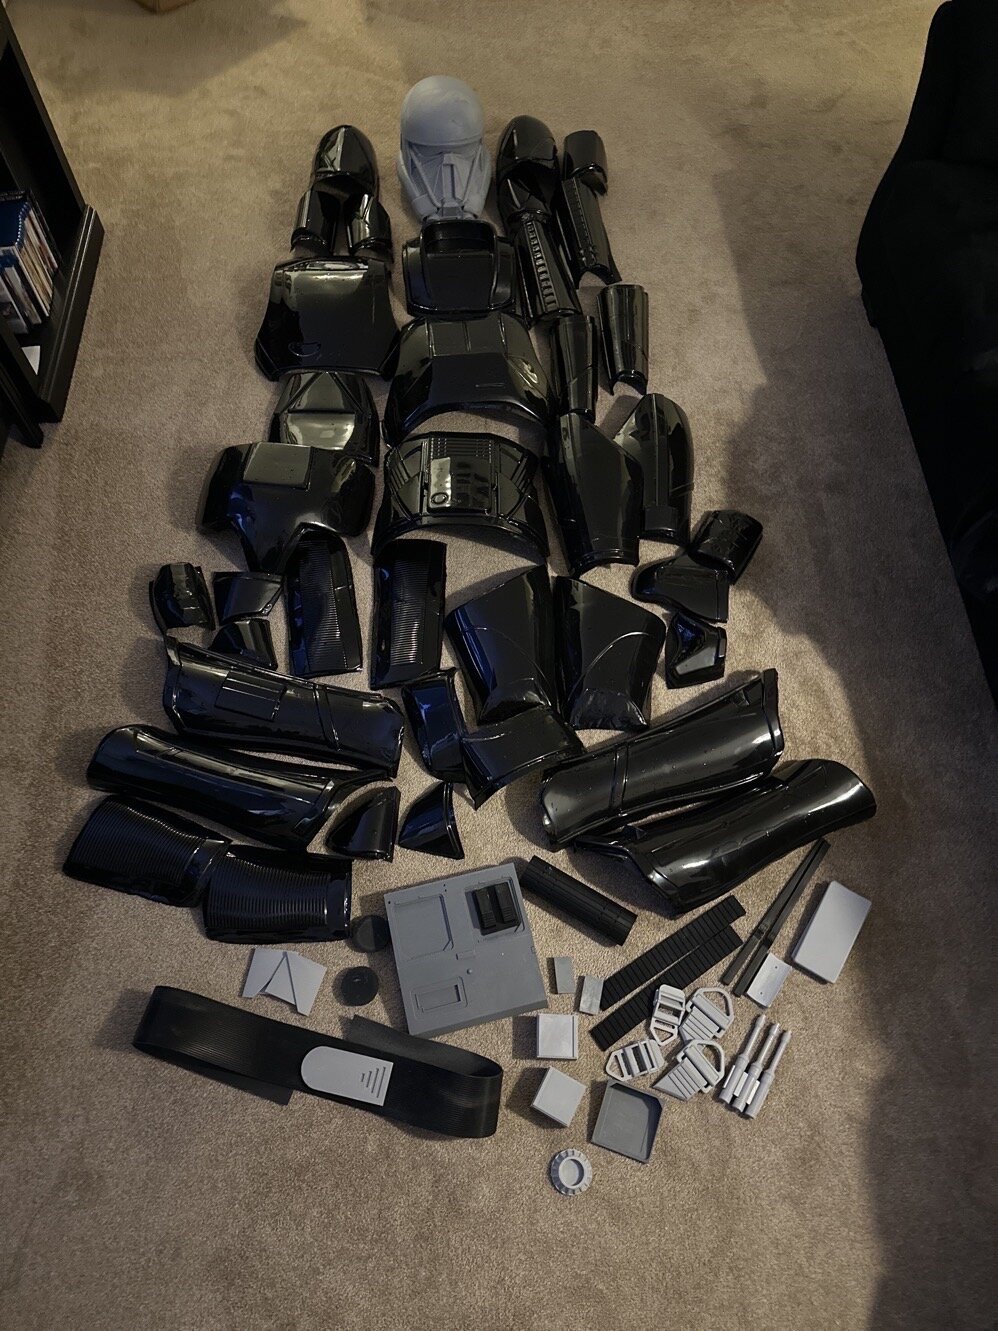
Grandmoshtarkin replied to Grandmoshtarkin's topic in Imperial Death Trooper
It’s here! Gave everything a quick rinse the tub to get the plastic dust and styrofoam pieces off. Overall everything is accounted for and looks good, but I will definitely have to trim a few pieces where I can to fit a little better. That or put on a few pounds…
-
Grand Mosh Tarkin's Death Trooper WIP
Grandmoshtarkin replied to Grandmoshtarkin's topic in Imperial Death Trooper
It’s actually out for delivery today with UPS so I will try and take a look when it gets here. It was pretty hard to tell with any real certainty in the photos on their site, but hoping it has it present. I just had a fear it’d be a completely flat piece so I wanted to prepare a few backup options just in case. I know I’ll at least need to mod the shin to add that lower groove if I want level 2 approval eventually. -
Grand Mosh Tarkin's Death Trooper WIP
Grandmoshtarkin replied to Grandmoshtarkin's topic in Imperial Death Trooper
Hi all, in an effort to keep from flooding the forum with new topics every time I have a question, I’m hoping I might be able to get some eyes on this here. I ended up going with the Death Trooper kit and raw helmet from 850, and they will be here by the weekend most likely. (Impatiently watching the box make its way up a few states to me) I’ve already made plans to have some helmet pieces printed for better accuracy once I get the helmet and can measure for scaling, but wanted to get opinions on this hand plate. The file is from MCM_Design on Cults3d. I wanted to reach out and see if they might be willing to just sell me the hand plate file. With this having the appearance of some thickness and the recessed oblong shape along the front edge, would it be a safe guess to say this should be better suited than what will come with the kit?
-
Grand Mosh Tarkin's Death Trooper WIP
Grandmoshtarkin replied to Grandmoshtarkin's topic in Imperial Death Trooper
Absolutely appreciated! I guess I’m leaning towards the 850 helmet! I do have an accurate file as well and a friend with a printer, so I may have him print a new nose bridge as that one does appear to meet the Level 2 specs, including the 8th raised bar in the middle. The 8 side vents all appear to be there as well so I can definitely clean those out and back them as needed. Thank you!! -
Grand Mosh Tarkin's Death Trooper WIP
Grandmoshtarkin replied to Grandmoshtarkin's topic in Imperial Death Trooper
Thank you so much! In looking at it, it looks like the main nose/front grills are the area that aren’t accurate enough. I’ve tried to compare the photos on their site against the CRLs but might need to do some additional research… -
Grand Mosh Tarkin's Death Trooper WIP
Grandmoshtarkin replied to Grandmoshtarkin's topic in Imperial Death Trooper
Quick question regarding helmets if anyone happens to see this- I've been considering buying a raw cast helmet from 850, but I know the front ridge details aren’t accurate from what I’ve seen. Additionally, it’s made for up to 25” circumference heads, while I’m only about 23”. is it worth it to get a cast helmet and just have someone print more accurate detail panels to use, or to simply pay for a fully resin printed helmet that is scaled more towards my size? Ideally, I would love to seek level 2 approval one day. Also, being a slimmer guy, I want to avoid the bobble head effect where possible. Does anyone have any thoughts or recommendations? I’ve looked at the vendors thread but curious about everyone’s first-hand experience. -
Hi all! Decided to start a WIP thread for my Death Trooper build and hopefully keeping myself accountable to finish this thing. My goal is to have a fully finished Death Trooper, and hopefully go for Level 2 approval by the time it's all completed. As part of this- I do have a few questions I'm hoping someone can help with at some point around the requirements for it. So far- I have the following areas started: Armor- Order placed with 850 Armor Works for a set of vacuformed ABS, just the kit but plan to trim and prep everything myself. Undersuit- Order placed with The Dark Side Closet. They were nice enough to check if they still had any remnants, and had enough for a final suit thankfully! Soft-sided Ammo Pouches- Also being made by 850 Armor Works. E11-D Carbine- Purchased a 3-D printed kit from Galactic Armory, and have that in hand. Things like the boots, other accessories, and various parts for the Level 2 approval will be up next, as well as a helmet. Both Darkside and 850 quoted some wait time, so my main focus is going to be on working on the E11-D, and other parts I can make while I wait. That being said, for the E11-D Carbine, Level 2 requirements, I am hoping someone can confirm how I'm reading this. All LED, laser pointer, and flashlight options will be working. (This would mean that the flashlight, laser range finder, bow tie led, and 2 yellow leds are all functional. Does this also include the 3 leds in the Hengstler counter?) The blaster will be the same size and proportions as the Sterling SMG which the blaster is patterned on. Its overall length with the shoulder stock extended should be between 30" to 32” (76-82cm). (Can anyone confirm that the Galactic Armory kit is okay to start working on? It's about 32" when laid out and put together, though not perfectly.) I did also purchase a sling and working flashlight from Canto Arms, and am looking at a number of other parts on Blaster Factory, including the led bow-tie greeble, led rangefinder, a better stock, and one of the Hengstler counters that allows for leds to be installed. I am also looking at the folding E11 stock, as the one that came with the kit had to be glued back together within a day of it arriving. 🫠 Pictures to come soon once progress starts being made. I'm working on cleaning off the project workbench to start tinkering with it. Any insight on the blaster questions are more than appreciated!