DarthBerry
-
Posts
55 -
Joined
-
Last visited
-
Days Won
4
Content Type
Profiles
Forums
Events
Everything posted by DarthBerry
-
I'm up for whatever! My GML has a great camera and green screen so I can take some high quality photos.
-
Helmet bolts on! @RAIDER, do you have anymore edits you'd like to see?
-
New bolts came in from Imperial Surplus! Gotta paint them black and make the circle openings on the plastic into square openings.
-
Here are the V2 macrobinoculars printed at .2mm layer height. They look great! Any scratches or artifacts you see are just from the supports, I didn't do a perfect job. It has an inner and outer lip so you should be able to trim clear plastic and glue it on as a lens easy. Just let me know if you want this one and I can ship it out with the comlink.
-
I did a test print of the comlink - the V2 version was okay, but I adjusted a few things for V3 and reuploaded. It's available for free at the same link as before on Thingiverse. I'll print out the macros tonight, it would've been a 29 hour print with a .2mm nozzle so I've got to swap it to .4mm. I'm not going to do this costume but wanted to make sure the files print well, so if anyone is doing this costume you can shoot me a PM and I can send you the test print for V2 if you cover shipping. It's Bambu silk PLA filament on .2mm nozzle at like .14 layer height with 5% infill.
-
I tried another variation of the helmet bolts but I don't think my FDM 3D printed can do it justice, so I reached out to Imperial Surplus to get a set of the accurate bolts. For the boots, I added notches where the tread occurred on the boots, please let me know what you think (I'll clean up the grey overpaint soon): I also got a better suit up, I think it's looking pretty much there. I can do the belt and cod a little bit higher and the boxes a little bit wider next time.
-
How does this look (right old, left new)? I was also wondering what you were thinking for edits to the boot soles for L2. Should I fill in the middle portion of it and cut notches in there? Here's an old progress photo that shows the boot sole:
-
Sure thing, they're just 3D prints since I didn't want to spend $30 on a few bolts. 😂 I'll whip up a better design tonight and try it again.
-
Here's a bunch of photos to document strapping thickness:
-
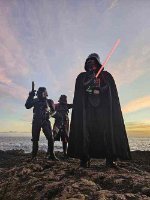
Here's a couple of awkward suit up pics I got as the sun was setting! The cummerbund & cod attach in a different way than my previous one so I'll need to dial in the attachment points before doing another round of photos.
-
New cummerbund came in! I gave it a paint job and compared it to the old (it is must larger). I should be ready for a suitup tomorrow.
-
You're building plenty of black armor these days! I just checked a recent buildthread on Pathfinders and they used the same clips you linked and it looks really good once they bent it. I'm just a RotJ Scout and working on a new SpecOps scout CRL so I'm not an expert on Shadow, but that looks good to me.
-
Well the suit didn't come in time and I didn't have enough time to finish it and do a suit up once it did! 😅 Test photos below and I'll be back from vacation to finish off the chest suit up hopefully with the cummerbund in about 3 weeks.
-
I made some L2 adjustments today and picked up all the materials for the jumpsuit that should be arriving tomorrow. For the boots, I changed the boot black strap to connect off the main seam but I still need to cut out the tread details. On the helmet, I started the groove filling process and swapped to some concave bolts. I also curved the bottom bicep corners for the extra detail. Hopefully I'll have time tomorrow to add the details on the jumpsuit and do a suit up, that should show how the helmet+tank stripes look together and if I should adjust them.
-
Tank rank stripes adjusted to be thinner, let me know what you guys think.
-
No worries, it's on there for L2: "No visible "vent" detail/indentions on lower right of back of helmet." I'll need to fill those and repaint. I fill gaps on 3D printed stuff all the time so it's no big deal. This CRL will make a great armor set for new members to print from scratch due to the simplicity of it.
-
Thanks! I was also thinking only 5 rank stripes on both sides, but the picture below and the draft CRL L2 language says 7: In this shot, it looks to me like the helmet barcode and tank square really are supposed to be that thick while the rank stripes are meant to be thin and they go from the side of the tank to about where the tank square ends, instead of where I (and RotJ) had them. I'll give that a try tonight and see how it looks.
-
Mahalo! I got some progress done on the helmet - breaking up the linear-ness of the back of the head and redoing the stripes. This lighting is very bright in the photos but the green is now blended much better. I also took the tank topper off, patched the hole from the rivet, and reworked the black stripes for L2 goals. There's an extra photo for the shoulder bridge & chest connectors as well. L2 boot adjustment is done too, I'll get some new photos soon. Scylla (the cat) was unimpressed with all of it. ETA on the flight suit (Red Kap) is a week or two and ETA on the new bund (Cucblack) is probably a month or two. I'll be out of the country for most of August, so the timing works out pretty good. I'll take super detailed photos before I leave to allow for plenty of time for additional review. I hope by that point it's just the codpiece that needs updating. I appreciate all the great feedback, this kit is better than I ever set out for it to be!
-
Thanks! I wanted some new soft goods anyways, they should arrive in a few weeks. Everything should have a crisp & deep black look with the new soft goods. I'm up for removing the tank topper, I think it's just on there with some E6000 so I can do that tonight. I'll swap the closure method on the boots too to hit that L2 requirement.
-
Thanks for the detailed review! Overall, I am doubtful if these parts can make it to L2, but I'll keep making some improvements where suggested. Helmet: Concur, will break up the back paint (there is no seam present, I was just extrapolating from the reference photo and its a little unnatural looking). Concur on the back decals, those guys are tricky for me to put on but I know I can do it better. I think I'll go with the thick, almost no-gap-between-them look from the reference screen caps instead of the RotJ style. Flight Suit: Noted on the butt flap and thighs - both are stitched onto this old suit and I'm not sure it'll survive any adjustment. I like the suggestion about the L2 thighs, that would set a good precedent for newer troopers to do the flightsuit even more cost effectively. I just put in an order on a new flightsuit and will make those edits. A few years ago, the Pathfinders moved the RotJ Scout CRL away from just mandarin collar and allowed for the open collar to match movie stills. Since some of the other components that aren't captured too well by the old computer graphics match the RotJ scout (flak vest for example), would you be interested in having this CRL match that CRL and allow for the folded, open collar? I'm just curious as it's not detailed that way on the in game model but I can't see enough detail for a mandarin collar either. In my mind, it lowers the barrier for entry on this costume if a new member just needs to buy an off-the-shelf flightsuit and hand stich some 2" elastic on the leg and a suede flap versus making a full mandarin collar. Chest/Back: Will take photos to detail the unclear items. Bund/Codpiece: The in-game model has a thinner cod when compared to a regular scout, so I thought it may be okay, but this cod is very small. I just put in an order for a new one. Knees: I actually just couldn't find one of the straps after taking them off for painting. Sounds like I should lose the other one and swap them to just the bottom! Boots: Soles are painted grey and the dogbone is a leather-like material. Fitting Issues: Thanks for the tip, I'll drop them belt a little lower. I've been wearing Vader too often, he wears the belt very high up 😂. The cable out the back was my tightening strap for the neck gaiter, I'll use a typical balaclava next time so that doesn't pop out.
-
That sounds good to me, I don't have any other adjustments in mind that I think it needs right now, so looking for feedback. No rush or anything, mahalo!
-
Thanks guys! Helmet details added so it was time for a suitup. The weather was funky so the lighting was all over the place, but the colors are just about the same as the previous photos with better lighting in the thread above. Let me know what you guys think!
-
I'll give the finishing a go this weekend for a suitup and see how it looks!
-
Bummer about the flaky vendor, hopefully you can dispute the charge or something! The Pathfinders forum for regular scouts has a list of Vendors that others have been approved with, so one of these might be good: BlasterWorks (USA) Chef's Creations (UK) The Force Forum (USA) Hole in the Ground Productions (USA) Inland Empire Armory (USA) Kropserkel (Canada) Negative Eleven (USA) Polymer Armory (USA) Praetorian Blasters (USA)
-
The Pathfinders Detachment has a list of 3D files that they've seen used (below). I don't see anything glaringly incorrect with the Galactic Armory files, but there is an analysis of all the inaccuracies in the files in a thread on the Pathfinders Detachment. GA did correct the important inaccuracies, so you should be fine as long as you've purchased the files recently and you aren't going for higher level accuracy. The Pathfinders folks confirmed that the files shouldn't have any issues with basic approval, but you may want to go find that thread for any concerns. MrPoopie (Armor) Jesus Salmeron (Helmet) ChristhePropGuy (Armor and helmet)
- 1 reply
-
- 1
-