ukswrath[TX] Posted September 15, 2017 Share Posted September 15, 2017 We can see you lol 1 Link to comment
nanotek[CMD-DWM] Posted September 17, 2017 Share Posted September 17, 2017 Looking great! Nice job Link to comment
Atraxas[TX] Posted September 19, 2017 Share Posted September 19, 2017 Looks great More DT for the win!!! Link to comment
rogerwyatt[501st] Posted September 20, 2017 Author Share Posted September 20, 2017 Last night I got the tusk lights glued in place and soldered the lights to the harness. I'm going to build a little mounting/reflector part for the LED that I will connect using gaffer tape and will use gaffer tape for the harness wiring to the helmet. Fans, and marine plugs are arriving today so I will be wiring all that up tonight. My goal is to have the helmet wired for everything but the voice before the weekend. Going to use temporary switches until I do the upgrade to micro switches in my left glove. On the paint side of the house, I'm now down to 2 pieces that need full paint, 2 that need color sanding and then finish coat and clear, and I'm polish sanding the clear coat on the backpack. Strapping will start soon, maybe next week and hope to be finished by next weekend and ready to submit for approval! Link to comment
rogerwyatt[501st] Posted September 21, 2017 Author Share Posted September 21, 2017 I got the wiring harness built and did a test fit in the helmet. I have a light leak on one light that I'll be fixing with a little black paint and fine brush. Everything is 5v so I can use a USB recharging pack. One circuit is for the fans and one for the lights. I have an extra circuit on the connector for the mic when I get ready to add it for the voice changer. On the paint front, I'm now down to: Clear Coat: forearms, one thigh Color: shins, one thigh, and repainting backpack (it had too much orange peel so I remanded it) Link to comment
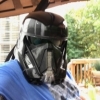
Chaos[CMD-DCA] Posted September 21, 2017 Share Posted September 21, 2017 Looking good! Are you going to use some type of green filter for the tusk LEDs? Link to comment
rogerwyatt[501st] Posted September 21, 2017 Author Share Posted September 21, 2017 It's just picking up the blue painters tape that I used temporarily. In Jimi's kit, the tusk lights are green resin already. 1 Link to comment
rogerwyatt[501st] Posted September 21, 2017 Author Share Posted September 21, 2017 Well, it looks like part of it is the white LEDs I used were just blowing through the resin. I'm going to put on a piece of green plastic between the LED and the resin to make sure it gets to the proper green. Link to comment
rogerwyatt[501st] Posted September 22, 2017 Author Share Posted September 22, 2017 I was able to make a quick modification and now I've got the lovely green color I wanted. Still have to deal with he light leak, but that's going to be easy with a little bit of model paint. Link to comment
rogerwyatt[501st] Posted September 22, 2017 Author Share Posted September 22, 2017 Tonight I'm going to be working on getting the visor installed. Backpack is painted and clear coated and it is now perfect. Link to comment
Chaos[CMD-DCA] Posted September 22, 2017 Share Posted September 22, 2017 Almost there Roger! Looking great! Link to comment
rogerwyatt[501st] Posted September 29, 2017 Author Share Posted September 29, 2017 I fixed the light leak. It look a lot of masking and then I got my airbrush and tried to get in there but it wasn't really working. So, I ended up taking paint and pouring a drop on the gap and then using a toothpick to let the air bubbles out. The paint flowed down to the big offending leak and took care of it. Lesson learned. On Jimi's kit mask ONLY the front of the light and the back of the square mounting peg. Paint everything else. I made the mistake of leaving the sides of the square mounting peg unpainted. Had I painted the sides, I wouldn't have had the problem. Shins are assembled. I have some Apoxie Putty coming in today and going to finish filling the seams. I have 1 little hole in a box to fill. With that, I'll be painting them and then I start strapping it up. I'm also planning to use it for attaching the rockets to the forearm. I may change my mind because I'll need to touch up paint them. I just think it would give the rockets more durability than just using 5min epoxy. Link to comment
Chaos[CMD-DCA] Posted September 29, 2017 Share Posted September 29, 2017 Roger, are your forearms clam shelled or did you glue both edges together? If you clam shelled it you could do what I did for the forearm greeblies and put screws thru the inside of the forearm into the greeblies. Link to comment
rogerwyatt[501st] Posted October 1, 2017 Author Share Posted October 1, 2017 I clam-shelled them. Good idea on screwing them from the inside. I'll look at doing that. Would be much more durable. Link to comment
rogerwyatt[501st] Posted October 2, 2017 Author Share Posted October 2, 2017 So, here is the work so far all laid out (except the belt stuff) 1 Link to comment
rogerwyatt[501st] Posted October 4, 2017 Author Share Posted October 4, 2017 Worked out how I'm going to strap everything. I'm using all velcro and elastic. I'm making these tabs that will triple lock the straps. It will allow me to completely disassemble the kit and individually wrap each piece so they don't get banged up, avoid failing snaps, and will hold up to movement. Link to comment
rogerwyatt[501st] Posted October 12, 2017 Author Share Posted October 12, 2017 Progress update. I have most of the upper strapping completed. Attached the rockets to the forearm. Link to comment
Jedi_Outcast77[TX] Posted October 12, 2017 Share Posted October 12, 2017 Sooooo shiny! Sent from my SM-G955U using Tapatalk Link to comment
rogerwyatt[501st] Posted October 16, 2017 Author Share Posted October 16, 2017 I did a first test fitting. One shin was still drying. I was checking on the length needed for the side straps and to figure out mounting positions for the thigh straps (which is why one thigh was falling down). Happy with how it is turning out. 1 Link to comment
rogerwyatt[501st] Posted October 18, 2017 Author Share Posted October 18, 2017 Test for the belt location and the thigh straps. I got the final piece out of paint today. I need to attach the boxes to the belt and put on some velcro to hold the belt up. Link to comment
rogerwyatt[501st] Posted October 20, 2017 Author Share Posted October 20, 2017 Submitted today!!! Still going to make adjustments and some tweaks. VERY happy with Jimi's kit. I want to get the undercut shirt altered to fit tighter. 2 Link to comment
DeathMOS30[501st] Posted October 21, 2017 Share Posted October 21, 2017 Looking Sharp:D Link to comment
rogerwyatt[501st] Posted October 23, 2017 Author Share Posted October 23, 2017 ... and I got approved. I am now TX 71607 (my son's birthday). Proud to join the Legion! 4 Link to comment

Recommended Posts
Create an account or sign in to comment
You need to be a member in order to leave a comment
Create an account
Sign up for a new account in our community. It's easy!
Register a new accountSign in
Already have an account? Sign in here.
Sign In Now