weldingdude Posted July 19, 2019 Author Share Posted July 19, 2019 Thanks for the confirmation on the helmet scaling. Re: the Plash... we'll see... I tried using the washing machine method... got mixed results, it came out kinda brown. so then I tried some fabric spray paint, still so so results. so I picked up 3 more die packs and went with the tub method, and left it in the tub for a few days ( truth be told, it's still in the die bath. I haven't had time to process it, and I figured the longer is soaks in the bath, the better.) so I should have some results to report this weekend. Link to comment
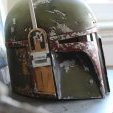
weldingdude Posted July 19, 2019 Author Share Posted July 19, 2019 finally found some time for an update. (really annoying how work/life gets in the way of a good build) printed/sanded and painted shins straps, chin cup, and patches came in. printed off a buckle for goggles. (its the one from the FB group, it's not the right one is it?...) anyone know the original part for the mettle toothed buckle for the goggles? and my code discs came in! I through bolted the discs on, and put a pair of magnets on the inside of the bucket to hold the yugo buckles of the mask (I can't remember where I read about that idea with the magnets, it was either here of the FB group...) it seems to work kinda well... 3 Link to comment
weldingdude Posted July 20, 2019 Author Share Posted July 20, 2019 quick update on the Plash, just took it out of the bath, it looks pretty good it's been soaking since Sunday (probably overkill) but it looks good. its a little faded in places, but should be perfect after a bit of mud and grime. 1 Link to comment
IcyTrooper[CMD-DL] Posted July 24, 2019 Share Posted July 24, 2019 Right on! The shins and helmet/mask look good. 1 Link to comment
87ninefiveone[501st] Posted July 24, 2019 Share Posted July 24, 2019 Looking good! You're weathering is outstanding, you should print and paint an extra bicep and submit photos for the medic CRL. In regards to the helmet buckle, I'm not sure if we have a really definitive reference shot of the actual prop or not. The only shots I've seen are dark and blurry screen grabs so I think the exact design is open to interpretation and the CRL isn't very descriptive other than that the buckle includes a tan colored square. I remixed Valok's buckle from Thingiverse for my build so it's similar in design to what the CRL shows, but I think the Facebook group buckle looks good and adds an extra bit of realism since it looks functional. If you're worried about approval, contact your GML to get their opinion before wasting time on finishing/painting. 1 Link to comment
weldingdude Posted July 26, 2019 Author Share Posted July 26, 2019 Thanks! re the buckle, good to know, I think I'll continue with the buckle I've got for the moment, it looks like swapping it out if it's a problem should be kinda trivial... and printing a new one should also be pretty trivial... also, re the medic bicep... challenge accepted. Link to comment
weldingdude Posted July 27, 2019 Author Share Posted July 27, 2019 picked up a cap from Imperial boots, along with the belt... couldn't help myself, I had to muck it up a bit.... before After... Link to comment
weldingdude Posted August 2, 2019 Author Share Posted August 2, 2019 quick update. finished major assembly on the backpack/collar https://i.imgur.com/2tfIXuc.jpg https://i.imgur.com/jarKxTQ.jpg https://i.imgur.com/ffewn2T.jpg and started on the medic bicep paint job https://i.imgur.com/J7tuhU0.jpg https://i.imgur.com/TN2g4wl.jpg just need to add the yellow stripes and weather it, and I should be done with that. I also started looking into making a medic kit, possibly also a smaller "unofficial" medic kit... not 100% sure yet. in soft parts news, my pants and tunic should be arriving from Jim mid next week, I've got the USSR officer's boots at the cobbler adding gussets and rubber soles/heels. I think I might actually I think I'm only a couple of weeks away from completing this... 1 Link to comment
weldingdude Posted August 4, 2019 Author Share Posted August 4, 2019 I need some advice... so the collar... I can't seem to get it to slot into the chest plate without snapping the tips off... tips? tricks? also, I feel like I'd be able to fit into chest rig if I glue the front and the back together... from people who have trooped more than me (ie. trooped at all) if I can get into it, is there a reason I shouldn't do that? in other news... MEDIC!! 1 Link to comment
weldingdude Posted August 4, 2019 Author Share Posted August 4, 2019 soooo, I taped it together to decide if I should glue it or not... and discovered I had been a tad generous with my scaling. back to the printer ?... Link to comment
87ninefiveone[501st] Posted August 19, 2019 Share Posted August 19, 2019 I had the same issue with the collar and I ended up cutting it in half about mid neck and attaching the front and rear portions to the armor separately. It’s not screen accurate, but it solves the issue and you can’t tell once your in costume with all the other stuff covering the neck area. Even printing in nylon that collar pierce is just too fragile to work as designed. Link to comment
weldingdude Posted August 19, 2019 Author Share Posted August 19, 2019 I wonder if I could get away with printing in a TPU or something... that might be interesting... Link to comment
87ninefiveone[501st] Posted August 20, 2019 Share Posted August 20, 2019 That’s an interesting thought. Print it in TPU with high infill to allow some flex. Flex PLA might do it too. I wonder how well a painted finish would hold up to the flex though? Link to comment
weldingdude Posted August 22, 2019 Author Share Posted August 22, 2019 TPU just arrived, I'm going to give it a shot, see what happens. in other news, I decided to throw together an unofficial small med kit. (unofficial cause its seems really had to actually get the military surplus case shipped to the US. and also cause its a pretty big hefty case... not something I really want to be carrying around.) I'm planning on adding some shoulder straps to make it a little easier to carry. just a fun side project to keep my busy while waiting for the new chest and back armor to print... ? 3 Link to comment
87ninefiveone[501st] Posted September 10, 2019 Share Posted September 10, 2019 Looks great! Are you working on the inside of the case too? Link to comment
weldingdude Posted September 11, 2019 Author Share Posted September 11, 2019 oh yea! I finished that too 3 Link to comment
weldingdude Posted September 11, 2019 Author Share Posted September 11, 2019 also, just finished printing the TPU collar, so far it looks promising. it feels like it will have the flexibility to mate up with the chest as designed. 1 Link to comment
IcyTrooper[CMD-DL] Posted September 12, 2019 Share Posted September 12, 2019 That case is so cool! Link to comment
87ninefiveone[501st] Posted September 16, 2019 Share Posted September 16, 2019 That case is exceptional! Really nice work. Your thread needs to be bookmarked for others looking to 3D print this costume as well, lots of good info in here. Link to comment
weldingdude Posted September 17, 2019 Author Share Posted September 17, 2019 Thanks Kal! I really appreciate the feedback! also, I did some more mocking up while I wait for the rest of the new (IE:scaled correctly) chest plate to print, I *think* at this point, TPU with like 3 walls and 30% infill (almost solid) is the way to make the Sean Fields Collar work without modifying the collar. it looks really really promising. I'll post more pictures once I have more of the chest printed and the collar mounted up. sadly, that will be at least 2 weeks, since my real job sent me to MA for 2 weeks... at least the weather is nice. Link to comment
weldingdude Posted October 4, 2019 Author Share Posted October 4, 2019 I think the TPU is a winner. it just kinda works. I just CA'd it down to the back, it has enough flex to let the chest plate mate with the back, and then you just bend the tips of the collar up till they pop into the holes on the chest plate. I am also planing on fiberglassing the inside of the armor, just cause I'm feeling a little paranoid about some of it being a tad fragile... might be overkill, but I'm feeling like I'd rather be safe than sorry. Link to comment
weldingdude Posted October 31, 2019 Author Share Posted October 31, 2019 done enough for a company Halloween party still need to finish rigging the shins, and I think I prefer having the ammo pouch slung across the hip... but overall I think it went together really well... a bit more mud and distressing, rigging the shins and I think I'm almost ready for approval... 1 Link to comment
Devolver[501st] Posted October 31, 2019 Share Posted October 31, 2019 Wow man, that's looking good! I can't wait to see the end result. You're so close! 1 Link to comment
weldingdude Posted June 6, 2020 Author Share Posted June 6, 2020 welp! ... Sad to say, but it took me 9 months to get around to mounting up the shin guards... BUT! now that the Shins are mounted up, I got some mud and muck thrown on it! I think, I might be just about ready to submit for approval... Clean https://imgur.com/Kv5CgzO Muddy! https://imgur.com/yHV4ZbL https://imgur.com/NrZM58e Link to comment
weldingdude Posted June 6, 2020 Author Share Posted June 6, 2020 Whoops... used the image links, not the direct links... photos for easy access. Link to comment

Recommended Posts
Create an account or sign in to comment
You need to be a member in order to leave a comment
Create an account
Sign up for a new account in our community. It's easy!
Register a new accountSign in
Already have an account? Sign in here.
Sign In Now