Sparrow_69676[TX] Posted May 2, 2024 Share Posted May 2, 2024 Hello everyone! as I wrote last September in my introductory post, I have been a member of the Italica Garrison since 2017 and I have always been a Sandtrooper since then. Now I've finally decided to add a second costume to my beloved Sand, and this one will be pretty dirty too 🥰 I started getting the necessary material a few months ago, but since I have to do this work outside I had to wait for a favorable season. I started the build a few days ago, and I will send some photos and updates when I have enough material to do so. In addition to looking at the CRL, my work will be heavily inspired by those of Jimmiroquai, Ricky and Merkava74. I would like to take this opportunity to thank them very much for the enormous amount of photos and information they provided in their respective threads. My thread is absolutely not meant to have the same importance, I'm just here to learn and I hope to receive comments, or criticisms when you see something wrong. Thank you for your attention and see you soon! 2 Link to comment
minimo[CMD-DCA] Posted May 2, 2024 Share Posted May 2, 2024 Welcome Francesco!!! Looking fwd to seeing your build!!! Any questions, feel free to hit us up!!! 1 Link to comment
Sparrow_69676[TX] Posted May 5, 2024 Author Share Posted May 5, 2024 Let's start... at the beginning, which for many builds appears to be painting the Plash Palatka black. I got mine via Ebay, ordered one with leather covered loops, and luckily it arrived as described! At this point I performed the coloring procedure explained by Sven Trosken on the FB group. The result was not complete, probably my fault because I only used one pack of dye. So I tried to do a further wash with two more packs, and this time I would say it came out a perfect black. Before: After: 2 Link to comment
IcyTrooper[CMD-DWM] Posted May 6, 2024 Share Posted May 6, 2024 I'd say that dye job is a job well done! 1 Link to comment
Sparrow_69676[TX] Posted May 12, 2024 Author Share Posted May 12, 2024 In this phase my goal is to make the various pieces of the armor wearable, making the necessary modifications and attachments. I will do the painting later, in the hope of having to work as little as possible with already colored pieces. Today I thought I'd do a general test with the soft parts I collected. These are all things I received ready-made, so I get no credit for them ☺️ Here is the list and a couple of photos: - Jacket and trousers received from Jim Tripon, tailor-made according to the measurements I sent him - Russian officer boots ordered from a Ukrainian seller on Etsy, this is the version with the adjustment strap - Belt, buckle and belt boxes made by Gian Filippo Zamboni (Philoprops) - Vinyl imperial cog patches received from Jim Lau - Gloves received from Military1st, they are the Highlander Special Ops gloves GL033-BK model - Scarf purchased in a military clothing store, it may look black but is actually dark green 2 Link to comment
minimo[CMD-DCA] Posted May 12, 2024 Share Posted May 12, 2024 You look great! Nice work! 1 Link to comment
Sparrow_69676[TX] Posted May 20, 2024 Author Share Posted May 20, 2024 Hello again! I would say that after some work I can show some photos of the armor, which I worked on to make it wearable. What you see is a first test that helped me understand the general appearance of the various parts joined together. Before getting to the painting there are some parts that I need to fix more solidly and some gluing that I need to finish. Also the lower belt is still missing. Well, here I am: The shin buckles are obviously still to be fixed, this will be the next step. The chest and the back are held together by magnets, and I cut the side part of the chest a little to reduce the overlap which seemed excessive. The buckles that rest on the chest are also held in place by magnets. On the back view you can see the three magnets by side that I used (I think I'll paint them black so they won't be noticeable). I also 3D printed and inserted the angled hose connectors, using the 3D-files created by Daniel Andersen. At the bottom I added the loop for the two belts, while at the top I added the narrower one for the gasmask strap. These two loops are in black leather, I chose this material because I saw that it is allowed and I like it more aesthetically (although I know that the loops will be hidden under the poncho). 2 Link to comment
Sparrow_69676[TX] Posted June 23, 2024 Author Share Posted June 23, 2024 I'm back! Lately I've had a lot to do and little time to dedicate to the Muddie, also a lot of the work was gathering informations, taking measurements, strengthening some pieces, adding snaps. In short, little that could be photographed. But I finally got to painting! On the inside of all the pieces I applied a dense primer in order to seal the fiberglass (one of those products that take forever to dry 😨). On the external side I applied two layers of a gray universal primer: Note that the upper belt is missing because the one I received from Philoprops is already painted and with partial weathering. As a second phase I applied two layers of matt black paint: In a few days I will apply the texture on the helmet, and then proceed with painting all the pieces with Pantone 350U green. In the meantime I decided to take care of the respirator. Here are the parts I will use: - Straps, two-piece buckles and 4mm hex socket cap screws provided by a friend of mine from the 501st Italica Garrison, who became a Mudtrooper before me - other buckles taken from the famous Yugoslavian backpack (they have rusted a little, and I would say this is a very good thing 🥰) - Isopon Aluminum mesh to put in the filters and in front of the mouth - disks that I cut out of a forex panel to close the filters internally. In the next post I think I will be able to show the respirator almost finished and ready for weathering! 4 Link to comment
minimo[CMD-DCA] Posted June 23, 2024 Share Posted June 23, 2024 Grats! Coming along really nice, looking forward to seeing more!!! Great call on doing the helmet texture!!! 1 1 Link to comment
IcyTrooper[CMD-DWM] Posted June 26, 2024 Share Posted June 26, 2024 I agree, this looks great! 1 Link to comment
Sparrow_69676[TX] Posted July 13, 2024 Author Share Posted July 13, 2024 Guys thanks for the support! ❤️ After the gray primer and the matt black, I moved on to paint all the pieces with the official colors: two-three layers with Pantone 350U, then a thin and non-uniform layer of Pantone 433U. That is except for the right bicep, which I painted Toyota Red 3E5 and Montana Yellow Cab. For this piece I made sure the paint is chipped in a few spots. As I mentioned previously, I also added a texture to the helmet: And finally I got to the assembly of the respirator with all the required pieces! I still need to adjust the straps based on how it will fit on the chest. As regards the connection of the rubber tubes I tried to come up with a non-permanent solution that would also allow them to be attached and detached quickly. I think that's a solution adopted by the Tie Pilots, too. I shortened the 3D printed hoses and attached two magnets to the base. Then I stuck them in the end of the tubes and glued two more magnets inside the respirator: This way the pipes can be put into position by simply placing them down. I will most likely have to add more magnets inside the respirator (I think I will make two stacks of three magnets) in order to get a strong enough attachment. I will be on holiday for about ten days, on my return I will finish the goggles (indeed a scary work!), the TU and the lower belt, which I have already started working on. 3 Link to comment
minimo[CMD-DCA] Posted July 13, 2024 Share Posted July 13, 2024 Looking fantastic! Excellent work! 1 1 Link to comment
IcyTrooper[CMD-DWM] Posted July 13, 2024 Share Posted July 13, 2024 Great job on the painting! I agree, that magnet/metal setup for the mask is great to have for the convenience, that is how my TIE pilot is setup. 1 1 Link to comment
yo_its_nino[TX] Posted July 14, 2024 Share Posted July 14, 2024 Excellent build! Love all the attention to the detail. We’re looking forward to seeing you as Muddy specialist number 11! Keep up the great work. Love that hose to mask attachment, I may need to do that to mine as well. 2 1 Link to comment
Sparrow_69676[TX] Posted September 15, 2024 Author Share Posted September 15, 2024 It's been two months... the terrible heat and humidity have made it very difficult to work on the Muddie... But finally I have something new to show! First of all I finished the upper belt. Nylon straps sewn in a zig-zag pattern and boxes secured with both glue and screws. The box on the far left has an elastic band that allows the attached part to move. Then I moved on to the goggles (a job that scared me from the beginning!). This is the starting material, all supplied by Jim Tripon, except for the metal buckles that I got from Darren Vaughan. Compared to the photo you see, I decided at the last moment to replace the screen with one of those used for welding. For the trim I used a piece of black foam, I found it easier to adapt to the shape of the frame, especially around the "nose". The lens sits in a groove I carved into the frame, as I've seen done in other builds. Next up: telemetry unit with torch. The unit came from Paul Prentice and I found the flashlight at an electronics store. In this case the zip ties are working and pass through the TU. I added paracord under the piece and this way, in addition to being more accurate, there is more room for the goggles strap. Moving on to the helmet, I placed the bicycle helmet on the inside (after having butchered it to reduce its size) and then added the strap that goes under the chin. This is a test of the helmet with the goggles resting on the forehead. I need to check some things better but I can already say I'm in love with it 🥰 Then, since a soldier is nothing without his rifle, it was time to work on it. The choice fell on the iconic E-10. These are some pieces of the kit that I received from Mark Shearman. There is also a small modification ... whoever knows this kit and notices it will also understand the reason 😉 I joined the pieces together after working on them to refine them a bit. Then I added the t-tracks, the rail with the iron sights, and painted everything satin black. Well, that's it for now. Aside from finishing the rifle, the things I have left to do are basically attaching the plash palatka to the armor and the shin straps to the boots. And then, of course, the weathering 😨 2 Link to comment
minimo[CMD-DCA] Posted September 15, 2024 Share Posted September 15, 2024 Fantastic work!!! 1 1 Link to comment
IcyTrooper[CMD-DWM] Posted September 17, 2024 Share Posted September 17, 2024 Well done!! 1 1 Link to comment
Sparrow_69676[TX] Posted October 2, 2024 Author Share Posted October 2, 2024 Here I go again! My E-10 is now fully assembled and ready for weathering. I installed the sling, a working flashlight (not the original, but a nearly identical metal copy) and added lights in the magazine and taser box. And now, with some emotion, I show you the photos of the pre-weathering test 🥲 Looking at these photos I realized that I had to fix some small things, also I have to add the connection between the mask and the helmet so that I can wear it, but apart from that the costume is complete. The foam here is over the left shoulder, next time I'll make sure to wear it correctly 😉 To attach the plash palatka I used the method of snap buttons, which are fixed under the upper part of the chest. At this point I have to make the last adjustments and the famous weathering... 2 Link to comment
minimo[CMD-DCA] Posted October 2, 2024 Share Posted October 2, 2024 Everything looks great! This is where the fun begins, time to go swimming in a puddle!!! 1 1 Link to comment
IcyTrooper[CMD-DWM] Posted October 3, 2024 Share Posted October 3, 2024 Looking sharp!! 1 Link to comment
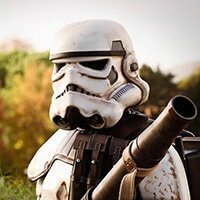
Sparrow_69676[TX] Posted October 12, 2024 Author Share Posted October 12, 2024 Well... I think this journey is pretty much over 🥲 Thank you so much for your support ❤️ Today I sent the photos to my Garrison GMLs for approval. Here are some oh them showing the full costume and weathering. I hope it will be approved as is, otherwise I will make the changes they ask me... 4 Link to comment
minimo[CMD-DCA] Posted October 12, 2024 Share Posted October 12, 2024 You look fantastic, well done! It’s in the bag! 1 1 Link to comment
IcyTrooper[CMD-DWM] Posted October 13, 2024 Share Posted October 13, 2024 Looking like a job well done! 1 Link to comment

Recommended Posts
Create an account or sign in to comment
You need to be a member in order to leave a comment
Create an account
Sign up for a new account in our community. It's easy!
Register a new accountSign in
Already have an account? Sign in here.
Sign In Now