kaabous
-
Posts
53 -
Joined
-
Last visited
-
Days Won
1
Content Type
Profiles
Forums
Events
Everything posted by kaabous
-
I use two two-sided hook and loop straps. I use hook and loop for the belt closure in the back, so it attaches to that. It hasn't moved since I attached it with that. I have some clips, but they pretty much just for show at this point.
-
Thanks Peter. Being new I am still learning as lot. Even though I knew the SC kit was more of a budget kit, good quality but on the lower end, I surprised how much better the MC helmet is. I knew there have been problems with getting MC gear and I think the helmet I saw was purchased second hand. If Chef or Spike are even close to that I will be more than happy. Plus theirs are ABS versus fiberglass, which I imagine will match better to my ABS armor. If I am going to spend the money to upgrade the helmet, I just want it to be "worth it" since my current one is fine for trooping. Are there any major differences between Chef's and an Altmann? My head isn't that big, around 24.5", so the SC just fits but I don't need a melon bucket either. How is the closure on Chef's? That was one of the big upgrades I saw in the MC (other than the general quality of the sculpt and tight fit tolerances), the faceplate snaps into place securely, but still has free movement to go up. My SC faceplate can shift a bit if I move a lot. I have been considering adding magnets to keep it closed.
-
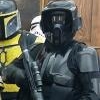
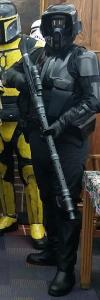
Well, I have my first few troops in and I have learned a lot. I have significantly changed how I secure much of the soft armor and I have tightened up my build quite a bit. I actually feel like I can move around and not be worried about things being out of place! I also added a weapon a bit more fitting a Spec Ops trooper! Next up is some more comfort related upgrades and improved pouches. One question. The TB in that pic has an MC bucket. Seeing it up close it is clear how superior it is to the SC. I have been talking to Spike about his helmet as well. Have any of you seen both of them in person (MC and Altmann)? What are pros and cons of each? I am leaning toward going with Spike's, but I want to be sure because this the last money I want to drop on this kit for a while (too many other projects going right now...). I know Chef does a great bucket too, but I am looking for a pre-assembled bucket at this point because my time is going into my next kit:)
-
Got an update from my GMLs. They said everything looked great and even thanked me for making their job easy. So, I'll pass that thanks onto you all. Thanks for all of the help and guidance to make my first build successful and for getting me approved for 501st membership!
-
Looks good. Just go slow from and test fit the visor lens frequently. The mounting holes in the afx fast shield can show if cut too much.
-
That is really cool. No need to add the extra bracket to rivet the tank on now.
-
My best tip is to go slow and check the sizing and shape often. I used a drill to get some holes started then lexan scissors for the bulk of it. The next time I do it, I would do more of the shaping with rough (80-100 grit) sand paper (or sand blocks are great for it too). I think I tried to get it too close to the necessary size and shape with the scissors and even with curved scissors it was hard not to miscut anything. I'm curious about the nub on the back armor. Can you post a top down pic of that? It looks like they added a spot to rivet the tank top without adding the pandatrooper style bracket. That is awesome!
-
Thanks for the feedback. I saw how puffy the thighs got when I was uploading the pictures and thought the same thing (plus I've been considering my next build, potentially shore trooper or pilot, so jodhpurs are fresh in my mind). I put the knee armor on first, so I think they moved around a bit as I got everything else on since I have not added the velcro to the suit yet. My next steps are the vest and finishing/specialist modifications to the undersuit: riding patches, mud flap, stirrups and taking in the legs and arms a bit. I think I can add the stirrups first without much trouble.
-
Well, it is that time. I think I am done with basic requirements for this build, so here are some pre-clearance pics. Please let me know if there is anything I should fix before I submit for approval and entrance into the 501st! There are a number of things I will tighten up and add to go for specialist, but I just wanted to focus on getting in first. Thanks.
-
I'm down to pretty much the last bits for basic approval. How does this dog bone look?
-
Thanks a lot, that is really helpful. SC actually includes 1 strip of ABS now with the holster and I had a strip from trimming the bells, so I am all set there. Is there a guide line on placement on the boot calf? From what I can see it looks like the holster goes around .5-.75" or so from the top of the boot. Is that about right? Thanks for all the clear guidance on these parts.
-
Ha, thanks. Yea totally agree on the duck cloth. I did a test sleeve. It looked good but wasn't functional or comfortable. I'll try again with softer cotton. I can pull the drops up easily. My prospective squad is having an armor party today, so I can get the placement right on those. I was planning on sewing all of the H&L connections, except the one inside the front "buckle." I could just sew that one to the belt, potentially. Here are some shots of the holster: Hopefully that gives you an idea of how it looks. Thanks.
-
I am getting pretty close to done enough for basic, just need to finish boots and the drop boxes. The holster seems a bit big, but it is hard for to tell from picture if I should trim it or not. Is there a general consensus on the SC holster? How does the placement of the drop boxes look in the picture above? I am planning just using hook and loop to secure the straps inside the belt. It looks like most people use snaps. Is hook and loop not good for those connections? I was also going to use one piece to attach the boxes, it looks like a lot of split the straps and do separate ones for front and back. Is there an advantage to that? I'm also starting on the vest. It seems like most people use scrap from the bottom of the t-shirt for the sleeve quilting. I was planning on using the duck cloth for that. Will that impact approval? I think it looks more like a flak vest with the heavier cloth, but I want to do it in a way that will get approval for when I get everything ready for specialist.
-
Getting down to the last few pieces. Working on the boots, got the toes glued down tonight, I'll hit the calves and dog bones tomorrow. Also did a most of cod tonight. I went off of some picture measurement Mickey posted over at BSN. How is the size and fit? Does the arc placement look right? It looks like it should go down an inch or so to me. Thanks.
-
Cod time. I was trying to work from this post by Chef: http://forum.specops501st.com/index.php?/topic/3186-no-toe/ Here is my first mock up. It is just card board and cloth, so it is stiff, but I am just trying to get the dimensions right: This also the first pic I have put up with the pouches and drop boxes (these are not placed yet, just strapped loosely), so any critique on them would be helpful too. As always, thanks for all of your help.
-
That is exactly what I wanted to know. Thanks! I was thinking of putting a black vinyl washer on the tank topper rivet, figured it would have more give, then metal backing washers. Good idea? Or just got metal for all of them? I also put ABS scraps on the knees for the rivets (and have ABS strips to back the holster rivets in side the boot), did you do backing washers on them too?
-
So, I think I am getting close to completing this thing. I pretty much just have the boots and cod to go for basic approval. A couple of questions about rivets. Is there a particular size for the rivets ? I didn't see a size listed for the belt, holster, knee or tank rivets. I was planning on 1/4" for all of them. Also the tank topper rivets looks like some people have a washer in some shots, is that something that needs to be there? For the tank I am planning on riveting the top rivet (using a Pandatrooper style bracket) and applying some e-6000, then once that has set drilling the guide hole for the bottom and popping that rivet in. Is there a better way? I am a little concerned that the bottom rivet may not have enough space If anyone familiar with SC armor has any tips for that attachment, I'd appreciate them. I did the pouches to the size Chef listed and they look good to me, they fit well in the space between the chest and belt. A lot of the pics I've seen here and BSN the pouches look too big. I think those new dimensions look good.
-
New bund in the real fabric this time: How does the fit look? It is big enough to go over the under-suit with no problem. I just thought these pics would be easier to see how it fits.
-
Great! Thanks for the feedback. The belt was centered over my belly button, so it may well be too high. I got the basic bund sewing done with heavy black cloth and the double batting, it seems much better. I'll do the ribbing and fastener tomorrow and maybe start on the cod. I was working on my boots too. I got the heels cut on both soles. I've been trying to find good pictures for the front soles. Do they have a line that is not removed, like the back? Or are the cuts all the way through in the front? I gather both ways may be OK, but is there a preferred way to do it?
-
Quick shot of my first bund experiment: Size-wise how does it look? I learned a lot that will help when I do the real one. I think I need to double up the batting to make it thicker and I have a better technique for the ribbing. Any other big red flags on the construction?
-
I went ahead and trimmed some off the bottom of he bells. I think it is all fitting together better now: The back plate seems to naturally settle a bit lower than the front on me. Is that an issue? Is there a good tutorial on making a bund? There are some great ones on the vest, boots, pouches, etc. but I have yet to find one on the bund. I was planning on doing it as one folded piece with one seam, then sliding the batting in and doing the ribs and velcro. I am worried that the batting will not be secure enough though without some other method of attaching it (like iron on hem adhesive). After checking the CRLs, it looks like the TB CRL says no visible stitching on the cod or pouch flaps (for level 2), but does not mention the bund (TX has no mention of stitching). It would make life a lot easier if there can be stitching across the top and/or bottom of the bund. Is that really the case? Thanks.
-
Thanks guys, I appreciate all of the feedback on my many questions. I will try to get some pics up, but I am pretty sure an inch or so off of them will be needed. I'm 5'9" too and if I have the bicep armor strap around the center of my bicep the armor is overlapped by the bell. I'm going to try to get a pic of the chest armor fit too. I think I have it mocked up about right, but I want to check before I trim the shoulder straps. I don't have the vest done yet, since I am just focusing on the basic build requirements first to speed up getting in to the 501st in the first place. I have kept an eye on the specialist requirements though, so I haven't done anything I will really need to change (other than nylon to cotton strapping for the drop boxes, but that is an easy fix), I'll just need to add things like the vest.
-
I've got all of my strapping done and I'm working on fit of the hard armor. I'm looking at the shoulder bells and they seem too long. I know the fit is specific to each individual, but I'm wonder how much people have trimmed recent SC shoulder bells. The bells I got seem to already have the adjusted angle from Pandatrooper's build over at BSN, but they seem too long. There isn't much room between the pieces of the arm armor, but I think the main culprit is the length of the bells. Is there any guideline for distance between the arm armor pieces, especially the bells and bicep armor? I want to be sure before I start trimming the bells much. It looks to me like there is some variation in bell size across different iterations of the scout armor and several builds on here and BSN.
-
Got my next piece in today: My piece! Up next is sewing the soft bits and velcro/elastic straps together. I ordered some 2" nylon webbing for the belt to replaced the short piece that came with the kit. I want to do a full belt of webbing so the ABS belt piece is not load bearing. I have considered a number of methods, but I think attaching velcro to the inside of the ABS pieces with corresponding attachments on the webbing will work and look best. Any tips on how to do it?
-
I have the bucket mostly done, just need to attach the visor and drill the bolt holes for the mask. I think visor hole looks decent compared to the other SC buckets I've looked at, but I'm waiting to do the final assembly until I'm sure about it. Here is a dry fit of the pieces: I have my coveralls prepped for altering and assembly, I am working on the hard armor in pieces and I'm getting the vinyl for my boots ready to go. It is slowly starting to come together.