
rickyboyblue
-
Posts
122 -
Joined
-
Last visited
-
Days Won
6
Content Type
Profiles
Forums
Events
Everything posted by rickyboyblue
-
Ricky's Mudtrooper Build aka Mad Mud Mods (Photo Heavy)
rickyboyblue replied to rickyboyblue's topic in Mudtroopers
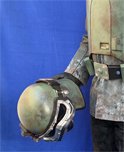
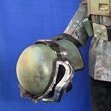
THE COMPLETED RESPIRATOR (as of JAN 2019) -
Ricky's Mudtrooper Build aka Mad Mud Mods (Photo Heavy)
rickyboyblue replied to rickyboyblue's topic in Mudtroopers
THE COMPLETED GOGGLES (as of JAN 2019) -
Ricky's Mudtrooper Build aka Mad Mud Mods (Photo Heavy)
rickyboyblue replied to rickyboyblue's topic in Mudtroopers
Thank you very much, my friend. It was actually you who instilled in me the value of passing on knowledge and sharing build experiences so other folks who thinks they can benefit from it, use it. For me, you're also one of the gold standards in build threads. I'm just following in your footsteps and I hope I give justice to your examples. Thanks for the inspiration, Tony! ? -
Ricky's Mudtrooper Build aka Mad Mud Mods (Photo Heavy)
rickyboyblue replied to rickyboyblue's topic in Mudtroopers
BREATHING LIFE INTO THE RESPIRATOR... (Part 3: Strapping & Screens) The final step for competing the respirator was installing the Yugo backpack buckles, webbing, and plugging the holes with the screen. For the first iteration of my respirator, I used this screen I bought from amazon. I just pressed it against the respirator and applied a generous goop of black E6000 around it. Overnight, the ring of E6 around it hardened and the screen stayed. Jim's kit does not include the notches where other respirators have (the one's where you slot-in the webbing through the buckles). In order to attach the buckle to the respirator, here's what i did: 1. Drilled a hole on the respirator, burned a hole on the webbing -- for the rivet. 2. Bonded the webbing on the respirator via CA glue 3. Reinforced the side of the webbing with my fave - black E6000 4. Installed the rivets These webbing ain't going nowhere! With the webbings, buckles, screen installed (NOV 2018) Accurate screen mesh used in the movie arrived, so a respirator update was in the offing. (DEC 2018) Note the subtle difference between the two screen meshes I used (top: Isopon, bottom: Wireform). In my opinon, if you don't have access to Isopon, Wireform is already a very good alternative for basic approval. In fact, they both sport the rounded diamond-shape pattern required by the level 2 on the proposed CRL. I'd argue that this would pass muster for level 2. Another upgrade was the installation of a car-door side trimming on the edge of the respirator, for level 2 of the proposed CRL. [NOTE: The edge trim is NO LONGER A CRL REQUIREMENT. I have since removed the trim post-CRL release.] The final upgrade was losing Jim's tusk tips and replacing them with the more accurate M4 x 16mm hex socket head cap screws. (JAN 2019) 1. Dremel the original tip til it’s gone. 2. Sand the area flat. 3. Drill a hole for the hex screw. 4. Install the hex screw and nut. The cherry on top was cutting a portion of my foamies, to cover / black-out the tusks (JAN 2019). -
Ricky's Mudtrooper Build aka Mad Mud Mods (Photo Heavy)
rickyboyblue replied to rickyboyblue's topic in Mudtroopers
BREATHING LIFE INTO THE RESPIRATOR... (Part 2 - Hose Rigging) I started with figuring out how to attach the hoses to the mouth. The required hose is a bit on the heavy side, so I was thinking the respirator should be able to hold up to the weight of the hoses, especially when the costume in on the respirator-on configuration. Options I considered for hose rigging: 1. Make a hole - quick and simple solution. drill a huge hole, insert hoses during troops. Need to rig the hoses though on the end that it stays in place. 2. Magnets -- even if I use rare earth magnets, may not be strong enough to hold the hoses. Plus, would have to rig the hose-side. Too much work. I arrived with the solution of using 1/2'" diameter PVC pipes. Easy to build, respirators looks clean sans hose, easy on-off affair during troops. (NOV 2018) Quick try with the hose. Perfect fit! PVC pipe rig behind the mask: Here's the completed pipe rig for the hoses (NOV 2018): -
Ricky's Mudtrooper Build aka Mad Mud Mods (Photo Heavy)
rickyboyblue replied to rickyboyblue's topic in Mudtroopers
BREATHING LIFE INTO THE RESPIRATOR... (Part 1: Prep & Painting) Another easy build that helped me get a leg up with this character. This also turned-out to be one of the more fun pieces to build. Based on extensive sharing of research, the respirator is the recipient of interesting and relatively inexpensive found parts and stuff. Jim's respirator, all in one piece (SEP 2018). ummm... yeah. Time for dremel, sanding, and blasting of some primer paint. For my first green coats, I had some Rust-oleum camo green cans lying around the house, so I used those for my first top coats. Regular black acrylic paint on the mouth part. (OCT 2018). Next stage was applying additional coats and the Krylon Olive Green coat (NOV 2018) The Mud was the very first costume build that I need to weather. I first tried weathering the respirator by using 3 different brush tips. Applying 3 acrylic paint colors, layered on each other -- burnt umber, nutmeg, and pewter gray. These are the only 3 colors I used for weathering throughout this project. By mid November, I would have attained a good level of confidence that I can weather the weathering part of this costume. This was the final paint look of the respirator body. Now, it was ready for rigging... -
Ricky's Mudtrooper Build aka Mad Mud Mods (Photo Heavy)
rickyboyblue replied to rickyboyblue's topic in Mudtroopers
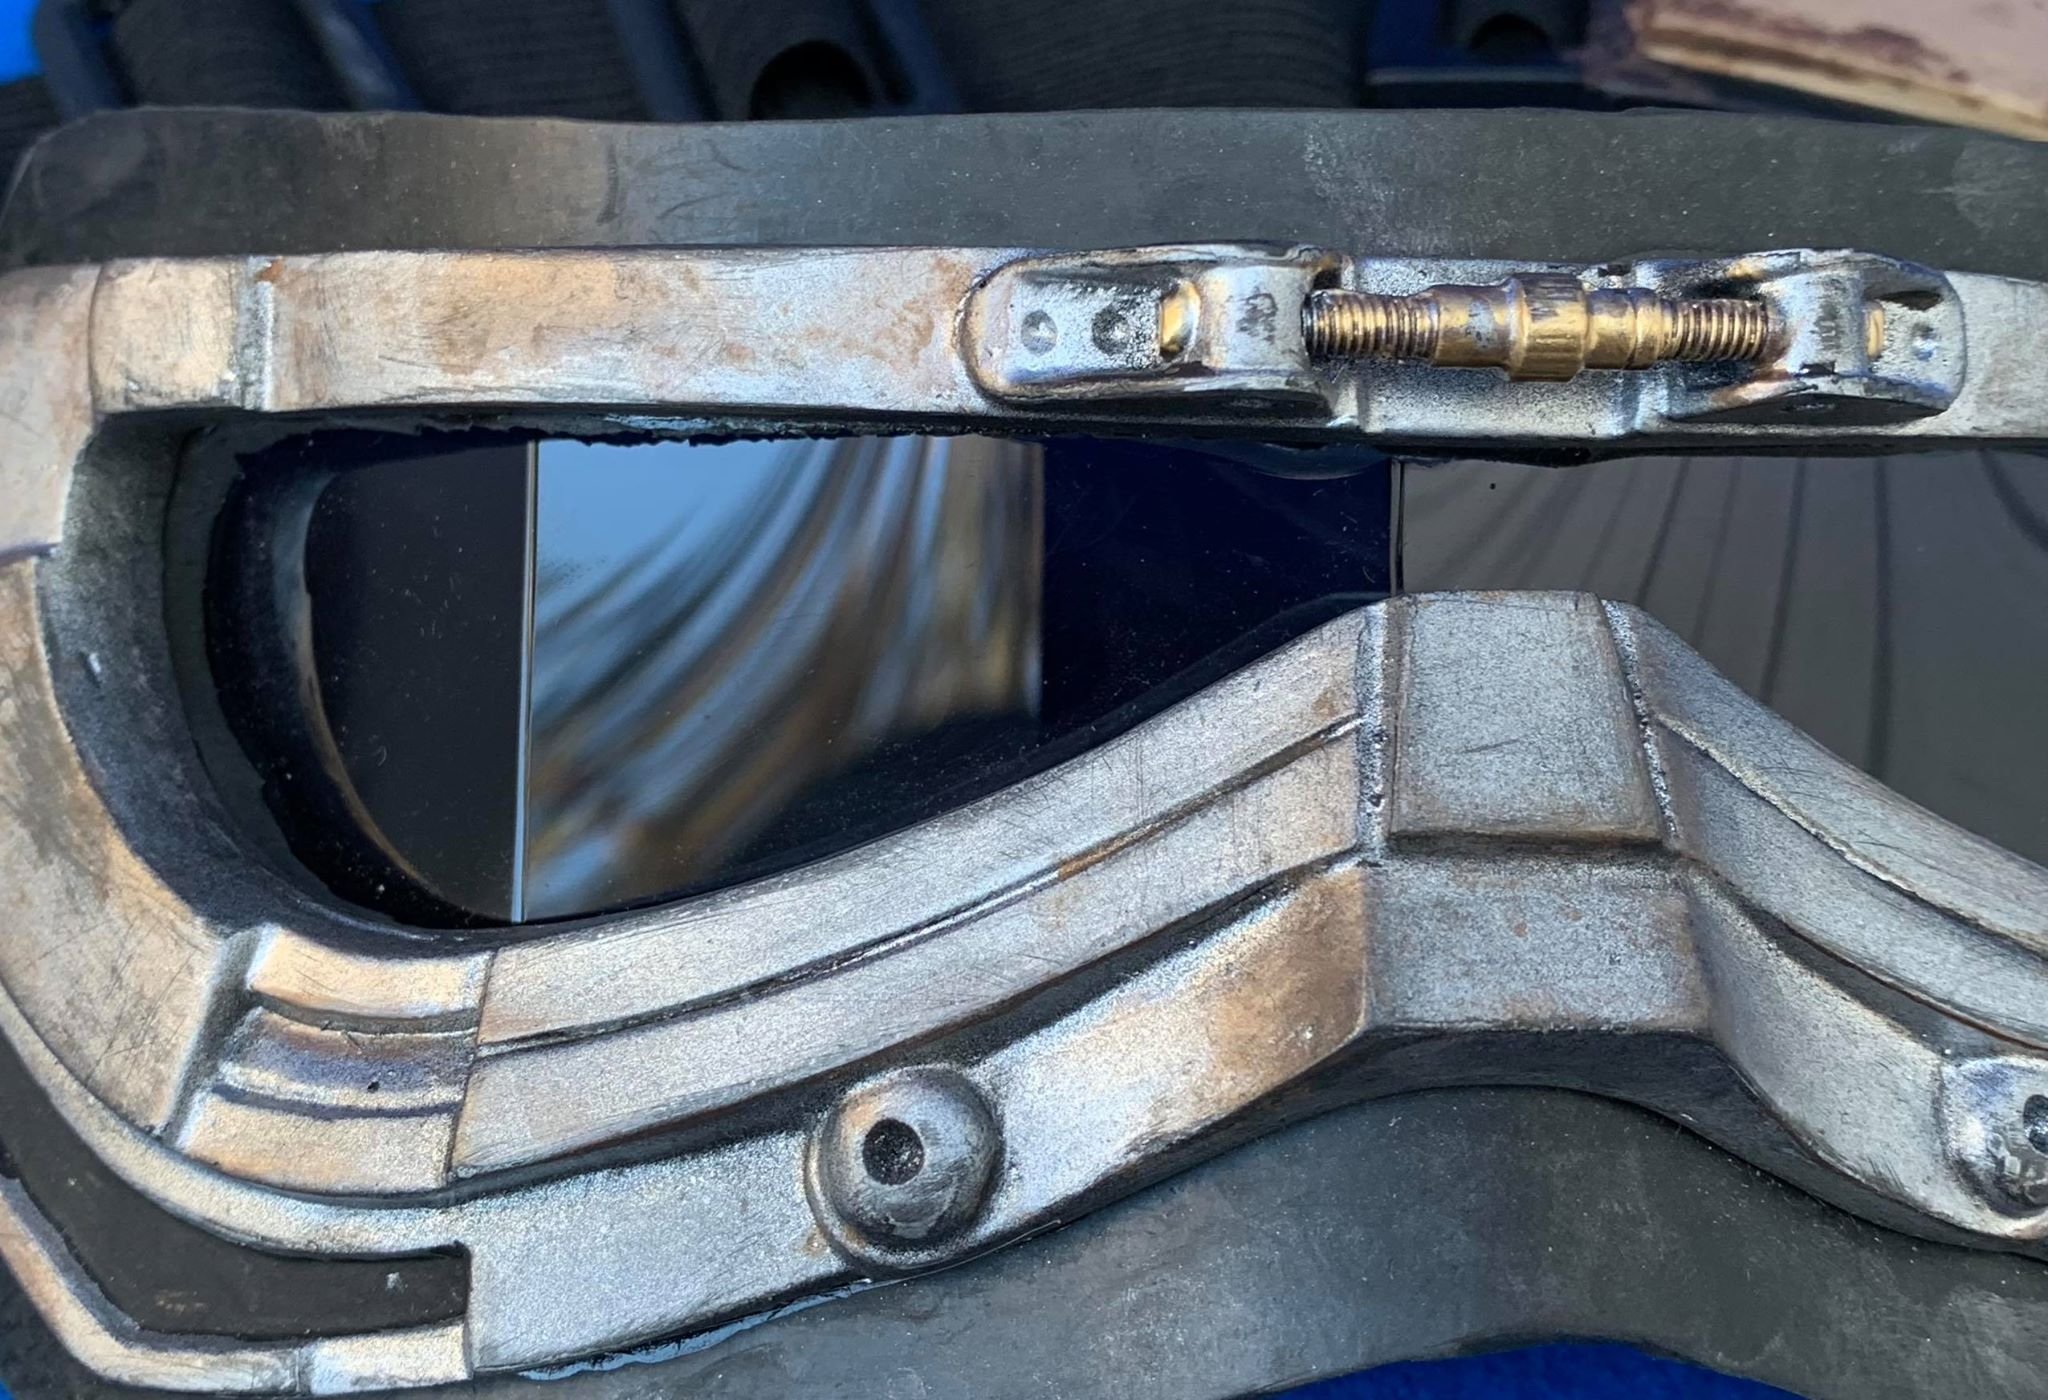
GOGGLE'S BUCKLES, ETC... Completing the goggle rig is the kinda elaborate strap that it has. Primarily consists of 5 types of buckles and two different sizes of straps. I essentially used the items that came with Jim's kit: Then for the side buckles, I initially got the ones available from Imperial Trading Co. Assembling them all together, this was how it ended looking like (NOV 2018): In one of my many productive discussions with Darren, he noticed the sizes of my straps. On my further review of the proposed CRL, it was confirmed that my wider strap is not wide enough. (JAN 2019) ORIGINAL STRAP: REPLACEMENT STRAP: With this replacement, the flow from the smaller strap to the wider is more obvious. While we await confirmation of what type of side buckle was more accurate or appears closer to the screen-used ones, Darren suggested a 25mm cinch lock buckle that hugs the strap better. I ditched the original buckles from Imperial Trader Co and used the smaller cinch. I initially installed it through the normal pass-through way. I still wasn't happy with it, the serrated look is not too obvious when you don't move the cinch or you don't pull back the straps. So we took a second look at the reference photos, and we determined that the strap was not passed-through at all. The straps were sewn from both sides of the cinch. (JAN 2019) With this correction, the serrated portion is now very apparent. Until the build group decides on which best side buckle is ideal, my goggle straps are done. -
Ricky's Mudtrooper Build aka Mad Mud Mods (Photo Heavy)
rickyboyblue replied to rickyboyblue's topic in Mudtroopers
OOGLING THROUGH THE GOGGLES Every costume build requires from you a certain level of confidence. A very good confidence-builder for me was deciding to start work on the goggles. This was an easy part to build and finishing it makes you experience a quick rush of "mission accomplished" feeling knowing that you've completed a simple but crucial part of the costume. Note that total build time for the goggle for me was actually almost four months. Even after finishing it on the first go, one can never be satisfied with how a part turns out. You'd always find areas to improve on... With base coat paint applied to the goggle (Oct 2018) Metallic paint applied, a bit of sandpaper scuffing for some weathering details. I set the goggle on the rubber sheet to visualize the trim around the goggle. (NOV 2018) Rough cut, testing how the rubber would contour to the goggle. I'd eventually use CA glue to stick the rubber to the goggle. Bonded well. Never experienced these two parts separating. (NOV 2018) Another shot of the three parts: goggle, rubber trim, and the lens. In most of the costumes I built, I got accustomed to using the Hobart replacement lenses. Cheap, very flexible, nice to see through, eyes won't be seen. (NOV 2018) With the rubber trim permanently applied on the goggle (NOV 2018) Lens permanently applied (NOV 2018) Note the tensioner, sans required detail. (NOV 2018) Nose tensioner with the brass-look detail. Some peeps use different methods like Rub n' Buff. I only used one of those metallic markers. (NOV 2018) To achieve the angles on the lenses (as inspired by aviator lenses), I only used the tried-and–tested score and bend method. After aligning the lens on the goggle opening, I just scored the points with a box cutter, then bent them to the desired angle. Voila! No voodoo here, folks. (NOV 2018) Full shot of the lens, against natural sunlight (NOV 2018) Here's how the goggle rig looks like from behind. CA glue was used to bond the lens to the rubber trim. (NOV 2018) This was how my goggles looked like when first completed. (NOV 2018) Until I was advised by Raider that there's something not quite right... D'oh! how'd I miss that???? Quick fix, snip-snip. Done! (JAN 2019) -
Ricky's Mudtrooper Build aka Mad Mud Mods (Photo Heavy)
rickyboyblue replied to rickyboyblue's topic in Mudtroopers
TRANSPORTING TRIPON'S PS. During my Manila trip, I had a wonderful get-together with some members and friends from the Philippine Garrison. I was also able to acquire their new merch, an ultra-huge helmet bag. It was so big, it became my main container to pack the Mudtrooper kit in. I was confident that my kit would be safe inside the big box because it's packed inside this foam-walled beast of a bag. It. Was. Epic! ? -
Ricky's Mudtrooper Build aka Mad Mud Mods (Photo Heavy)
rickyboyblue replied to rickyboyblue's topic in Mudtroopers
THESE BE WHAT'S INSIDE THE BBB... I've owned about two kits from Jim Tripon (FOTI and Praetorian Guard). I find his flexible fiberglass kits to be quite an easy and forgiving material to build costumes from. Pulling the trigger for the Mud last September of 2018 was easy. It helped that I was on a biz trip in Manila, so I saved a whole lot in shipping charges. This is a very nice kit and I'm satisfied with Jim's Mudtrooper kit. -
Dear Friends: Having completed my newest costume, please allow me to share my photo documentation of how I attempted to breath life to the Mudtrooper character. It was a pretty long journey from deciding to pursue the next costume, to joining the wonderful Facebok group of Mud builders, to acquiring all the required (and mostly accurate) parts, to solving problems, to committing mistakes, to finally completing it. Last October 2018, I was on a business trip to Manila. The decision to jump became easier -- I have an easier access to Jim Tripon's wonderful kit. Ever the accommodating vendor, Jim's had the BBB delivered to my hotel room and all I had to do was bring it back to the US on my return. The rest was history. I will try to load progress and complete this build thread as quickly as I can. This is by no means the definitive guide to how the Mud should be built. It's how I built mine and it worked for my purpose. If any of you find this experience useful, feel free to follow my thread for your own build. Good luck, see you all in the muds! UPDATE (as of 01.26.19): This character is now official. 501st Legion CRL is live! HUGE DISCLAIMER (as of 01.08.19): This build was based on the currently proposed CRL. There's no approved CRL yet for this costume. Proceed at your own risk. QUICK BUILD LINKS: 1. BBB Parts Check Bonus - Mud Bag 2. GOGGLES Main Goggles Strapping Completed Goggles 3. RESPIRATOR Prep and Painting Hose Rigging Strapping and Screens Completed Respirator 4. BUCKET Exterior Tactical Unit / Torch Interior Rigging Completed Bucket 5. ARMS AND SHOULDER BELLS Prep, Painting, Rigging Completed Arms & Shoulder Bells 6. BOOTS / SHINS Leather Shin Armor Completed Shins Completed Shins on Boots 7. BELT Top Bottom Completed Belts Improving the Lower Belt (August 2019) 8. BODY ARMOR Chest Back Rigging A Rigging B Completed Body Armor 9. PLASH PALATKA Original Plash Dyeing RIgging the Plash to the Armor Completed Plash Palatka 10. SOFT GOODS Tunic & Pants Other Soft Goods - Gloves, Scarf, Shirt Completed Soft Goods 11. AMMO POUCHES MP40 Cloth Bandoleer Completed Pouches 12. BLASTERS: E-11B E-10 Build Completed E-10 13. PREPARING FOR THE SUBMISSION OF APPLICATION 14. END OF THE BUILD JOURNEY Below is a list of my costume parts and stuff, with some having a link to where I sourced them. Please feel free to source yours from where you think they're more accurate, convenient, and cost-efficient. Confirmed found parts used in the movie are indicated by "*" Thanks. PARTS LIST: HARDWARE: Bucket / Armor / Goggles / Respirator / Hoses - Jimmiroquai Bucket Tactical Unit - Mr. Paul's Shoretrooper Build Bucket Lining - bike/skates helmet Respirator Metal Parts / Greeblies* - from a vintage Yugoslavian small backpack Goggle Lens - Hobart 770580 Face Shield Replacement Lens Goggle Rubber Trim - 1/8in rubber sheet Goggle Webbing* - Imperial Trader Co. Goggle Chin Cup - Rawling's Chin Cup Goggle Side Buckle - 1" cinch lock webbing buckles Respirator Mesh* - Isopon Repair Aluminium Respirator Tusk Filter Tip* - Hex socket head cap screws Belt Boxes (R1 Type) - PhiloProps Belt - Wampa Wear Belt Buckle - Tandy Leather blank buckle Code Disks - Elvistrooper Standard/High Detail Disks (no notch) Back Armor Foam - 6mm Darice Foamies Bucket Torch - 9-LED mini aluminum flashlight SOFT GOODS: Tunic - Jimmiroquai Pants - Jimmiroquai Parka* - Russian Plash Palatka Boots - vintage Russian Officer military boots Gloves* - Highlander Special Ops Gloves Scarf - GI wool scarf Undershirt* (not required by the CRL) - British Army surplus shirt ACCESSORIES: Ammo Pouch* - MP40 Ammo Pouch Cloth Bandoleer* - Vietnam-era 5.56mm 4-pouch cloth bandoleer BLASTERS: E-10 Kit - Inland Empire Armory E-10 Torch* - Streamlight 85001 Scorpion E-10 Torch Mount* - Fenix Gun Mount E-11B Base - Hyeprfirm E-11 E-11B Torch - M300 replica --------------------------------------------------------------------- RickyBoyBlue DZ/IC/ID//IG/IN/RP/TA/TB/TI/TK/TR 74259 Location: San Francisco Bay Area 501st ID / TKID: 74259 Garrison / Outpost: Golden Gate Garrison

