Blue Hatter
-
Posts
150 -
Joined
-
Last visited
-
Days Won
8
Content Type
Profiles
Forums
Events
Everything posted by Blue Hatter
-
 Any opinions about what I should do regarding the rivet-like thing that I mistakenly put above the greeblie? Should I leave it? Should I cover it with "rust"? I realize that the rivet shouldn't be there but I'm concerned that a blob of "rust" might just be too much of it to look real, y'know? I didn't want to get too carried away with the rusting look, and actually already did a bit more than I had intended. Heh.
 -
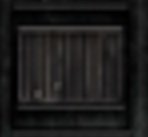
Zoom in on the greeblie. It definitely has a golden/brownish hue to it. It's not straight gray. It looks like a pale brown or dark gold color to my eye. When I run it through a color picker I get... HEX #3A3223 ███████ HEX #2d2926 ███████ HEX #3f3b3a ███████ HEX #3d3c38 ███████ HEX #161515 ███████

-
For the color of the greeblie, I stared at the reference for quite a long time and that's how it looked to me, a dark gold color. If it helps any, when I did the color-picker thing earlier trying to identify names for the various texture colors it did come back as HEX #3A3223, which is a dark golden-brown color. So that's how the computer identified it... ████ The rivet thingy above the greeblie (which is actually a little plastic disc) was a flub on my part. When I was putting the pack together I thought it looked like the texture showed something that looked like a rivet there, but when I looked at it again later I realized I was just looking at a bit of the "bumpy" surface texture... But by that time the epoxy had set and I couldn't pry the piece off again no matter what I did, without risking breaking the plastic around it. So I just had to leave it. Heh. I figured that it's a tiny thing that wasn't worth risking breaking the plastic around it. If it's a big issue I could probably hide it with some more "rust", and just make a blob of it there.
-
The greeblie on the back of the jump pack, it's hard to make out exactly what it looks like so I took my best guess. It looks, to me, to have one or two horizontal lines on the top and bottom, and between them vertical bars. I did alternating depths of the spaces between those vertical bars (deep, shallow, deep, shallow, deep) because it kind of looked like that to me on the texture, and also because I thought it gave some good dimension to the piece. As for the color, it looked to me like a very dark gold... So that's what I did on mine. I used some antique gold acrylic paint and darkened it with sequin black acrylic paint.
-
It's sounding good to me. No complaints here. And yeah, "trapezoidagon" is a word. When I was making my notes I had to find a way to describe how the wing things looked without it being too wordy, and that shape was the closest match. A trapezoidagon is also called a "truncated square pyramid" or a "trapezoidal prism" but trapezoidagon just sounds cooler, and it's more fun to say. I've definitely been trying to find ways to add trapezoidagon into daily conversation just to sound smart. ?
-
Would my notes be of any help? Jump pack is gloss medium gray-blue. Two rectangular recessed panels near the top (one one each side of the center tank). Two smaller rectangular panels near the center (one on each side of the center tank). These panels are painted gunmetal gray. Center tank with three recessed panels-- one at the top, one in the center, and one at the bottom. The bottom and top recessed tank panels have a raised panel within the center of them. → Level 2: The bottom corners of the top and bottom recessed panels have two tiny cylinder greeblies or rivets, one in either of the lower corners. The middle recessed panel of the center tank has a rectangular greeblie in the center of it. The greeblie features a series of verticle columns with a ridge at the top and bottom of the greeblie. This greeblie is painted a dark antique gold. The entire center tank is painted gunmetal gray. → Level 2: The center tank has a rough and bumpy texture in conjunction with the gunmetal gray paint. This texture is only on the center tank. Top of the center tank has a cut open trapezoid “air intake” with the interior painted black. → Level 2: The trapezoid is “closed” with a mesh or grill that is painted the same black as the interior. Two jet fuel units at either lower side of the jump pack, painted gloss medium gray-blue, the top of which are half-cones painted silver or aluminum. One jet thruster on the bottom of each of the two jet fuel units. The thrusters are painted aluminum or stainless steel and have thick white smoke stripe around the middle of them. → Level 2: The interior of the thrusters are painted black to simulate depth. Two trapezoidagon wings protruding from either side at the top of the jump pack. The wings are mirrored images of each other. -The top, front and bottom faces of the wings have vents with five recessed frame slots which are black in color. The vent frames and slats are painted a very dark gray-blue. -The top vent frame is outlined in snow white or frost white. -The front vent frame is not outlined (the standard medium gray-blue is seen around the frame). -The bottom vent frame is outlined in dark gray. -The outer side of the wings have an recessed circle that is painted dark gray. Within this circle is a raised ring with four to five horizontal vent slats. The ring and vent slats are painted a dark silver or a light gunmetal gray. Between each vent is a recessed black space. -The back of the wings have no vents are are smooth, the surface of which is painted the same gunmetal gray as the back, bottom and center tank. Bottom of the jump pack is painted gunmetal gray. The back of the jump pack is painted gunmetal gray. The top of the jump pack features a gunmetal gray stripe that is the same width as the center tank. Level 3: jump pack is fully functional, features thrusters that can be rotated to alter direction, and which allows the wearer to leap through the air to distances of about twenty meters. (Warning: only use if your legs have been enhanced with cybernetics, use of jump packs without cybernetic enhancements may result in legs being broken upon landing.) A couple thoughts from your points... The bottom of the thrusters don't have any rectangular detailing, not to my eye at least. I think it's just something with the model texture, not details that are actually supposed to be on there. If you look at the texture image there aren't any parts that have the rectangular detailing like you mention. I think that it's just caused by the way that the texture wraps around the model on that part. The off-white stripes around the center of the thrusters I don't think need to have a black fade on the top. That is likely just supposed to look like a shadow on the game model, that's probably not something that really needs to be painted on. If you look closely at the model, in the bottom corners of the recessed areas on the gunmetal/black tank piece, there are little... I don't know what to call them. Just little cylinder detail things. Perhaps something for level two? I'll post a picture of my pack below as an example. There's also the rectangular antique golden-ish greeblie on the center of the tank. (FYI, if anyone would like that greeblie model, I'm happy to share it. It's a model I designed and 3D printed.) The tank also has a bumpy texture to it. Perhaps another thing for level two?
-
Yup, both of those look fine to me. Strangely enough, on the character texture image the O II details are actually reversed to II O, and even have the shading facing that direction. But on the game model it's reversed that back to the usual O II, but the shading doesn't match because it 's then in the wrong direction. Those crazy artists! (I'm sure they didn't care, it's never seen in-game, anyway. It's always covered by the jump pack.)
-
That all sounds good to me!
-
Around the edges of the light/dark areas there are shadows on the darker portions, along the edge where the dark turns to the lighter color. Seeing as the texture is completely flat it's hard to say for certain, I just assumed that the artists intended for the armor to look "layered", and that the lighter color pieces were slightly higher, casting a shadow onto the darker parts. But I'm just making assumptions there. Again, the game model is flat, it doesn't really have any defined texture, so... who knows? Either works. The chest bolt greeblies I definitely think are supposed to be silver. The texture image has a highlight on them like a shine, which to make makes it look like they're suposed to look like silver/metal. Should the black pill slots on the right breast be added to the standards? Perhaps as L2? For the red parts, I would definitely not see a problem with L1 having the aerator interiors, chest bolt interiors and knee bolt interiors painted red, and L2 requiring LED lights. Oota Goota painted the interior of his helmet aerators red and they look alright.
-
Would my notes be of any use here? CHEST ARMOR The chest armor is very similar to the standard OT stormtrooper chest armor. The armor is painted gloss medium gray-blue. Two black pill-shaped slots on the right breast. There is a beveled edge from near the shoulders and which curves down to the side of the chest giving the appearance of armor layered beneath the medium gray-blue armor. → Level 2/3: Chest armor is made of two layers of armor, a bottom layer and a top layer, with the top layer painted medium gray-blue and the bottom layer painted gloss dark gray-blue. This inset armor section is painted gloss dark gray-blue. Two cone-shaped bolts attached to the upper chest. The bolts are roughly two inches at the bottom and taper in toward the top, and stop at a flat end. Cone-shaped indented interior that ends in a flat surface. Bolts are painted metallic silver to look like metal. The interior flat surface is painted bright red. → Level 2: The interior is hollow and red LED lights are affixed within. Chestplate overlaps the abdominal plate.
-
Ah, I was wondering what the "clamshell" style was, too. Thanks!
-
The thing about the hand plates is that they're a texture, not a model, so they get deformed with the hand movement of the character model. Case in point, the picture here... With the index finger outstretched it stretched out the hand plate texture into a point. It also comes to a point in this picture... I’m assuming that Oota Goota used a picture like one of those when designing his kit. And in this picture it gets pushed in behind the thumb... So it's hard to say what the developers were going for there. That said, don't stormtrooper hand plates have more ridges and a T-shaped section while the clone trooper ones are smoother without the ridges? Or am I getting hand plate designed mixed up? Granted I haven't really studied the stormtrooper hand plates much so I don't really know the differences. Heh. But here are my hand plates, which also look similar to the one shown in IcyTrooper’s second picture... And here's what they looked like on me during my original test fitting (man, that seems like ages ago)...
-
Yup, that all sounds good to me.
-
I'm sorry to hear about the family problems, that's gotta be rough. And yeah, COVID has nixxed a lot of activity anymore. For printing, yeah, that would be tough to find someone to do it. I imagine that Shapeways would cost a fortune to do it. I'd print it for you but it would take my printer forever do it. My print bed is something like 5" x 8" x 10"... I might be able to print it all in like... three years? XD Have you tried looking up local printers? There might be a printing fabrication company around you that could do it, perhaps. There are also various community print shops that might be able to do it, or at least they might know someone who can. Another option could be Pepakura, though that would take a bit of work to finish the printed paper model, fill it all in, harden it up, sand it and whatever else. And I have no idea how you convert models in Pepakura... But I've seen some impressive stuff done with it. And for whatever it's worth, I think your model is much more accurate than the one on Youtube.
-
Ah, okay, I think I get it now. The reason I mentioned the layering is because on the game model skin it usually looks like the lighter color armor parts are layered over the darker parts and I figured that it would be the same for the biceps as well. The skin does have a bit of a shadow on the bicep texture where the dark color meets the light color, which to me gives it the illusion that the dark-colored inner half of the bicep is "deeper" than the lighter-colored half... But seeing as the models are flat and the textures don't really have any bump mapping it's hard to say that for certain. I suppose that either construction method would give it essentially the same look, anyway, because of the two-tone color scheme.
-
What is "overlap construction"? I've seen that mentioned before but I'm not sure what it means. And here are a few things from my notes... Biceps are fully closed. Outer shell of the bicep overlays the inner shell. The outer shell and cover strips are painted gloss medium gray-blue. The inner shell is painted gloss dark gray-blue.
-
Sounds good to me.
-
For the shoulder armor to be up it would have to be edited on the mesh itself. And the fact that shoulder armor stays in that position throughout the various character animations makes me think that the design was intentional. But there's no way of knowing for certain so having the floating shoulders as a level two requirement I think would work just fine.
-
I'm fairly certain it's a design choice as the shoulder bells are always like that on the game model, not just during particular animations. I'm not sure why the artists made the shoulders float like that, I can only assume they did it to make the troops look "bulkier", but who knows. Whatever the case, the shoulders remain like that at all times. I used football shoulder armor, which I snapped to the webbing shoulder straps of the chest/back armor. The football armor is painted black to blend in better with the suit. The trooper shoulder bells are attached to the football armor by webbing, the webbing is attached to the football armor webbing strap, which allows for movement. The shoulders are kept "floating" by using pieces of black window insulation foam that are glued to the outer surface of the football armor and the inner surface of the trooper shoulder armor. I don't have much problem moving around with it. Sounds good to me.
-
The shoulder bells float, they don't sit flat over the shoulder like most other trooper armor and kind of float upward. Maybe that should be a level 2 requirement? In most pictures you can actually see the shoulders of the character model from under the shoulder bells.
-
Yeah, I meant regarding the color of the strap itself. I wasn't sure if it needed to be part of that particular section of the CRL or not.
-
Sounds good to me. Does the color need to be mentioned or is the picture good enough for that?
-
I agree about leaving the mention of the tabs for the shoulder straps off. The model doesn't have them and it could be confusing if one place says they're allowed and another place says they shouldn't be on the armor. I'm always for the ways that are the easiest to understand. If it matters any, to keep the shoulder straps pulled down on the back, I did sort of like the OT stormtroopers with a piece of elastic around them, but I used clear elastic. I wanted to do something more tactile than just using magnets, and I liked how the elastic loops on the OT stormtroopers kind of seemed more "realistic" to me, in a sense... And the clear elastic actually works pretty well.
-
Oops, yeah, I totally forgot to mention that chin detail. My bad! Yeah, it's two vertical lines, a sort of "V" shape under them, and then a fatter "U" shape under that. The V fits inside the arc of the U, and the two vertical lines fine within the arc of the V.
-
Sounds good to me. It's not really anything different than that. The game model is just solid black. Heh.