

Blue Hatter
-
Posts
150 -
Joined
-
Last visited
-
Days Won
8
Content Type
Profiles
Forums
Events
Everything posted by Blue Hatter
-
 I do like the fan-made model, it's a pretty cool rendition of the Phase Zero, but it's actually quite a bit different from the canon version of it. Aside from the knee armor, the bolts are smaller, for one, the shoulder armor is up-side down and shouldn't have a center ridge, the helmet is a different design (the back is more rounded on the fan version and doesn't go as far out, and it doesn't have the "elf ears"), the fan version has a clone trooper belt instead of a stormtrooper belt with clone trooper ammo packs, the shoes don't have armor over the top of them, there's no vent on the top of the jump pack, there aren't any slats on the circular vent on the sides of the "wings" of the jump pack, the calf armor is missing the stripes that go down the front and back, the hand armor isn't the correct shape, there's no stripe on the top of the jump pack, and there are a few other smaller design differences. It's a sweet model but it's significantly different from the Pandemic model. Sure, whatever works! Makes no nevermind to me. I prefer the look of the neck seal, anyway, makes it look more finished.
 -
I still need to take them. I've been hoping that it would cool down a little bit so I don't melt away but I don't think that's going to be happening any time soon. I'm going to get the pictures done this weekend, no ifs, ands or buts. I've also been hoping for a bit of an overcast sky so that the lights can be seen better but I'm just going to take the pictures and hope for the best.
-
If the person wears a balaclava their neck wont be seen. Or if their undersuit has a turtleneck or something. Perhaps it should just be noted that no skin should be visible? For the record, I'll be wearing a balaclava and a neck seal. That's a fan-made mod, it's not official. Even though it is really neat, and I dig the knee armor (why does the "canon" P0 have bare knees?). I found a video of that same mod about a week ago.
-
Optional sounds good to me.
-
The concept stormtrooper neck seal probably wouldn't work for the P0 but I don't think it would matter much if it was clone trooper or OT stormtrooper version. The game model doesn't have anything, it's just a solid black texture, and like I mentioned, the P0 armor is pretty much just a mixture of phase one clone trooper and OT stormtrooper armor thrown together. Either one would look okay and would probably make sense. But personally, I prefer the stormtrooper neck seal. I dig the ribbing.
-
So here's my list of notes that I've been working on. These are just short-form notes, meant to be quick and give some ideas. I wrote a section for the helmet as well before I realized it was done here, but I'll post it anyway, just 'cause I have it. I was asked to post only sections of it so I'll do that and put the full list in a spoiler tag below. Regarding the four main colors of the armor, to make it easier I am labeling them as “light gray-blue”, “medium gray-blue”, “full gray-blue” and “dark gray-blue”, with light gray-blue being the lightest shade, full gray-blue being the full, true shade, medium gray-blue being something between light and full, and dark gray-blue being the darkest shade of gray-blue. There are some variations to these shades but these are the four primary for (hopefully) easier identification. Scale: Light gray-blue → medium gray-blue → full gray-blue → dark gray-blue. HELMET Helmet is medium gray-blue in color. Back of helmet swoops out in half-hexagonal shape. Ears come out to a point at the sides of the helmet. Trapezoids on dome of helmet and tears beneath the eyes are one or two shades lighter than the base medium gray-blue. Each have a thick black outline around them. → Level 2: All trapezoids and tears are raised (like Rogue One stormtrooper helmets). Rear trapezoids have five vertical black lines (“vents”), tears also have five black lines → Level 2: Trapezoid and tear lines are cut in, giving them depth (like Rogue One stormtrooper helmets). They are still painted black. Dark red flat lenses behind the helmet eyes. → Level 2: Flat dark red mirrored lenses. Black or dark gray rubber brow strip above eyes, bottom edges of front trapezoids go under strip. Eleven black C-shaped tube stripes angled outward at the back end. Can either be a flat decal or each stripe can be etched in. Medium navy blue teeth. Black mesh behind teeth. Rectangular ear greeblies that are one or two shades lighter than the base medium gray-blue. Ear greeblies are outlined with a thick black line. Ear greblies have three rectangular pips, one black inset rectangle, and one last pip behind it. Flat black chin greeblie. Black Hovi aerator tips with mesh on front. The interior of the aerators as well as the mesh are painted bright red. → Level 2: Red LED lights inside the aerator tips. Interior of the aerators are painted bright silver to reflect the light, the mesh is also painted a bright, reflective silver. All surfaces of the helmet should be glossy except for the chin greeblie (which is flat black). NECK SEAL Black with horizontal ribs and is fitted to the wearer. It extends from the base of the neck to the top to conceal the entire neck. (Stormtrooper style.) Or... Black in color with vertical ribbing. (Phase one clone trooper style.) No logos or labels are visible. The in-game model just has flat blackness around the neck (and most of the body "undersuit") so there isn't really a reference for it on the model. But seeing as the Phase Zeroes are essentially a mish-mash of clone trooper and stormtroper armor that either the clone trooper or the stormtrooper neck seal would probably be okay. I opted for the stormtrooper version for my armor, I like the look of it better.
-
Ah, neat! Does the baking soda give it a texture or does it interacting with the paint somehow? I'll have to try that sometime... I'm not completely thrilled with the texture on mine, it's a bit rougher and coarser than I wanted but I couldn't find any thin sand at craft stores, all I could find was the thicker, heavier sand that I used. Michaels had a container of somewhat finer sand than what I used but it was a small container of it, and the heavier sand was the same price but the container was almost three times bigger, so I went with that. I guess it's just very thick rust...
-
Thanks! I can't wait to, either. Hmm... I wonder when we'll ever be able to safely troop again... x.x
-
By "storing planes" do you mean storing alien spaceships? I was wrong about the helmet teeth, I was looking through my paints and realized that I did use a particular color to paint them. It's DecoArt Americana "Deep Midnight Blue". It's essentially a really deep, dark navy blue/blue-grey.
-
Alrighty, I dug out my paints over the weekend and got a lost of them. The only one that I'm not completely sure is on the Montana Gold paint that I used for the shoulder straps in place of the 004Connec paint that I ran out of. I think that it's "Denim", which looked fairly close to the base paint color after I had used some transparent paints on it, but I can't swear to it that Denim is the color I used for it. I also couldn't find the icy blue color I used for the jetpack vent frames on top, I'll keep looking for that. But anyway, here's the list of my paint plethora... Spray paints... 004Connec "Evolve" -Fully Navy (chest, thigh front/back, etc.) -Dark Navy (chest sides, thigh sides, etc.) -Medium Navy (calf stripes, stomach stripes, codpiece square) -Light Navy (small boxes on belt) Montana Black -Mouse (belt) Montana Gold -Denim (shoulder straps?) -Deep Sea (jetpack bottom vent frame) -Marble (jetpack thruster stripes) -Silver Chrome (knee and chest bolts, thermal detonator) Rust-oleum -Aluminum (jetpack thruster half-cones) -Flat Soft Iron (jetpack bottom, back, air intake) Krylon -Stainless Steel Finish (jetpack thrusters) Blair -Hi Gloss Varnish (jetpack thrusters) Belton Molotow Premium -Transparent Middle Grey Neutral** -Transparent White** -Transparent TOAST Signal Black** -Transparent Ultramarine Blue* -Transparent Shock Blue* **I used various coats of the transparent grey, white and black on all of the 004Connec navy paints to alter the color. The entire belt was also hit with various coats of these. *I didn't regularly use the transparent blues, I only kept them on hand and used them if I happened to make something too pale and needed to brighten it up again. Bottle acrylic paints... DecoArt Americana -Winter Blue (helmet vents/cheeks/back plates, ear greeblies) -Silver, black label metallic (inside aerators, aerator mesh, other things, I love this stuff) -Deep Midnight Blue (helmet teeth) -Black, gloss (helmet vents, chest vents, jetpack vents, stomach stripe dots, plate outlines) -Black, flat (helmet chin) -Gunmetal, black label metallic (armor chipping) Craft Smart -Bright Silver (also used inside aerators) DecoArt -Glamour Dust Ultra Fine Glitter, Silver (anything I wanted more shiny and reflective) Folkart -Clear Holographic Glitterific (thermal detonator, to make it more reflective)
-
Yeah, there are a lot of colors. Thankfully most of the colors are just different shades of the same so anyone making it could probably just get a few paint colors and then paint transparent colors over it to change the shades.That's what I did with mine, I essentially had three main colors of the gray-blue paint and then used transparent white, transparent grey and transparent black to alter the colors to fit the various shades. For the different colors on the armor, as far as I can tell, these are the various different places that get a different color... -Armor "overlay" (chest front, front thighs, etc.) and jetpack --> Medium grey-blue -Armor "underlay" (chest sides, thigh sides, etc.) --> Dark grey-blue -Shoulder straps (debatable, may or may not be a shade lighter than the overlay color) --> Medium grey-blue or shade ligther -Stomach stripes --> Dark grey with a hint of blue -Calf stripes --> Medium grey with a blue hue -Belt --> Light grey with a bluish tint -Belt boxes --> Very light grey-blue -Jetpack top vents --> Icy blue -Jetpack front vents --> Medium grey with blue tint -Jetpack bottom vents --> Very dark navy/very dark grey-blue -Jetback back and bottom --> Metallic gunmetal -Ear greeblies/helmet vents, etc. --> Pale sky blue/ pale grey-blue The gray-blue paints were from 004Connec, which I believe is also the brand, but I would never recommend using them. The paints work fine, the company itself is crap. All of them were navy-- "light navy", "medium navy", "dark navy". Montana Gold has a color that's very similar to the "medium navy" that I got from 004Connec, and I used that to paint the shoulder straps when I ran out of the 004Connec paint. I have to dig out the can to find the name of it. The belt is "mouse", which I think is also Montana Gold. I can't remember what I painted the belt boxes with. The transparent spray paints I need to dig out, I can't remember the brand but I bought them at a local art store as well as online. The other colors were fairly standard Krylon and Rust-oleum. As for the acrylic paints I think that almost all of them were DecoArt Americana from Michaels. There might be a couple Apple Barrel or whatever the brand is from Walmart, but I think that was only white and black. I have a ton of acrylic paints, around 150 or so, and I think that 90% of them are Americana. Like I mentioned, I don't have a specific color for the helmet teeth as it's a mixture of acrylics because I couldn't find a pre-made color that looked right to me. I might have actually used a pre-made color for the ear greeblies now that I think about it, I'll look through my stash and see if I can find any bottles that seem to match.
-
That said, here are some Pantone colors I found. I compared the various different colors for each part listed above and found the color that best matched them all. Base color: 4138 U ████ Dark armor: 5395 U ████ Belt: 431 U ████ Belt boxes: 2109 U ████ Stomach stripes: 546 U ████ Ear greeblies/cheek panels/forehead panels: 2164 U ████ Calf stripes: 546 U ████ (should actually be darker than stomach stripes) Top jetpack vent frame 441 U ████ Bottom jetpack vent frame: 5463 U ████ (looks too light, might need something else) Jetpack inner vent frames: 5463 U ████ Thruster stripe: 5315 U ████ Helmet teeth: Pantone doesn't have a match I'm not sure if there's a way to convert the Pantone colors to paint brand colors, like Montana Gold or something. Molotow does have some colors that are similar but not exact... https://artprimo.com/catalog/molotow_to_pantone_colors_guide.php Some of the basic colors I used... Jetpack greeblie: antique gold mixed with black and brown (acrylic) Jetpack circle vent outer ring: stormy grey (acrylic) Jetpack vent ring: metallic light gunmetal (acrylic) Jetpack back/tank/bottom: metallic gunmetal (spray paint, can't remember brand) Jetpack thrusters: Krylon stainless steel and fine silver glitter acrylic paint Jetpack side cones: metallic steel (spray paint, can't remember brand) The helmet teeth I don't have a color for, it was one I mixed myself. The cheek panels and helmet vent panels are the same, they're a color I mixed myself.
-
It is but I'm sure that things can be consolidated by combining similar colors. For example, the base armor color (the standard grey-blue) is listed as shuttle grey, Bright Grey and Blue Bayou. The colors are close enough that they could just be called one thing... It could probably even just be "medium grey-blue", the boxes on the belt "light grey-blue", the dark parts of the armor "dark grey-blue" or something like that. One reason that there are so many different colors is because of the texture. The texture is a little blotchy, I suppose to look like texture or something, so even for one color there are different variations to give it that look. The jetpack texture is actually the best reference for colors because it's got a lot of big, open areas that don't have any of that blotchy look. How technical should the color names be? Is something like "medium grey-blue" good enough it would it need to be more of something like "shuttle grey" or "blue bayou"?
-
Here's what I've found regarding the colors. Using a couple different websites I've been able to find the HEX color code and the closest match of color name. I haven't looked up Pantone colors yet, I'll do that next. These are the two sites that I used... https://pinetools.com/image-color-picker https://www.color-blindness.com/color-name-hue/ A) Black Rock 2B313D ████ B ) Slate Gray 747d8f ████ C) River Bed 586063 ████ D) Regent Gray 717e84 ████ E) Oxford Blue 2b363c ████ F) Kashmir Blue 57697d ████ G) Montana 383c3d ████ H) Blue Bayou 62737b ████ I) Haiti 201d26 ████ J) Shuttle Grey 60676f ████ K) Shuttle Grey 63686c ████ L) Blue Bayou 677580 ████ M) Regent Gray 747d84 ████ N) Aluminium 848b93 ████ O) Light Slate Gray 808a94 ████ P) Black Pearl 20272f ████ Q) Charade 3a4245 ████ R) Zumthor d5dade ████ S) Red Berry 711e28 ████ T) Blue Charcoal 262A30 ████ U) Pale Sky 5a676f ████ V) Blue Charcoal 252a2e ████ W) Mine Shaft 35393c ████ X) Mischka a7aeb4 ████ Y) Licorice (Blue) 2d3743 ████ Z) Falu Red 641015 ████ AA) Bordeaux 4b1a1d ████ AB) Aluminium 81898c ████ AC) Regent Grey 7f888d ████ A) Woodsmoke 242827 ████ B ) Black Bean 181d19 ████ C) Midnight Mass 131514 ████ D) Black 000000 ████ E) Mulled Wine 4d4b50 ████ F) Grey Chateau 969ea1 ████ G) Nero 222222 ████ H) Midnight Mass 1E231F ████ I) Charade 404548 ████ J) River Bed 575f62 ████ K) Birch 3A3223 ████ L) Midnight Mass 1e201f ████ M) Gunmetal 2c3437 ████ N) Trout 484f59 ████ O) Bokara Grey 22211f ████ P) Cape Cod 4f5150 ████ Q) Woodsmoke 252726 ████ R) Bright Grey 545b63 ████ S) Shuttle Grey 59646a ████ T) Corduroy 3c3e3d ████ U) Monsoon 7a737a ████ V) Jumbo 8e8e8c ████ W) Shuttle Grey 5a656b ████ So yeah, Blackwatch is right, the colors are varying shades of grey-blue (and some blue-grey).
-
Those changes look good to me. No complaints here. And yeah, I agree that we need a way to agree and identify the colors better. This weekend I'll try finding that website I mentioned which may help with getting the colors. If we can at least find names of the colors that would probably make it easier to find matching paint colors. Finding spray paint for this armor was a nightmare, I searched for a good part of a year. The color my armor is is actually a mixture of colors... A base coat of one color and then a few coats of transparent white, gray and black until I got something that looked pretty close to the references. Most of the paint I got was from a place called 00Connec, or something like that... but I would not recommend using them. Ever. They have the rudest customer service I've ever experienced, they pretty much tell you that they don't want to help you and that you're bothering them if you ask a question, and they never return your calls. One person outright hung up on me after I asked if they knew if there were any local sellers. I will never, ever shop with them again. Montana Gold has a color that's very similar to the color I got from 00Connec that I used to paint the main parts of the armor (the largest part of the chest, thighs, arms, etc.). The shoulder straps are actually painted with that color after I ran out of the 00Connec paint and couldn't get ahold of them to see if they had more (they changed the names of the paint on their website for some reason and I couldn't figure out which was which). It's the Montana Gold "Mt. Fuji" if I remember right, but I'd have to look at the can I have to say for certain. I used "Polar Blue" for the vent frame on the top of the jetpack and I think it was "Nautilus" for the vent frame on the bottom of the jetpack. I used "Mouse" for the belt and I think it was either "Cool Candy" or "Denim Light" for the boxes on it. I'll get my paint cans out this weekend and get the names.
-
I think that sounds pretty good so far! I do have a few thoughts, though... The skirt widens to partoially cover the top of the wearers backplate, and completely covers the shoulder straps. I'm not sure that description is entirely needed, or maybe it's a little too complicated? To me it's sounding like the back of the helmet is supposed to somehow drape over the armor and shoulder straps, like it's touching them, but it's just a long swoop (or whatever you want to call it) going back. Maybe just a description similar to that might be less confusing? Something like "a swoop/skirt/whatever from the back of the helmet and is roughly X inches long to the end". Also, "partially" is spelled wrong. The “ear” bars have three or four bumps and are gray or painted gray, with a black outline. Painting the bumps with rank stripes (highlighted) in black is optional. The ears do have four bumps, three, an indented bar (painted black inside), and one more bump. Depending on how picky it should be, the indented black bar is wider than the other four bars/bumps by roughly 1 1/2 times. I'm not sure what you mean by "painting the bumps with rank stripes"... Is that the black outline around the rectangular ear greeblie? The tears and traps have black outlines around them. Though maybe that's implied about painting them, I wasn't sure. Other than that I think it's sounding alright. I'll poke around for better color names, though. Gray, I think, isn't quite descriptive enough as "gray" is just a mix of black and white, it's a shade and not a color. By definition gray has no color in it. Heh, I'm a art/theater major, colors are my thing. ?? (I can also see more colors than average, but that's another story.) I seem to remember a website where you could upload an image and click on various parts and it would give you the name of the color you clicked on... I'll see if I can find that website again. Also, gray-blue and blue-gray are actually two different things. Gray-blue is gray with a hue of blue in it (a cool gray as opposed to a warm gray), blue-gray is blue with a gray hue. But maybe I'm being too nit-picky there... Sorry. Again, I'm an art dude... XD
-
So here are a few of my observations during my build. This is rather brief for now. FYI, the names of the colors are the "official" names found online, not the names of the paint I used, just to make it simple for now. I can provide the names of the spray paint colors I used if desired. The names below are the closest approximations that I could find to the colors I see. Most colors appear, to me, to be varying shades of blue-gray. https://en.wikipedia.org/wiki/Shades_of_blue https://en.wikipedia.org/wiki/Blue-gray Helmet -The helmet is painted "morning blue" -Teeth are painted "independence blue" -Black aerators with silver or red interior -Aerators are light with red LEDs -Dark red flat lenses (can't tell if they're supposed to look mirrored or not, either is probably fine) -Ear greeblies have three protruding rectangles, one black indented rectangle, and then one last protruding rectangle -Cheek vents and vent plates on back of the helmet have the vents cut in and are painted black inside -Tube vents could be either cut in or be a sticker (it's impossible to tell on the Pandemic texture if they're supposed to look cut in or not, the texture is too small) -Ear greeblies, vent plates and forehead plate are painted "periwinkle blue" -Chin is flat black Torso -The bulk of the chest armor is painted "morning blue" -Indented area near the shoulders should either be a separate piece under the main chest piece or be painted to look like it's sitting below -The section mentioned above is painted "Berkley blue" -Two pill-shaped indentations to the right side of the chest, painted black -Silver "bolts" on the chest, indented circular center, center is backlit with red LED lights -The shoulder straps are painted "morning blue" or a shade lighter (the Pandemic texture appears to show that the shoulder straps are a shade lighter but it's very close) -Stomach armor has "space cadet blue" stripes down the center and six black circular indentations down the center of each stripe -Cod piece is "morning blue" with an "independence blue" or "Berkley blue" square in the middle of it Arms -The outer half of the upper arm and lower arm armor are painted "morning blue" -The inner half of the armor is painted "Berkley blue" -The outer half of the armor layers over the inner half Legs -Thigh armor appears to be layered, with a base layer and two thicker layers over it on the front and back. The armor should appear to be made of two layers, or be painted to appear this way -The "over layers" on the front and back of the thigh armor are painted "morning blue" -The "under layer" on the center parts of the thigh armor are painted "Berkley blue" -The base color of the calf armor is "morning blue" -There is a stripe of "dark blue-gray" running down the front and back of the calf armor -Cone-shaped "bolts" on either side of the knee, painted silver, circular indented center that is lit with red LEDs Belt -Mouse gray base color -"Periwinkle" or "powder blue" boxes"(a shade or two lighter than the base armor color) -Cloth belt is mouse gray or similar in color (could either be the same width as the plastic belt or the width of a standard stormtrooper belt, it's the same width on the Pandemic texture the belt is also just one big graphic that wraps around the model with no separation between plastic and cloth, so I'd say either width should be fine) -Two clone trooper armor boxes on the front of the belt painted mouse gray. Shoes -Chelsea boots with a strip of material up the toe (similar to clone trooper shoes) -Painted "morning blue" -Soles are gray in color -Bottom of soles have a crinkle texture (probably optional?) -There is a portion of armor over the shoes made of two layers -There are two pill-shaped indentations on the shoe armor toward the two, painted black Jetpack -Base color of the jetpack is "morning blue" -Large air intake tank (not sure what to call this) down the enter -Air intake tank is painted gunmetal and has a rough stucco-like or stone-like texture -Back of the jetpack is gunmetal -Bottom of the jetpack is gunmetal -Jet thrusts are stainless steel or silver in color and have an off-white stripe around the center of them -Trapezoid-shape cut on the top of the air intake tank, inside of this opening is painted black -Optional black mesh over the trapezoid opening -Silver half cones on the sides of the jetpack above where the thrusters are attached -Wings on either side of the top of the jet pack -Bottom of wings has vents painted black and these are framed in "independence blue" -Outward facing side of the wings has vents painted black and these are framed in "dark blue-gray" -Top side of wings has vents painted black and these are framed in "dark blue-gray", which this is also framed in pale "periwinkle" Thermal detonator -Dark gray base color -Silver sides and face plate
-
Thank you! I’ve wanted to try doing rust effects for a while. This armor gave me a reason to try it out. I used a bunch of guides online and then tweaked a bit to get a look I wanted.
-
Nipple Trooper it is! The kinky side of the Empire! XD And thanks! I’ve never tried doing rust like that before and had to do some experimenting but I like how it turned out. The back armor had a bit more “rust” than the other parts because it was sort of my test piece, I figured that it would mostly be hidden by the jetpack so it was a good piece to try techniques on. And I wanted the back to look like it had gotten a little scorched from the thrusters, as it naturally would. The rust was a combination of black acrylic paint sprinkled with sand on top, dabs of various colors of acrylic over it, some air brushing and a dusting of ground cinnamon. I’m hoping to get some pictures wearing the armor this weekend. The weather just has to hold out.
-
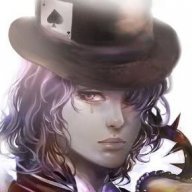
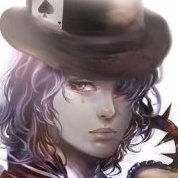
Finally, here's a picture of the finished suit! I'm pleased with how it turned out and, considering this was my first ever armor build, I learned a lot from it. I'm hoping to get some pictures of me wearing the armor this weekend if the weather is good. And here are a few closer pictures. I'm planning to take pictures of each individual piece against a green screen soon, I just have to make some room for the screen stand. Packing boxes to move has made space a bit tight (as you can probably see in some of the pictures, heh). And I am officially dubbing this the "Nipple Trooper"! Better change the CRL name now!
-
Sorry, not yet. Things got a little busy on my end. I am updating my build thread with some finished pictures, though...
-
Alrighty. I'll take a look at it and get some ideas going. Roger roger. I'll start listing a my observations and thoughts and go from there. I'll also try to snap some pictures this weekend to help explain my thoughts.
-
Would it be best for me to briefly list my thoughts on each section, like under helmet, for example, "red lenses", "flat black chin" and then expand on those later after opinions are given, or go into more detail right off the bat? At least for this first version of it. One thing, though, regarding the interior of the aerators being red... I'd actually recommend them being silver inside, something bright and reflective, because that will reflect the LED light better than red would. The interior of my aerators are painted a bright silver with some reflective glitter and that helps to reflect the light. Using some mirrored foil would probably work even better. Or even just gluing in a small strip of tin foil. Not that this should be required or anything, but when I printed the aerators, on the bottom inside I made the interior a bit of a cone shape (also painted silver) which directs the light upward and out. I also painted the mesh of the aerators a reflective silver (different than the interior, actually) so that when the lights were on the mesh would "disappear" a bit more. If the builder was able to get the LED lights closer to the end of the aerators they probably wouldn't have to worry so much about reflecting the light, so long as they used some kind of diffusion material to diffuse the light. My lights sit fairly far back so I had to make the insides more able to propel and focus the light. I did use diffusion material on all of the lights. Heh, a cheap shower curtain liner from the Dollar Tree works pretty well for light diffusion.
-
For this being my first ever armor build I chugged through it faster than I thought that I would as well, though I'm sure that there might still be a bit of tweaking I'll end up doing here and there. It's been raining over here the last few days so I probably wont get a chance to suit up this weekend but at least I can get pictures of the armor parts themselves. I can definitely help out with that! I've written a few costume standards for the Rebel Legion in the past so I understand the gist of what is likely to be needed, more or less. I've been keeping some notes along my build journey as well. I also kept all of the cans of spray paint that I used in case the color names are needed for anything.
-
Alrighty, I can definitely help out with these! I gather that it would probably be easier for me to first take some pictures of my parts to compare to and such? I've written a few costume standards for the Rebel Legion before so I understand the gist of what is likely needed.


