DHKnecht
-
Posts
50 -
Joined
-
Last visited
-
Days Won
1
Content Type
Profiles
Forums
Events
Everything posted by DHKnecht
-
Lt. Dan - can you show some pics of how you mounted the shoulder bells with the brackets? I saw the same ones you got and wonder how they look/work/assemble. Thanks!
-
Congrats! I had no doubt you'd be the first Lvl 2 DT!
-
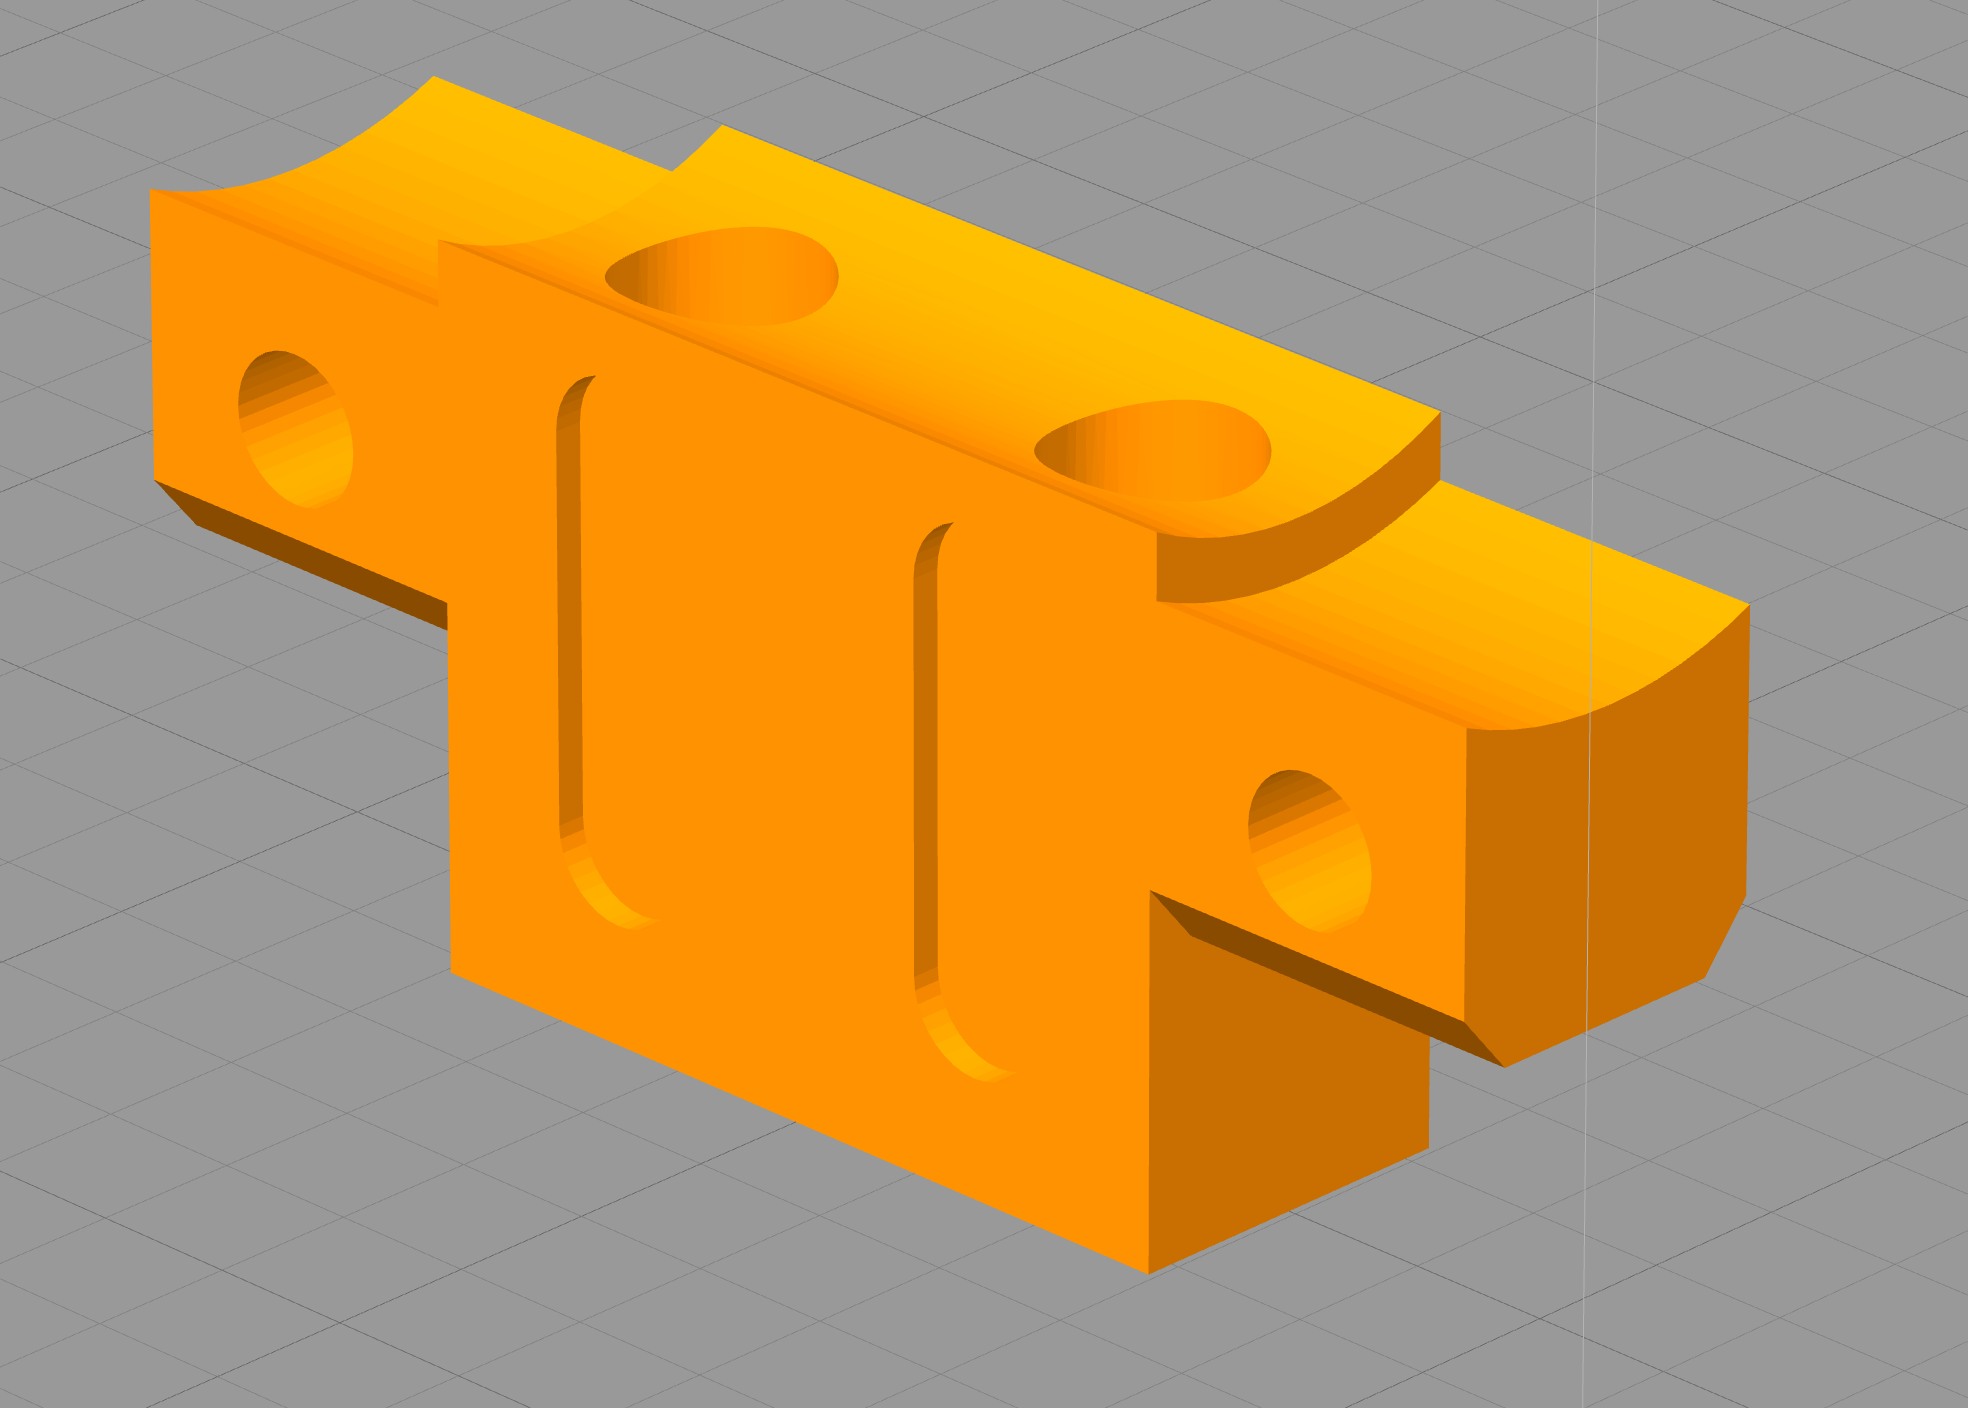
As many of you know, the scope mount for the SE-14R that comes with many of the 3d files and kits comes in many different flavors and sizes. I purchased Tom Campbell's files and it came with a square block for a scope mount. It works, and the scope mount is actually hidden by the belt loop in the holster. However, if you remove the blaster from the holster, it's just a square block, not the "T" shaped block that it should be, and doesn't have the inset oval details on the sides. Therefore, I created a 3d .stl file for printing that includes these details. I also added holes down the center that are countersunk for M4x30mm or 35mm screws so you can screw the mount into the barrel (after drilling holes in the barrel). This gives better strength to the attachment point, as this is the only attachment point of the scope/scope mount to the barrel/base. Anyway, I will distribute this file for free to anyone who wants it, just send me PM here and include your email. Feel free to print as many as you like for friends, etc., but in no way do I give permission to any maker or retailer to include this in any kit for sale. If you do, you must seek permission from me first. Basically, I want this to be given out for free to anyone who wants it, not just to have someone else make money off of it. A pic of the rendering is attached.

- 1 reply
-
- 3
-

-
I didn't do an 850 kit, I 3d printed mine from Tom Campbell's files. However, someone on Facebook posted a similar question about whether people painted their 850 kit, and if I remember right, almost everyone completely painted the 850 kit. Plus, if you are having to paint it anyway to cover scratches and fixed areas, it's probably better to get a uniform look, so painting everything is the way to go.
-
Although printing upside down does save on support material, to me, the cost of that material is negligible. I'd rather have a nice, solid, smooth outer surface and minimize sanding, rather than save an extra dollar's worth of support material. When I first started 3d printing, I hated wasting filament on supports. Now, I'd rather waste it on supports for a good print than have the print fail halfway through or end up with a print that is messed up and one I'll have to print again, which is an even bigger waste.
-
Those were awkward. I actually had a print fail or two getting those right, with the problem of placing them right on the print bed. Instead, I lifted them off the bed by 1/2 mm or so, so that I got supports built up underneath. There are a lot of supports here, but you need them to get a successful print with good detail on the exterior faces. The pic below is how I positioned them on the build plate. It helped to have Simplify3D so I could add supports where I wanted them, then play around with print times and filament usage.
-
CyberNinja's Death Trooper Build WIP
DHKnecht replied to CyberNinja89's topic in Imperial Death Trooper
I'm in Louisiana, so I feel your pain. I'm working on a refrigeration system for my entire unit, based in the backpack area ... stay tuned .... (should have posted that on April 1). -
Michael - just for comparison, I printed my armor on a Prusa Mk2S using PETG as well. I printed at .2 mm resolution, and for PETG, slowed the fan speed down to 30% (slowing the fan speed was the single best option I changed, and it made a helluva difference). I had to cut files like you due to the smaller size of the build plate, but I made them as big as I could otherwise, regardless of print time. The chest, for example, was cut into 4 pieces. If I could do it all over, I'd get a printer that could print the chest in on print. I spent countless hours sanding, filling, using bondo, sanding, filling again, more bondo ... all to make the seam lines where I glued pieces together disappear. Good luck!
-
CyberNinja's Death Trooper Build WIP
DHKnecht replied to CyberNinja89's topic in Imperial Death Trooper
Nice post ... keep us informed and send pictures of your build. Everyone loves seeing how the process is going. Also, I used Tom's files and printed the helmet at full size, and fit in the audio system by Tony Jobe (UKSWrath). I ordered 40mm x 40mm x 20mm fans, but switched them for 40mmx40mm x 10mm fans so they didn't take up as much space. On my one outing in full armor, I found out that fans are a MUST. It was 65 degrees outside, and felt great in full armor without the helmet on, but with it on, there was so little air circulation that it got hot quickly. -
Resizing Tom's files to fit - Who's done it?
DHKnecht replied to mjt82's topic in Imperial Death Trooper
I'm 6'0", 225 lbs., and based on what I discussed with Tom, printed everything at full size. The shins were way too long and tight, and I couldn't move in them, so I reduced the height (Z axis) only by 10%, which resulted in a shortening of the shins by 2 inches. That worked *much* better, but I should have increased the X and Y axes by 5%, and maybe even the Z axis by another 5%. I wish I had read @lancer's comment about printing just the slices, as that would have saved me some time and lots of filament. I also printed the forearms at full size, and those need to be shortened by an inch for better movement, but I can wear them now. -
Resizing Tom's files to fit - Who's done it?
DHKnecht replied to mjt82's topic in Imperial Death Trooper
Your method is probably fine. The armorsmith program is basically an estimated guess at proper sizing, which you could probably do with Meshmixer anyway. I'd have used armorsmith if it were available for the mac. Oh, and don't knock the Prusa printer. Yes, it's not able to print some of the larger parts in one go, but the print stability and output is second to none! -
I didn't mean to imply that the rivet head was a requirement anywhere on the boots. I was using that example discussed above in the split-rivets used on the TK Centurion. I'm with you IcyTrooper. The CRL has the specs for Lvl 2, and if you have the visible stitching and pull tab identical to the Jered, that should be enough for Lvl 2. The unseen padding around the ankle that is hidden by the shin shouldn't matter.
-
To Detachment Staff: You might be opening a can of worms here. If the padded part of the boots that is unseen becomes a requirement for Level 2, then what about the "corset" style of the abdomen/back plate? or the metal shoulder/side buckles? or how the shoulder bells attach? There really could be an endless discussion of detail that only the maker would know is there, and there is no real consensus on what strapping and attachment is accurate. If we later find out that no velcro was used anywhere, and it was all snaps and buckles, will we have to redo all of that? Is that what Level 2 is all about, or is it more for accurate *visible* detail? Personally, I'd stick with Chaos statement that it is only what is actually seen and visible, rather than what is underneath. As to the boots, Jereds and the replica "Killer" boots from Imperial Boots both fit the bill of course. If you want to modify a Mayer or Talib (or other boot) so that visible details are identical to the Jered, then that should be good too. Otherwise, people will be spending money buying new boots or modifying something that no one will see. If you bring in the "split rivet" discussion, the argument there is that the rivet head can be seen, and using the right type of rivet adds to the level of detail (even if you have to show an unseen area to prove it's the right type of rivet). yes, that might be splitting hairs, but at least it's a distinction.
-
Resizing Tom's files to fit - Who's done it?
DHKnecht replied to mjt82's topic in Imperial Death Trooper
I have used Tom's files and had very little need to resize, as I'm 6'0" and 225 lbs. However, what looked to be fine "as is" on the shins turned out to be too long, and I had already printed both completely. To reprint, I used Simplify3D and shrunk them by 20% in the Z axis. I probably need to do the same on the forearms, as they are a little bit long, but those can wait. I also used Meshmixer to cut the pieces before slicing in Simplify3D and printing on a Prusa Mk2S. I can't recommend Simplify3D enough, even though it's a $150 purchase. With Simplify3D, you can really play around with the position of parts, supports, etc., and not have to wait on a 5 minute time to re-slice. It's super fast, and allowed me to play around and get the best surface for each print to reduce sanding, get the best detail, etc. PS - I had heard of ArmorSmith mentioned by Lancer above, and wish I would have used it, but since I use a Mac and it's a PC only program, I never really looked into it. -
Death Trooper 3d print build in Melbourne
DHKnecht replied to Damo Fett's topic in Imperial Death Trooper
I second Woodo007's comments. I've built the suit from Tom Campbell's files and they really can't be beat, though the future files hinted at above look promising. I looked at the D03d files and see where you will have problems in accuracy, not to mention the unknown issues in printing. Tom's files print great, and are the basis for pretty much every vendor out there who sells pre-made fiberglass or plastic kits. They really are that good. -
From the CRL (update): Specialist Long Range Blaster Rifle ● Modified DLT-19 ● Fitted with telescopic scope. A resin cast or equivalent is acceptable. ● Has two tactical spotlight like devices fitted via scope mounts under the flash suppressor. Resin casts or equivalent are acceptable. o These devices are connected to the main body of the rifle via piping that runs along the barrel ● This rifle is not fitted with the M300 tactical light that is seen on the E-11D ● Black in color the rifle may be weathered. OPTIONAL Level two certification (if applicable): ● The two tactical spotlight like devices are operational and illuminate white. Therefore, since they "illuminate white", a glass lens with a white bulb, or a solid white lens, would seem to work. I don't believe they were ever shown on screen illuminated, but I could be wrong. At one point, it was rumored that those areas were some type of flame thrower, which fits with the fires seen after they raze the Erso home, but again, that was never seen on screen. (Otherwise, that's some highly specialized piping and detailed, non-symmetric cylinders hovering just below the front of the barrel, too much so to just be lights). Good luck!
-
Most of the one's I've seen are more of a Satin Black. Flat black is a little too flat, while gloss is, well, too glossy. Satin black is the good medium between the two. That's what I've used to paint parts of mine, but it's still a work in progress so no pictures yet.
- 1 reply
-
- 1
-

-
With the belt kit, you probably want to wait to get your pouches in before final assembly of everything. Also, you want to figure out how the belt will work and hook together in conjunction with your armor, since the abdomen piece, butt piece, and cod piece are all usually sandwiched under the belt. I'd wait and do the belt last once you have the armor (I know that might be tough, since you have that in hand and are anxious to work on something). As far as building the belt itself, check out this link: https://www.jollyrogers1942.com/death-trooper-build-reference.html This has a great tutorial on how to assemble the belt and each part of the belt. Personally, I don't use a belt buckle like in that instruction page. Instead, I use a 3" velcro strap as an underbelt, with velcro glued to the inside of the main rubber belt itself. I attach velcro to the armor pieces so I can sandwich them in place between the inner belt and main belt, and everything stays firm and in place without the outer belt sagging at all. I then hide the end of the main belt under the rear pouch. The underbelt also provides a good support for the straps for the thigh pieces, which end up being hidden behind your two front pouches. Good luck and keep posting your WIP pics and questions!
-
Looking great so far. This is one of the most impressive builds of all of the different CRL's out there when finished, and its difficulty has to be one of the toughest . One quick question, what material are you using to print it?
-
DHKnecht's Death Trooper Armor Build WIP
DHKnecht replied to DHKnecht's topic in Imperial Death Trooper
Chaos - thanks, that's a great idea with the felt backing. I will definitely do that with the back of the chest where it rubs on the abdominal plate, and on the inside of the shoulders. I already was figuring on doing the 2K clear coat. At $25 a can, it's a bit pricey, but if I can get away with 1 or 2 cans, it's worth it to protect it. Oh, and as to the wear spots that show primer, a sharpie is a nice quick fix. It dulls down and wipes out the white/gray of the primer, and doesn't affect the surrounding gloss black much at all. -
DHKnecht's Death Trooper Armor Build WIP
DHKnecht replied to DHKnecht's topic in Imperial Death Trooper
First Steps So my first time fully suited up was Halloween 2020. I had been feverishly working to get the suit completed, for the previous month, but it was progressing slowly. This was mostly due to the fact that I’m a perfectionist, so every detail had to be just right, every little minor imperfection, gap, warp or pinhole corrected, the paint application perfect. If not, sand off, fix the part and reapply. I was planning to go walk with my 4 year-old grandson who dressed as Kylo Ren. The day before, though, I was still sanding my re-printed shins and the ribbing areas of the thighs. I worked 38 hours straight, staying up all night on the 30th, and just painting the shins at 11:00 am on Halloween morning, hoping the paint had cured enough by 4:30 to wear them (it did). After painting the shins, I still had to sand the “rubber” ribs on the thighs and glue those together. On top of finishing all the pieces, I was really just getting started with the strapping, so I ended up doing things in quite a rush. I even left off quite a few smaller pieces so I could have something to wear (i.e., I left off the sniper plate from the thigh, the vent tubes on the helmet, the solid boxes from the belt, and I even left off the silver belt buckle unintentionally!). By the time I was packing it all up to go to my daughter’s house to suit up, it was already almost 6:00. By the time I got there and my son-in-law helped me suit up, Halloween was practically over. I missed walking with my grandson, but met him down the street, and hung out for about half an hour before heading back. Since it was night, and my lenses are a cut away from a plexiglass welder’s face shield, I couldn’t see anything at all. It was all dark. Here's a pic of us. I had already taken off the forearms and gloves, and just threw the helmet back on for a pic. YES, there are issues. The ab plate pokes out from under the chest plate, the chest plate is sticking out too far (due to the side plates not holding it all together right). However, this gave me an idea of how it should fit, and what I needed to work on. All in all, it wasn’t a failure, but it was far from a success. For starters, it was hot. Don’t get me wrong, the weather was beautiful, in the mid-60’s. However, it was stifling hot in the helmet. I have a set of fans, but didn’t get to put them in. Those are a MUST for next time. Then I had issues with the legs. I think the shins are still too long (I already reprinted them once, shortening them by two inches), and the thighs might be too small on the lower edge, so they didn’t ride up high enough. It didn’t help that one of the thigh straps came undone, so the right thigh fell. Moving to the arms, it turns out that the forearms are too long also. It appeared that they would be okay in testing, maybe a bit long, but acceptable. However, once I had the undersuit on, and the biceps and shoulders in place, I couldn’t bend my arms well at all, less than 90 degrees. It was frustrating. The chest and back were good, but not perfect. The side plates under the arms that join the chest to the back were a bit short. Again, they fit ok in testing, but not with the full undersuit, ab and lower back in place. That’ll be an easy reprint. The rest of the pieces were fine, even great. The ab plate, lower back, cod piece, butt plate, shoulders and biceps were perfect. I’m 6’ ft. even, 220 lbs., so I thought the ab plate would be small, but it actually fit fine and worked well. My design for the belt used an underbelt of velco, with a solid layer of Velcro on the inside of the main belt itself, so it was just like attaching two Velcro straps together. I sandwiched the ab plate, back plate, cod, and butt plate between the two belts (each plate had Velcro on the under and outer sides), so they held firmly in place and worked great. However, I’m not a fan of the how the pouches look. I ordered ones from Jim Tripon (with my undersuit), but he sent ones that are too big (maybe they were sandtroooper pouches? Anyone?). I ended up getting pouches from Przemysław Grzesiak, but they fit up too high and not firmly enough against the belt/body. I'll probably have to re-stitch the belt loops on these to get them to fit and look right. I mentioned the helmet (see post above for pictures). I think in terms of looks, it came out great (even though I forgot to add the flat black vent tubes, as seen in the pic of me and the grandson). I spent more time with bondo and sanding than I’d care to think about, all to get the contour perfect. I had issues with one of the face plates, first with pinholes, then when filled, the paint crazed badly, sanded, then crazed again. I finally had to sand it down all the way, even removing the primer, and pretty much started over, but it eventually came out right. I still have the full voice system (from ukswrath), tusk lights, and fans to add. Plus, I still need to paint a few of the recessed areas flat black. On top of all of that, I figured that I would be able to put it all on myself. Step through the thighs, into a boot. Bend my leg and lace up the boot, then put on the shins. Yeah, right. I couldn’t bend my leg enough with the thigh in place to get the boots on and laced up. Even then, I thought I could keep my leg bent when stepping on a chair seat (or my storage box) to put the shins on, but I couldn’t even do that. At that point, I pretty much gave up and let my son-in-law put it all on me and strap me in. Overall too, I was a little disappointed with the paint. Even those areas that I had painted weeks ago and that had time to cure still rubbed and scratched too easily. It scratched down to the gray primer, so it looked like white scratches that showed up way too easily. I used Duplicolor primer, and it went on nice and smooth. I sanded the primer with 1000 grit, then used Duplicolor Gloss Black High Performance Wheel Coating. This paint was recommended because it has a small amount of Urethane in it that is supposed to prevent damage and chipping (since it is designed to go on rims). I didn’t think it did any better than normal gloss black paint. So again, it wasn’t a failure, but it was far from a success. There go my hopes of being a 501st member anytime soon. Looks like I still have a few weeks or months ahead of me reprinting and painting and finished the fit for everything. Any and all comments are welcome! I know there are a lot of issues left to finish, so it doesn't bother me if anyone posts negative comments. I'd prefer that so it tells me where I can improve! Thanks for reading and I look forward to hearing from you! Don K. -
DHKnecht's Death Trooper Armor Build WIP
DHKnecht replied to DHKnecht's topic in Imperial Death Trooper
Here's an update and some pics of the helmet. I'll post more later of the complete suit. I wore it for Halloween but had to leave off some details so it still isn't ready to submit for approval. On here, for accuracy and detail, I actually added the metal screens under the vent holes. The wires coming out were for the speaker/voice system by UKSWrath, but it isn't fully installed yet. PS - I know there is a small piece on the upper front grill that broke off. I have it and need to re-attach it. Quick question for anyone out there --- what's the best position for the internal fans? It was cool outside for Halloween, but the helmet was *very* hot. -
DreadPirateRoberts Death Trooper WIP
DHKnecht replied to DreadPirateRoberts's topic in Imperial Death Trooper
I had the same issue with my NSM printed from Tom's files. The cover wouldn't close well and would keep "popping" open slightly. There was a ton of leftover support structures on the inside that I think was giving it problems, as well as just getting a good tight fit, rather than too big of a fit. However, after some time, continual sanding of different areas both inside the main part and the cover, I eventually got it to work. Keep at it and it will eventually fit fine. As to the magnets, I haven't installed those fully yet. It did see that the magnet fit fine in the NSM, but I'll have to go back and see how it fits in the helmet. Once you get yours to work, let us all know how it goes. Good luck! -
Those look great. Many of us are adventurous enough to get the armor and sand and finish it ourselves, or even print it from scratch. Not many are skilled enough to do what you are doing with making your own undersuit. I have some sewing skills and have made costumes, but designing it from scratch was way out of my skill level. This looks very very impressive. Keep us up to date on the material you used, how you did the ribbing (both the under arm, softer ribbed material and the gasket areas). Once you get it all complete, you might consider selling your patterns. I'd have liked to have that option, since I could have sewn it myself, but not designed it. Best of luck and I look forward to seeing how your suit and armor progresses!
-
If you are able to re-dye it black with the same look, I think you'd be fine. However, the trouble is dyeing it to the right level of black. I've done some work with leather and dyeing one color over another works if you are going darker, which is the case here. What you don't know, though, is what type of sealant they use on the leather, though you might be able to call Doc Marten company and find out. The bottom line is the new dye might not take well, or be splotchy, based on how they sealed the leather against water, stains, etc. good luck!