DHKnecht
-
Posts
50 -
Joined
-
Last visited
-
Days Won
1
Content Type
Profiles
Forums
Events
Everything posted by DHKnecht
-
Looking forward to this!
-
Good luck on your build. Post some pics when you get things in and keep us informed. It's great to read others builds, especially someone of your ... um ... stature. It will be interesting for all the other tall DT's out there to see how things fit.
-
DHKnecht's Death Trooper Armor Build WIP
DHKnecht replied to DHKnecht's topic in Imperial Death Trooper
No issues whatsoever with gluing PETG. I've used E6000 and medium viscosity superglue (with superglue accelerator). I'll do about 90% of a seam with E6000, coating each piece to be glued, leaving a little spot every few inches for superglue. After matching the pieces just right, I hit the superglue with accelerator to have it set instantly, and hold it in place with clamps while the E6000 dries. That gives both a hard set with the superglue as well as the longevity and flexibility of the E6000. Doing it this way, I've had very little that I even need to fill with a filler or bondo. One other thing -- I've made sure to adjust my prints so that I'm printing a flat surface against the printbed for each piece I have to glue. That way, it helps assure the right angle of the pieces and gives a nice, flat surface for each piece to mate with. If you take a look at the pic of the thigh pieces above, they were done this way, and the sanding at the seam was with a dremel with a sanding wheel. This smoothed the seam and I've since sanded the whole of them flat with an orbital sander and 150 grit sandpaper. This has gotten rid of almost all the print lines, which is helping greatly with the finishing process. (PETG also doesn't melt under an orbital sander like PLA would). Also, getting the right settings with PETG is important. Play around with your temperatures. I found that using the high end of the heat range for the print bed temperature was much better, whereas the mid to high range on print head temperature helped. However, the single biggest factor was the fan speed ... slow your fan speed down to about 30% when printing normally (with an override of 100% when bridging if you have that option). That lower fan speed gives much better layer to layer adhesion and helps let the PETG flex without coming apart. Good luck with your Mk3S ... I'm jealous ... having the filament sensor, power interruption protection, and removable print plate make this so much better .... -
Proposed Imperial Death Trooper CRL Update
DHKnecht replied to Chaos's topic in Imperial Death Trooper
@nanotek @Chaos Thank you guys. Got it and understand now. The pics and explanation cleared it up. Thanks again! -
Proposed Imperial Death Trooper CRL Update
DHKnecht replied to Chaos's topic in Imperial Death Trooper
@Chaos Hey, no rush, take care of yourself first!! Here's hoping it was minor and you'll have no long lasting issues with it. Get well soon! -
DHKnecht's Death Trooper Armor Build WIP
DHKnecht replied to DHKnecht's topic in Imperial Death Trooper
Thanks - I was curious about that, since the CRL pic shows 2, but the CRL itself only mentions 1. I figured it was just one since that's what everyone else did. The CRL must be an older picture. I'll also make an imgr account so I can post more. I've never used that site so I wasn't sure. Thanks again -
DHKnecht's Death Trooper Armor Build WIP
DHKnecht replied to DHKnecht's topic in Imperial Death Trooper
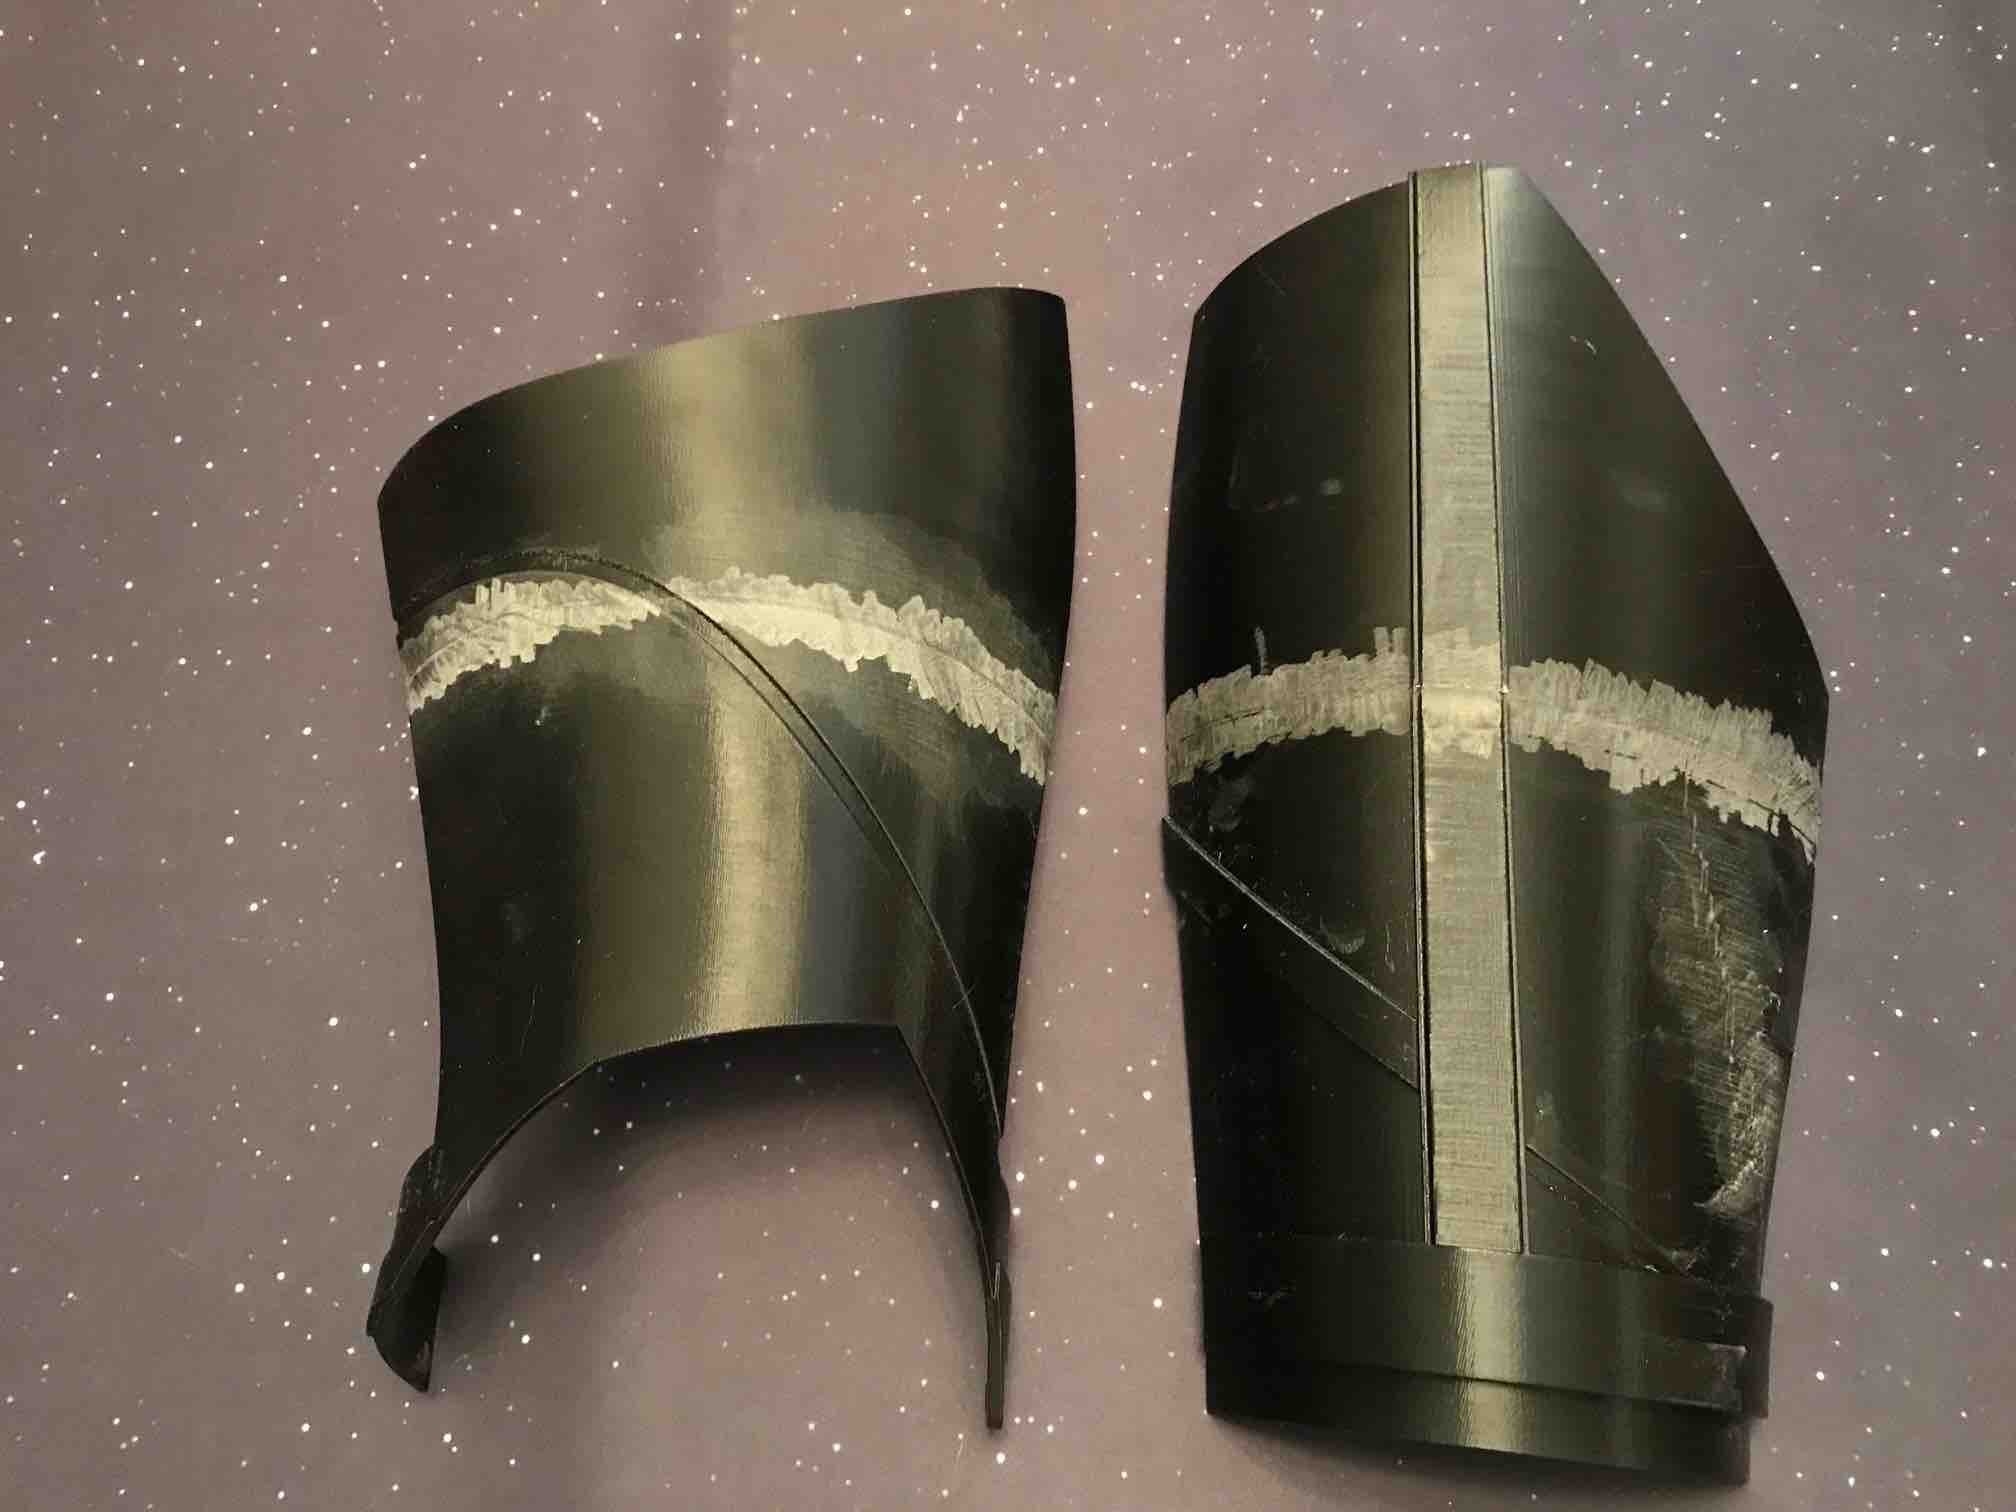
Here are a few pics of the work in progress (still getting used to how to upload pics here): First, the helmet, glued and some minor sanding where the pieces were joined, but that's it so far: Two pieces of the thighs. The sanding is where the pieces had to be joined. No filler has yet been used. Those are the only two pics it will let me upload. I need to figure out how to add more, or make these smaller ...
-
Probably not the best time (or is it?) to start a Death Trooper build, but here goes: (QUICK NOTE - Updated items below; all items received, printed, sanded and finished) In early February, 2020, we had to go to Orlando because my 15 year old was in the national cheerleader competition, hosted at ESPN World/Disney, and included tickets to Disney World. No complaints, since I was able to check out Galaxy’s Edge. Wow. I had never seen anything like it, nor even a Storm Trooper in person. We didn’t get to go on any of the attractions due to time and the long lines (in part because of the 20,000 cheerleaders there, too), but just being there to see it was incredible. The highlight had to be when my 3-year-old grandson broke down violently crying in fear when Kylo Ren was staring down a woman and telling her to “clear the way.” So that got my interest up. I’ve had a 3d printer for a couple of years now, a Prusa Mk2S, and had looked at some Death Trooper armor files for $100 or so, but they were split in so many little pieces that it didn’t look worthwhile. Also, it was quite a daunting thing to do just for a costume I’d never wear. A friend had told me about the 501st and the story about how some of the members were called in to help with production of The Mandalorian, but it wasn’t until I saw the storm troopers, Kylo Ren, Lord Vader, and others, IN PERSON, that I was blown away by the detail and sheer awesomeness of the kits. Yes, these weren’t 501st members, but it got me interested and I started looking. That led me to the 501st website, and from there, after reading about the function and history of the group, the CRL’s (I looked at ALL of them in detail), and even the local group here in Louisiana (Bast Alpha Garrison), I was really impressed. What finally got me hooked was this forum here – the Spec Ops. Reading what was available, vendors, pieces, sources for builds, build reports, and the like, convinced me to try. The most important thing? I contacted Tom Campbell with TDK Props (based on recommendations that I kept seeing on this site), purchased his files, and was incredible impressed with the accuracy and detail of the files. I started printing something small with an old roll of black PETG plastic, baking the roll to dry it out first. The hand plate cover looked great, so I moved to the right bicep. Half-way through, the filament snapped, ruining the print and jamming the hot end of the printer. In trying to clear the printer (and throwing away the bad roll of filament), I snapped a fan wire and had to re-solder it, then broke the heating wire trying to unscrew the nozzle. It was a comedy of errors, but I eventually disassembled the print head, cleaned it, replaced the parts, acquire new and better rolls of PETG, and got started again. After printing a few parts with some problems, I finally got the temperature of the hot end and print bed right and tweaked some other things and have it all dialed in perfectly (or near so). (If anyone wants more info on the print settings, feel free to send me a private message or ask here and I’ll send the info to you; I’m really impressed at how smooth PETG prints and how flexible it is – infinitely better than PLA). So that was actually almost two months ago. Everything is now printed and assembled, and I am on to sanding/painting. In the middle of printing, the Corona virus hit. I’m not sure whether it’s a great time to be working on this or not, as I’m working from home too, but it sure gave me time to stay on top of prints, so there was almost no down time when the printing wasn’t going. Unlike many of the build reports here, this is one where it will be almost all a direct 3d print (as opposed to a vacu-form or molded kit). In retrospect, it would have been easier to get Jim Tripon’s fiberglass kit or one of the similar ones, but my 3d printer churned away and that part is at least now done. Below is my list of parts/sources and what is completed so far, as well as some pictures of items already printed (but not yet finished/painted): •Helmet: 3d Print (Tom Campbell’s Files) – Printed; started sanding/finishing – see pics below —Helmet Electronics: Voice/iComm by UKSWrath – in hand, awaiting installation in helmet -- UPDATE - also have an Adafruit MP3 board with remote button to add under my glove to play Deathtrooper voice sounds (taken from a Youtube video of Battlefront Death Troopers speaking) —Helmet Fans: Self-built, acquired from ebay, various sources, 2 40mm fans —Helmet Padding: Airsoft Helmet Pads, 19pc set, Amazon.com, in hand —Helmet NSM: 3d Print (Tom Campbell’s Files) – Sanded and halfway primed/painted —NSM Light: Small LED, UKSWrath - UPDATE - not impressed with the LEDs; looking into switching to EL Panels —Helmet Eye Lens: Amazon.com, dark green face shield, as recommended by Chaos on this forum, in hand •Armor: 3d Print (Tom Campbell’s Files) – Printing 3/4 complete – see pics below —Armor Enhancements: Rubber Shoulder Straps/Buckles/Wrist Straps – Plastic Arms Dealer – in hand - UPDATE - the silicon wrist straps from Plastic Arms Dealer were nice and soft and stretchy, but one of them had some pits and holes and didn't look right; also, the color is a bit faded, not a true black; I ordered two from Przemysław Grzesiak and his were nice and dark black, but shipping from Poland resulted in one cracking beyond repair •Undersuit: Jim Tripon, ordered and completed; awaiting shipping to be available again from the Phillipines (Jim’s location) •Boots: almost ordered Imperial Boots, but found a pair of Doc Martens Mayer in my size on ebay, brand new, so scooped them up (for the same price in hand as the Imperial Boots, but without the long wait) •Gloves: Endor Finders – in hand (pun intended) •Balaclava: Amazon.com – in hand •Belt: Jim Tripon, awaiting shipping from the Phillipines —Canvas Belt Pouches: Jim Tripon - UPDATE - Jim's pouches were way too big - ordered and received the ones from Przemysław Grzesiak and they are much better in size and even better material, but the elastic belt loops should be positioned higher, as they tend to lean forward too much as if they are top heavy —Belt Boxes/Covers: 3d Print (Tom Campbell’s Files) —Leather Belt Pouch: the CRL only says one, but the picture has two; making one myself, since I have some leatherworking experience, but this might be one of the last things I do - UPDATE - ordered one from Przemysław Grzesiak; it's decent, maybe looking a little hastily made, but it'll do fine —SE-14R Holster: making this myself, based on Nanotek’s thread/plans here on specops •SE-14R: 3d Print (Tom Campbell’s Files) – Printed and 95% complete; just need some touch ups to the paint and to seal it with clear coat •E-11D: 3d Print (Tom Campbell’s Files) – Printed and ready for sanding/paint assembly —m300 Light: Amazon.com (Chinese knockoff) —Sling & Swivels: ebay —Retractable Stock Rods: ebay (used some 200mm RC car axels) —Electronics: Blast FX by TRamp ordered, awaiting completion and shipping in about a month (that’s how long his build/ship times are) •DLT-19D: 3d Print (Tom Campbell’s Files) – printing complete, but not working on this one really until everything submitted and awaiting approval •Heavy Weapons Specialist Pauldron and Chest Rig—Jim Tripon – awaiting shipping •Heavy Weapons Specialist MP40 Ammo Pouch – still sourcing this - UPDATE - received a nice one from Przemysław Grzesiak •Heavy Weapons Specialist Grenades and Magazines – 3d printed, haven’t printed these yet, working on normal approval first I’ve included pictures below of different parts in different stages of completion. I still have a long way to go, but I can’t wait for this to be done and finalized. This armor looks superb and I hope I can get mine to look as good as everyone else. I plan to go for Lvl 2 Specialist, so I’m building with that approach. I’ll post more on my build process as far as sanding grits, processing times, layers of paint, etc., etc., but it’s all in a state of change as I play around with it for now. Finally, if anyone sees any issues in the paint, sanding, printing, layout, form …. anything …. Please let me know!! I am not afraid of criticism … it is encouraged!! I welcome any input, no matter how harsh, on how to make this as good a build as I can. I couldn’t have done even what little I have so far without the help I’ve received from many of the members on here, either what they have already posted or what they helped with when messaged. Thanks in advance and here’s to the long process ... NOTE - Pics to follow in next post …
-
Proposed Imperial Death Trooper CRL Update
DHKnecht replied to Chaos's topic in Imperial Death Trooper
I have a question on the Shoulder Straps for Level 2. It says that they will "also have a slight inward angled curve". Does that mean than the buckles will be angled slightly inwards, or the entire shoulder straps? I purchased the rubber ones from PlasticArmsDealer and they don't have any inward curve, but could be altered to have that. What I'm curious about is how much of a curve is needed? Are there any reference/comparison pics showing this curve v. a straight/uncurved shoulder strap? -
That finish looks great. Thanks for letting us know how you achieved it, and I'll be following your advice with the XTC-3D. Good luck with the final suit and approval!
-
Here are some references that I've seen from others. Check out these, as they are way more experienced that I at assembly and strapping. This first one is from ArmoryShop Props, one of the pre-eminent makers of full Death Trooper Armor kits: The second video is from Andrew McCleary with PlasticArmsDealer, another pre-eminent maker of DT Armor based out of Florida. His video shows how DT Armor is put on, so you can see how it is strapped and assembled. Third, (and these are in no particular order), is an example of someone who strapped up a fiberglass kit from JimmiRoquai (Jim Tripon), another great DT armor maker from the Phillipines: Finally, there is a video out there from Tom Campbell, the author of the best 3d printing files, showing how he has strapped his armor. However, I can't find it right off. If and when I find it, I'll edit this post and add it in. Good luck with your build!
- 1 reply
-
- 1
-

-
As per the CRL - There is a leather or leather-style pouch (approximate dimensions 120mm x 60mm x 25mm) with a single press stud and no visible stitching located between front pouch and the belt box on the wearer's left. The proposed revised CRL adds "approximate dimensions 4 3/4th x 2 3/8th x 1 inches". As a side note, the prices for a pre-made pouch like this are unreal. $68 from Trooperbay.com. I'm a little skilled in leatherworking and will be making mine, and even thought of offering it to other Death Troopers/501st members for 1/2 that price. We'll see. The best I've seen for the holster is in Nanotek's thread linked below. There's a downloadable template, but it doesn't have any dimensions, though it's a great start and you can figure out the dimensions based on your SE-14R and Nanotek's template. He hinted at posting a similar build thread for the pouch, but I haven't seen that one posted yet. Best of luck!
-
Mitcheg1/Greg - a few questions --- what is your process for filling, sanding and painting the 3d prints? What filler did you use when you printed parts in multiple pieces then attached them together? Did you use anything to help before sanding and painting, such as Filler Primer or XTC-3d? What kind of primer and paint did you use? I'm just about at the same stage myself and have looked at several different methods, so wanted to see what you did so I can try it out as well. Thanks!
-
Proposed Imperial Death Trooper CRL Update
DHKnecht replied to Chaos's topic in Imperial Death Trooper
Just wanted to add my $.02. I'm not a 501st member yet as I'm still working on my first build. However, I've been following these forums almost daily for the 2 months I've been working on this. The boot issue is one that has come up before. One guy found some $20 boots that didn't even have the ribbing on the soles and was a little miffed when it was suggested he add that detail, though he was told they would pass Level 1 as is. I just wanted to add my support for the authenticity required by the Jereds for Level 2. Everyone should remember that this requirement is for Level 2 Specialist (not Heavy Weapons Specialist) certification, and not for general approval. This gives us all something to strive for and to be a Specialist means you put forth the extra time, effort and even money to make your suit as authentic as possible. I personally found a pair of Mayer boots so I didn't have to order the "killer" (replica Jereds) from Imperial Boots (not that Imperial Boots are bad, I've read great things, but the wait time was ... interesting). In order to make the Mayer boots fit the Level 2 requirements, I'd need to add stitching, move the pull tab down, and take down the shine a bit. To me, that's what Level 2 authenticity is all about, and people who go through that extra step should be rewarded, while those with Level 1 are still pretty remarkable as this is one of the most difficult suits to build (from what I've read). Again, I'm new, but I want to commend the staff on an excellent job on the revisions and the balance between approvable Level 1 and authentic Level 2. Here's waiting to see if there is ever a Level 3 ... Don K. -
Proposed Imperial Death Trooper CRL Update
DHKnecht replied to Chaos's topic in Imperial Death Trooper
Just a quick notice of correction -- PTEG should be PETG, for Polyethylene Terephthalate, Glycol Modified. Otherwise, this revision is incredible. Exactly what I need right now as I just finished printing my full armor set out of PETG from Tom Campbell's files and I am in the process of assembling, sanding and painting everything for final approval. Awesome revision and thanks very much for the detail and hard work! -
Who made your helmet? Knowing that would help some of the others on this site who have had the same one identify what they did to add the lighting. I think the bottom line, though, is if that there are already holes for the lighting, I'd sand/prime/paint first, but if not, I'd get all the access drilled and opened up first, then sand/prime/paint. By the way, I'd recommend the voice changer from UKSWrath. I have this system to install and it does everything you might want. Tony is a member here, communication is unparalleled, and he makes great stuff (including LED lighting for the NASM and tusks of your helmet). https://www.etsy.com/shop/UkswrathsSpeciality?ref=simple-shop-header-name&listing_id=525802212
-
The ones I've seen that most people have are by Plastic Arms Dealer. I recently placed an order for some for $20 on his Etsy store, but they aren't listed there (I just checked to provide a link here). You can also check PlasticArmsDealer.com, but they sometimes show "out of stock" or aren't listed at all. At worst, message him and check on the availability. He's great with communication.
-
You are a braver person than I am, printing in ABS. I've had ZERO luck with ABS (always getting warping, inconsistent prints, poor bed adhesion, you name it). I'm printing my full armor set and weapons in PETG. Once I progress more, I'll be posting a build thread. Further, you are right, the difference is great. The latest pic looks really spot on and so much better! Good luck with the final clear coat. These things are a *ton* of work but so rewarding when you get them finished!
-
Your prints look great form-wise. What material did you use to print them, ABS? Taking a look at your pics, though, I don't think 2000 grit sandpaper will be your savior. You need to have a good flat layer sanded to 600 grit first, then work up to 2000 or higher to get your gloss shine. Take a look at the post below. Ensi does a great job explaining how to achieve that level of high gloss. My suggestion would be to go over everything with a 320 or 600 grit and get it all smooth first, then work up to the shine like in Ensi's post. (As a quick note, too, you might try some light filler in the ridges of the upper grille/nasal area. It's a pain getting all of that out of 3d prints ... I'm doing the same myself. Metal finishes make even the slightest imperfections stand out, even worse than gloss black).
-
I see this post is over a year old, but just wanted to offer my thanks as well for posting a great build with *tons* of helpful pictures. I'm in the process of doing exactly what you have done, with a 3d print from Tom Campbell's files, and seeing how you have worked it out step by step is a *tremendous* help. Thanks again!
-
Source for Eye Lens for Death Trooper Helmet
DHKnecht replied to DHKnecht's topic in Imperial Death Trooper
Chaos - thanks very much ... I went with the darker face shield from Amazon ... looks like this will provide a good dark lens but still have the hint of green required. Greatly appreciate the help and I'll post pics of the helmet once it's finished. I've got it all printed, now just to start the assembly, painting and sanding. Thanks again! -
I'm in the process of 3d printing a Death Trooper Helmet/Armor from Tom Campbell's files (which are incredible, by the way). I have the helmet printed and ready to assemble and sand, but I'm looking for the proper eye lens. I've searched and can't find any recommendations for what to use, what type of acrylic, acetate, plastic, etc., nor what is the best color. Any recommendations? I'd love to know what thickness, material, and color others have used, or what you guys would recommend. Thanks in advance for the help! Don K. UPDATE - I found this on TrooperBay.com, and I assume the Dark Green is the proper color. Can anyone confirm? https://trooperbay.com/costuming-accessories/lenses-eyewear/dark-green-lens-material
-
Looking forward to seeing your pics. I'm in the process of 3d printing a kit now and would like to see how yours is coming for comparison. Good luck on the build!
-
I am a new member of this forum (not an official 501st member yet) and purchased the files from Tom Campbell. Tom is great and his files are superb. I'm printing out a complete death trooper kit now. I had to break up the main part of the helmet into 6 pieces to print it (my printer's print size is 10 x 8 x 8 in.), and I'm printing it in PETG for the strength and flexibility. Once I get further underway I'll post a build on here, but for now, I can't recommend Tom enough.