SirCalcium
-
Posts
84 -
Joined
-
Last visited
-
Days Won
5
Content Type
Profiles
Forums
Events
Everything posted by SirCalcium
-
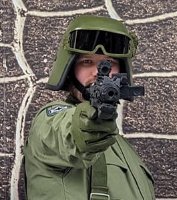
Done some more weathering to the helmet Additionally one of my Garrison members who made an AT-AT Commander had a spare set of goggles that he gave me. Aside from painting the frames green and replacing the band with a green one, is there any other mods needed?
-
The trim I ordered arrived. I did some initial weathering, but I think it needs more.
-
@Jankes had a look at your WIP, and could you tell me where you got those Polish Army Goggles?
-
Quick update, helmet is clear coated and next step is dirtying up it and the TK belt. I've got some trim ordered and waiting it's arrival. Really the only part that's left are the goggles. Any suggestions?
-
I'm in Scotland I'll get rain sooner or later. Anyways, got the helmet painted green Still needs to be clear coated, and weathered. Aside from weathering parts, the last 2 parts needed are the black trim on the helmet, and the goggles. For the trim I have 2 options. Either paint the trim section on the helmet black, or apply a trim around the helmet
-
Good to hear. I can proceed with finishing up the helmet then. ? At this point in time I don't think I'll be aiming for Specialist, mainly because the main seller of ROTJ parts in the UK isn't working on TK parts at this point in time (Cast from Original), however I'm not against working towards Specialist at a later date. I'll definitely weather the parts I can, maybe I could wait for the rain to come back and go for a walk.
-
Apologies for the silence, but I've got some updates to share. The gloves have been dirtied The chin cups I bought earlier, I decided wouldn't cut it and luckily a friend 3D printed me a chin cup used for X-Wing pilot helmets. Going by the CRL model thats the one used for the helmet. With the part finished and some elastic measured out, I have temporarily fixed the strap to my helmet pending feedback If all is well then I can rivet the strap in place, then add the screw caps, and generally finish the helmet Additionally I've been working on a TK ammo belt with help from a local Garrison armourer Just waiting for the glue on the screw caps to dry (using Gorilla Glue since E6000 isn't as easy to find in the UK). When the glues all set I can weather it up.
-
Quick update. Gloves with stitching have been painted
-
Alright I went ahead with the gloves, and I'm happy with them. Need to be greened now. I managed to get a chin cups, plus spares So now the questions are; 1. Webbing or elastic for the strap that hangs from the helmet? 2. How best to secure the strap to the helmet? 3. When attaching the TU to the helmet is there a specific location, or keep it on the left side above the ear? I'm to guess the strap and optional screw caps would be in line with the wearers ears?
-
I had a shot at gluing some lengths of overlocking thread to my gloves, and I decided before I go to far to show what I've done and make sure it hasn't gone wrong. There's a part nearer the bottom of the left stitch I may have to apply a new layer of thread
-
I'm assuming when you say PVA, you mean the glue? Also what length of overlock thread did you use for each stitch on the gloves?
-
Quick update. I had a shot with my mother's overlocker (that's what a surger is called in the UK), and "made" a line of runoff thread. Aside from paint and glue does it need any extra alterations?
-
To answer the questions. 1. I spoke to the suits creator and he told me it's made of Cotton Drill, same as the ICAT and Mudtroopers. 2. Which Bolt, I don't know I'm afraid. 3. I tried 2 putties that as far as I'm aware are UK exclusive. The first is Holts Cataloy Knifing Putty which is cheap but hard to get out the tube. The second (which is much better) is Isopon Knifing Putty, and based on it's performance and on video's I've seen, this stuff is basically bondo glazing and spot putty (premixed version) 4. I still don't know what files were used to print the helmet I'm afraid. After some rounds acetone/putty solution, my spray putty of choice, along with some high grit sandpaper. I've got the helmet to a level of smoothness I am happy with. My choice of Spray Putty is Motip Spray Putty. It's thick spray paint meant for filling in scratches I used this putty to smooth out the Telemetry Unit too. I could've used the acetone/putty solution but I didn't feel comfortable applying it to a heavily detailed part. The results of priming, filling and sanding Next stage would be fixing the TU to the helmet. By luck I found I had some screw caps on my house, but worth checking if these are acceptable, and if yes where on the helmet the should be fixed? The TK Ammo belt I ordered also arrived. It's an ANH variant from RWA Creations. The provider of the ROTJ belt, CFO, was unable to provide a belt at this point in time.
-
Been a while since I last posted. To fill the gaps on the helmet I've been using a new technique I heard that involves diluting glazing/knifing putty with acetone, making it into a thin slurry that can be painted onto the printed part. The acetone will evaporate within minutes and the dried putty can be sanded. After a first round of just applying putty straight from the tube A coat of the acetone diluted putty A coat of primer After sanding At this point I'll skip the results of additional layers of putty, priming and sanding Still have some layer lines to hide along with finishing the telemetry unit, but that can be done with some spray filler putty, and higher grit sand paper. I'm not intending to get all the inside smooth since it'll be covered with the helmet padding I intend to use. As for the patches, I've sewn them back onto the flight suit, and I'm hopeful they are at the right location on the sleeves Other things that need done are detailing the gloves, acquiring goggles and a chin cup, and whilst it's not needed for Lvl 1 clearance I'm thinking about adding the screw caps to add some detail to the helmet.
-
I got the finished helmet and telemetry unit And with that will begin the never-ending process of filling, sanding, priming, filling, sanding priming. I have worked on 3D prints and Clone armour, so nothing too difficult. Afterwards it just needs padding and the chin strap. As for the patches, unless told otherwise I'll go with the 3 inches down the sleeve. Whilst at a troop with the head armourer of my garrison he mentioned that the E11 in the CRL is an ANH one, but the one I have is an ESB. Is there a specific model of E11 that IATs can use?
-
Ok 2 things I've done (that I can show), first is the patches. The first one is at 1 inch below the shoulder seam, and the second is 3 inches below the seam Second thing is I tried on the modified boots
-
Made some small steps on this. I trimmed down the boots so they're the right height, and whilst level 2 clearance asks for them to be Olive Green I personally like the black worn look, but opinions may change. I spoke with a friend and fellow ISG member about printing the Version 1 helmet, and he agreed to do it, just waiting to get the final result. I've spoken with some TK suppliers local to the UK about getting a TK ammo belt, just waiting for replies
-
Flight suit is made from Cotton Drill, and was made by a fellow ISG member. Might as well ask some questions of my own. 1st. I have a pair of Jackboots I bought second hand, with some trimming (I've used some pens to mark were 20 and 23cms are) could they pass clearance? 2nd. I plan to get a TK Ammo belt for this costume. I am aware the CRL's Lvl 2 clearance asks for an ROTJ belt with the ANH drop boxes, but for Lvl 1 clearance is there any limitations, i.e. can I use either an ANH or an ROTJ belt? 3rd. How far up the sleeve should the patches be?
-
Hello all. Quick intro, I am DZ19195 from the Imperial Scottish Garrison, and I bought an incomplete Imperial Army Trooper from a friend who decided not to finish the costume, looking to add a TX to my TKID. What I got. A custom made flight suit, patches need to be raised higher up the sleeve The gloves, belt, H strap, pouches, E11 holster and hat I also got an E11 I did get a pair of boots with the costume too, however since they're too small for my large feet they're a no. It's also worth checking if these types of boots would pass basic clearance too (I was told they are X-Wing boots) Aside from better boots what I'd like to add to this costume is the Helmet as depicted in version 1, and the TK Ammo belt.