

trooper
-
Posts
325 -
Joined
-
Last visited
Content Type
Profiles
Forums
Events
Everything posted by trooper
-
Welcome aboard the fun ship
-
I'm with you on the foil part it looks good but would drive me crazy attempting to do it that way. I think I will stick with the brush
-
Nordic TX (AM) under construction [Now Constructed]
trooper replied to Amplexor's topic in Shadow Stormtrooper
I love all the little extra goodies that the AM kit supply. Hand plates 3 different kinds. 2 knee plates incase you kneal to hard -
Probably best thing to do is get in touch with your local Garrison and they should be able to sign you up and give you all the information needed in regards to armour .
-
will try to up date as pieces get built, but you know what its like when ya get carried away..... forgrt to take pics. Q1 what clour silver should i be painting the frown
-
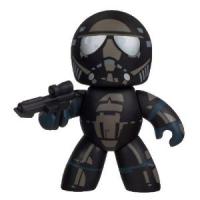
Howdy folks hope everybody had a great christmas and a wonderful new year. This will be a tutorial of my Shadow storm trooper build which when completed will hopefully qualify me for the specialist program. The usual brown box that we love seeing when ordering any armour finally turned up on my door step this week. Maker: Shepparton Design studios Details: The armour was ordered as a full black ABS kit unassembled but trimmed. So all is required is to follow the instructions and put it all together. They do sell them already assembled but as this is my fourth costume build i prefer to assemble it the way i want to using the tips and tricks i have learnt over the years. Box Contents: The box came with everything in individually wrapped pieces in plastic bags which where dot colour coded to make the assembly easier. (must cost them a fortune in plastic bags and rubberbands) There was also rubber chemical gloves, full one piece black undersuit supplied as well. There was a full detailed instruction book and a detailed booklet containing information about the company and how to reorder replacement parts if required. All the glue was supplied as well which was also black. Okay after reading the book and checking to make sure all parts where present and counted for i started the build on the helmet. The helmet came as a 2 piece cap back with the teeth area in the frown already filed out and ready for painting. The helmet was probably one of the easiest i have built and was all assembled within a couple of hours minus the painting of the frown and the lens install. The photo shows size comparison next to my AP helmet Today was drooling over the helmet day and more building. Forearm assembled and waiting for the glue to dry, bicep is next on the agenda.
-
My (not quite) shiny (yet) new TX helmet
trooper replied to stormtrooperguy's topic in Shadow Stormtrooper
I think he is busy doing the CRL's -
Nice picks TX7398... love the mailbox photo as well what brand of armour is it Jef ?
-
Is this any help to you, he does have a E11 though E-11s sniper rifle Production information Manufacturer BlasTech Industries Model E-11s sniper rifle Type Sniper rifle; modified Blaster rifle Physical and technical specifications Capacity 6 shots Usage and history Era(s) Rebellion era Affiliation Galactic Empire The E-11s sniper rifle was a heavily modified version of the E-11 blaster rifle, which was the standard issue weapon for the Empire's Scout troopers. The E-11s had a high-powered scope, allowing it to be used as a sniper weapon. In exchange for long-range power, however, the E-11s could only fire 6 shots before recharging. Also it was a very effective rifle as it could withstand any kind of weather and seldom jammed. It could shoot about 3 miles.
-
My (not quite) shiny (yet) new TX helmet
trooper replied to stormtrooperguy's topic in Shadow Stormtrooper
Nice work Brian, its always a pleasure watching you work. -
Nordic TX (AM) under construction [Now Constructed]
trooper replied to Amplexor's topic in Shadow Stormtrooper
Trooper bay sells them on line. I just ordered some and they where cheap even with shipping to Oz . -
Welcome and i have replied to your PM.
-
Very Nice indeed I just took delivery of one myself... Sooo Shiney and clean
-
Nordic TX (AM) under construction [Now Constructed]
trooper replied to Amplexor's topic in Shadow Stormtrooper
Just looking how wonderful ths pic is with everything laid out nicely then i noticed the helmet and memories came floating back to me of how much drama i had putting my TK AM helmet together. I still have it but it is now a dust collecter and i currently use a AP helmet. -
Would love to come over one day for a visit.
-
Thanks everybody. I love this place even though i am thousands of miles away.
-
Thankyou Boss.... Pics have been submitted and just waiting on a reply from our GML. The waiting game ... hate playing the waiting game
-
Hey Mr Matt can you send me that PM as well regarding where to purchase the Black Armour. Darth raider sorry for Hijacking your thread.
-
Yeah i was quiet surprised how good it did turn out
-
You mean this nose piece
-
Thankyou sir. Do you see anything that may stop approval.
-
After speaking to the guy who i bought it from all he said to do was give it a very good clean up, let it dry for about a week. Then apply 2 coats of grey primer then apply 2 coats of flat black and let it sit in a dry to warm area for a few days. pic showing size of pistol against the gloves and boxes
-
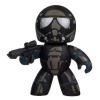
Morning All, I have been working hard to get this armour finished for Armageddon Melbourne which was last weekend but unfortunately i did not quiet get it finished in time for that weekend. I didnt want to rush it and stuff it up so i finished it when i got home and here are some pics for you to view, still have a few adjustments to make but pretty well done. The pics aern't the best but am due to take some more today. Armour pieces all trimmed Rubber resin pistol has been given 2 coats of primer and left to dry for days..... Then 2 coats of flat black applied and left for days to dry. This is the KS helmet which took me several attempts at building this but after hours and hours of frustration it all came together. This is end result but still need to tweak a bit here and a bit there.
-
howdy folks sorry for the absence and silence but have been busy with life and work. I am back on track now with my costume building and need some advice from the experts. I am about to do the belt and need to know if Rivets are allowed to hold it all together. Are rivets also allowed to be used with the webbing supplied to attach it all to the main part of the belt. The belt is a nightmare as i don't know how far down do the side boxes sit from the belt. How long is the webbing in the centre part of the belt supposed to be. Any help would be appreciated to get this monkey off my back
-
Very Nice