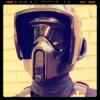
Griffin-X[501st] Posted September 23, 2011 Share Posted September 23, 2011 Hey everyone, I'm a long time Star Wars fan, but new to the TX costume. I've been exposed to the Shadow Trooper for a few years via figures, comics, etc and have checked out the forum and work you all have done. It's really awesome and a great resource. Anyways, I am purchasing an AM kit from a friend. It will require some mods and tweaks to get it up to par and fit me. I will be posting pics to this topic and hope you guys can help guide me. Thanks in advance! This is the bucket. Right away I will be replacing the lenses with darker material. I do not plan to go silver at this time. Link to comment
ELP[501st] Posted September 23, 2011 Share Posted September 23, 2011 Nice Pics thanks for sharing and good to see the start of a WIP (work in progress) thread! Good call on changing the lenses. The material may not be dark enough, but guaranteed those bubble lenses can be pretty difficult for some people to see through. Your frown, ear buds, and indents (cheeks and temples) will probably need some tweaking. They look like decals or glued on paper so that shouldn't be too hard to fix/remove ... If it's paint the best solution would probably be to remove the old paint with soap & water and your thumbnail and then either leave as is (bare plastic - black gloss is fine), or apply paint or decals for your desired finish. As far as replacement decals go have a look at Trooperbay (Mike Appling - TK 4510) he's got a great supply of stuff for modding, altering and generally blinging out your kit. Spec. Ops helmet decals: here - these are not one size fits all! make sure to mention you have an FX helmet (that's what it looks like to me) so you get the right size. I've dealt with Jim a number of times with a number of different projects and he's a great guy ... If you have any questions about his products please send him an e-mail and he'll get you squared away. He's also got lenses, helmet trip, d-rings ... etc. I could have sworn he also sold the reflective material for helmet lenses - ask him about it if you're interested (I know you said not right away but just so you have a source). Oh and the mic tips should probably be not white inside ... Best bet is pop out the screens give it a shot of black spray paint, screens back in and you're done. But for the official word on what tweaks are needed wait for Izzi or Blackhole - This is just my 2 cents . Link to comment
Griffin-X[501st] Posted September 23, 2011 Author Share Posted September 23, 2011 Nice Pics thanks for sharing and good to see the start of a WIP (work in progress) thread! Good call on changing the lenses. The material may not be dark enough, but guaranteed those bubble lenses can be pretty difficult for some people to see through. Your frown, ear buds, and indents (cheeks and temples) will probably need some tweaking. They look like decals or glued on paper so that shouldn't be too hard to fix/remove ... If it's paint the best solution would probably be to remove the old paint with soap & water and your thumbnail and then either leave as is (bare plastic - black gloss is fine), or apply paint or decals for your desired finish. As far as replacement decals go have a look at Trooperbay (Mike Appling - TK 4510) he's got a great supply of stuff for modding, altering and generally blinging out your kit. Spec. Ops helmet decals: here - these are not one size fits all! make sure to mention you have an FX helmet (that's what it looks like to me) so you get the right size. I've dealt with Jim a number of times with a number of different projects and he's a great guy ... If you have any questions about his products please send him an e-mail and he'll get you squared away. He's also got lenses, helmet trip, d-rings ... etc. I could have sworn he also sold the reflective material for helmet lenses - ask him about it if you're interested (I know you said not right away but just so you have a source). Oh and the mic tips should probably be not white inside ... Best bet is pop out the screens give it a shot of black spray paint, screens back in and you're done. But for the official word on what tweaks are needed wait for Izzi or Blackhole - This is just my 2 cents . THANK YOU! I appreciate the feedback. I am working on the armor pics and they will be coming soon. Link to comment
Griffin-X[501st] Posted September 23, 2011 Author Share Posted September 23, 2011 Hey everyone, I'm a long time Star Wars fan, but new to the TX costume. I've been exposed to the Shadow Trooper for a few years via figures, comics, etc and have checked out the forum and work you all have done. It's really awesome and a great resource. Anyways, I am purchasing an AM kit from a friend. It will require some mods and tweaks to get it up to par and fit me. I will be posting pics to this topic and hope you guys can help guide me. Thanks in advance! This is the bucket. Right away I will be replacing the lenses with darker material. I do not plan to go silver at this time. I have added a few pics of my E-11 blaster. It is a resin cast that I picked up and refinished. It had been "Horribly" done by someone who should not have even tried. I need to remove the trigger, but other than that, she's done. Link to comment
Wraith[TX] Posted September 24, 2011 Share Posted September 24, 2011 Hey, welcome aboard.. shadow troopers are fun! Link to comment
Darth Agnon[501st] Posted September 24, 2011 Share Posted September 24, 2011 I suggest cutting out the black "teeth" in the frown and putting mesh behind them. It looks better and allows for some air flow and better breath-ability. For the mesh or screen I recommend a roll of pet screen for screen doors. You can get a roll at home depot for about 6 bucks. I then suggest double layering it so people can't see through it. Here's a pic of my first bucket. If you PM me your address, I'll mail you some screen. I have plenty of it. Link to comment
Griffin-X[501st] Posted September 24, 2011 Author Share Posted September 24, 2011 I suggest cutting out the black "teeth" in the frown and putting mesh behind them. It looks better and allows for some air flow and better breath-ability. For the mesh or screen I recommend a roll of pet screen for screen doors. You can get a roll at home depot for about 6 bucks. I then suggest double layering it so people can't see through it. Here's a pic of my first bucket. If you PM me your address, I'll mail you some screen. I have plenty of it. Thanks for your reply and suggestion. I just got this one and knew a few things would need some adjustments. I actually have some screen mesh from a few backup window screens. Yep, got em at good ol HD! Yours looks nice btw and thanks for the tips! Link to comment
Griffin-X[501st] Posted September 25, 2011 Author Share Posted September 25, 2011 So it looks like I got an FX set from my friend. The armor looks good and is complete. I think this set is from 2007. Question: The FX bucket looks big, but fits good. Aside from changing the lenses, fixing the frown and mesh, and then removing decals, is this bucket 501st approvable? I'm considering an eFx bucket. What would need to be done to it for 501st approval? My goal is to get 501st approved, then begin working towards specialist. Thanks for the help guys. G Link to comment
Darth Agnon[501st] Posted September 26, 2011 Share Posted September 26, 2011 So it looks like I got an FX set from my friend. The armor looks good and is complete. I think this set is from 2007. Question: The FX bucket looks big, but fits good. Aside from changing the lenses, fixing the frown and mesh, and then removing decals, is this bucket 501st approvable? I'm considering an eFx bucket. What would need to be done to it for 501st approval? My goal is to get 501st approved, then begin working towards specialist. Thanks for the help guys. G The FX bucket is currently Legion approved and Detachment approved. as for the mods, those will be according to your taste. the CRL's for the bucket are Mandatory Costume Components The costume components below must be present for approval: Helmet Shiney Black fiberglass, ABS (Acrylonitrile Butadiene Styrene), or HIPS (High Impact Polystyrene). Helmet Details: Lenses must be sufficiently dark enough to obscure the costumer's eyes. They may be flat or Bubble. The black "ear" bars have three of four bumps Frown must have either 6 or 8 teeth cut out and any colouring must not leave indented area. Tube stripes may number between 9 and 15 per side with the curve bends extending backwards. There does not need to be the same number per side. Aerators (cylinders on either side of the vocoder) are black, and screening maybe silver or black. Tears, traps, and tube stripes may be: hand painted, decals, or decals that replicate hand painting, they may also be untouched and left as unmodified shiny black helmet material. Helmet Colour Combinations: Accepted helmet colour combinations are as follows: 1) Smoke/Black Lenses must have the following: Frown: Shiny Black Chin / Vocoder (vertically ribbed chin detail): Black (Shiny or matte) Tube stripes, Tears and Temples: Black (Shiny or matte) 2) Silver Lenses must have the following: Black OR Silver/Grey Frown - Black Frown: Chin must be Black - Silver/Grey Frown: Chin can be Silver/Grey or Black (Shiny or matte) Chin / Vocoder (vertically ribbed chin detail): Black (Shiny or matte), or Silver/Grey - dependent on frown colour. Tube stripes, Tears and Temples: Black (Shiny or matte) * - A Black Lense, Black Frown and Black Chin colour combination may be paired with Navy Blue Tube stripes, Tears and Temples - But this combination requires a Dark Navy Blue Under suit. Link to comment
Griffin-X[501st] Posted September 26, 2011 Author Share Posted September 26, 2011 The FX bucket is currently Legion approved and Detachment approved. as for the mods, those will be according to your taste. the CRL's for the bucket are Mandatory Costume Components The costume components below must be present for approval: Helmet Shiney Black fiberglass, ABS (Acrylonitrile Butadiene Styrene), or HIPS (High Impact Polystyrene). Helmet Details: Lenses must be sufficiently dark enough to obscure the costumer's eyes. They may be flat or Bubble. The black "ear" bars have three of four bumps Frown must have either 6 or 8 teeth cut out and any colouring must not leave indented area. Tube stripes may number between 9 and 15 per side with the curve bends extending backwards. There does not need to be the same number per side. Aerators (cylinders on either side of the vocoder) are black, and screening maybe silver or black. Tears, traps, and tube stripes may be: hand painted, decals, or decals that replicate hand painting, they may also be untouched and left as unmodified shiny black helmet material. Helmet Colour Combinations: Accepted helmet colour combinations are as follows: 1) Smoke/Black Lenses must have the following: Frown: Shiny Black Chin / Vocoder (vertically ribbed chin detail): Black (Shiny or matte) Tube stripes, Tears and Temples: Black (Shiny or matte) 2) Silver Lenses must have the following: Black OR Silver/Grey Frown - Black Frown: Chin must be Black - Silver/Grey Frown: Chin can be Silver/Grey or Black (Shiny or matte) Chin / Vocoder (vertically ribbed chin detail): Black (Shiny or matte), or Silver/Grey - dependent on frown colour. Tube stripes, Tears and Temples: Black (Shiny or matte) * - A Black Lense, Black Frown and Black Chin colour combination may be paired with Navy Blue Tube stripes, Tears and Temples - But this combination requires a Dark Navy Blue Under suit. Thanks Blackhole, that's what I needed. Link to comment
Griffin-X[501st] Posted September 27, 2011 Author Share Posted September 27, 2011 Okay, thanks for the feedback guys. I am going ahead with mirrored lenses and found a great topic and link. I will be doing the frown in silver w/some black window mesh. Everything else will be gloss black. Armor should arrive tomorrow, YEAH! For the blaster - is a resin E-11 okay, or does it need modification? THANKS again! Link to comment
Darth Agnon[501st] Posted September 27, 2011 Share Posted September 27, 2011 Okay, thanks for the feedback guys. I am going ahead with mirrored lenses and found a great topic and link. I will be doing the frown in silver w/some black window mesh. Everything else will be gloss black. Armor should arrive tomorrow, YEAH! For the blaster - is a resin E-11 okay, or does it need modification? THANKS again! A blaster is not required for Legion approval. Only a holster. Your resin blaster will be fine to troop with. Link to comment
Griffin-X[501st] Posted September 27, 2011 Author Share Posted September 27, 2011 A blaster is not required for Legion approval. Only a holster. Your resin blaster will be fine to troop with. Thanks, I appreciate the reply and post. Link to comment
Griffin-X[501st] Posted September 29, 2011 Author Share Posted September 29, 2011 Update: I received my TX armor from a friend (got a good deal). Based on some feedback, it's an FX kit. The armor was pre-worn and most of the velcro was old, or had bad glue spots all over, mostly in the leg areas. I spent most of the day working on just getting it together then figuring out some mods for it. I love this stuff. The helmet is the 1st major thing I will tackle; new lens and frown coming this weekend. I've already reworked the TD and trashed the Mylar tape, fixed the seams, painted shiny black, etc. Let the mods and fun begin! Link to comment
Darth Agnon[501st] Posted September 29, 2011 Share Posted September 29, 2011 Congrats! Nothing like the feeling of getting the "big brown box"! Only thing that immediately stands out is that they painted part of the TD gray. You'll need to remove that paint, or paint it black. (just removing it will probably be easier) Keep the pics coming with updates! and any questions of course. Link to comment
Darth Emphatic[CMD-DWM] Posted September 30, 2011 Share Posted September 30, 2011 Consider areas where you can go with Snaps instead of velcro. It makes things a little easier and keep things in place better. Link to comment
Griffin-X[501st] Posted September 30, 2011 Author Share Posted September 30, 2011 I appreciate the feedback, please keep it coming! So far: 1. I removed the decals from the bucket and removed the aerators. I replaced and painted those black w/silver screens. 2. Painted the TD and fixed it up a bit. This kit had a multi-colored version with Mylar tape. 3. Cut out the frown. This was easier than I thought it would be, but it's only cutout so far! 4. Fixed a ton of the Velcro crap that the previous owner placed on here. It has/had copius amounts of ABS glue that left it a mess. I'm replacing where I can and plan to update to a button snap system for certain parts. 5. Fixed the thigh leg armor; mostly this was just in how they hung from the belly and back part. I made a belt and have them hanging from the belt now. That prevents "sag" and keeps them in place better. 6. Removed the crap suspender straps and replaced with real Y suspenders. This was a cool tip I picked up on this forum. I'm planning to mod this tomorrow. 7. Paint frown and add mesh; should be done tomorrow. 8. Add reflective lenses; should be here Monday. Link to comment
Griffin-X[501st] Posted October 3, 2011 Author Share Posted October 3, 2011 Busy weekend! Here are some update pics for your viewing. I will be adding the reflective lenses today (if they arrive)! Please let me know what you think! Painted TD, mic tips: Drilling out the frown: Painted Ears: Painted frown: Added frown mesh & mic tips: Ready for lenses: Link to comment
Griffin-X[501st] Posted October 5, 2011 Author Share Posted October 5, 2011 Here's my finished FX bucket. I should have some pics in the whole costume soon. Let me know what you guys think? Thanks! Link to comment
Darth Agnon[501st] Posted October 5, 2011 Share Posted October 5, 2011 Looks good. Only thing is that you can kinda see your face through the screen. You might want to add more layers to make that a little less see through. Link to comment
Griffin-X[501st] Posted October 5, 2011 Author Share Posted October 5, 2011 Thanks Josh. I added an extra layer just to be sure. Link to comment
Griffin-X[501st] Posted October 6, 2011 Author Share Posted October 6, 2011 Okay guys. Here are some shots of the whole thing. Link to comment
Darth Agnon[501st] Posted October 6, 2011 Share Posted October 6, 2011 Wow, that was quick. Everything looks good except for the boots. Could you take some close up pics? Here's the current boot CRL * BOOTS: Must be Glossy Black "Chelsea-style" Boot. These boots are an ankle high, lace-less boot that have an elastic u-shaped gore on the sides and up to a 1†heel. They should be made of leather or vinyl and must closely match the TK standard. No ornamental stitching is allowed. Link to comment
Griffin-X[501st] Posted October 6, 2011 Author Share Posted October 6, 2011 No problem. They are shiny black, ankle boots with the elastic sides. Here's a shot: Link to comment

Recommended Posts
Create an account or sign in to comment
You need to be a member in order to leave a comment
Create an account
Sign up for a new account in our community. It's easy!
Register a new accountSign in
Already have an account? Sign in here.
Sign In Now