First0rder[501st] Posted March 26, 2017 Share Posted March 26, 2017 Hi All, ive unwrapped my TX Shadow Trooper Kit from Walts and getting ready to start trimming and building. Here is my WIP, please comment as you see fit. ive got all of the strapping, rivets, and snaps. just a few more items to get. Unboxed 2 Link to comment
Kylorick[501st] Posted March 27, 2017 Share Posted March 27, 2017 Hi Andy , enjoy the build , here if needed. Link to comment
Darth Emphatic[CMD-DWM] Posted March 27, 2017 Share Posted March 27, 2017 Ah, so pretty! Link to comment
ukswrath[TX] Posted March 28, 2017 Share Posted March 28, 2017 So Chiney! Another build to follow, awesome. Link to comment
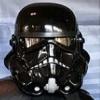
First0rder[501st] Posted March 29, 2017 Author Share Posted March 29, 2017 Helmet thus far - Using Guides for the rivets. For the Brow, can you use a Centered Rivet hiding under the Rubber brow trim to hold the correct height of the brow to the eye spacing? Also, whats your recommendation to get the rear part of the helmet that overlaps the face plate (portion under the ear) to lay flatter and contour with the face plate? below can see if flared out and not hugging causing the ear to not fit well Link to comment
Kylorick[501st] Posted March 31, 2017 Share Posted March 31, 2017 Hi there wont be a need for rivet in center under brow. Once sides are secured they will hold it all in place , this will also pull sides in for ears to fit over and cover. Link to comment
Kylorick[501st] Posted March 31, 2017 Share Posted March 31, 2017 Heres a handy video Link to comment
First0rder[501st] Posted March 31, 2017 Author Share Posted March 31, 2017 Question - for the TX CRL, it says that a Single Kidney / Posterior Armor piece is acceptable. Is this the same ruling for the Specialist approval? Reason why i ask is that the kit came with a single piece. Im more than happy to separate it but if not needed then might leave it one piece. However, how is it for comfort. assuming that i want to sit, then better to have it separated? Whats your guys take? Link to comment
ukswrath[TX] Posted March 31, 2017 Share Posted March 31, 2017 Well, there's no mention of them being separated in the Specialist CRL, which I am then to assume they're accepted as one also. Someone above my pay grade correct me if I'm incorrect. Link to comment
Darth Emphatic[CMD-DWM] Posted April 1, 2017 Share Posted April 1, 2017 One piece is fine. One piece is also allowed for centurion over at FISD. If you do for it, which you can, there should be no visible gap. Link to comment
Darth Emphatic[CMD-DWM] Posted April 1, 2017 Share Posted April 1, 2017 Clarification - I misspoke about centurion. It requires the split. Spec ops does not. It still tends to be more comfortable to split it and that's still approvalable. 1 Link to comment
First0rder[501st] Posted April 3, 2017 Author Share Posted April 3, 2017 Thanks Gents. guessing you guys have them split? Progress on the Build: Ive ordered a E-11 Complete ANH Kit and a Boushh Thermal Det from DoopyDoos today. they should ship by Apr 3rd. I got a bunch of Binding posts 3/16" x 1/4" Aluminum and glued them around the eye openings in the inside Approx 1/2" away from the eye sockets. these will work great for holding the lens in place. : Tube stripes going on Caution! dont use Novus polish around painted areas. Doha!! Now i have to repaint the frown. Link to comment
First0rder[501st] Posted April 7, 2017 Author Share Posted April 7, 2017 Helmet lenses are in. Dark Green for now but i did order AFX 90/100 Mirror lenses and picking up on Saturday. Heres the helmet thus far: Next i started working on the Them Det. Made my own brackets. Purchased 1" Aluminum stock from Ace Hardware in Canton, CT. Afterwhich started work on the ChestPlate, Abs, and Shoulder. Here i trimmed and glued on the ab buttons. What i opted for was use ABS filler under the trim plate this way there isnt any gluey mess along the edge. later ill use a small bead of black silicon to fill in any minor gap. Heres the inside of the ab plate. ive cut 2x2 ABS and drilled plus inserted Tandy Line 24 Snaps then glued these down with E6000. Finally the Chest plate. Here the Lower snaps are mounted to 2x2 ABS and glued down with E6000. However the shoulder snaps, i opted for 2x2 Flexible Elastic and clamped and glued down. once these dry will start making the strapping and test fit. More to come Link to comment
First0rder[501st] Posted April 8, 2017 Author Share Posted April 8, 2017 Thanks Ukswrath!! Next set of pics - 04.07.2016 - Progression Ive finished the Therm Det. Front View Beneath View Helmet Progression - S trim added Final Look Chest plate with Shoulder straps added. I gently heated these then bent them around a large jar. ensuring no stress. i then glued them onto the chest plate using E6000. Please comment as you see fit. thanks Link to comment
Kylorick[501st] Posted April 8, 2017 Share Posted April 8, 2017 Hi your doing a great job. The only thing is the vocoder on helmet the crl states either black or silver. Have you got any reference to this design ? Also if your sticking with the dark lenses the overall look is great with black frown and vocoder. Link to comment
First0rder[501st] Posted April 9, 2017 Author Share Posted April 9, 2017 Thanks. I was wondering about the vocoder color choice. There's no reference photo for the split color. Was more if would be allowed split color like that. If not no issues as will adjust. Thx for the feedback Link to comment
Kylorick[501st] Posted April 9, 2017 Share Posted April 9, 2017 Hi Andy , your welcome. just change vocoder a nice easy fix and keep up the great work mate. Link to comment
First0rder[501st] Posted April 9, 2017 Author Share Posted April 9, 2017 Thanks Kindly Ricky and love the feed back. Ill fill in the vocoder to be all silver. Ive also picked up silver lenses and plan to install today. will repost a pic and with new progress. 1 Link to comment
First0rder[501st] Posted April 11, 2017 Author Share Posted April 11, 2017 Please find the latest installment of pics. Vocoder repainted - Made more pronounced along the humps and filled in the center Chest Plate view of the snaps Back plate view of the snaps Abdomen Right Side view with correct upper Snap placement Groin - Correct rivet placement Please let me know your thoughts. thanks again Link to comment
Kylorick[501st] Posted April 11, 2017 Share Posted April 11, 2017 Hi Andy , looking good trooper Link to comment
First0rder[501st] Posted April 11, 2017 Author Share Posted April 11, 2017 Thanks Ricky. Q - how is the Color Silver that i used? is it too muted or should i use a silver that is more Aluminum color? I used Testors Model Master Silver Enamel. But i also have Model Master Aluminum and Model Master Chrome Silver. What Color is the approved silver to meet Specialist? thanks Link to comment
Darth Emphatic[CMD-DWM] Posted April 11, 2017 Share Posted April 11, 2017 Just a note, the color used should match between the teeth and the vocoder. In your pics, the first looks too metallic and in the last, the teeth look too whiteish. Might be a lighting issue. Link to comment

Recommended Posts
Create an account or sign in to comment
You need to be a member in order to leave a comment
Create an account
Sign up for a new account in our community. It's easy!
Register a new accountSign in
Already have an account? Sign in here.
Sign In Now