Sgt. Bilko[501st] Posted July 28, 2017 Share Posted July 28, 2017 Hello SPC OPS! Starting a build thread to share my build and call on this forum's expertise. I have built TK armor to Centurion, so I have some experience with a build. I set my eyes on the DT and decided I wanted to build it as well. Here is where I am currently. Helmet - ArmoryShop (2nd Gen - Fiberglass). On Hand. I am printing a second helmet as well. Armor - 850 Armor Works (3rd Gen - nice shiny ABS). Awaiting delivery. Undersuit - ImperialBoots "Killer Combo" (KC). I've had great service from these folks. I was excited to see this combo in their offering. Gloves - Imperial Boots KC Boots - Imperial Boots KC Blasters - 3D Files from Tom Campbell. E-11D and SE-14R. Printed, Built and awaiting paint. Soft Parts - WIP, TBD It's been a while since I posted on the forums and I see PhotoBucket has gotten pricey. As soon as I find an alternative, I'll post my progress pics thus far. Stay Tuned. Link to comment
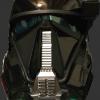
Sgt. Bilko[501st] Posted July 28, 2017 Author Share Posted July 28, 2017 Let's try this with the helmet picture. IMGUR. Link to comment
Sgt. Bilko[501st] Posted July 28, 2017 Author Share Posted July 28, 2017 Blaster Progress Photos Link to comment
lancer[TX] Posted July 28, 2017 Share Posted July 28, 2017 Looking forward to your build. If you want a photobucket alternative check out imgur. I have used it to host all the pics on my build and so far so good. Link to comment
Sgt. Bilko[501st] Posted July 28, 2017 Author Share Posted July 28, 2017 Thanks Lancer. Ill give it a shot. Sent from my iPhone using Tapatalk Link to comment
Sgt. Bilko[501st] Posted July 29, 2017 Author Share Posted July 29, 2017 Final assembly of the blaster before filling, sanding, primer and painting. 1 Link to comment
Sgt. Bilko[501st] Posted July 29, 2017 Author Share Posted July 29, 2017 My 3D printer did a good job printing the parts, so I'm only going to fill some areas with Bondo (for plastic) and smooth others before applying the primer. For the finish job, I'm following in the footsteps of Tommy. The materials for this part are: Automotive 'Plastic' Bondo Sandpaper (220, 400, 600) Rustoleum Automotive Primer - Grey Rustoleum Flat Black Rustoleum Metallic Aluminum (for front of barrel) Tamiya Weathering Kit Master #D (Burnt blue, Burnt red, Oil stain) Extra Tamiya Applicators (kit comes with one, will need at least three). I plan on going to the local make-up isle for Tommy's purple and possibly extra applicators. Link to comment
Sgt. Bilko[501st] Posted July 30, 2017 Author Share Posted July 30, 2017 Initial sand. First primer coat. Second sand and second primer coat. Letting dry overnight. Flat black tomorrow. 1 Link to comment
Sgt. Bilko[501st] Posted August 1, 2017 Author Share Posted August 1, 2017 SE-14R with real scope. Will weather later. Sent from my iPhone using Tapatalk 1 Link to comment
Sgt. Bilko[501st] Posted August 2, 2017 Author Share Posted August 2, 2017 E-11D Blaster. Weathered with blaster barrel heat discoloration. Used Tamiya weathering kit D with additional purple Lorel makeup. Practiced technique on a piece of PVC pipe painted earlier. Sent from my iPhone using Tapatalk Link to comment
Sgt. Bilko[501st] Posted August 2, 2017 Author Share Posted August 2, 2017 Aaaaaaaannndd....big box arrived today! Now the armor fun begins. Thanks to Kevin at 850 Armory for on time delivery. Sent from my iPhone using Tapatalk 2 Link to comment
Evan1701 Posted August 3, 2017 Share Posted August 3, 2017 Thanks for posting this, I plan on getting an 850 kit later this year or next year so I will be following this thread closely! Link to comment
Sgt. Bilko[501st] Posted August 3, 2017 Author Share Posted August 3, 2017 Quite welcome @evan1701. I'm also on the 850 Facebook page, so you can follow this thread and PM me on FB for better details. Sent from my iPhone using Tapatalk Link to comment
Sgt. Bilko[501st] Posted August 6, 2017 Author Share Posted August 6, 2017 Been a long work week, but finally able to get started on the armor build. To get started, I plan on rough cutting all of my pieces. I am going to save black ABS pieces to make strips, as I did from my TK build. From there I will begin the task of dry fitting onto myself. During the process of dry fitting, I will fine cut to fit and sand the amor. For this work, I use a Dremel 3000 with a model 225 Flexible shaft. This is a personal preference. Some folks cut and snap and others use lexan scissors. The Dremel method is faster and more accurate. If you are not comfortable with the Dremel you can do a lot of damage to the armor. So choose wisely. 1 Link to comment
Sgt. Bilko[501st] Posted August 7, 2017 Author Share Posted August 7, 2017 Rough cuts complete. I'm going to start with the forearms. I'm assuming NO return edges on these, as with TK. CRL does not mention this. Also, the 850 armor has seam lines which I believe will overlap one another. This should make the assembly easier. Sent from my iPhone using Tapatalk Link to comment
Sgt. Bilko[501st] Posted August 11, 2017 Author Share Posted August 11, 2017 Right forearm trimmed and now gluing. Slow but sure. Sent from my iPhone using Tapatalk 1 Link to comment
DeathMOS30[501st] Posted August 11, 2017 Share Posted August 11, 2017 YAS!!! Looking good keep up the great work Link to comment
Sgt. Bilko[501st] Posted August 18, 2017 Author Share Posted August 18, 2017 Making slow progress due to being worked like a dog...LOL. I've finished the forearm armor and have set aside for final cleaning. Working on the shins. After dry fitting the shins, it appears I will have to trim them down by about 3". I'm a bit worried about this, as I don't want to trim off any CRL required lines off of the armor. I'm in touch with 850 to discuss how best to do this. By the way, 850 Armor Works has started a tutorial page on FB. See links below: 850 armor works page - https://www.facebook.com/groups/205514516516535/ Death Trooper Tutorial page - https://www.facebook.com/deathtrooperjames/ Link to comment

Recommended Posts
Create an account or sign in to comment
You need to be a member in order to leave a comment
Create an account
Sign up for a new account in our community. It's easy!
Register a new accountSign in
Already have an account? Sign in here.
Sign In Now