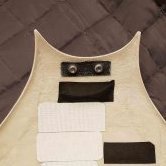
Ensi[TX] Posted March 16, 2019 Share Posted March 16, 2019 Hey all, this was originally posted over on the FISD forums. And I thought as most of the costumes here are super black, many would probably learn at least a thing from it being posted here as well! If this tutorial helped make your parts shinier, post a pic! I wanna see! Hello all! I've seen a lot of confusion about wetsanding and polishing with the goal of increasing the shine. Lots of people mixing up terms and using the wrong methods/products at the wrong time/place. So I decided to put up a little tutorial to clear (hehe) things up. DISCLAIMER: I am not a professional, I do auto detailing in my spare time and have some experience with paint correction. This will be a pretty long tutorial but stick with me and hopefully we'll learn something 1. What is shine? To be brief: when something is really really flat, it will reflect a lot of light directly into your eyes, making it appear shiny. Below is an illustration of perfect paint reflecting light, this would look like glass: (Illustrations are not to scale, just there to give you an idea). But that's a show-car-130-hours-polishing-lunatic-finish. Most of us use spray cans, and spray cans suck. They spit out paint unevenly and most of it is propellant anyway. And we do it in conditions that are not optimal, so we end up with very uneven paint full of orange peel. For this tutorial i've prepared a plate of ABS plastic which has been painted black (easier to demonstrate) and clear coated. See this pic below? See that wrinkly, orange'y look to it? That's orange peel. Image 1: If we want to go the extra mile to get rid of this, we need to do.. 2. Sanding - Levelling the paint Using sandpaper is ABRASIVE. From Merriam-Webster: abrasive 1: causing damage, wear, or removal of surface material by grinding or rubbing Focus here being "removal of surface material". Every time you swipe that sandpaper it removes some material. What we are trying to achieve here is a flat surface, we are trying to flatten out those "peaks and valleys" by removing/flattening the clear coat. A sandpaper's "grit" determines if it's coarse or fine. A higher number means it's more fine, and will remove less material. A lower number means it's more coarse and will remove more material. You need to have enough clear coat on your piece to be able to do this correction. Or else you might sand into the basecoat or even the primer. Which sucks because that means a re-paint.. Here is a list of my PERSONAL sandpaper grits: 40 - Super coarse for doing an Alderaan on whatever you are working on, I never use this 80 - Very coarse, for removing material quickly. I use this on woodworking projects 120 - Quick removal of material while still being in control 180 - I use this to knock down 3D-print lines and filler 240 - Smoothing filler if i'm feeling a bit scared 320 - This is what I sand my parts with before primer 600 - For wetsanding my primer 800-1000 - Anything from color-coat/clear-coat fixes to wetsanding hard clear coat 1200 - For knocking down tough orange peel 1500 - For knocking down orange peel 2000 - For removing 1500 scratches 3000 - For removing 2000 scratches For this test piece I started with 1500 grit to knock down the orange peel as the clear coat I used is kind of soft. Keep in mind every sanding step in this tutorial is done wet/wetsanding. As you can see here i've flattened out the peel on most of the piece but I missed a spot. I went over it again and made sure the entire surface was equally "dull". After this I went over it with 2000 grit. This is a finer sandpaper and my goal here is to eliminate the scratches from the 1500 job. Notice the sanding marks going the opposite direction this time. This is a good way to gauge if you've successfully sanded away the marks from the previous steps. And finally I went over it with 3000 grit in the opposite direction to remove the 2000 grit marks. At this point you should start seeing some shine My camera really struggled to focus taking these pictures. And we're done with sanding! Dry off your parts and move on to.. 3. Polishing - Levelling the paint again, just very very little From Merriam-Webster: polished; polishing; polishes transitive verb 1 : to make smooth and glossy usually by friction : burnish 2 : to smooth, soften, or refine in manners or condition 3 : to bring to a highly developed, finished, or refined state : perfect This is were it gets confusing. Some people "put polish" on their car, but they really mean wax. Some people "polish in the wax". I mean, it's been used so much in so many different ways I know it seems confusing. For simplicitys sake: Polishing is the last step in paint correction. In the auto detailing world, if you would let's say fix orange peel on a car, you'd go through all the steps above then.. 1. Use a RUBBING COMPOUND with a machine to knock down the 3000 grit scratches, paint should look like ANH Vader at this point 2. Use a POLISH with a machine to further level the paint from the faint marks the COMPOUND may have left, at this point the paint will be as clear as an ESB Vader 3 Apply a WAX/SEALANT/COATING on top of the newly corrected and flawless paint, to protect it (and also add a tiny bit more shine). Wax/sealant/coatings will fill in tiny tiny scratches making the paint appear more shiny, but the effect will diminish as the wax deteriorates. Rubbing compound and Polishes are ABRASIVE, they will REMOVE clear coat, just like sandpaper, only much much finer. Think of them like liquid 30000 grit and 80000 grit sandpaper After drying off my newly 3000 grit sanded piece, I found a foam polishing pad, and primed it with some rubbing compound. Priming is basically just "feeding" the working area of your pad with polish so there are no dry spots. All my compounding/polishing was done by hand. I then applied some more compound to the pad, a pea sized drop and went to town in small, circular motions. Follow the instructions on your product. After finishing I wiped off with a microfibre cloth aaaand... BAM! Shine!! The compound I used was Menzerna FG-400. It's a really good compound, it finishes super fine and you could just leave it as it is right there! You can also use Meguiars M105 for this step. Or any "rubbing compound", as long as it doesn't have fillers/wax in it which will trick you and lie to you. You can also just straight up use a polish, but you might have to work a bit longer to achieve the same effect. Now on to the polishing, for this I did the exact same thing with a finer foam pad and Menzerna SF-3500 (Meguiars equivalent M205). Honestly it didn't make much of a difference since the FG-400 finished out so nicely. If you're using other products you may have to do this step if you see "haze" from the compounding step. I tried my best getting an in focus picture but my camera got so confused because of the shine 4. Wax/Sealant/Coating - Protective Layer A wax is a protective layer, it is NOT abrasive. At this stage you can add wax if you want, it'll protect the paint a bit and also give it a tiny bit more shine. It's the prep-work and COMPOUNDING/POLISHING that really makes it shine. I didn't bother adding wax to my polished test piece as it was already as good as it gets. I did however tape off the piece before polishing, so I had one side which was 3000 grit sanded, and one side that was polished. I tried adding wax to the sanded side: After buffing it off with a microfibre and removing tape: And that's it Hope you learned something! Any questions feel free to post them here and i'll do my best to answer. After closely inspecting the piece I can see some orange peel left, but that's from when I put my color coat on, which is under the clear coat.. oh well.. Spray cans suck!! 3 Link to comment
IcyTrooper[CMD-DWM] Posted March 16, 2019 Share Posted March 16, 2019 Very informative and love the pics that accompany it, great work! Link to comment

Recommended Posts
Create an account or sign in to comment
You need to be a member in order to leave a comment
Create an account
Sign up for a new account in our community. It's easy!
Register a new accountSign in
Already have an account? Sign in here.
Sign In Now