DoggyDoc[CMD-DCA] Posted August 24, 2023 Share Posted August 24, 2023 Here is what I did with mine. It is not attached yet though 2 Link to comment
Chaos[CMD-DCA] Posted August 24, 2023 Share Posted August 24, 2023 7 hours ago, DoggyDoc said: Here is what I did with mine. It is not attached yet though I did mine the same way Link to comment
TookBreaker[TX] Posted August 24, 2023 Author Share Posted August 24, 2023 Thank you all! This is helpful. 1 Link to comment
TookBreaker[TX] Posted October 25, 2023 Author Share Posted October 25, 2023 It has been a while since my last post. I am in final stages of my armor parts after a good friend completed the paint work. Waiting for my undersuit to be trimmed down by a tailor and then I should be ready to submit my DT. Just need to mount the belt boxes, get the snaps right for the thighs, and fit the shins (had to remove all the foam padding of my boots as they eat up a lot of space. A few photos of my helmet: NSM: With a couple of optimizations: Covered all contact points with FlexSeal as it scratches the helmet over time. Installed a Switch to turn on/off the LED light Attached with magnets 2 Link to comment
DoggyDoc[CMD-DCA] Posted October 25, 2023 Share Posted October 25, 2023 Looking good. The end is so close 1 Link to comment
TookBreaker[TX] Posted November 1, 2023 Author Share Posted November 1, 2023 Brief update: Wrapped pretty much everything up, re-adjusted strapping (mostly thighs as they are in motion). Submitted my application two days ago. First test run today for Halloween to see what else needs some "tuning", all seems to be good, a little bit the thigh clips and better nose padding in the helmet. But am pleased and can't wait to have it official. 3 Link to comment
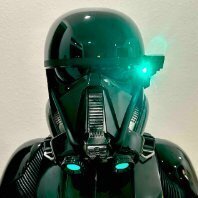
Chaos[CMD-DCA] Posted November 2, 2023 Share Posted November 2, 2023 Looking good. If you haven't yet done so, the helmet vent screens need to back line with a black material "The vents are cut out and lined with steel small mesh and backed with black material." 1 Link to comment
TookBreaker[TX] Posted November 2, 2023 Author Share Posted November 2, 2023 Thanks @Chaos. I did back the vents with steel mesh and mosquito netting. The below picture shows the vents: 1 Link to comment
Mal86 Posted November 2, 2023 Share Posted November 2, 2023 7 hours ago, TookBreaker said: Thanks @Chaos. I did back the vents with steel mesh and mosquito netting. The below picture shows the vents: I think you have to have some black material on this side of the mesh, based on the CRL so that from the outside they see the vents, mesh, then black. 1 1 Link to comment
Chaos[CMD-DCA] Posted November 3, 2023 Share Posted November 3, 2023 Paul is correct. The black material prevents the "see thru" effect. 1 Link to comment
TookBreaker[TX] Posted November 3, 2023 Author Share Posted November 3, 2023 Thank you all! I just used a felt liner to back those areas now it is not see through! Good catch and much appreciated. 1 Link to comment
TookBreaker[TX] Posted November 4, 2023 Author Share Posted November 4, 2023 Dear DT experts, before hitting the weekend, I just received the good news of being approved. It went through without any flaws (and I covered the vents with a black felt from the inside to avoid any see through). Thank you big time and I am extremely pleased and honored to join the ranks of Death Troopers. I will update this post with an appropriate list of items I used so it is viewable in one post. For the Empire! 5 Link to comment
Chaos[CMD-DCA] Posted November 4, 2023 Share Posted November 4, 2023 Congratulations! 1 Link to comment
DoggyDoc[CMD-DCA] Posted November 4, 2023 Share Posted November 4, 2023 Congratulations. Great job. You can wear it with pride. 1 Link to comment
TookBreaker[TX] Posted December 17, 2023 Author Share Posted December 17, 2023 Hi, I thought I summarize by overall build experience to share with this community and you all were extremely helpful. Therefore, a big THANK YOU! I cannot be happier with the result of my Death Trooper and will look into the Specialist levels once time permits. For the Empire! TX 23011 Couple of lessons learned throughout the my build process Read the forums, not once, several times, there is a ton of great tips to learn from others to make the best build for yourself. No build is similar! You will always tweak something after each troop! 🙂 Most importantly, putting all the work into this costume, carry it with pride and have fun. People seeing you love it, These are the builds I followed throughout my Death Trooper build journey and where I learned the most: Best build to follow was from @DoggyDoc and he was extremely helpful during my build: Take your time, test it out several times before you finalize anything. Especially anything you have to glue, try out with E6000. It is easier to remove if something is not right. Otherwise, I used stronger glues for long lasting bond. Build work summary: Armor Jim Tripon DIY Armor Kit Large: https://www.facebook.com/jim.tripon Mostly had to trim the following: Thighs, shins, forearms to shorten their length AND shoulder connection of chest/back plate to fit chest circumference All armor parts required Bondo putty application as the regular Filler and Primer was not sufficient to fill in all fine lines. Once Bondo applied, I wet-sanded everything with 3M 300 grit angle grinder and then followed by 600 grit sandpaper to ensure a smooth surface to be primed before paint. Small tip: use one or two drops of dish soap with the water for sanding. Paint Project was done by my friends and squad members at J&J Props: https://www.facebook.com/jandjprops Undersuit / Neck Seal / Gasket Jim Tripon: tailored to remove excess and have a smug fit (otherwise armor pieces will be difficult to put on such as forearms). Alternatives you can consider: https://www.facebook.com/TheDarkSideCloset/photos OR https://www.facebook.com/sheevsemporium Helmet Started with Jim Tripon DIY Helmet Kit, however the helmet had a strange deformed structure (others in the forums stated the same), therefore changed to Print Files from MCM Design: https://cults3d.com/en/3d-model/various/death-trooper-helmet-star-wars-rogue-one Bulbed Lens from OPLE Props: https://www.opleprops.com/de/linsen-visor-linse-star-wars-cosplay-4/325-OPLE-Props-Deathtrooper-Rogue-one-gewoelbte-Linse-Anovos-Trooper-Helmlinse-Kostuem-Costume-Helmet-Rogueone-Linse-Visor-Visier-Kr.html Used UksWrathsSpecialty DT Hovi Lighting for the NSM EL Button - 3cm diameter circle in Grass Green: https://elwirecraft.co.uk/product/el-button-3cm-diameter/ Henry's Helmet Fans "Dual Modular Ball Bearing 4500rpm Fan Kit with 2 switches for mounting in a helmet" Alex Tech 25ft – 1/2 inch Split Wire Loom Tubing Wire Conduit – Black NSM has a 2 Position 3P SPDT Micro Miniature PCB Slide Switch Latching Toggle Switch, 12V 23A Battery Holder, Battery Case with Leads Wires, Black Tintvent Rubber Edge Trim Black, U Channel Rubber Seal Strip with Self-Adhesive Tape, Metal Edge Protector Fit for 0.15", 10Ft (118in) PAXLamb Memory Foam Pad Protective Mat Helmet Padding Kit Belt Belt Kit from Trooperbay: https://trooperbay.com/product/rogue-one-death-trooper-belt-webbing-and-buckle-cosplay-costuming-sci-fi/ Death Trooper Buckle Replica from BlasterFactory: https://blasterfactory.com/product/death-trooper-buckle-replica/ Death Trooper Pouch from DarmanProps (https://www.etsy.com/listing/970090206/death-trooper-pouch) Deathtrooper Black Canvas Ammo 3 Pouch Set - Purchased used ones through Deathtrooper Facebook Group (https://www.facebook.com/groups/DeathTroopersBG) Black Boxes 3D printed myself Followed this build to get mine done: https://www.jollyrogers1942.com/death-trooper-build-reference.html Accessories SE-14R Holster from DarmansProps Gloves from Endor Finders: https://www.endorfinders.com/shop/rogue-one-trooper-gloves - Removed inner lining as it is too hot for Florida troops Boots from CrowProps: https://crowprops.bigcartel.com/product/deathtrooper-boots - Removed all foam tongue padding as it was too thick with all the padding of collar and the DT shoe panel cover Metal shoulder bell supports, shoulder straps and buckles from Mr. Pauls Shoretrooper Build: https://www.facebook.com/totalgrunt Death Trooper Arm Impellers from Phoenix Props: https://www.phoenixprops.net/products/death-trooper-arm-impellers-rockets Specialist parts Chest Rig from Jim Tripon - The two short webbing straps are missing in my case, which I have to add - Work in Progress I have to modify the upper chest D-Rings as I am doubtful it will carry the weight of the chest rig. I may replace it with these as they are made out of metal: https://blasterfactory.com/product/death-trooper-chest-buckle-pre-cut-complete-set/ - Work in Progress Magazines / Grenades 3D printed myself Ammo Pouch: Purchased a used Sandtrooper one, dyed the stitching black Pauldron from Jim Tripon Audio Zoweetek Voice Amplifier: https://www.amazon.com/gp/product/B07KJ3TD6W/ref=ppx_yo_dt_b_asin_title_o05_s00?ie=UTF8&psc=1 Wired microphone SD-Card with Deathtrooper Chatter in loop mode Materials Paints Tamiya TS-40 (https://a.co/d/f1d4tYr) Rust-Oleum 7578838 Professional High Performance Enamel Spray Paint, 15 Oz, Flat Black SprayMax 2K High Gloss Finish Clear Coat Spray Paint | Car Parts and Repair Refinishing Clear Coat for Permanent Sealing of Coated Surfaces PlastiDip Rust-Oleum 260510 Automotive 2-in-1 Filler & Sandable Primer Glue E6000 for many parts but also testing Professional Grade Cyanoacrylate (CA) Super Glue by GLUE MASTERS. This one is much stronger than E6000 if you need stronger bonds. Just be careful as it dries white and may be visible depending on where you use it (https://www.amazon.com/dp/B019PFO4KM) J-B Weld 50139 Plastic Bonder Body Panel Adhesive and Gap Filler Syringe - Black - I used this to glue armor parts together such as the shins and forearms. Super strong bond. Rubber Glue 20g - Needed for the rubber straps around the left forearm as it is specifically designed for rubber (https://a.co/d/fAylkXb) Other Flex Seal Liquid, 16 oz, Black, Liquid Rubber to smoothen armor interior surfaces that overlap with other parts. This way you avoid scratches but also unnecessary plastic noises while trooping (https://a.co/d/3lbrldX). Rub n Buff Wax Metallic Finish - Silver Leaf for weathering (https://a.co/d/bxgYsRe). Velcro Black, Nylon Straps Black Bondo Glazing and Spot Putty Maintaining the entire costume Armor pieces Clean with quality micro fiber towels Polish with Meguiar's ULTIMATE POLISH to remove minor scratches, but also add a protection layer to it. Nice effect is glossy shine, but also a smooth finish that does not hold dust. It will not protect from all scratches, but minor ones can be removed. The rest is natural weathering. Undersuit You will sweat! It is one of the costumes that will not breath, especially with all armor pieces. I decided to cold wash it after each troop by turning the undersuit inside out, putting it into pillow cases and tie it up. This way I can put it into the washer. Use programs such as "Delicate" and cold water only with little spin. Rack dry it and all is good. No issues so far. 3 Link to comment

Recommended Posts
Create an account or sign in to comment
You need to be a member in order to leave a comment
Create an account
Sign up for a new account in our community. It's easy!
Register a new accountSign in
Already have an account? Sign in here.
Sign In Now