J47555[CMD-DWM] Posted February 29, 2024 Share Posted February 29, 2024 Hello everyone! I realized that in my lovely time here I never actually started a build thread and just kind of lurked until I had my build completed. My amazing father helped me a metric ton getting through this build and is a machinist by trade which influenced the creation of some of these parts. I unfortunately haven't actually gotten to a troop since October for personal/health reasons but I've been planning in the back of my head for level 2 among some other fixes I want to complete just for comfort. I'm absolutely in love with this armor/character so some of this might be a little ranty, sorry about that. 😅 My Current Build: Bucket My current bucket is (or was when I got this one) an unfinished 850 resin bucket that was sanded and painted. The greeblies on the bucket are just the standard ones included with 850 but the center one has an incorrect ridge count so that'll need to be replaced. The resin in the back where the cutouts are were cast a little too thin for my liking. In some spots you can see the light through my paint and it's blown through completely in others. I do actually have a fiberglass helmet I bought off of @Church113 🙂that I'm waiting to finish because I don't want to shoot little fiberglass shards all over my shop more than I already did giving it a preliminary sanding. As for the interior, I have a set of generic amazon tactical padding that I seem to adjust after every troop. There's a little piece of generic EVA foam where my nose sits for comfort. I'm sure you all know how nice and toasty it gets wearing several layers of clothes and black armor so a solid fan setup in my bucket for cooling and defogging my visor was a must. The current setup is dual 5V brushless fans with 2 aimed at my visor and 2 aimed at my face. The intakes for them are actually the side vents underneath the backing required by the crl. The fans and lights for the NSM/Tusks are wired into a 3d printed switch board that sits under my chin. All of this is power by a USB power bank with a modified Micro USB cord that started it's life as a cheap phone cord off amazon It's a little messy but she works: Inside Of Bucket Undersuit/Neckseal/Apron/Poncho/Elbows/Abdomen Gaskets All of the gaskets were completely hand sewn. I did consider buying a Jim Tripon Kit but this build started when I first got into college so I was away from home and sewing was the only option really given time and money constraints. All of the ribs are completely hand sewn on a standard sewing machine with a presser foot and a lot of time, patience, and episodes of the American Office. I did learn how to sew by hand and by machine to complete this which I feel could be a useful skill and I'm happy to help others do the same 😄 The shirt (Under suit) is actually built to Level 2 already. It started it's life as a template of a shirt from Walmart and my dad found the right material at a local JOANNS (A Fabric store) and we got to sewing. The ribs in all the gaskets throughout the armor are all two layers of backing fabric and a layer of the required semi gloss top sewn together in whatever shape they needed to be. After sewing all the lines in the fabric, we took some rope from a hardware store and threaded it through each rib and closed it off. The elbows and abdomen are sewn onto the shirt while the poncho and neck seal are a separate clothing item that Velcros behind my neck and gets hidden by the armor. Armor It seems to be a common choice here and now after wearing it I do share a lot of the criticisms most have. My armor was an unfinished 850 armorworks kit. Some of the pieces included came thin and/or lacked detail which were not game braking but took some extra work. Mainly the thighs, yoke, and all of the rubber components were my main issues. Nothing yet has had to have been completely replaced so I'm not really looking into a different material at the moment and as it's ABS, it's not hard to polish with some turtle wax and a drill wheel. I haven't gotten around to it yet but for now just the straps I believe I'm going to print out of TPU. There's a thread on here somewhere I'll have to find but it's worth trying. The ones that came in the kit or mine at least were incredibly pitted and are falling apart already. There isn't a spot to fit this in now looking back as I'm editing this but I forgot to mention my impellers. They're machined from aluminum and attached via a 3d printed mount and Chicago screws. It's heavy enough that it weighs down my arm and it's probably why you see my left arm grabbing my armor occasionally to turn it back in line. Gloves L2 Ready Trooper Gloves from KeepTrooping Belt The belt base itself is the standard belt piece that comes included in the soft goods kit when you a buy a set of 850 Armor. The belt itself is mostly kept the same with a few layers of tactical nylon E6000'd on the back for my attachment system to my armor. On top of that webbing used to be a 4-3 system of snaps that used to sit on the lower part of my abdomen armor. It worked for a couple troops until the weight of my brick of an SE-14R combined with heat slowly tore it off. It's since been replaced with a strand of this Velcro I found for mountain climbers that holds it good that runs the length of my belt and around my armor which hides underneath when attached. The holster for the SE hides the seam in the belt where I put it on. The buckle is a piece of aluminum that was made on a CNC mill. The three big pouches are all 3 printed boxes covered in a layer of black canvas that has a couple layers of Flexseal (Rubber based sealer that dries black) to cover it. The canvas itself was cut out of a blank painting canvas I found at a craft store. You can technically open them if you want but it messes up the appearance. I'm debating about buying this set I found on etsy when I get to that point that are actual pouches. The smaller pouch is the same thing as above really except done with leather. The nifty thing though is that the inside was hallowed out to fit cards into while still maintaining appearances. The square boxes are the ones included in the 850 kit. The holster was actually made following this thread here: Thank you Mark 🙂 Shorts/Knees As mentioned earlier my under suit is three pieces that combine into one to maintain the appearance. The shorts are entirely hand sewn from scratch. There was actually a pair of gym shorts that ribs were going to be sewn onto but found it easier to just start from scratch. The shorts extend long enough to cover the gap for my shins as they can be the same rib as shown in the CRL. The main thing here is that the shorts are actually connected to a pair of suspenders that are used to help hold up my thighs via a little piece of nylon with a snap in it that gets hidden. Boots KeepTrooping Killer's Voice/Sound system My voice system is a raspberry pi that sits on my wrist with a small button board that sits in my left palm that snakes under my clothes into my glove. Each button on my palm plays between 2-5 prerecorded lines with there being 5 buttons in total. One of them however plays the sound of an E-11D charging/firing while another just says "Rogue One" in DT. The rest are a mix of angry/commands that I generally use to have conversations or scare people with. It's powered by a large battery bank that sits in my tights underneath all my armor and is broadcast by a wireless guitar transmitter I found on amazon that sends to the signal to the receiver which sits on a splitter to my amp. The other half runs a wireless mic that sits in my bucket. This whole setup is a mess and I have bought upgrades since but as mentioned haven't made it to a troop for health reasons so I have no idea if this will actually work. The planned upgrades are: Soldering a new button board as I can't hit the buttons through the KT gloves. I haven't found a power solution fix as the board that runs this actually pulls so little power that, every power bank I've put it on doesn't output enough to actually keep itself on which results in my voice not being usable usually for the rest of a troop or until I can have someone smack the outside of my thigh and hopefully get the power button on the bank. SE-14R Completely 3d printed from bought files off of Cults. It has a moving trigger via a pen spring that sits behind it but I froze it purposely with paint as my local comic cons have issues with prop weapons that have moving triggers. (Among other moveable parts but dependent on venue) E-11D My first one started as a 3d printed model that I bought from Cults like my SE. I kid you not however when I say I spent weeks continually breaking the support guard that had to run from the trigger and connect up under the barrel. Instead of a 3d printed barrel I did have an aluminum pipe that I torched as a fun project to get the burn marks. However that support guard I couldn't just get right and broke I don't know how many of them to the point where I considered having it made out of something stronger. After a month or two of debacle and finally broke down and bought myself a present. Christmas was coming early and in early August I bought a premium steel rod E-11D from ImperialArms. I however have yet to receive it and it's been almost 7 months. Their customer service has been taking a while to respond and hasn't responded to some of my inquires at all which has been a little concerning. I got an email last week however telling me that it's getting ready to be shipped and that their shop has been dealing with lingering hurricane damage so we will see what shows up and hopefully I can give an honest review to y'all. DLT-19D The prop-master in my Garrison was selling a cast DLT-19 that I bought off of him and modified to become a "D" variant. I resin printed the scope and picatinny rails. The sensor lines are actually copper pipe and they break off where they connect to the receiver so I can split it and fit the entire thing in a relatively small(er) gun case. MISC (Anything I forgot about or will go back to add that doesn't fit into a main branch) Despite being 6'0, I do actually also wear lifts in my boots. They're just a pair of cheap amazon lifts in the biggest size you can buy. It's really just a personal choice and thought it would add to the aesthetic. 🙂 My base layer is a pair of compression pants and shorts, almost like a body suit that helps stay cool (Not really) and won't snag on any of the other clothes I wear on top. I wear a full face balaclava/neck gaiter combo for containing sweat and hair and also adding some cushion in my bucket As for transport, my bucket sits in a fleece lined motorcycle helmet bag inside of a kids DT bedding set. Everything else sits in a 50 gallon rolling tool chest as recommenced by you all actually which you can find my original forum here. The tool chest is lined with a felt furniture moving blanket and some spray adhesive. I also have a set of Assassin Graphics plates on top because they look nice. 🙂 - Moving on from the current, let's look into the future! As I complete these, pictures will be added hopefully culminating into my application! - My armor itself is Level 2 Ready as of this update on 7/31//24 Level 2 To-Do Helmet Outward Lenses - Done Bridge vent fixing - Done Rubber Seal - Done Undersuit Have been sewn to Level 2 Specifications. Neckseal and Apron Have been sewn to Level 2 Specifications. Poncho Have been sewn to Level 2 Specifications. Chest Plate and Shoulder Straps Rubber-like and inward curve are present Back Paint touch ups Lower Back Notches present Shoulder Armor Minimal Spacing Biceps Elastic Cord Elbow Gaskets Have been sewn to Level 2 Specifications. Gloves/Hand Plates Notch is present in hand plates and leather cutout in gloves is present. Abdomen Armor Painted Abdominal/Kidney Gasket Have been sewn to Level 2 Specifications. Shorts Have been sewn to Level 2 Specifications. Thighs Going with metallic black scheme so this is complete by default on my armor Knee Gaskets Have been sewn to Level 2 Specifications. Shins Notch Cutout Boots Killers from IB E-llD Company Issues..? Pending either a rebuild or seller compromise. - Just a quick little author's note here to get sappy: A quick thank you to everybody who's contributed to this build and welcomed me into SpecOps as a whole. This project started as something fun to do with my father and has now transformed into something I genuinely look forward to doing every time I suit up. At the end of the day, the people we do this for and with are what matter most and spreading the love of Star Wars and costuming as a whole. This post got a little rambly (A lot, it clocks in at around 3k words...) but it's because it's something I truly enjoy doing with now my family and lifelong friends I've made here. I just wanted to take a moment and give appreciation for all of you, each and every member with everything that you do that helps continue and contribute to the coolest hobby turned passion I've had the fortune to join with my loved ones and now all of you. Thank you 😄 3 Link to comment
Chaos[CMD-DCA] Posted February 29, 2024 Share Posted February 29, 2024 Well done on your build. I can't wait to see the finished project. When you are ready for your L2 look hit me up. We can take a look pre post application and I can tell you beforehand what I see (if any) as L2 issues. Several of our last DTs to apply for their "Specialist" badge did just that. I should clarify that "Specialist" refers to your Level 2 status and not the V2 which has the chest rigs etc. Best of luck. 1 Link to comment
J47555[CMD-DWM] Posted March 25, 2024 Author Share Posted March 25, 2024 On 2/29/2024 at 2:22 AM, Chaos said: Well done on your build. I can't wait to see the finished project. When you are ready for your L2 look hit me up. We can take a look pre post application and I can tell you beforehand what I see (if any) as L2 issues. Several of our last DTs to apply for their "Specialist" badge did just that. I should clarify that "Specialist" refers to your Level 2 status and not the V2 which has the chest rigs etc. Best of luck. Will do, I appreciate it! I was gone sadly for about a month but ready to get back into it. I'll definitely be sending some messages your way when I get around to painting and some weathering! 1 Link to comment
J47555[CMD-DWM] Posted July 15, 2024 Author Share Posted July 15, 2024 Getting closer! Bit of a snag trying to attach my new lenses to the inside of my bucket but getting excited with progress! Hoping to hit specialist before I go back to college in August. Link to comment
J47555[CMD-DWM] Posted July 31, 2024 Author Share Posted July 31, 2024 As of this message, everything but my E-11D is Level 2 ready 1 Link to comment
Chaos[CMD-DCA] Posted August 1, 2024 Share Posted August 1, 2024 alright! moving right along, I can't wait to see what you have done. Link to comment
Mal86 Posted August 2, 2024 Share Posted August 2, 2024 On 7/14/2024 at 9:14 PM, J47555 said: Getting closer! Bit of a snag trying to attach my new lenses to the inside of my bucket but getting excited with progress! Hoping to hit specialist before I go back to college in August. Do you mind sharing where you got your lenses from? Link to comment
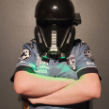
J47555[CMD-DWM] Posted August 3, 2024 Author Share Posted August 3, 2024 10 hours ago, Mal86 said: Do you mind sharing where you got your lenses from? Sure! - I bought mine from a company in Germany from OPLE Props, specifically their "Deathtrooper Rogue one bulbed lense". My bucket is resin cast from 850 so this lens was quite wider than the lens opening but, if you heat it up slightly you can mold it and then tack it down with hot glue or E6000. I am based in the USA so I did pay a premium to ship it here but specifically, I bought it off their etsy page -> here. Specifically I bought the Green/Green option. Best of luck! If you'd like I can also show you the finished product and/or how to attach it. 1 Link to comment
J47555[CMD-DWM] Posted August 3, 2024 Author Share Posted August 3, 2024 There were some shipping delays as granted it's coming from Germany. In my experience though I didn't have any issues at all and Marc shot me an email every time there would be a delay or to update me on the production/shipping time. 1 1 Link to comment
J47555[CMD-DWM] Posted August 6, 2024 Author Share Posted August 6, 2024 Everything should be done! Unfortunately I caught something and I'm sick at the moment but, all that's left to do is comb over the CRL again and suit up to take pictures for my application! That's for a later date though when I can breathe normally and can tolerate wearing my bucket...😅 3 Link to comment
Bayushi Posted August 22, 2024 Share Posted August 22, 2024 On 8/1/2024 at 12:08 AM, J47555 said: As of this message, everything but my E-11D is Level 2 ready Hi @J47555! congrats on the good work you are doing with your build! I have a question regarding the blaster: I was also thinking about ordering both blasters from Imperial Arms: did you receive your E-11D? I understand it is not level 2 valid, but it is for Level 1? Are you happy with it? Thanks in advance for your answer! Link to comment
J47555[CMD-DWM] Posted August 22, 2024 Author Share Posted August 22, 2024 6 hours ago, Bayushi said: Hi @J47555! congrats on the good work you are doing with your build! I have a question regarding the blaster: I was also thinking about ordering both blasters from Imperial Arms: did you receive your E-11D? I understand it is not level 2 valid, but it is for Level 1? Are you happy with it? Thanks in advance for your answer! Hello! Unfortunately, on a personal level, I don't have many positive things to say about their company at this point in time. To summarize a long and ongoing story, it has been over a year and I have yet to receive the product I paid for. Their customer support has been either dismissive of my inquires or have chosen not to respond at all in some cases. Every time I've politely asked for an update regarding my purchase, I'm quoted a date of which they blow past with no communication or something along the lines of "It's coming soon". If I eventually receive it, I can send photos and such as my order included the Steel and Premium options. - Regarding the blasters, I can tell you that if it is an option to print them yourself right now, the SE-14R and E-11D I've built since then all came from MCM_Design files from Cults3D which have been lovely! 1 Link to comment
Bayushi Posted August 23, 2024 Share Posted August 23, 2024 Thanks for the advice! I will take another options into consideration then... Link to comment
Clinton Posted August 23, 2024 Share Posted August 23, 2024 22 hours ago, J47555 said: Regarding the blasters, I can tell you that if it is an option to print them yourself right now, the SE-14R and E-11D I've built since then all came from MCM_Design files from Cults3D which have been lovely! I recently printed the SE-14R on my Bambu P1S in PETG HF. Do you have any advice on assembly/prep and paint? Should I assemble the Blaster then prep and paint the Blaster as a whole? Or should I prep and paint each part individually? I noticed that some of the parts are extremely loose and will most likely need to be Epoxied or Glued in place, like the back cap assembly. Link to comment
J47555[CMD-DWM] Posted August 23, 2024 Author Share Posted August 23, 2024 1 hour ago, Clinton said: I recently printed the SE-14R on my Bambu P1S in PETG HF. Do you have any advice on assembly/prep and paint? Should I assemble the Blaster then prep and paint the Blaster as a whole? Or should I prep and paint each part individually? I noticed that some of the parts are extremely loose and will most likely need to be Epoxied or Glued in place, like the back cap assembly. Personally, I did a mix of both but going back and doing it again, I would have prepped everything first with assembly being the last stage of the entire process. It's a lot easier to fix/fill/paint while you can individually manipulate that part. It can be done when the blaster is put together but, I've found it's going to be more work protecting the rest of the areas around the problem than it would be to have done the finishing work before hand. - Regarding specifics, I use a product called XTC-3D to fill print lines which has saved me a metric ton of time. From there, I wet-sanded up to 1k for a smooth finish and painted. My personal choice is Krylon Fusion 5-1 as paint and primer because it dries even and fills little mistakes. Putting it together, I used JB Weld Epoxy but recently I've also been turned on to a product called "The Last Glue" which has been my go to for attaching/fixing/filling holes. 2 Link to comment
J47555[CMD-DWM] Posted August 23, 2024 Author Share Posted August 23, 2024 1 hour ago, Clinton said: I recently printed the SE-14R on my Bambu P1S in PETG HF. Do you have any advice on assembly/prep and paint? Should I assemble the Blaster then prep and paint the Blaster as a whole? Or should I prep and paint each part individually? I noticed that some of the parts are extremely loose and will most likely need to be Epoxied or Glued in place, like the back cap assembly. Regarding the fit, some of mine were loose as well so I built up a buffer of glue in that area. Usually if it could be clamped: I would put a bead of glue there, clamp it, and wipe the excess and let it sit still until it cured. I had the same problem with the little insert that goes in the barrel that I held with a pair of needle-nose pliers and held there until it set enough to hold itself. 2 Link to comment

Recommended Posts
Create an account or sign in to comment
You need to be a member in order to leave a comment
Create an account
Sign up for a new account in our community. It's easy!
Register a new accountSign in
Already have an account? Sign in here.
Sign In Now