IcyTrooper[CMD-DWM] Posted March 14 Share Posted March 14 Much better from what I can! @tipperaryred has some good info for painting in there. 1 Link to comment
DarthBerry[501st] Posted May 12 Author Share Posted May 12 I got some work done at an armor party yesterday, here are some updates! Boots still need a major overhaul but everything else is getting a nice, subtle wash of light green after many passes. I think I'll do another round of green wash and then try a suit-up to check in on how it's looking all together. Thanks for the support guys! 4 Link to comment
IcyTrooper[CMD-DWM] Posted May 14 Share Posted May 14 Oh nice! The chest/back is really popping! @RAIDER & @tipperaryred check this out! 1 Link to comment
RAIDER[CMD-DCA] Posted May 14 Share Posted May 14 Good to see you at it still! I still think what @tipperaryred mentioned early of this being more of a “wash” is the best description of it. I’m not sure it is quite there yet. Look at this shoulder/bicep as an example: Notice how the darker areas are almost more like “shadows” as opposed to texturing and distinct/noticeable differences between the shades…they just kinda flow (that’s where I see airbrushing as a better option). But if that’s not available for you, where Tipp’s suggestion of making a wash that’s more wiped on than sponged could work. Yes, there are occasional strong bits of weathering but those look more like scratches and gouges, not really the camo (which is more like shading IMO). 1 2 Link to comment
tipperaryred[CMD-DCA] Posted May 14 Share Posted May 14 That's absolutely a lot closer, great work. The shoulder piece that David picked out above is a particularly nice reference point, and I'd agree with David's point that the smooth gradients between colours are still going to be tricky to get spot on without an airbrush. However I think your torso armour is the closest you've gotten to a solid match so far, so maybe tweak that a little further and come back to us? If you can then replicate that on the other armour parts you'll be most of the way there. Great to see the progress 🔥 2 Link to comment
DarthBerry[501st] Posted May 19 Author Share Posted May 19 Thanks for the advice, the shoulders, biceps, & forearms have been redone to match the blended look of the references. I took an overall shot of everything, please let me know if anything else looks like it needs a repaint. I've got to replace the "nose" of the boots still and repaint the boot shaft but I think it's really getting there! 3 Link to comment
IcyTrooper[CMD-DWM] Posted May 20 Share Posted May 20 I feel like the gradients are A LOT smoother there! 1 Link to comment
RAIDER[CMD-DCA] Posted May 20 Share Posted May 20 Those arms look waaaay better! l actually think w that that look it might be worth knocking down/smoothing out the chest/back and possibly knees/TD/belt (hard to make those out in the new pics). Good work! 2 Link to comment
DarthBerry[501st] Posted May 21 Author Share Posted May 21 11 hours ago, RAIDER said: Those arms look waaaay better! l actually think w that that look it might be worth knocking down/smoothing out the chest/back and possibly knees/TD/belt (hard to make those out in the new pics). Good work! Thanks, will do this weekend! Close up photos of the knees are at the end of the last page, they're in the same style as I did these ones so they should match. 1 Link to comment
DarthBerry[501st] Posted June 10 Author Share Posted June 10 Alright! Let me know if you guys think it's ready for the black details and a suitup. I'm thinking about adding some more brown to the chest and helmet. 1 Link to comment
IcyTrooper[CMD-DWM] Posted June 19 Share Posted June 19 I like the look of that! @RAIDER and all? 1 Link to comment
DarthBerry[501st] Posted June 27 Author Share Posted June 27 I'll give the finishing a go this weekend for a suitup and see how it looks! 1 1 Link to comment
IcyTrooper[CMD-DWM] Posted June 30 Share Posted June 30 Sounds good to me! I had to take a break from here for a little bit, had a lot going on outside of the 501st. The next month is going go be a whirlwind for me 🤪 2 Link to comment
RAIDER[CMD-DCA] Posted July 4 Share Posted July 4 Sorry been away on vacation. Sure can try to move forward. I would only say to really work towards keeping the darker tones fairly consistent. In these latest shots can see the 2 shoulder bells together side by side...the one on the left looks has pretty noticeable darker tones than the one on the right (which is the one that you showed more clearly in the wave of pics prior to this one). 1 Link to comment
BlacXabbath[CMD-XO] Posted July 4 Share Posted July 4 WoW! Luke you did an amazing job with this kit, i really like the painting results, can't wait to see the totally finished costume on you! Very Impressive job! 1 Link to comment
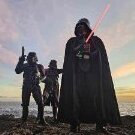
DarthBerry[501st] Posted July 12 Author Share Posted July 12 Thanks guys! Helmet details added so it was time for a suitup. The weather was funky so the lighting was all over the place, but the colors are just about the same as the previous photos with better lighting in the thread above. Let me know what you guys think! 2 Link to comment
RAIDER[CMD-DCA] Posted July 12 Share Posted July 12 Progress! I dont have time today, but would you like us to start comparing your build against the text ti see if theres any other adjustments to be made? 1 Link to comment
DarthBerry[501st] Posted July 12 Author Share Posted July 12 That sounds good to me, I don't have any other adjustments in mind that I think it needs right now, so looking for feedback. No rush or anything, mahalo! Link to comment
RAIDER[CMD-DCA] Posted July 17 Share Posted July 17 @DarthBerry Alright...here's an initial review of your kit at the moment based on the last set of pics: HELMET: For level 1, it looks like you have all of the details met. The only constructive critiques I'd offer here is the camo on the rear of the helmet. It looks as if it is being used to uniformly to conceal the center seam on most scout buckets. I'd like to see that broken up a bit if possible. And then the rear helmet decal lines...they look roughly put on there...those should probably be applied more cleanly. The missing Level 2 reqs if you chose to do them would be the concave helmet bolts. BALACLAVA - Present. FLIGHT SUIT (this is probably the piece where we might have to see a bit more adjustments..I'm open to hearing others opinions): The butt flap needs to be a bit longer to cover the butt. The thigh patches...to me they look positioned to far on the front of your thighs, not enough on the rear, and a bit too rounded. Due to the shape of the patch, the straps look to be further in to the thigh at the upper part of the patch. I would reference you to the standard scout CRL (as you can see the patches a bit better on the pictures they have to see the patch/strap orientation a bit better: https://databank.501st.com/databank/Costuming:TB_Scout_trooper or here https://databank.501st.com/databank/File:Thigh_patches_and_straps.png NOTE: The L2 requirement is that the riding patches are removed entirely and the elastic straps circle the entire thigh...so I'd offer that as a solution...discreetly sewing the straps to the flight suit w/out the patches. "Stand-up collar conceals the neck with an enclosing strap to keep the collar closed." Your collar looks to have a button which would be unacceptable. Normally there is a strap that wraps over the neck and then a hidden button or velcro straps it down to the flight suit. The Scout Trooper CRL offers a good image in the reference gallery: https://databank.501st.com/databank/File:Collar.png SHOULDERS: Level 1 elements appear present. Level 2 would require rounded bottom corners of the bells and then the actual measure of the straps. BICEP ARMOR - Appears to meet L1...strapping to verify for L2. FOREARM ARMOR: L1 appears met...strapping to verify for L2. Minor critique...maybe thin the weathering lines a bit in the curves. GLOVES - Meet L1 and appear to meet L2. VEST - Meets L1 and appears to meet L2. CHEST: Appears to meet L1. Would want to verify the material being used on the shoulder strap covers and material for straps under the arms connecting chest to back. For L2 would need to verify strap measures and materials. BACK: Appears to meet L1 reqs. Would want to verify the top tank greeblie is entirely black. For L2, rank stripes would need to be added to both sides of the tank. The tank top greeblie would need to be removed entirely. If a rivet at the bottom of the tank is present, it should be painted to match armor (not silver). BUND: Appears to meet most L1 and L2 reqs...I would add, the way you have your pouches situated is great. My only concern here is the codpiece...it seems too thin and we also can see the stitching at the bottom...that should wrap a bit under the crotch and not be so visible. Again, I'd reference you to the standard scout (or even Shadow Scout) CRLs to see the shape of the codpiece as well as the positioning of the curved sewn detail which seems high. BELT/DET - Appears to meet L1 and L2 reqs. Would need to verify strap measures and materials. KNEES: Appears to meet most L1 reqs. The only issue I see here...you're utilizing the upper strap but there appears to be no lower strap. The CRL says you can use 2 (implying 1 is optional), BUT if you only opt for 1...it should be the lower. See the L2 req. Also note this reference image showing the bottom strap being used only: BOOTS (this version of your boots is a big improvement): Appears to meet the L1 reqs. My only questions here: What is the color of the boot sole? What is the material used for the dog bone/toe? Everything else (blasters, neck seal) is optional and not required...so I think that covers everything. Tagging @Dropkick here so he can tag additional Scout DCAs for feedback (or critiques of my feedback) as well as @IcyTrooper and @tipperaryred since theyve been helping along the way. Getting close! 1 3 Link to comment
RAIDER[CMD-DCA] Posted July 17 Share Posted July 17 I forgot one last piece @DarthBerry…this is only a fitting issue for next time you suit up. The bund should not cross beneath the bottom of the belt…it’s most noticeable on your back pic. Simply lowering the belt a bit should take care of that. Oh…and a cord is visible from the back coming out of the helmet…a fan cable maybe? 1 Link to comment
DarthBerry[501st] Posted July 18 Author Share Posted July 18 Thanks for the detailed review! Overall, I am doubtful if these parts can make it to L2, but I'll keep making some improvements where suggested. Helmet: Concur, will break up the back paint (there is no seam present, I was just extrapolating from the reference photo and its a little unnatural looking). Concur on the back decals, those guys are tricky for me to put on but I know I can do it better. I think I'll go with the thick, almost no-gap-between-them look from the reference screen caps instead of the RotJ style. Flight Suit: Noted on the butt flap and thighs - both are stitched onto this old suit and I'm not sure it'll survive any adjustment. I like the suggestion about the L2 thighs, that would set a good precedent for newer troopers to do the flightsuit even more cost effectively. I just put in an order on a new flightsuit and will make those edits. A few years ago, the Pathfinders moved the RotJ Scout CRL away from just mandarin collar and allowed for the open collar to match movie stills. Since some of the other components that aren't captured too well by the old computer graphics match the RotJ scout (flak vest for example), would you be interested in having this CRL match that CRL and allow for the folded, open collar? I'm just curious as it's not detailed that way on the in game model but I can't see enough detail for a mandarin collar either. In my mind, it lowers the barrier for entry on this costume if a new member just needs to buy an off-the-shelf flightsuit and hand stich some 2" elastic on the leg and a suede flap versus making a full mandarin collar. Chest/Back: Will take photos to detail the unclear items. Bund/Codpiece: The in-game model has a thinner cod when compared to a regular scout, so I thought it may be okay, but this cod is very small. I just put in an order for a new one. Knees: I actually just couldn't find one of the straps after taking them off for painting. Sounds like I should lose the other one and swap them to just the bottom! Boots: Soles are painted grey and the dogbone is a leather-like material. Fitting Issues: Thanks for the tip, I'll drop them belt a little lower. I've been wearing Vader too often, he wears the belt very high up 😂. The cable out the back was my tightening strap for the neck gaiter, I'll use a typical balaclava next time so that doesn't pop out. Link to comment
RAIDER[CMD-DCA] Posted July 18 Share Posted July 18 @DarthBerry Just some added thoughts (you really didn't need to buy anything yet)... L2...no problem...we tend to lean that way w/ the models if at all possible but it's definitely not a deal breaker. For the helmet decals...I haven't ordered these in awhile but when I did, mine came on a single sheet that you could apply all at once. Trooperbay is where I got mine...they're really pricey now though (may be cheaper options on Etsy)...but you can see how they're all on sheet you can cut and then apply so the spacing and leveling stays consistent. https://trooperbay.com/product/shadow-special-ops-biker-scout-helmet-decals-star-trooper-wars-return-of-the-jedi-cosplay-bikerscout-cosplay-costuming-sci-fi/ Flightsuit collar...I think if we used this image you could make a case for the open collar (appears there's a V there at the center of the neck): That said...in your suitup, it was buttoned closed...so you could open it OR you could go the Mandarin collar route. I'd be open to allowing either in the CRL...with the open collar, the neck covering would be required. We would just need to adjust the CRL text as well. The thigh straps...honestly, I'd prefer to see those instead of the thigh patches...any detail we have to distinguish this from a standard scout I think is great to implement. Bund...yea that cod in the reference images might look thin just because the game model is a rail lol. I think though it's not as thin as what you have...either way, if you're working on a new one that's perfect! Knees...entirely up to you...you could use 1 or 2...2 would give you better hold and seems more practical. Heck...if you want to do one for the suitup and then add the second later, that would work too. Back...just curious...how easy would that top greeblie be able to come off you think AND would you be willing to do remove it? Again, not required...this is just one of the 5 or so main things that deviates the Forest Trooper from a standard scout (along w/ the boots, thigh straps, back tank decals, helmet decals)...I think it'd be cool to see as many of these as possible, but ultimately your call. 1 Link to comment
DarthBerry[501st] Posted July 18 Author Share Posted July 18 Thanks! I wanted some new soft goods anyways, they should arrive in a few weeks. Everything should have a crisp & deep black look with the new soft goods. I'm up for removing the tank topper, I think it's just on there with some E6000 so I can do that tonight. I'll swap the closure method on the boots too to hit that L2 requirement. Link to comment
tipperaryred[CMD-DCA] Posted July 21 Share Posted July 21 Superb work on this one, and thanks for the tag David to remind me to check back in! Particularly loving the way that the paint scheme has developed - I think that you've got a perfect foundation for it now. Huge congratulations. Will defer to David's expertise on the wider scout detailing, though I'll add my agreement to the consensus that you've both agreed to on the collar. If the low res model doesn't clearly show a mandarin (or any other specific type of) collar, then it should be grand leaving that open on the CRL. My instinct would be a similar approach to what I attempted with the draft Inferno Trooper CRL before it got scrapped - to make sure that the "standard" Shadow Scout flight suit is clearable for this one, but to also allow a bit of flexibility for suits that might not quite hit the same standard (at least when it comes to details that aren't clearly identifiable in the references for this particular costume). 1 Link to comment
DarthBerry[501st] Posted July 21 Author Share Posted July 21 Mahalo! I got some progress done on the helmet - breaking up the linear-ness of the back of the head and redoing the stripes. This lighting is very bright in the photos but the green is now blended much better. I also took the tank topper off, patched the hole from the rivet, and reworked the black stripes for L2 goals. There's an extra photo for the shoulder bridge & chest connectors as well. L2 boot adjustment is done too, I'll get some new photos soon. Scylla (the cat) was unimpressed with all of it. ETA on the flight suit (Red Kap) is a week or two and ETA on the new bund (Cucblack) is probably a month or two. I'll be out of the country for most of August, so the timing works out pretty good. I'll take super detailed photos before I leave to allow for plenty of time for additional review. I hope by that point it's just the codpiece that needs updating. I appreciate all the great feedback, this kit is better than I ever set out for it to be! 2 Link to comment

Recommended Posts
Create an account or sign in to comment
You need to be a member in order to leave a comment
Create an account
Sign up for a new account in our community. It's easy!
Register a new accountSign in
Already have an account? Sign in here.
Sign In Now