

DeadMan
-
Posts
127 -
Joined
-
Last visited
-
Days Won
7
Content Type
Profiles
Forums
Events
Everything posted by DeadMan
-
What I managed to get trimmed and ready for painting today: Waist Butt Butt Flaps Biceps One leg (have to cut out the two notchy parts yet) Cod piece Front spats Sunday I hope to get the prep done at least, and start assembling something
-
And another new light on the tanks. Really though to figure out where this may be coming from. I can only see it for a few frames. And can't see it after he ignites the thrower. Tracing the spot to the last frame we can see the dot in the second picture. Should mention the arrow in the first picture. That part looks a little to bright to be catching the light emitting from the bottom of that tank. Can't be sure at all about it. Can only see it for 2 or 3 frames from the video I have.
-
Also, Clint Randall pointed out in the Facebook group more lights on the D-93 handle. Wondering if they are on the other side as well. http://www.starwars....or-flamethrower Yes, they are on both sides of the handle. (From the ComicCon 2015 reel)
-
Shoulder bells and shoulder thingies.
-
How about this light on the transmitter? (Top circle in the 2nd photo) It's consistent throughout the scene. Looking at display photos, I can't tell where the light may be coming from.
-
Hand plates.
-
Have been wondering about the hoses. Anaheim pics show only one main hose coming from the tank that leads into the gun. The second hose loops back under the tank. The newer Disney Studios (?) pics show the two hoses going into the sleeve, then joining close to the handle.
-
Looks fantastic! Well done.
-
Yes it is there. Thought we had done all the barrel parts I should have rechecked those too, thanks for checking.
-
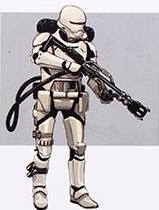
Will start my own thread and will try to take photo's as I go. Here's a pic of what I have so far... What I have: Helmet - SkyGunBros Armour - KBProps Gaskets - Bill G. Boots - Gio R. Gloves - Imperial Boots Tanks - MLC Fiberglassing. A very nice tank set. Pouches - Pete B. Thrower - 3D Print of "thisiskevin" 3D files. 48" long! In production: Hearing devices - Cheap hearing assist aids from Amazon ($10 CDN each), modding to fit into my helmet. Stereo sound Speech assist - not sure yet, one of the iComm devices maybe
-
Hi Kevin, is the part circled in the picture missing from the archive? Or I am over looking it.
-
Nick Havard - FlameTrooper - Many Questions for Build
DeadMan replied to nickorossa's topic in First Order Flametrooper
This is very interesting to me as well. I was thinking of trying to make one of mine shoot bubbles, which would probably be easier than what you are trying to do. -
Thanks a lot for releasing the files Kevin. Assigned a friend of mine to 3D print them for me I told him just to scale and make the whole thing 48 inches long.
-
Oh wow. I guess it pays to go away for a few weeks. Amazing work! How do we get onto that facebook page? Really need to be in on this build.
-
Wow, well done. And like the others, want to see this assembled... and on me!
-
Wow this is great! Can't wait to see it all come together.
-
Very nice. Thank you!
-
This is the first perfect image I have seen of the front of the gun. Although quite excited, also somewhat disappointed at the design. I was expecting some cool metal ejection tips like the types you may see on just about anything that produces a flame. I know the chemicals mix away from the tips before they ignite. In the movie itself, I can't tell if it is a special effect or if they really did shoot out real flames - It looked like they actually were fully working to me during the quick solo scenes. Will have to wait for the bluray to watch it again now.
-
Finally done travelling so I can get back at this (Didn't want to leave Orlando ). Haven't touched a thing since December when I was home last. Ken, thanks for the new photos!
-
Awesome! Love my SGB helmet. Need to repaint it since it was to cold when I did it and it looks lumpy up close. Orange peel I think it's called.
-
I'm not really sure how they come up with the CRL stuff. I imagine that someone gets ahold of original screen used stuff and does everything from there. I am waiting for my Hot Toys figure to come, and then might 3D scan the pieces to make a more accurate armour. I would have to use and trust that the scale they tell us is used is accurate. At the very least, I will make a list of exact measurements for the entire thing.
-
Pretty cool. I was looking into bollard covers - the plastic posts that cover the steel posts outside of doors, around fuel pumps, etc. They come in all sizes, but can be quite pricey. I'm away for one more week, then can get back into this
-
OK here is the 3rd revision of the PDO for the backpack and tanks. New unfold of the caps and fixed some tab sizes. Not sure I'll have time to work on anything in between trips this weekend. Seeing as it's -40 outside, there isn't a lot to do except help the neighbours get their cars started I'll try to bring some of this mild weather down to Orlando as it's probably way to hot there. http://1drv.ms/1OxypwP
-
This is all I had time for this week. Now I'm gone for the next 3 weeks. (1 week in Orlando to scope out where the next Celebration may be ) No holidays, all business The messy large sphere prompted me to make a V3 of the pep unfold for those, but I won't be able to get it uploaded now. Next Saturday I am back for a bit, then I will finish what I started, and get it uploaded.
