

darthRivera
-
Posts
105 -
Joined
-
Last visited
-
Days Won
7
Content Type
Profiles
Forums
Events
Everything posted by darthRivera
-

Sergeant Kreel WIP. Comic Star Wars (2015) Issue #59&60
darthRivera replied to darthRivera's topic in Sergeant Kreel
Hello all. Today I took the measurements to place the largest pouch on the belt, So I took the opportunity to test the position of the thighs with the torso, and the left pouch, which I was worried about hitting the holster. But, everything seems fine. I did the comparison with my old TK, built by the guys at RS PropMaster who are experts. And I think my Kreel build is similar, not bad. ? -
Sergeant Kreel WIP. Comic Star Wars (2015) Issue #59&60
darthRivera replied to darthRivera's topic in Sergeant Kreel
Industrial Strength Velcro on the sides and in the center of the strap, luckily they are not noticeable, that had me worried. For example, on the thigh, in the middle of the strap, there is a velcro square in the indicated part of the image and it is very little visible On the left arm and left bicep, only on the sides it has velcro. -
Sergeant Kreel WIP. Comic Star Wars (2015) Issue #59&60
darthRivera replied to darthRivera's topic in Sergeant Kreel
The big question is, what does he use them for? House keys? Speeder keys? Reading glasses? LOL ? -
Sergeant Kreel WIP. Comic Star Wars (2015) Issue #59&60
darthRivera replied to darthRivera's topic in Sergeant Kreel
Another little update. I already ordered the boots, from Imperialboots. The lightsaber is coming soon, I already want to start working on it. lol I finished the ammo pouches. They are not perfect, but I think they work. In a while I hope to have them made in real leather. A professional job. It is not very clear what accessory they have, but I used this as a reference for everyone. The biggest ammo pouch of all had this detail. While I wait for the lightsaber, I start with the installation of these little friends. Greetings to all. Soon more updates, I'm about to finish the work, I want to see everything together. -
Sergeant Kreel WIP. Comic Star Wars (2015) Issue #59&60
darthRivera replied to darthRivera's topic in Sergeant Kreel
I found another type of faux leather, a little thicker and more "hard", I don't know the correct word. I am going to make another ammo pouch but with this material to compare. I used it for the left hand communicator (Waiting for the led material to replace the "screen".) straps and I liked the finish. -
Sergeant Kreel WIP. Comic Star Wars (2015) Issue #59&60
darthRivera replied to darthRivera's topic in Sergeant Kreel
Updating a bit. I ordered a Ben Kenobi lightsaber, 3D printed, I will use it as a base to recreate Kreel's saber. I started with the ammo pouches, I am using black faux leather. The design shown by the references is very simple. But, it is a bit tricky to calculate the size and position, especially the ones on the left. Drawing versus reality. The holster and shoulder armor are on top of their respective pouches and there may be problems when wearing them. But we'll see that later. I started with the ammo pouch on the left thigh. The medium. I should add an "accessory" in the center, a button or something like that. -
Sergeant Kreel WIP. Comic Star Wars (2015) Issue #59&60
darthRivera replied to darthRivera's topic in Sergeant Kreel
Updated the shoulder bell cover section. I covered the foam design with a piece of orange faux leather. The only shade of orange I found. (I live in a not so big town, I didn't have many options) I wanted a slightly darker color, but I think it works. In the photos of it is clearer than in reality. Imperial cog I added it digitally to calculate the size. I'm going to order a vinyl sticker for this. The magnets are already installed, I think it has worked very well. I must admit that I am not 100% happy with the finish, I want the edges to be smoother, later I will probably build another one. But for now it works, what do you think? -
Sergeant Kreel WIP. Comic Star Wars (2015) Issue #59&60
darthRivera replied to darthRivera's topic in Sergeant Kreel
Thank you @crazas for those words and trust me. Continuing with the work, I made tests of the pattern on a 5mm thick foam. I shaped it with a heat gun (my wife's hair dryer lol) It is flexible and holds its shape very well. The plan is to cover it with orange faux leather, I hope to find the right shade. Inside or below, I will cover it with a soft black cloth. (gamuza, I don't know what it's called in English lol) and wait for final results. Additionally, I did tests to attach the piece to the shoulder armor with magnets. I had planned to wear snaps, but, these magnets are very strong and testing, mobility is excellent. The shoulder cover stays in place. -
Sergeant Kreel WIP. Comic Star Wars (2015) Issue #59&60
darthRivera replied to darthRivera's topic in Sergeant Kreel
Second try today. It is difficult to make it look the same as the reference drawing, the same angle of the image cannot be found in a photo. lol -
Sergeant Kreel WIP. Comic Star Wars (2015) Issue #59&60
darthRivera replied to darthRivera's topic in Sergeant Kreel
Most references show that it is not on the shoulder strap, maybe yes, it is the effect of the curve in this reference that I used for comparison. I can make a slight curve, but, I am concerned about mobility if I do it like that. As soon as I have the new versions, I post the results. Again, thanks for the feedback, it is very helpful. -
Sergeant Kreel WIP. Comic Star Wars (2015) Issue #59&60
darthRivera replied to darthRivera's topic in Sergeant Kreel
Yes, I want to draw two more patterns, I'm going to use @Fivezero's suggestion. Thanks for the feedback. -
Sergeant Kreel WIP. Comic Star Wars (2015) Issue #59&60
darthRivera replied to darthRivera's topic in Sergeant Kreel
Shoulder bell cover Ok, my first try with the shoulder bell cover. I drew this pattern, I think it is not bad, but maybe it could be better. What do you think? I'm not 100% happy how it looks in the back. But I made the pattern symmetrical. So I don't know what I could do to make me like it 100% lol _______________ 03/05/2021 V2 ______ 03/11/2021 04-05-2021 -
Sergeant Kreel WIP. Comic Star Wars (2015) Issue #59&60
darthRivera replied to darthRivera's topic in Sergeant Kreel
Thanks. Yes, you are right I have to correct those edges, it is not complicated. I should order the boots to fit the lower leg armor and I would be ready for a full suit test. soon more updates -
Sergeant Kreel WIP. Comic Star Wars (2015) Issue #59&60
darthRivera replied to darthRivera's topic in Sergeant Kreel
Today I finished the painting of the abdomen (Updated abdomen section) , this piece, along with the chest were the ones that had to be modified. I hope it is an acceptable finish, or the minimum quality required for a 501st suit. I need to finish the inner strapping for the first fit test, then I start with the shoulder bell cover -
Sergeant Kreel WIP. Comic Star Wars (2015) Issue #59&60
darthRivera replied to darthRivera's topic in Sergeant Kreel
I agree with you. It must be a custom shoulder bell cover. I'm going to work on some prototypes to see if there are good results. -
Sergeant Kreel WIP. Comic Star Wars (2015) Issue #59&60
darthRivera replied to darthRivera's topic in Sergeant Kreel
I did an update on the abdomen section, referring to the "white rectangles" of the abdomen. Based on these being "relive" and not just painted, I got some 3d printed ABS rectangles. More details in the Abdomen section. ________ I have been working on the inner strapping, there is progress, but not noticeable, but it is progress. lol ________ I'm close to finishing the armor. And I want to go analyzing the "accessories", pauldron, ammo pouches, saber, etc. I would like initial with the pauldron or shoulder pad. To help me determine the material and ideas of how to put the shoulder together. First, pauldron or shoulder pad? In the other Issues, we can notice that it is a pauldron, but in those same issues, they completely stop drawing the pauldron leaving the impression that it is a shoulder pad. If it is a pauldron, it would be the easy way. But I am looking for the right way. On the other hand. The issues that I am using as a reference, there are no clues that I pointed to a pauldrón. It's more of a shoulder pad, or an additional shoulder on top of the white shoulder armor. Looking at the first reference, I am a little concerned about mobility. But in the other references, and all other references, it shows the piece over the shoulder armor and leaving the shoulder strap free. This contributes to mobility. I have no problem building this piece, I only have doubts, in its material or finish. Plastic? Leather or a leather-like material? I have in mind a solid base, but flexible, and cover it with vinyl or leather-like material, how to wear it? I do not know yet. lol What do you think? Thanks for the comments and help. -
Sergeant Kreel WIP. Comic Star Wars (2015) Issue #59&60
darthRivera replied to darthRivera's topic in Sergeant Kreel
I agree. Thanks. You're right, those other belt details are more important. The cartoonist gave more importance to the fasteners lol Inconsistencies is what there is most in comic book drawings, I think that in this character there are acceptable ones to try to emulate him. Being a comic book artist is hard work. lol Continuing work, more updates soon. -
Sergeant Kreel WIP. Comic Star Wars (2015) Issue #59&60
darthRivera replied to darthRivera's topic in Sergeant Kreel
BELT Yesterday I received my new belt from Trooperbay, which replaces the ANOVOS black belt. The quality is much higher, in addition to the fact that I need it white, not black. An interesting detail. For a regular Tk, the holster affixed with only two fasteners at the bottom. The references indicate that it should be fastened with 4 fasteners. I think it is the correct way to attach the holster to the belt. Luckily the ANOVOS holster brings the 4 fasteners What do you think? ____________ 03/08/2021 -
Sergeant Kreel WIP. Comic Star Wars (2015) Issue #59&60
darthRivera replied to darthRivera's topic in Sergeant Kreel
Wow, thanks for the info. I'll definitely go this way. -
Sergeant Kreel WIP. Comic Star Wars (2015) Issue #59&60
darthRivera replied to darthRivera's topic in Sergeant Kreel
Yes, a piece of black foam or silver tape that helps spread the led light. I don't know, I'm going to try some things. I want to apply transparent paint to the screen, it is not noticeable in the photo but I sanded the plastic a little to remove transparency, I think painting would help. -
Sergeant Kreel WIP. Comic Star Wars (2015) Issue #59&60
darthRivera replied to darthRivera's topic in Sergeant Kreel
First prototype of the communicator. I need to improve the transparency of the screen. I should do the tests with LED lights, maybe also put something black on the section of the forearm that covers the communicator. I should be thinking about the straps too, but I think it will be the last. -
Sergeant Kreel WIP. Comic Star Wars (2015) Issue #59&60
darthRivera replied to darthRivera's topic in Sergeant Kreel
Analyzing the position and size of the horizontal white rectangles on the sides of the abdomen. After measuring my armor. I see that the space is not much on the sides. The space shown in the reference drawing, has a size in reality is not possible. This is the actual space I have. Because of this, in the end it will look similar to the right side of this reference. The chest and belt, on top of these white rectangles. Possibly use ABS plastic of a good thickness, so join two sheets, since these rectangles come out of the adbomen. -
Sergeant Kreel WIP. Comic Star Wars (2015) Issue #59&60
darthRivera replied to darthRivera's topic in Sergeant Kreel
Only Kreel has these variations, the other members of the Squad, the same thing happens. That is why I think it is better to focus on one version. -
Sergeant Kreel WIP. Comic Star Wars (2015) Issue #59&60
darthRivera replied to darthRivera's topic in Sergeant Kreel
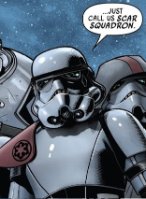
Thanks, I'm very excited about this build, I'll send you all the references I have in a moment. In my case I focus on the comic issue #59 and 60. The SCAR Squadron has many variations of drawing in the different issues. -
Sergeant Kreel WIP. Comic Star Wars (2015) Issue #59&60
darthRivera replied to darthRivera's topic in Sergeant Kreel
Left arm communicator. I started with a prototype. The references do not show much detail, a rectangle with a light blue screen. Once the prototype is attached, I cut the center leaving a slight edge to install a semi transparent plastic, and inside it, install led lights. I used this image for reference to determine the size. First results (prototype) I have not thought about the straps that hold this device yet. Size and material. I imagine they should be leather or leather-like. Final finish pending.

