Chaos
-
Posts
1,472 -
Joined
-
Last visited
-
Days Won
111


p7.thumb.jpg.bace682851481eb60e276cb89785563d.jpg)


About Chaos
SpecOps Info
-

-

-
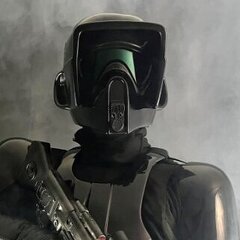
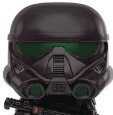
Costumes
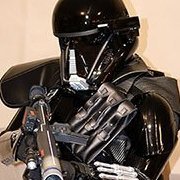
Imperial Death Trooper
-

-
TotM Datestamp
Mar 2020, Jun 2023
Support Info
-

-
Supporter Datestamp
2018, 2023
Recent Profile Visitors


Chaos's Achievements
")


-

DeathTrooperIAm's Death Trooper Work In Progress
Chaos replied to DeathTrooperIAm's topic in Imperial Death Trooper
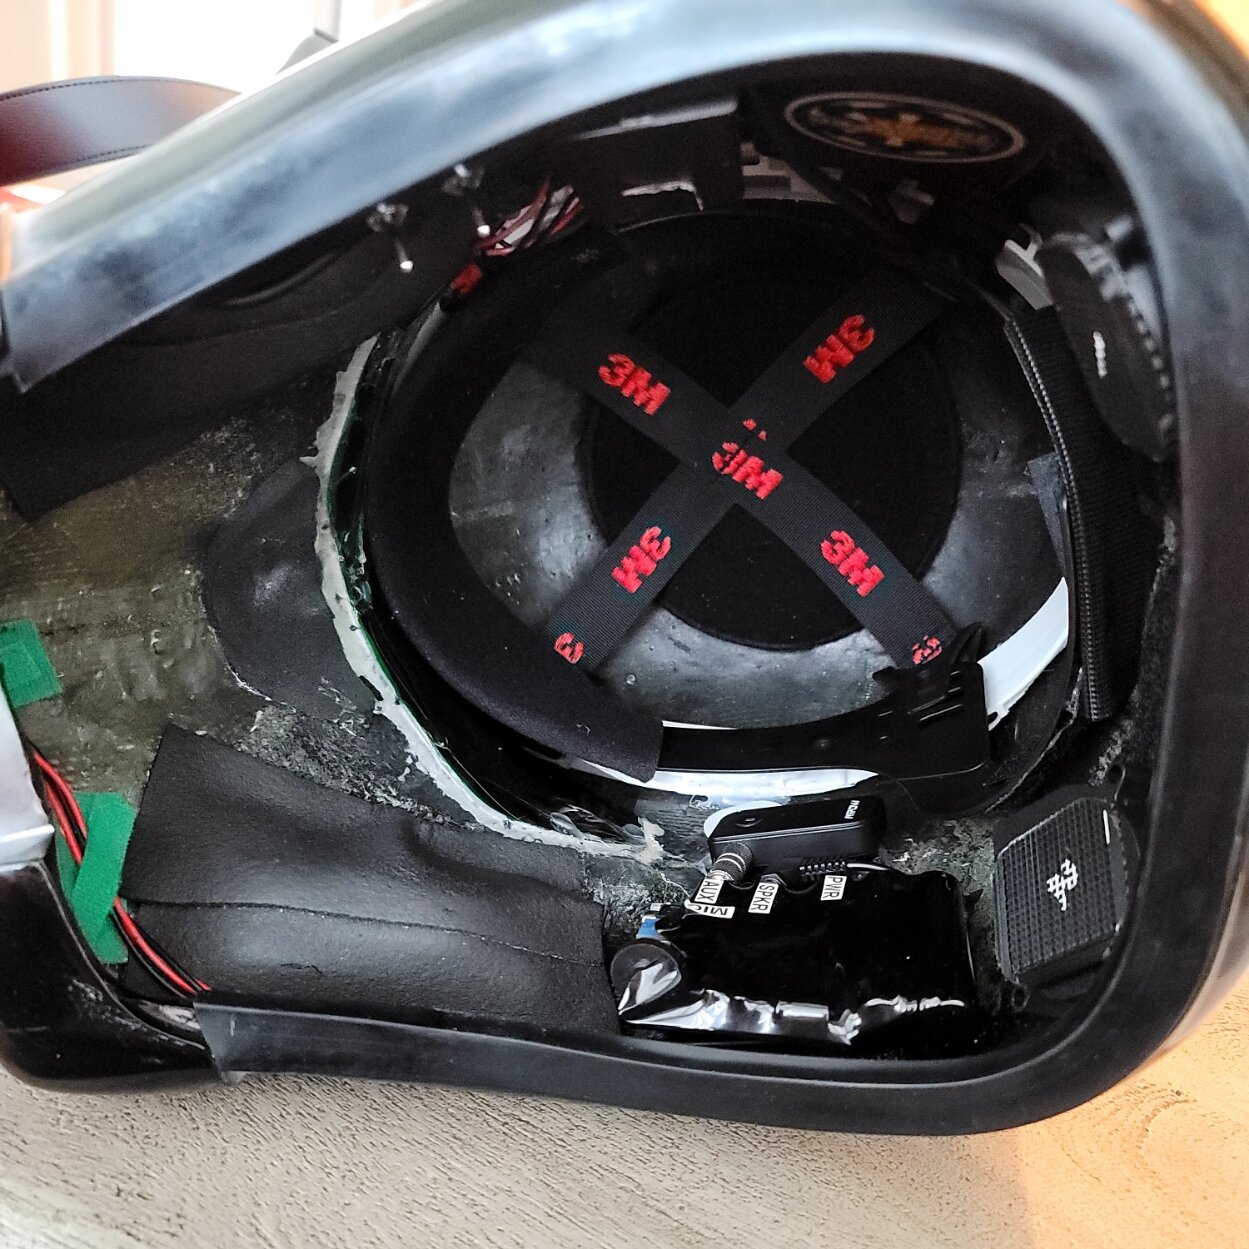
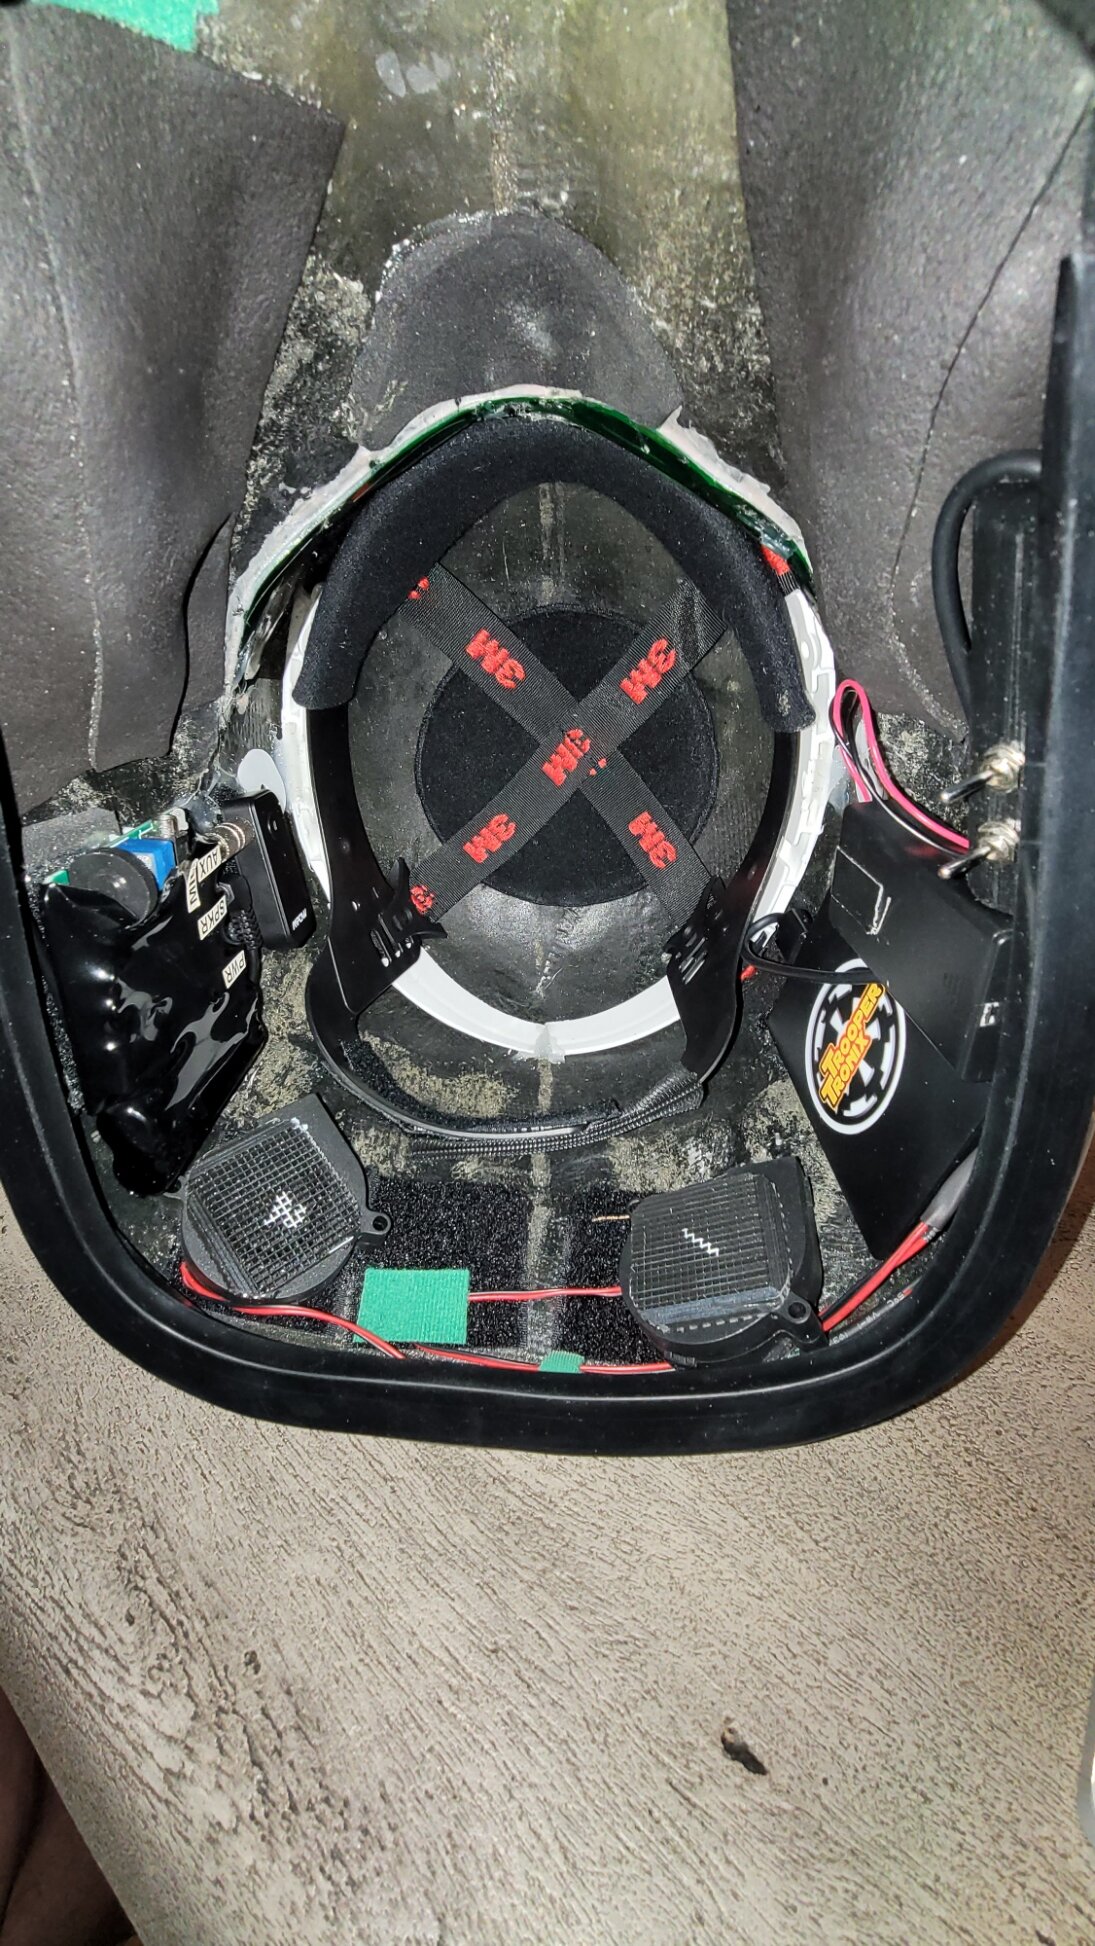
Any time and you're most welcome. I have a hard hat liner in my DT. It allows a lot more airflow that thick pads and makes aligning my eyes with the helmet visor easy. Here is what the inside of my helmet looks like: Here is a video on how to do it. It is using a TK helmet but the principle is the same. This was done my Trooperbay. And as I was looking for Trooperbay's video I found this one by Captain's Wookshop which he did for his DT Hope this helps.
-
plankton’s Death Trooper *Approved!*
Chaos replied to planktonimore's topic in Imperial Death Trooper
Congrats! Adjustments will also be ongoing 🤣 with this kit you'll always have something to improve on, took me about 8 troops initially until I got everything straight, then I started doing improvements and upgrades ... never ending -
DeathTrooperIAm's Death Trooper Work In Progress
Chaos replied to DeathTrooperIAm's topic in Imperial Death Trooper
@DeathTrooperIAm Preston, of course updates are not only allowed but very much encouraged during your build process. Keep them coming. To answer your questions: Increasing your height. Depending on your boot heals and helmet design, you will already gain 2-4 inches in your bare foot height. Most boots will increase your height 1-1.5 inches because of the design. More on boots later. Helmets: depending upon your internal configuration, will increase your bare foot height by about 1 to 3.5 inches. Flat helmet pads like the ones in combat helmets are usually an inch or so thick. If you install some type of webbing system or helmet liner, it can increase the top of the helmet height by as much as 3.5 inches. Be aware, how much height you get out of internal padding is limited by you eye line of site with the visor opening. Example, my bare foot height is 5'9" and when I am suited up, my overall height is just shy of 6' 2" It is not a requirement to be as tall as the screen stunt men and we have some Death Troopers who stand less than 5' and who look just as intimidating as the screen stunt height of 6'5". More on Boots: Keep in mind you can't change the boots' sole/heel height as that would not meet CRL appearance requirements. We have had people use internal heel lifts. If you put these in proper fitting boots (your normal shoe size) they can become very uncomfortable. If you go that route, I would recommend getting boots 1 to 2 sizes bigger. Also if you go the heel insert route, you will need to size your shins circumference around your ankle to accommodated the extra width of your heel being raised farther up into the boot collar. Heel lifts are basically the same as women wearing high heeled shoes, so it does take some getting used to. I have tried that path with my boots and found it to be very uncomfortable standing like that for several hours during troopings. Now, about the Version Two Specialist variant, there is a Vendor thread where you can find makers of the items. Most are up to date. Before you buy a chest rig take a look at the linked thread below. It gives you a good idea of how the screen rigs were attached etc. Best of luck with your build. -
Rob, The photos don't really show what the issues are. If you take another photo a little farther away and clearer we might be able to assist you better. Also, who produced the armor and is it ABS or polymer/fiber glass? How much do you need to shorten the shins to get them to sit correctly over the top of your boots. Where does the shin not close around your leg and how much is the gap?
-
Hey Dan, apologies for the delay, work has been crazy, I've been flying my ass off. For your Specialist L2 application its good that you have taken new sets of pictures. Here is what we will need by way of photos. 1. Standard set of photos for basic approval: Front: arms down - palms inward, arms up parallel to the ground - palms down Right side: arms down - palms inward, arms up parallel to the ground - palms down Back: arms down - palms inward, arms up parallel to the ground - palms down Left side: arms down - palms inward, arms up parallel to the ground - palms down Some type of action shot with a weapon or using your hands like in a fist or "force wave" 2. After you take the basic photos you will need to take photos of each of the L2 requirements that are mentioned in the CRL example, if the L2 Requirement says "There are two small notches on the outer ⅕ of each side of the canister approximately 3/4" (20mm) from the inner edge of the end caps and spaced approximately 1" to 1.25" (25-30mm) apart on the lower edge of each horizontal grooves. Refer to reference photos for specific details." then we would need a close up photo of the detail with a ruler next to the detail to verify the detail and measurements. If an L2 requirement is visible in the basic photos or in another close up, you don't have to take an up close photo. 3. If you have Microsoft Office you use Word or PowerPoint to insert all your photos and then save the file as a PDF and upload that into your Application thread. If you can't do that, then it would be best to create an account on an image storage site. Imgur is what I use. Create a post and upload all the photo to there and post the link in make it shareable in your Application Thread in the Specialist sub-forum. 4. Make sure all your photos are clear, well lit, and in at least 960 or larger resolution. Let me know if you have any issues or other questions. You can go to any of the request threads for examples.
-
plankton’s Death Trooper *Approved!*
Chaos replied to planktonimore's topic in Imperial Death Trooper
Looking good Trooper. Yes, the DT is a very warm and motion limiting armor kit. I have fans in my helmet; Additionally, I used a construction helmet liner to provide more air flow around my head. Most people complain about the range of motion in their upper legs and pinching between the thigh armor and cod piece. You can make the gap bigger between the thighs and cod piece by determining how much of a gap you need and trimming that amount off the top of the thighs. When you trim the top of the thighs, follow the shape all the way around so the appearance of the thighs shape remains the same. If you are getting binding or limited range of motion in your knee area, you can cut an additional amount off the top of the thighs and raise up the thigh armor, this will increase the knee gap enough to allow for a greater range of motion. I am not sure how your torso armor is strapped but if you are having issues turning your upper torso, a way to increase the range of motion is to have the chest and back separate from the lower back and abdomen armor strapping. This will allow your upper body to twist and the lower armor to stay in place. Issues occur with the helmet hitting the neck collar in the back when looking up. There is not much to do about that other than either making sure the collar is as close to your neck so that the helmet opening allows the collar to rise into the helmet opening. Or you can trim the neck collar's edge down some to give you more of a gap. It took me almost twelve troops and experimentation to get all my armor strapped and sized so it gives me enough freedom of movement to walk up and down stairs, climb onto parade trailers, and be able to actually sit down. Even to this day I am still tweaking mt DT set up. Shins, if clam shelled, definitely need a locking type closure. I use Velcro along the vertical split on mine and it works perfectly. -
I have been following along in the FB messages and I am so sorry for your loss. I actually posted the request there to have another set of eyes as I knew you had a lot going on. After looking at @Andreas Funk's photos and videos, his armor may make the mark for the CRL so we may not have to wait on someone to build a kit and this CRL approval may go quickly once we get the wording completed. I am still building mine with 3D FDM and Resin printers so its taking a while. Plus once I get mine finished I will have to figure out how to send it back to the USA when I leave my job. Good to see you getting back into things, if you ever need anything send me a message.
-
Rudi, Welcome to the Darker Side of the Darkside! You have chosen one of the more intricate kits to build. The DT is impressive when completed and is one of the few kits that has a lot of minor details which are required for basic approval. I recommend that as you build each section of your kit that you refer to other Trooper's build threads. Any questions that you may have about your build have already probably been addressed by others and how they solved an issue. It is also good to consult the CRL when building and painting. Yes the armor for the DT is gloss black, however there are some paint schemes that are highlighted in the text of each piece along with a Paint Scheme Guide link in the CRL. If you have any questions or need something clarified, do not hesitate to ask here in your build thread. Best of luck with your build and we look forward to seeing your progress.
-
plankton’s Death Trooper *Approved!*
Chaos replied to planktonimore's topic in Imperial Death Trooper
What the heck is going on with the right hand box? Is it intentionally designed to not be flush with the opening? -
DeathTrooperIAm's Death Trooper Work In Progress
Chaos replied to DeathTrooperIAm's topic in Imperial Death Trooper
His contact info is in the Death Trooper Vendor list. -
Airsoft mags are acceptable
-
DeathTrooperIAm's Death Trooper Work In Progress
Chaos replied to DeathTrooperIAm's topic in Imperial Death Trooper
Jim Tripon has a tailor who makes under suits to a person's measurements. -
plankton’s Death Trooper *Approved!*
Chaos replied to planktonimore's topic in Imperial Death Trooper
Nathan does an amazing job of weathering his kit. For your helmet this might help. The same technique will work for the forearm cylinders. For your armor this will help as well Ideally, you will want to use acrylic paints. This provides two benefits... it's not permanent and can be washed off if you ever want to look like you just walked out of an Emperial Quartermaster. I also highly recommend that you use flat black or the Tamiya TS40 for the recess details mentioned in the CRL. Pay attention to this because not all recesses are painted. I used the same method on mine, but instead of a brush, I used an airbrush with light gray and a damp rag to wipe down the excess wash. Best of luck and the best advice I can give you this is not like a sand trooper or mudtrooper. When it comes to weathering DTs, less is more. Keep it conservative. -
C’mon! Let’s make that Death Trooper Kmon. WIP
Chaos replied to Kmon's topic in Imperial Death Trooper
Everything is looking good so. Regards to the placement of your abs and lower back, best to put the top front and back armor on, the adjust the abs and back to get the correct placement