

lancer
-
Posts
80 -
Joined
-
Last visited
-
Days Won
7
Content Type
Profiles
Forums
Events
Everything posted by lancer
-
YADT - Yet another Death Trooper (from Germany)
lancer replied to Havrix's topic in Imperial Death Trooper
If you check out my build thread on here I have a few pictures of how I put most of the suit together. Snap type and location, as well as clam shelling the shins and forearms. -
YADT - Yet another Death Trooper (from Germany)
lancer replied to Havrix's topic in Imperial Death Trooper
You've got a great list there. An almost identical part loadout to my deathtrooper build. Good luck! -
So is your speaker for your mic located in the helmet? Or is it Bluetooth?
-
Lmao yeah I've already gotten Vader a few times. Even standing side by side with a Vader we got "oh look two vaders!" ???? Electronics are a work in progress. I have a TRamp voice amp that I'm pretty happy with. I also received my fans recently. They work great and run off of a USB power bank. At this point I'm searching for a power bank small enough to comfortably fit in my anovos helmet, if not figure out where to stash the one I have and power the helmet remotely. Once I figure out my set up I'll post pics as well as the links to where I got everything.
-
Contact Andrew Mclary at the plastic arms dealer on etsy. He offers buckles and straps that are fantastic.
-
Thanks for the support. I guess I just got spoiled with how clean Jims kit was, not having to do any substantial pre work before painting. I have 4 troops lined up over the next 6 weeks. I start vacation on Sunday so I should have plenty of time to finish up everything I'm working on. Can't wait to have my e11 finished for troops so I don't have to stand there wondering what to do with my hands hahaha
-
I did my very first official 501st troop a few weeks ago. This was a Star Wars Christmas party at St. Jude's Children's Hospital. A really great event, and I was very pleased to meet everyone there. The other troopers made me feel more than welcome and I had a wonderful time. I have a few more troops signed up in early February which has given me enough time to make some adjustments that I wanted to make to my suit. At the moment I am currently working on fixing some of the minor issues that arose from wearing the suit the first few times, as well as adding some of the detail that I had not done previously. I have started painting the alternate coloring on the chest, back, and ab pieces using Tamiya TS40. I really like the color that it adds to the suit, but I absolutely hate how it looks in certain lighting in pictures. I am debating between adding a gloss layer and polishing it like the rest of the suit. It would give me the added depth while not being too stark of a contrast. I may do a test piece and see how I like it before committing to doing the entire suit that way. Once the armor has been polished and finished properly I will begin the weathering process. This will be subtle hits of dust/gunmetal in the cracks and crevices all over the suit, per the CRL. I have also began the work on my weapons. I finished my SE-14R blaster and am in the early stages of the E11-D. The blaster went together fairly quickly, but unfortunately the E11-D is not being as kind. I feel like i'm currently lost in a never ending cycle of sanding and filler primer. Hopefully all of the work and attention to detail will pay off in the long run. I hope to have everything completed and put back together by the end of the month.
-
Do you have pictures? Unless you're positive it's a chip I would recommend trying to buff it out first. I had some scuffs on the forehead of my bucket that I thought were chips as well that I was able to get out with my DA polisher and some compound.
-
New too Forum looking to join as a Death Trooper
lancer replied to Darthjon's topic in Imperial Death Trooper
Never too short bro. I'm only a smidge taller than you and I'm an approved Deathtrooper. Remember there are plenty of ways to make yourself taller. With helmet on, boots, and shoe inserts im about 6'3"-6'4" all suited. Which only puts me a few inches below the "official" height. Work on getting the suit to fit you correctly and you'll be fine. -
Awesome! I had no idea that even existed!
-
I'd say total cost is in the $3500-4000 range all said and done. That's including the entire suit, supplies, weapons, electronics, and a few upgraded parts I purchased. As far as the most difficult part of the build it was definitely the painting. Jims kit is wonderful and I didn't have any trouble putting it together. But getting that mirror glossy black finish over everything that I was after was a nightmare. Most of that had to do with electing to do the entire thing with rattle cans. Sanding, sanding, sanding, painting, more sanding, polishing. Tons of work but the final result is worth it.
-
I have this one. I think it's pretty excellent. https://www.theuniquetee.com/products/star-wars-death-trooper-t-shirt-hoodie?utm_medium=cpc&utm_source=googlepla&gclid=CjwKCAiA-KzSBRAnEiwAkmQ151Vi_fL-HBk6bgpeSH-H0wqrXAL81QG7C6kLXrgDVp5rHa1LZt3CVBoCf2IQAvD_BwE
-
Congrats! Looks great
-
Finally! TX-23684 reporting for duty! I am officially 501st approved and already signed up for my first troop! I have a bit of maintenance to do on my suit after the last time that I wore it but I'm very excited to get out there and start trooping already. A huge thank you to everyone here on the board. Tons of valuable information and resources made the process much easier than I was expecting it to be.
-
Officially submitted my application for 501st approval this week. Just waiting patiently now. Fingers crossed! In the meantime I'm working on my blasters. Both se-14R and E-11D that were printed wonderfully by Tom Campbell. Running out of things to work on at this point. Maybe it's time to start thinking about a new project
-
If you ordered a kit from Jim the buckles are included.
-
Well the suit is just about finished and I was able to wear it for the very first time at LA Comic Con this last weekend. Met up with the 501st at their booth and was able to talk to a few of the guys on the application process. I hope to be wrapping up the last few details in the next week or so and I'll be ready to submit for approval. Overall the suit was very successful. I need to do a little bit of work on my shins, as they kept riding up my leg and digging into the inside of my knees as I would walk. Very uncomfortable after 6 hours. I also busted one of the elastic bands that hold them closed so I will need to come up with a better solution. But overall I don't have any complaints. A few small tweaks here and there and it's actually fairly comfortable to wear. Huge hit with the crowd as well. I couldn't go more than a few feet without stopping to take pictures with someone. I will be posting up a few of the details I have done to the suit as I have time, as well as a final list of all parts included in my build, and a list of where I got them from for those who are interested. Until next time!
-
The rockets have pre drilled and taped holes in them. I drilled holes in the arm and attached them with a screw. Not super happy with it but it will work for the time being.
-
Awesome. I'll keep an eye out for your update! I have an update of my own. I finally have a finished piece of armor! What seemingly became a 50 step paint process has finally yielded me a finished buttplate. Now just to complete the rest of the suit. For those interested. I am using Rustoleum Professional Primer, Professional High Gloss Black, and Professional Clear Enamel. The clear enamel was the most difficult to find. I eventually had to order it from Lowe's, which would only allow me to purchase it by the case. Fortunately I don't think I'll have any problem ripping through all 6 cans of the stuff. Here is a link to where it can be purchased for those interested: https://www.lowes.co...TIaAncpEALw_wcB All parts receive an initial sanding of the raw fiberglass. This was followed by a number of coats of primer, as well as subsequent sandings with progressively finer sandpaper, starting at 120 grit all the way up to 400 grit. Once I was happy with the finish the part gets multiple coats of high gloss black. After some trial and error I found it best to do only one coat at a time, waiting the full 24 hour cure time before recoating. Each color coat was wet sanded with anywhere from 800-1200 grit sandpaper. The pieces were then finished with multiple coats of the clear enamel, again sprayed 24 hours apart. Then a final sanding starting with 1500 grit all the way up to 3000 grit sandpaper. Once the final coat of clear was cured and finish sanded I needed to bring the shine and reflectivity back to the paint. For this I used a dual action polisher attachment for my power drill that I got off Amazon. It's made by Meguiar's and can be found here: https://www.amazon.c...0?ie=UTF8&psc=1 I hit the piece with the cutting compound, polish, and finally a coat of wax to seal it all in. My final results can be seen below, and while labor intensive and time consuming, completely worth the effort. I have a finish almost identical to the Anovos bucket, and I am very happy with it. Now to knock out the rest of the suit!
-
Yeah the rockets have given me a bit of a headache as well. They are attached for the time being but I'm not very happy with it. Definitely looking for a better solution. Feel free to share once you've gotten it figured out!
-
It's been a while since I have had an update but it doesn't mean I haven't been busy at work! The suit is about 50% painted and I hope to be finished in the next few weeks. Unfortunately my OCD has kicked in big time and won't allow me to leave a piece alone until it is perfect. This means several pieces have been sprayed, sanded, resprayed, and sanded a few more times over and over until they are just right. I finally picked up a DA polisher and will be using it as the finishing step on all my parts. The results are fantastic. I finally received my weapons in the mail today. These were purchased from Tom Campbell at TDK props. SE-14R, E-11D, and Spectra sensor designed specifically for the Anovos bucket. The print quality is amazing, so much so that many of the pieces won't need much more than a coat of primer before they are ready for painting. Tom has also gone to the trouble of making sure he included lots of pictures and diagrams of how both weapons are assembled. I can't wait to get started on them. I have also taken the liberty of upgrading some of my parts as they become available while I finish the rest of the suit. I ordered some arm rockets machined out of aluminum from BlasTech Industries. These were offered through the Death Tooper Builders Group on Facebook, and can be purchased on eBay here: http://www.ebay.com/...GcAAOSwtZVZsG2A The quality of them is awesome, however they add a significant amount of weight to the forearm. I haven't weighed them yet, but I would wager they are roughly twice the weight of the cast resin ones that were included in Jim's kit. For now though they have a spot on my armor. Lastly, I was able to source some authentic RAF shoulder buckles and machined aluminum D-rings. I am just waiting for these to arrive from the UK.
-
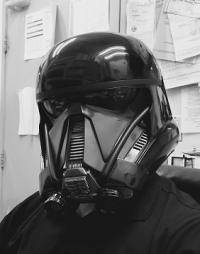
The paint job on the bucket looks fantastic. Great work.
-
That's more or less what I have being done to it. Suit was dropped off at the tailor. The entire thing is being tightened up to fit more like a wet suit. Both sleeves, both legs, neck and chest. The poncho is being pulled inwards and tighter down over the shoulders. Work on it should be done early next week. I'm excited to get it back and see how it looks. At that point I just have to finish the painting and I should be done.
-
I have finally moved on from the construction/fitting stage to the painting. While I'd already painted a few bits from start to finish to refine my process I've moved onto the rest of the kit. Lots of sanding, lots of primer, and then more sanding. There are a few pin holes throughout the kit that will be filled with bondo. I'm on vacation from work through Tuesday so I'm hoping I can get the majority of the suit primed and painted before I go back. I also have an appointment to meet with a tailor tomorrow morning to make some adjustments to my undersuit. It fits much looser than I would like it to, and I am finding it is getting bunched up in the armor on the legs and forearms. I will have them tighten the whole thing up to still be comfortable, but remove some of the unnecessary excess.
-
Small update. Finally got my boots and gloves from Imperialboots. The gloves are a perfect fit. The boots I went up in a half a size, and this has allowed me enough space to throw in a pretty decent insole to get me an extra bit of height. My one gripe about them is that the laces that they are supplied with were waaay to short, and I have had to order a set that's about 6 inches longer just to be able to tie them. Overall I am very pleased with both. The only parts I have left to get are my weapons which I plan to order from Tom Campbell sometime this week. Now that the boots are here I can finish fitting the shins. I have been working on a million different things at once on the suit and taking pictures as I go. I'll be posting up a few step-by-steps on some of the areas that have given me the most trouble hopefully within the next few days.
