


wook1138
-
Posts
104 -
Joined
-
Last visited
-
Days Won
4
Content Type
Profiles
Forums
Events
Everything posted by wook1138
-
Wook’s DT Build (850 ArmorWorks and Armoryshop)
wook1138 replied to wook1138's topic in Imperial Death Trooper
Resizing the forearms and dealing with the cover strip on the left forearm. The reference material shows that the cover strip does not extend all the way to the rest of the left forearm. So I had to figure out a way to modify the forearm to correct for this and also soul reduce the size of the forearm for my skinny little arms. So I came up with an idea that would solve both issues, but it meant cutting up my forearms quite a lot. Marked up the outer part of the forearm to where I wanted to cut it. At this point - if this doesn't work, I'm buying new armour. ? Cut Reattach cut part by sliding the cover strip piece underneath the rest of the forearm. The innerhalf of the forearm. I used the same process as the outer peace, but I cut away less so that I wasn’t destroying too much of the detail/ groove. The result I reduced the size of the forearm by 1 inch, which is the width of the cover strip. This allowed the part with the missing cover strip to but up on each side without an obvious gap. So I need to do the same for the back side of the left forearm. This make the forearm quite small - which is about perfect for me - well, hopefully it fits with my undersuit and gaskets. ? The right forearm will be easier - it has the coverstip right down to the wrist. Sent from my iPhone using Tapatalk -
Wook’s DT Build (850 ArmorWorks and Armoryshop)
wook1138 replied to wook1138's topic in Imperial Death Trooper
Strapping. I decided to attach the cod to the ab and the butt plate to the kidney. I’m using snaps with nylon bases. Straps for the butt are 1” and for the cod I’m using 2”. I also added some snap bases to the bottom of the cod and butt - I will join the two with an elastic similar to what is done on a TK. I'm not sure how I will attach the ab to the chest and the kidney to the back - I want to use elastic to give me some flexibility - I was also considering a suspender system for the ab and kidney pieces. I also needed to resize the abdomen piece. It was a bit wide for me, so I gave it a hot bath. Before After. There is roughly a 5 inch difference. Sent from my iPhone using Tapatalk -
Wook’s DT Build (850 ArmorWorks and Armoryshop)
wook1138 replied to wook1138's topic in Imperial Death Trooper
While trying to figure out my strapping I realized the belt doesn’t really overlap the armour. It wraps around directly on the undersuit with the armour butting up to it - except for the butt and cod pieces which hang from the belt. I don’t see this working well so I will be finding a way to attach the cod and butt pieces to the rest of the armour and then attaching the belt to the armour somehow. I also noticed this piece is not correct. There is extra space above the TD. Reference. So some modifications were in order. Made a cut. Made a little tab with a scrap piece of ABS and gave it a bend with a heat gun. Turn the TD part upside down and Glue it into the back for support. Glue upside down TD part back on - using the little bit of overlap that I left. The added tab is to give the piece something to glue to in the middle. Seems to work and I have some space below the TD to add Velcro or whatever to help with holding the belt in place. Sent from my iPhone using Tapatalk -
Wook’s DT Build (850 ArmorWorks and Armoryshop)
wook1138 replied to wook1138's topic in Imperial Death Trooper
Chest to back. The two pieces do not line up so well. I was going to hot bath the parts but decided that since I’m using snaps on a plastic tab that I wouldn’t bother. Trimmed for size. I let the collar parts overlap. I can trim later if I don’t like it v I made a couple of snap templates out of spare ABS. Used that to make a couple of double snap plates out of nylon. Glued this onto the inside front of the chest. Used my snap template to position snaps on a piece of plastic that I gave a hot bath to curve. Also added a bit of nylon to give me something to grab on to. Added some nylon to the other side of the tab to build it up - to account for the thickness of the snaps. Glued on the rubber shoulder straps. I tried E6000 first - I should know better- it didn’t work so I used something that works really well for rubber. Finally I glued on the plastic tabs to the back piece. I also added the snap that the shoulder bells will attach to. One is added in the photo below. Also added 1” elastic strapping to the shoulder bells. I use a soldering iron for holes. Mark the distance of the snap on the shoulder to the edge of the shoulder strap. Sand the inside of the shoulder bell and glue the elastic in. Then I did some final trimming and sanding. The snap connection works but is a pain in the butt to get dressed. I should have used a tab and slot connection with an elastic strap. I’ll see how my patience holds up. It might get changed. I don’t have a final picture yet, I will take one later. Sent from my iPhone using Tapatalk -
Wook’s DT Build (850 ArmorWorks and Armoryshop)
wook1138 replied to wook1138's topic in Imperial Death Trooper
Hahaha, thanks Chirs. Actually, I can't even take credit for that one - I saw it in a YouTube video - Death Trooper Build series by Big Pete's Cosplay (my "go to" for building tips on this kit). -
Wook’s DT Build (850 ArmorWorks and Armoryshop)
wook1138 replied to wook1138's topic in Imperial Death Trooper
Fine tuning the shoulder straps. The ones supplied in the kit are rubber of some sort. They require just a bit of cleaning up. The rubber straps have been cast with the rear mount detail, but the same detail is present on the back plate. So the rubber one had to be trimmed and inserted into the back plate. This tool is great for making holes for trimming. Needs some fine tuning with a file. It was still a little wide, so more trimming. A little aluminum paint. I also added wood to the sniper knee and belt boxes so they can be secured with screws or similar. I used a scrap piece of 1x8 and traced the ABS parts onto it. The piece for the sniper knee needed sanding to thin it down a bit. Sent from my iPhone using Tapatalk -
Wook’s DT Build (850 ArmorWorks and Armoryshop)
wook1138 replied to wook1138's topic in Imperial Death Trooper
I apologize if you are having issues with seeing the pictures as embedded images . Tapatalk is giving me grief on this site. Sometimes refreshing the page helps. -
Wook’s DT Build (850 ArmorWorks and Armoryshop)
wook1138 replied to wook1138's topic in Imperial Death Trooper
Hand plates. Untrimmed Reference. You can see the hand plates are actually pretty think in the picture. The return edge on the ABS pull above has very little return edge, so mine are going to be a lot thinner. Left and right hand plates. These were pretty straight forward so I sanded the edges down to about a 600 grit to get them nice and smooth. I do this to all the ABS once I am done with the trimming. These gloves are from Endor Finders. One goofy thing, they come with velcro sewn on already - which is great. Trick is, the left glove is the soft side and the right glove has the rough side of the velcro. After doing the left one first, I assume the right hand plate would also need the rough side. Nope. Luckily I just stuck the velcro on the plate with no additional glue so it came off very easily. I'm not sure if the velcro will be enough to keep the hand plates on. I may need to think of a better method of attaching them (glue?) Well, that's it for rough trimming of the ABS. On to sizing and final trimming. I'm still waiting on my undersuit - so I won't be doing all my sizing right away. In the meantime I have several other things to pick away at. Sent from my iPhone using Tapatalk -
Wook’s DT Build (850 ArmorWorks and Armoryshop)
wook1138 replied to wook1138's topic in Imperial Death Trooper
rough trimming boxes for the belt and generally getting the belt sorted out. These are the three covers for the pouches on the belt. The other pouch covers (in the background) are for the specialist chest rig - they are included in the 850 kit as well (covers, not the rig itself) I set up a little rig - the file is sitting on 1/4" dowel so I can scribe a trim line - to give the covers a 1/4" return edge. I hold the file stationary and move the ABS. reference shot of the covers. I got these pouches from Armory Shop (very nice). They come with velcro on the front and a loop to attach to the belt on the back. I filled them with some old foam I had. For this one, the foam is solid - and it makes the pouch look a little too full, IMO. So I hollowed out the foam. This makes the fit look a little better, plus, this way I can put things in my pouches. On to the little ABS belt boxes. I used this pic to figure out the height to width ratio so I would know how to trim the pieces. Doing some quick math, the thickness of the box should be about 40mm. The mold does not allow for quite that, so I had to trim as close to the return edge as possible. I just held the ruler along the return edge and used the score and snap method to trim. One box had these funny little fold from the pull - they are on the bottom so I'll see how much they bug me - I might have to trim them off and backfill with ABS paste. The belt. The buckle is aluminum - it has a velcro backing, but I think I will have to find a better solution for attaching it. The ABS boxes will also need to be filled in the back with wood or something and riveted (or similar) to the belt. This is the specialist rig (also from Armory Shop). I still need three grenades and 6 magazines for the rig. I will probably 3D print (or buy) the mags, and buy some grenades with the lighting system in them - because things that light up are cool. Sent from my iPhone using Tapatalk -
Wook’s DT Build (850 ArmorWorks and Armoryshop)
wook1138 replied to wook1138's topic in Imperial Death Trooper
Trimming the thighs. It has been a while since I've posted - mainly busy with Christmas stuff. But here is my meager progress in the last while. The back of the thighs have these little pieces that get glued on to wrap around to the front of the thigh at the knee. After watching Big Pete's Dt build video, I realized that these little tabs (above the red line) will get trimmed. They are just there to help you place it on the right spot. All four lower thigh pieces and the sniper knee trimmed. The sniper knee need to be fitted to the curve of the front of the right thigh. I just starting taking bits off with the Dremel until it was close. The front of the thighs before trimming. Right leg is on the left side of the pic. I trimmed to remove pretty much all return edge - having a TK and TD and knowing where they tend to rub, I knew I wasn't going to leave any return edge on the thighs (not that any part of the DT appears to have any return edge anyways). This is this funny bump in the edge of the right thigh - I didn't notice if this was actually screen accurate or not. The back parts of the thighs. Right side is trimmed. Placing the little "wrap around" pieces on the back thigh pieces. this is the outer right back thigh piece (I think). Inner right back thigh piece. This is the left back thigh - inner side. You can see the return edge of the little add-on piece does not match the return edge/groove of the thigh - You can barely see the groove on the thigh - it is very soft and misshapened. I'm not sure how I'm going to get the add-on piece to sit nice - cross that bridge later. Reference of details on thigh. You can see how different the detailing of the lower part of the front thighs are compared to the 850 kit. The sniper knee is also a bit different. Greeblies on out left thigh. All the parts. The greeblies need to be sanded and painted - they are resin. Sent from my iPhone using Tapatalk -
Wook’s DT Build (850 ArmorWorks and Armoryshop)
wook1138 replied to wook1138's topic in Imperial Death Trooper
Thought I would go through some of the stuff I’ve received in the last few weeks. I’ve been so busy I have not had time to even open most of it. Some upgrades. 850’s kit come with a lot of the needed extras. That said, I’ve decided to upgrade some things. The wrist rockets were the first thing I noticed that I would like to upgrade. The 850 ones are 3D printed and far too delicate for my clumsiness. They came broken in 3 places - which is not surprising considering the shape of these things. So I upgraded to resin cast rockets from Plastic Arms Dealer. They even arrived painted and ready to go. Back. The ones from plastic arms Dealer include screws for mounting. I’m not a fan of print lines. I would have destroyed the 850 ones while sanding. Reference Next was the belt buckle. 850’s is resin but I couldn’t resist Andrew’s (plastic Arms Dealer) aluminium buckle. It is a tad smaller and had a Velcro backing for attaching. I’ll probably attach to belt with glue or mount post screws or something. Here is my speed strap holster for the Se-14r. And the small pouch got the belt. Both from Kerry Rowntree. Reference E-11d from Jerry Buddy. And a e-11 finishing kit from 3DpropsNL. Sent from my iPhone using Tapatalk -
Wook’s DT Build (850 ArmorWorks and Armoryshop)
wook1138 replied to wook1138's topic in Imperial Death Trooper
Shins Before trimming. This is my right shin. This is the inside of the front coverstrip. I’m using the right edge as a trim line. The line is a bit curved so I didn’t use the ruler. The outside half will overlap the inside half. Back overlap. I did a quick test fit with the boots on. I will need to trim and move the “coverstrip” similar to what I plan with the forearms. Reference The edges of the formed coverstrips can be rough. Not sure how this will play out. Front done Reference. There are some resin cast greeblies that still need to be added. And these things These details get attached to the back coverstrip. This is the inside of the outer half. Sent from my iPhone using Tapatalk -
Wook’s DT Build (850 ArmorWorks and Armoryshop)
wook1138 replied to wook1138's topic in Imperial Death Trooper
While I was scoring and snapping some pieces, I ran into a problem with the ABS. It is almost as if there is a coating on the plastic. I’m having to score both sides of the plastic. If I don’t, and I try to just “snap” the piece off - I get this. I tried to send a message to 850 via Facebook and Etsy. I have not received a response. It’s been a week. So I guess I’m stuck with what appears to be junk plastic. To get the forearms to fit nice I had grand plans to trim along all the coverstrip edges to resize the forearms equally on all sides. This might take some ABS paste. So with the questionable plastic I decided to make sure I could make decent ABS paste. Whew. It dried nice and black. It is glossier than the piece in the pic but sanding and polishing will fix that. Anyway, I’ll need to reduce the forearms at least an inch. I’ll do the final sizing when I get my undersuit. The video online suggest cutting the inside lower coverstrip (overlap construction) and correcting with this one spot. I’m worried that there will not be enough overlap at “A” and “B” will stick out. So I’ll try the following, over-complicated idea. Anyway, forearms un-trimmed. Trimmed. Overlap coverstrip. Required overlap Trimmed I think the video says that you should overlap the outside piece over the inside piece. I found that the cover strip of the inside piece fits over top of the outside piece a lot better. Also, I will need to mod the left forearm to have the missing coverstrip part. I’ll try trimming the upper coverstrip and maybe reshape the underneath coverstrip. Sent from my iPhone using Tapatalk -
Wook’s DT Build (850 ArmorWorks and Armoryshop)
wook1138 replied to wook1138's topic in Imperial Death Trooper
Updated my supply list in the first post. -
Wook’s DT Build (850 ArmorWorks and Armoryshop)
wook1138 replied to wook1138's topic in Imperial Death Trooper
Rough Trimming. Not much to say. I use lexan scissors for the most part. I will score and snap straight edges. I do have some tin snips for really quick and rough trimming. I tend to leave a little return edge at this point just in case I need the extra material. The reference pictures seem to indicate very little return edge on most of this costume. Starting with the butt plate. I’m using big Pete’s cosplay YouTube videos and ref pics. During A lot of wonky return edge to trim away. The piece is not symmetrical. This seems to be typical for this kit. Trimmed. Little return edge left. I’ll do the final trim after I test fit. Might reshape butt piece to be more angular like the ref pic Cod piece trimmed. Lower back plate before trimming. After Left a 1/4” return edge as per YouTube video. I might trim it away. Not much in this reference pic. Ab plate trimmed. Left some return edge on bottom. Will likely remove it v Back. These tabs didn’t have obvious trim lines. I just tried my best to make each side match. I’ll trim for size later - I’m on the small side so I don’t need to worry about leaving extra - but I usually do. Back trimmed. Chest before. The trim lines leave a lot of return edge. I trim along them for now but probably trim down later. Shoulder bells after and before. Pretty straightforward. Biceps before. Trim line for inside open edge. Reference The trim line was a bit confusing but I went with the inside line. This is along the overlapping “coverstrip”. I highly recommend using a straight edge and clamps to score and snap this. The front piece overlaps the back piece. Biceps rough trimmed. I’ll post the forearms later. Sizing will be interesting. This is my tiny little forearm compared to one of the forearm pieces. Sent from my iPhone using Tapatalk -
Wook’s DT Build (850 ArmorWorks and Armoryshop)
wook1138 replied to wook1138's topic in Imperial Death Trooper
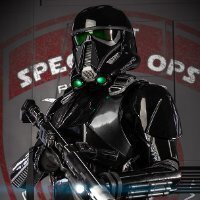
I took the advice from an earlier post and ordered some EL panels for the helmet lights. I also have conventional LEDs from Armoryshop. Armoryshop’s set up is the black tube with the green bulbs at the ends. There are two EL panels - I trimmed one to fit inside the light housing. What the panel looks like. Light is white. I might try green. LED light bulb. Here is the LED bulb with some white paper backing the light housing. I might paint the insides white and rough up the inside of the green lens with sandpaper to diffuse the light if I go with LEDs. The panels look good but the particular panels have little tabs where the wires attach. I really had to bend them to make them fit. Which caused it to not work. I repaired the light with some CA glue and it kind of works. Trouble is, how do I replace the panel if there is an issue? Sent from my iPhone using Tapatalk -
Funny - I just tested some new panels I got today with my WIP MK3 helmet. I bought both white and green panels to test. I was hoping to get them fitted behind the green lens. I'll post some pics in my build thread. First impressions are that they are not very bright (I ordered a more powerful driver after my first test) and the ones I bought have a little tab where the power supply attaches to the panel - makes it hard to get the light fitted nicely. I had to bend the tab a lot - which can make the light not work. I've already had to repair one panel with some CA glue. I'd be curious as well to see how others have these panels installed.
-
Wook’s DT Build (850 ArmorWorks and Armoryshop)
wook1138 replied to wook1138's topic in Imperial Death Trooper
Do you use regular Bondo? Or the spot putty stuff? Thanks. -
Wook’s DT Build (850 ArmorWorks and Armoryshop)
wook1138 replied to wook1138's topic in Imperial Death Trooper
So life did not offer me much opportunity to work on the DT this weekend. In lieu of fixing my helmet I turned my attention to the side monitor. On the cast there is a slight indent where the green light should be. I know, not seen on screen, but still cool. I’ve decided to mod my monitor to include a light. I drilled out the hole with a 3/32” bit. I originally thought I could use fibre optic line with 3mm led lights. The fibre optic line was just too dim. So I drilled a 5/32” hole from the back side and stopped short about 1/4 “ or so. The 3mm light fits in there nicely. I’ll still need to counter sink everything into the back of the monitor a bit so it mounts to the helmet ok. Sent from my iPhone using Tapatalk -
Wook’s DT Build (850 ArmorWorks and Armoryshop)
wook1138 replied to wook1138's topic in Imperial Death Trooper
Thanks man. It is the irony of trying so hard not to mess up the paint job and then that happens. But yeah, looks exactly like a nasty rust spot. I had my self-pity beer, so back on the horse this weekend. -
Wook’s DT Build (850 ArmorWorks and Armoryshop)
wook1138 replied to wook1138's topic in Imperial Death Trooper
FML. I started to sand the largest of the weird bubbles. It goes right into the resin. Looks like the heat from my lamp caused a thin layer of resin(?) to spawl (couldn’t think of a better word). Good news is that my painting maybe wasn’t so bad. Bad news... F$&@$?$&CK!!! Not happy. There are three more of these “bubbles”. Grrrr. View from the back. Close up. Primer stopped about 0.5mm ago. Three more Sent from my iPhone using Tapatalk -
Wook’s DT Build (850 ArmorWorks and Armoryshop)
wook1138 replied to wook1138's topic in Imperial Death Trooper
Not much completed in the last few days... busy with other things. I did try to repaint my helmet. I sanded down the paint drips and repainted with a couple coats of glossy black. I was doing a gloss clear coat when I noticed something. A couple of bubbles. They occurred where I had my halogen work lights sitting way too close to the helmet. Don’t know if it was coincidence or the heat, but it means more sanding and painting. On the bright side, the part of the helmet I got some clear coat on looks pretty good. This also arrived today. Print looks pretty clean so it should be easy to sand and paint. I got it from Maz3Dshop in the UK. Sent from my iPhone using Tapatalk -
Wook’s DT Build (850 ArmorWorks and Armoryshop)
wook1138 replied to wook1138's topic in Imperial Death Trooper
So, a question to other 850 Armor Works customers. What was your initial impression of the armor. BBB day was yesterday - which was exciting - then I opened the box and I become less excited. I have not worked with black ABS before and I realize the the imperfections are going to show a bit more, but some of the pulls seems a bit rough. Plus the gear arrived pretty banged up as there was not much in the way of packing. I'm sure I can polish everything out, but I have to say that I'm a little underwhelmed with what I've seen so far. I haven't had a chance to go through everything. I'll post pictures of some of my picky-guy concerns later. All this said, this was a very reasonably priced kit, so... . Has anyone out there found the need to paint their black ABS 850 kit? I've reached out to 850 on one item so far, but I wanted to hear some feedback from other customers. Thanks. -
Wook’s DT Build (850 ArmorWorks and Armoryshop)
wook1138 replied to wook1138's topic in Imperial Death Trooper
I gave the respirator and snout bridge a coat of glossy aluminum and clear coat yesterday. So today I sprayed a few light layers of gunmetal. I took s rag with mineral spirits and gently wiped away the gunmetal paint along ridges and other high points. I tested it by holding it up to the helmet and found the parts too light. Ended up doing a few coats of metallic black with the same weathering technique. I think I’m happy with what I ended up with. With the metallic black parts in place. Reference Oh, the pieces I did yesterday with a gloss coat. Well, no gloss on the metallic black (right) as they look less glossy in reference pics. Anovos Sent from my iPhone using Tapatalk -
Wook’s DT Build (850 ArmorWorks and Armoryshop)
wook1138 replied to wook1138's topic in Imperial Death Trooper
So, I did some research on using the TS paints. I had a great game plan. Did some fine wetsanding of the helmet and parts with 1500 up to 3000 grit sandpaper. Utilized an air compressor and tack cloth to keep everything clean (thanks Chris). Hit the pieces with a quick mist coat then went for a couple of wet coats about 20 minutes apart followed by a clear coat. This was working awesome on the smaller pieces. Started on the helmet. Was almost done the gloss black wet coat (was only going to do one) when, right as I was about to stop, I decided to hit the left tube a little more. As soon as I sprayed I knew I put on way too much paint. Sure enough - big ol' paint run. ? So I guess I'll have to wait a few days, sand it down, and try again. Anyone have an Anovos helmet they want to get rid of. jk... sort of.
