nocjef
-
Posts
53 -
Joined
-
Last visited
-
Days Won
2
Content Type
Profiles
Forums
Events
Everything posted by nocjef
-
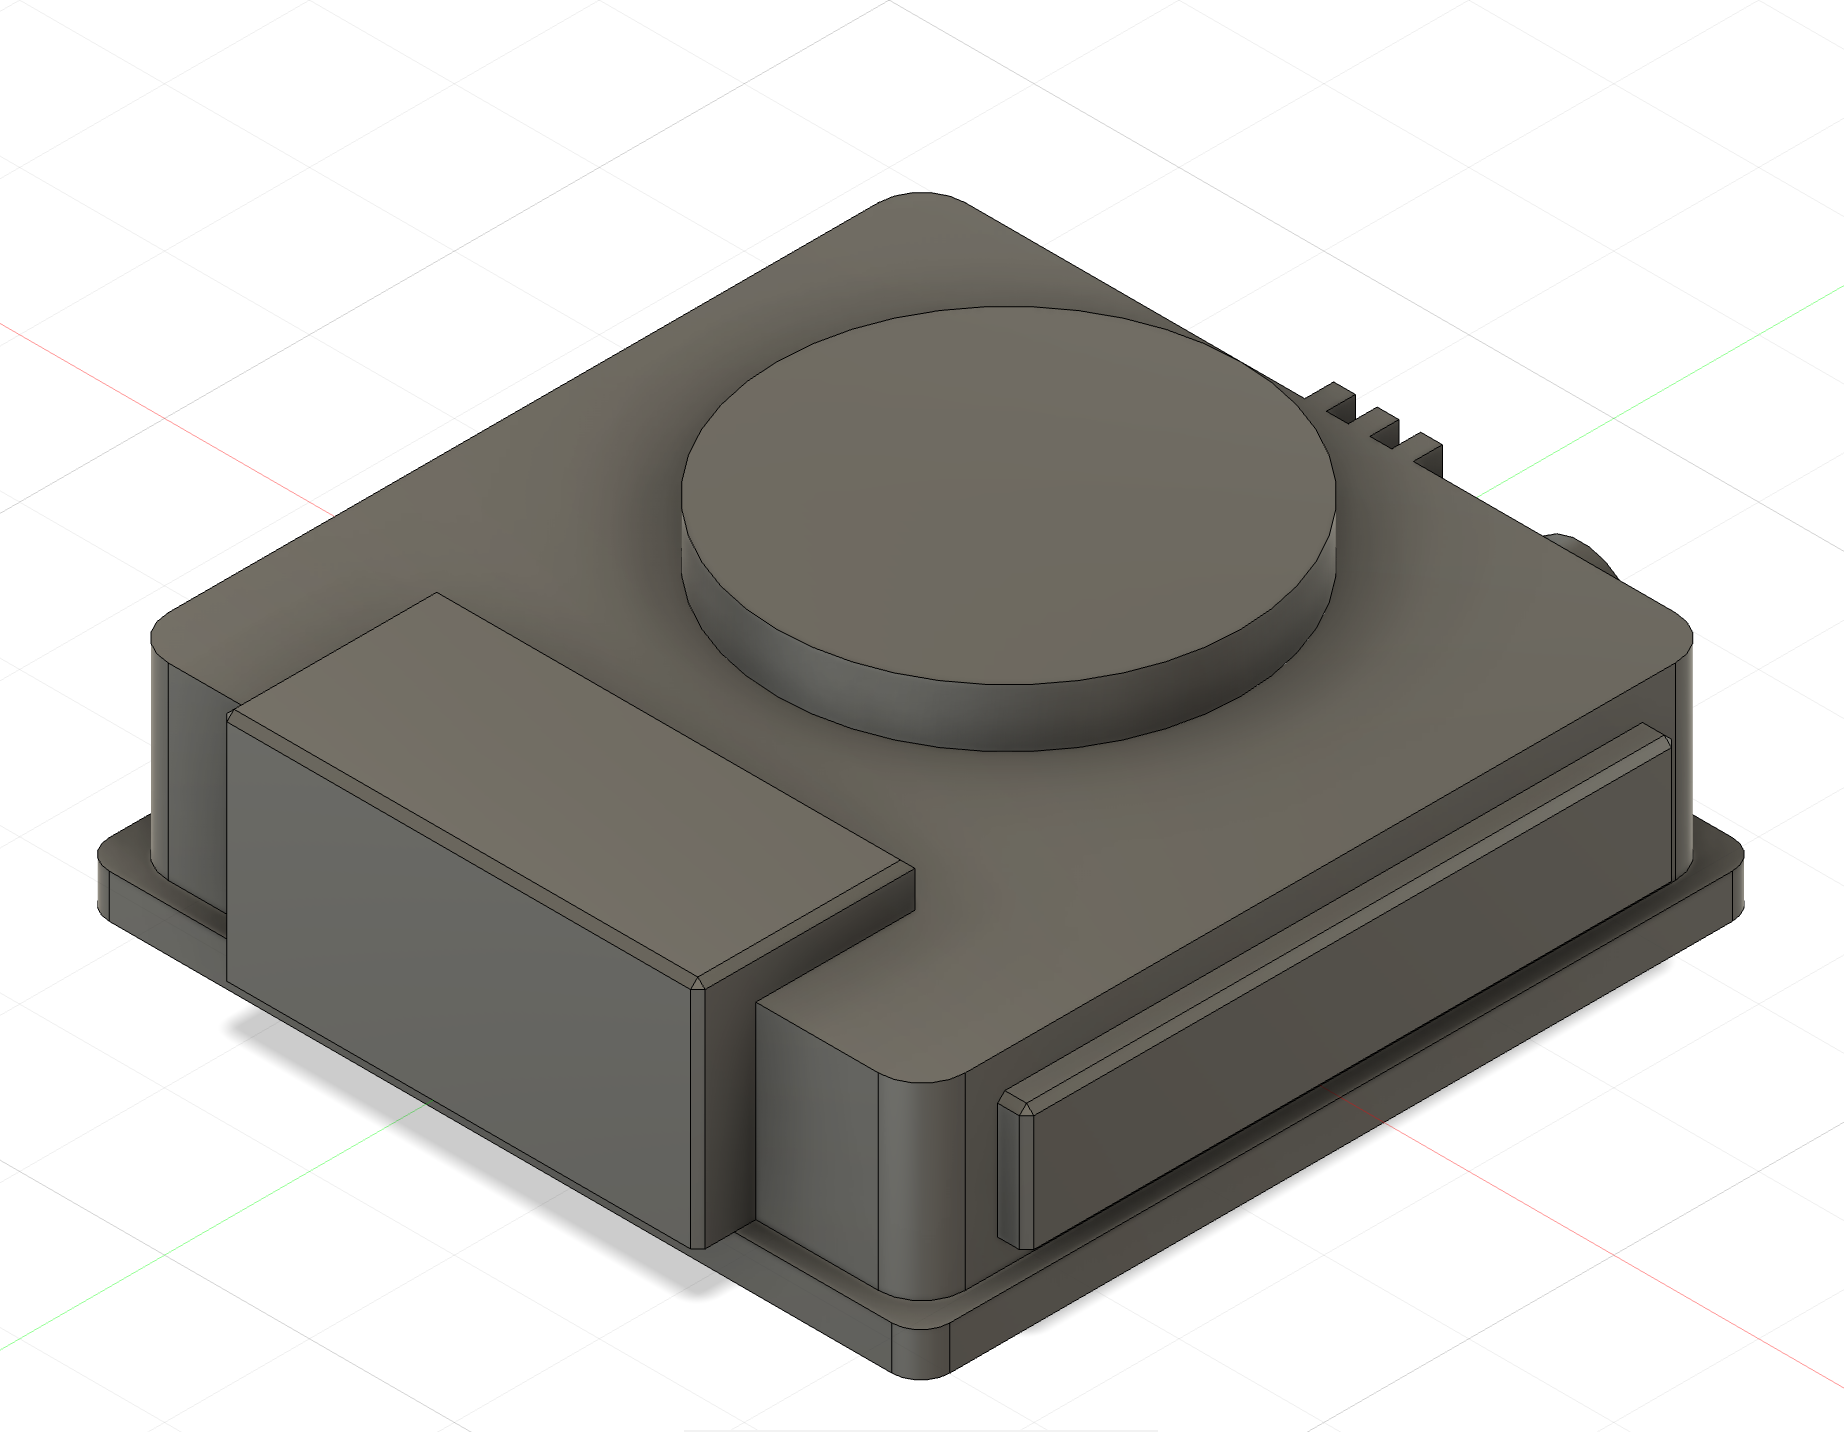
Since my approval years ago I see that the CRL changed and update the TU for the helmet. I searched around and found the WTF was able to provide one for me...but it's awful. The quality of the resin case was very bad and the scale seemed off compared to the CRL photos.... So I've modeled my own for 3d printing and I'm giving the files away. If you spot any glaring inaccuracies, I'm willing to try to fix it or share the fusion source. Merry Christmas! nocjef TX66667 IATCommUnit.3mf

-
Anyone making the Ab/kidney gasket from the new CRL yet?
nocjef replied to nocjef's topic in Imperial Death Trooper
Thanks for clarifying. I still don't like the way the ab floats so I will continue to look into how to make one of these based on the shoretrooper version. I would ideally like the ab to be tighter and more form-fitting vs free-floating. -
Hey, Anyone trying to put one of these together yet? I have a shoretrooper so I have an idea on how it should function. I'm going to have to fabricate one of these since they're now part of the new CRL and my DarkSide undersuit was made some time ago. -Jef
-
DHKnecht's Death Trooper Armor Build WIP
nocjef replied to DHKnecht's topic in Imperial Death Trooper
If you want a very good bond with PETG, I'd suggest using weld-on3/weld-on4. It's a solvent that will bond the PETG parts together and they will most likely break before the joint fails. -
Resurrecting this old post... Some of the IAT comic photos show the holster having a cover/flap. Opinions on that sort of holster or are we still on for the E11-style holster which is easily replicated and patterns are everywhere...
-
I use these for blousing: https://www.amazon.com/dp/B0054L6SQU/?coliid=I2BA9QMCRVBORK&colid=266MLWHX6L3A6&ref_=lv_ov_lig_dp_it&th=1 Those are now overpriced, you can get them for about $2 at an army/navy shop locally.
-
Thought it would be fun to make a themed gear bag for my IAT. I looked around the local army/navy stores but much of the used gear was too big or too expensive. I found this cargo bag on amazon: Rothco Canvas Parachute Cargo Bag https://www.amazon.com/dp/B000HKMXTO/ref=cm_sw_r_cp_api_i_iWbMCb22RWWXF I stenciled the imperial cog on both sides of the bag, did some airbrushing, and then went at it with the dremmel to add to the weathering. I think it came out pretty ok and goes with the theme.
- 1 reply
-
- 1
-

-
I've used this elastic on both my TK and my Shore: https://www.strapworks.com/Elastic_p/e.htm It's quite heavy duty and has a good memory. It is way better than the dritz stuff and has not failed me yet. It doesn't fray and take a good deal of effort to pierce. I used this for all of my snaps.
-
I've modeled a single rocket in Fusion360 that I can share with you. I've printed it out and it looks pretty good. I haven't modeled the attachment for it which is why I haven't shared it publicly. Let me know if you're interested, I can send it over. Jef
-
What sort of pattern are you using? What blaster will be used in the holster: E11 or DH17?
-
We can do weathering? We can do weathering?!!! That should be added to the CRL I see it now, I totally missed that.
-
If you're looking to get your IAT boots, get them quick. Payless is liquidating their inventories and going out of business. We'll need to find a new source of page-accurate boots now
-
Approved. Had to swap out the goggle strap for a black one (I missed that!). Thanks everyone.
-
I like the idea of adding Velcro, that would help them stay out. I’ll also weigh down the packs with loot so they help as well. Just waiting in the GML now. I was unaware at how few IAT there were in the wild. Jef
-
Photos taken, now waiting in my GML to approve.
-
Finished up the bucket tonight. I installed a hard hat liner to get a good fit. I originally tried to use helmet padding like my TK bucket but it made the bucket sit too low. I used a cheap $7 hard hat from HD and cut the tabs out with a dremmel. I affixed it to the inside of the bucket with Velcro so I could reposition if necessary. I had to do some touch up painting to the outside, paint the screw caps, and fill in some spots on the inside. After that, I applied three coats of matte clear to the outside of the bucket to hopefully protect the paint for a bit. I affixed the chin strap by attaching a snap to one side and used a snap plate to connect it to the inside of the helmet so I could undo the strap if needed. The other side of the strap is attached with a screw, washer, and nut. The screw caps were glued to the outside and the rubber seal was glued every few inches so it wouldn’t go anywhere. I’m calling this done. Just need to suit up and take approval photos now. I’ll keep you posted. Jef, TK/ST66667
-
Chargrilled Imperial Army Trooper Build
nocjef replied to Chargrilled's topic in Imperial Army Trooper
Did you get that holster yet? -
I thinned the angelus paint with alcohol and added a little createx flow reducer. The paint sputtered a little but it went on mostly even. It took a few coats to get it evened out but I think it’s fine. The printed snap covers got acetone smoothed tonight, chinstrap and padding arrive tomorrow so I should be able to finish it off. What size are you covers? I’m undecided if I’ll get approval with a weapon or not; I have a DH17 that I’m working on but would like a holster so there’s that problem to work out.
-
Painting and the telemetry device. I started by cleaning up the telemetry device. The WTF kit comes with an obvious cast of a 3D print. It sands easy but still took me about an hour to smooth out. I hit that and the bucket with a few coats of filler primer. I like the high build primer and it hides any imperfections you might have. I affixed the telemetry device to the helmet with CA glue and some kicker. Then the whole thing got airbrushed with angelus olive green to match everything else. I searched Home Depot for some screw caps that were the right sized but I couldn’t find any that would work. I decided to CAD some up and 3D print them. The size looks good and I’ll clean these up and paint them once I get the chinstrap. just a few more parts left...
-
Helmet building time! There was a good deal of release agent on the helmet so first I washed it with soap and water. Next I marked out the preliminary cut lines. Once it was rough trimmed, I did some dry fitting and added registration marks and additional cuts needed. These sharpie marks will be cleaned off with alcohol once the glue up is done and before paint to prevent bleed through. After another round of trimming and sanding, the two halves were glued together with e6000 and clamped. I chose e6000 as this was my first IAT bucket build and I wanted to ensure if I errored I could recover from the mistake. Not shown: I had to cut the bottom half of the helmet in half in the front (the small strip). I did this to make sure the helmet seated into the overlap of the top piece better. I’m not sure if this was correct, but it looks fine. Tomorrow I’ll clean up the glue bits, do some final sanding, and then prepare the telemetry unit for attachment.
-
The last big bit has arrived: Now to figure out how to build it and finish this up!
-
Woo! Got my tracking number for the WTF bucket today, I'll show the BBB and the goodies once it is delivered.
-
It's a race now, soft hat or bucket, who can deliver first! More updates to follow, I need to paint the suspenders/belt so it is a uniform color because it bothers me.
-
So other than some painting, I'm now done until WTF delivers the bucket. Updates when I finally see a BBB.
-
Got a little more work done: It took a few tries to get it right and I think once the pouches are on the belt and weight it down a bit, it will sit better. I still need to paint the whole thing so the olive green matches all of the other gear. Still waiting on my WTF bucket, it’s been about 3 months now... Jef