

Gree23
-
Posts
165 -
Joined
-
Last visited
-
Days Won
10
Content Type
Profiles
Forums
Events
Posts posted by Gree23
-
-
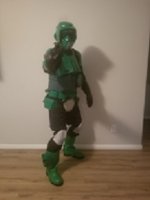
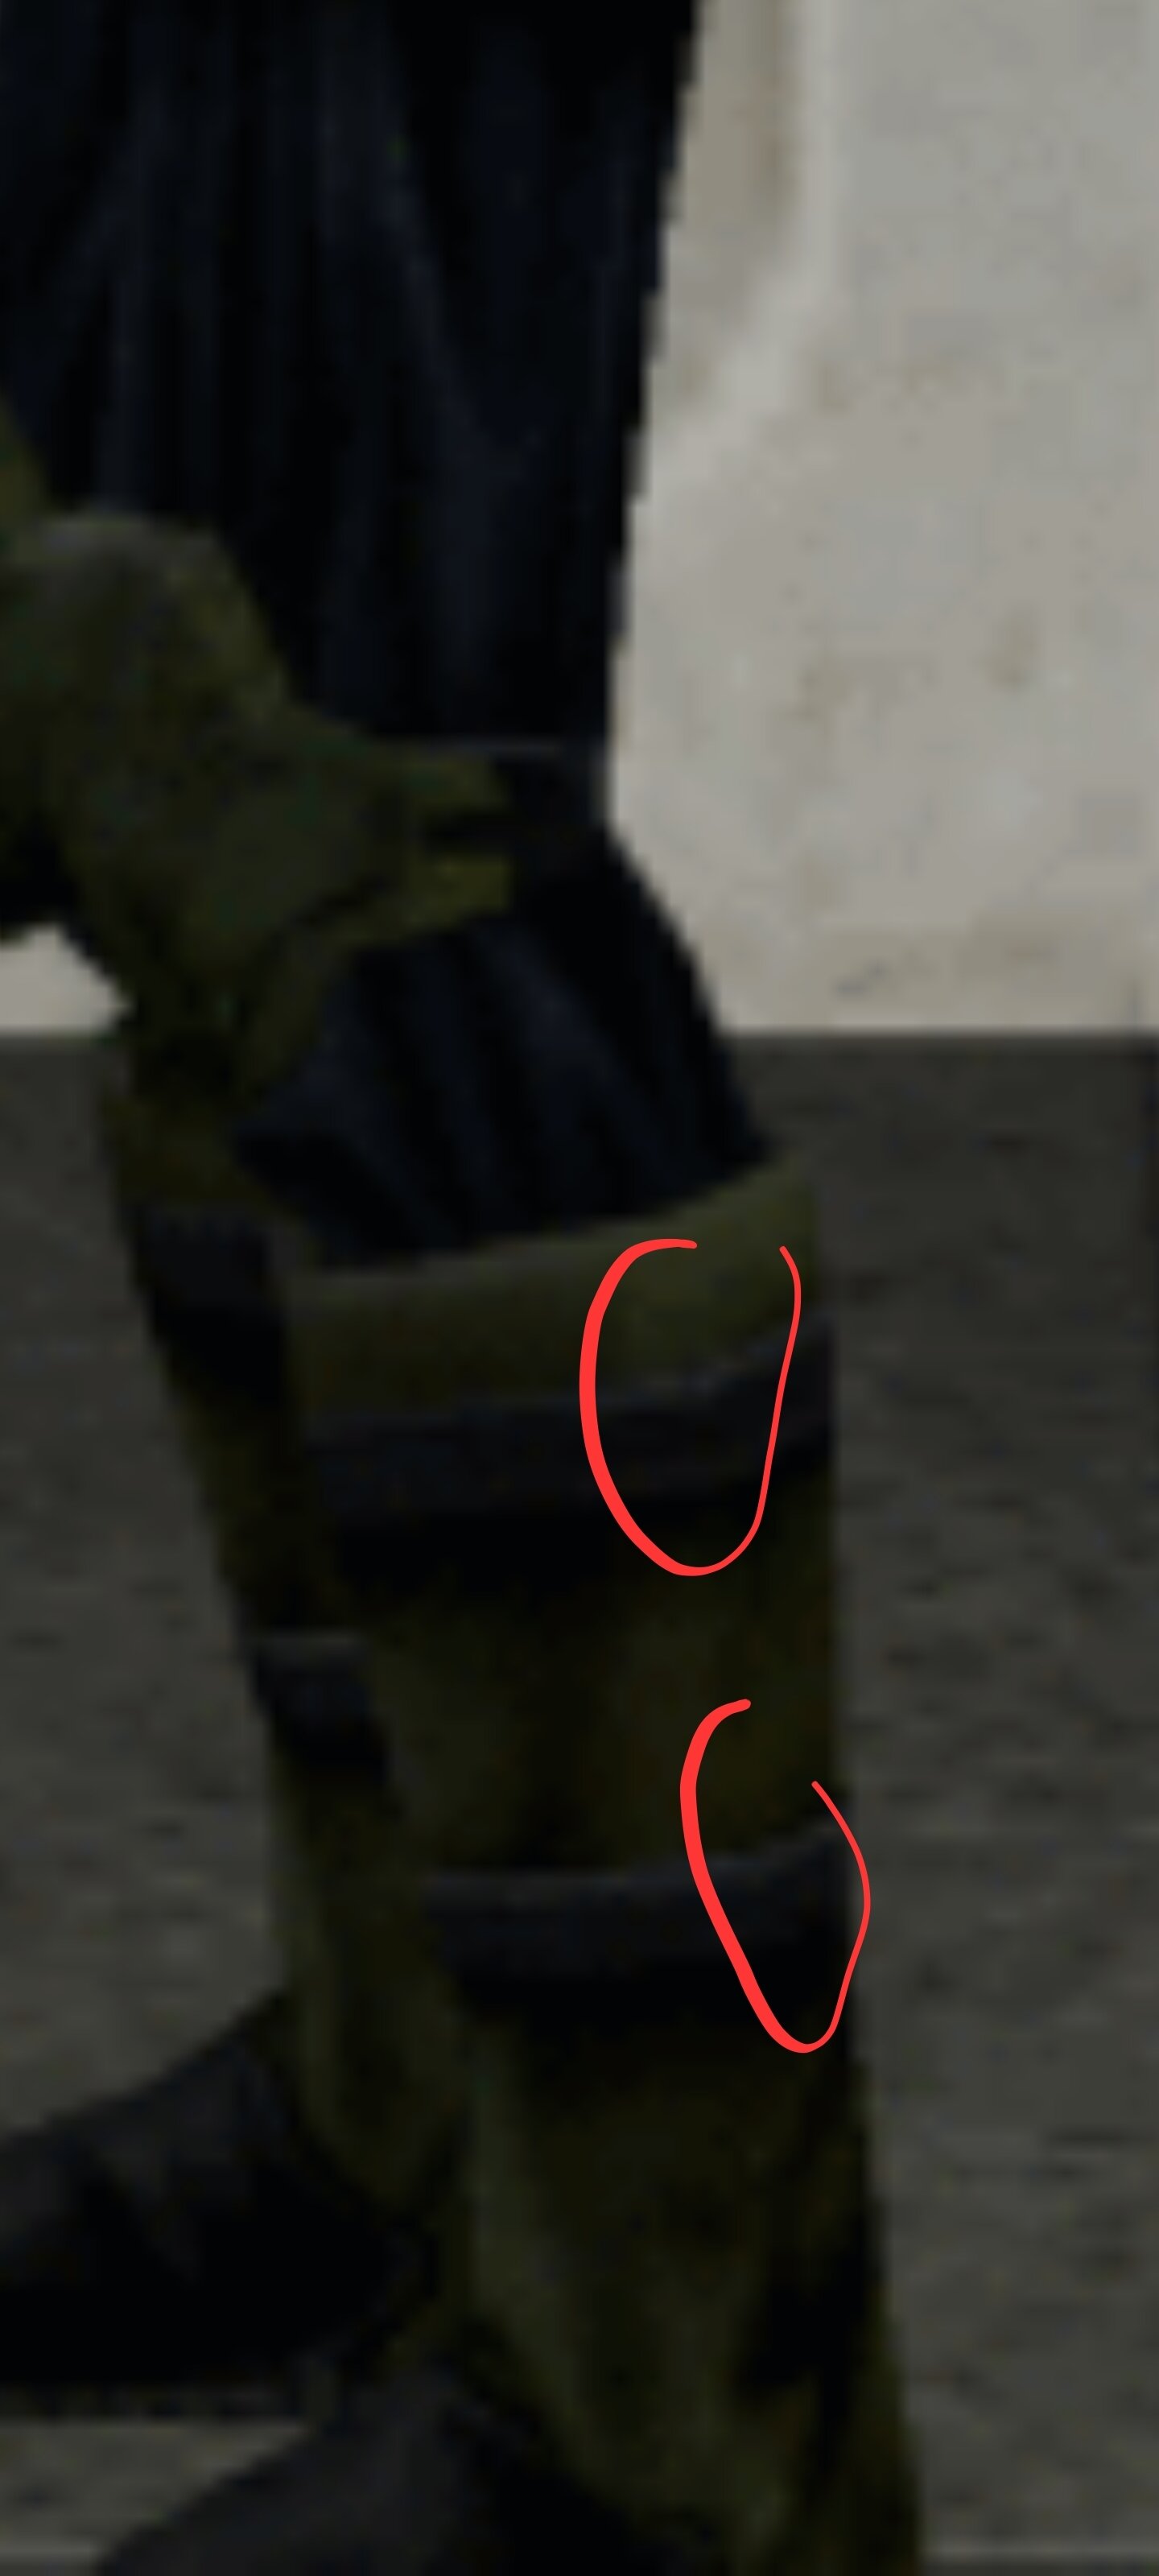
This is the part I am referencing. It appears that the seam of the strap is offset the seam of the boot shaft, meeting towards the back of the outside of the boot shaft, but not at the same location as the shaft closure

-
 1
1
-
-
This is what I am talking about. But the straps appear to offset from the direct back on a pic.
-
15 minutes ago, IcyTrooper said:
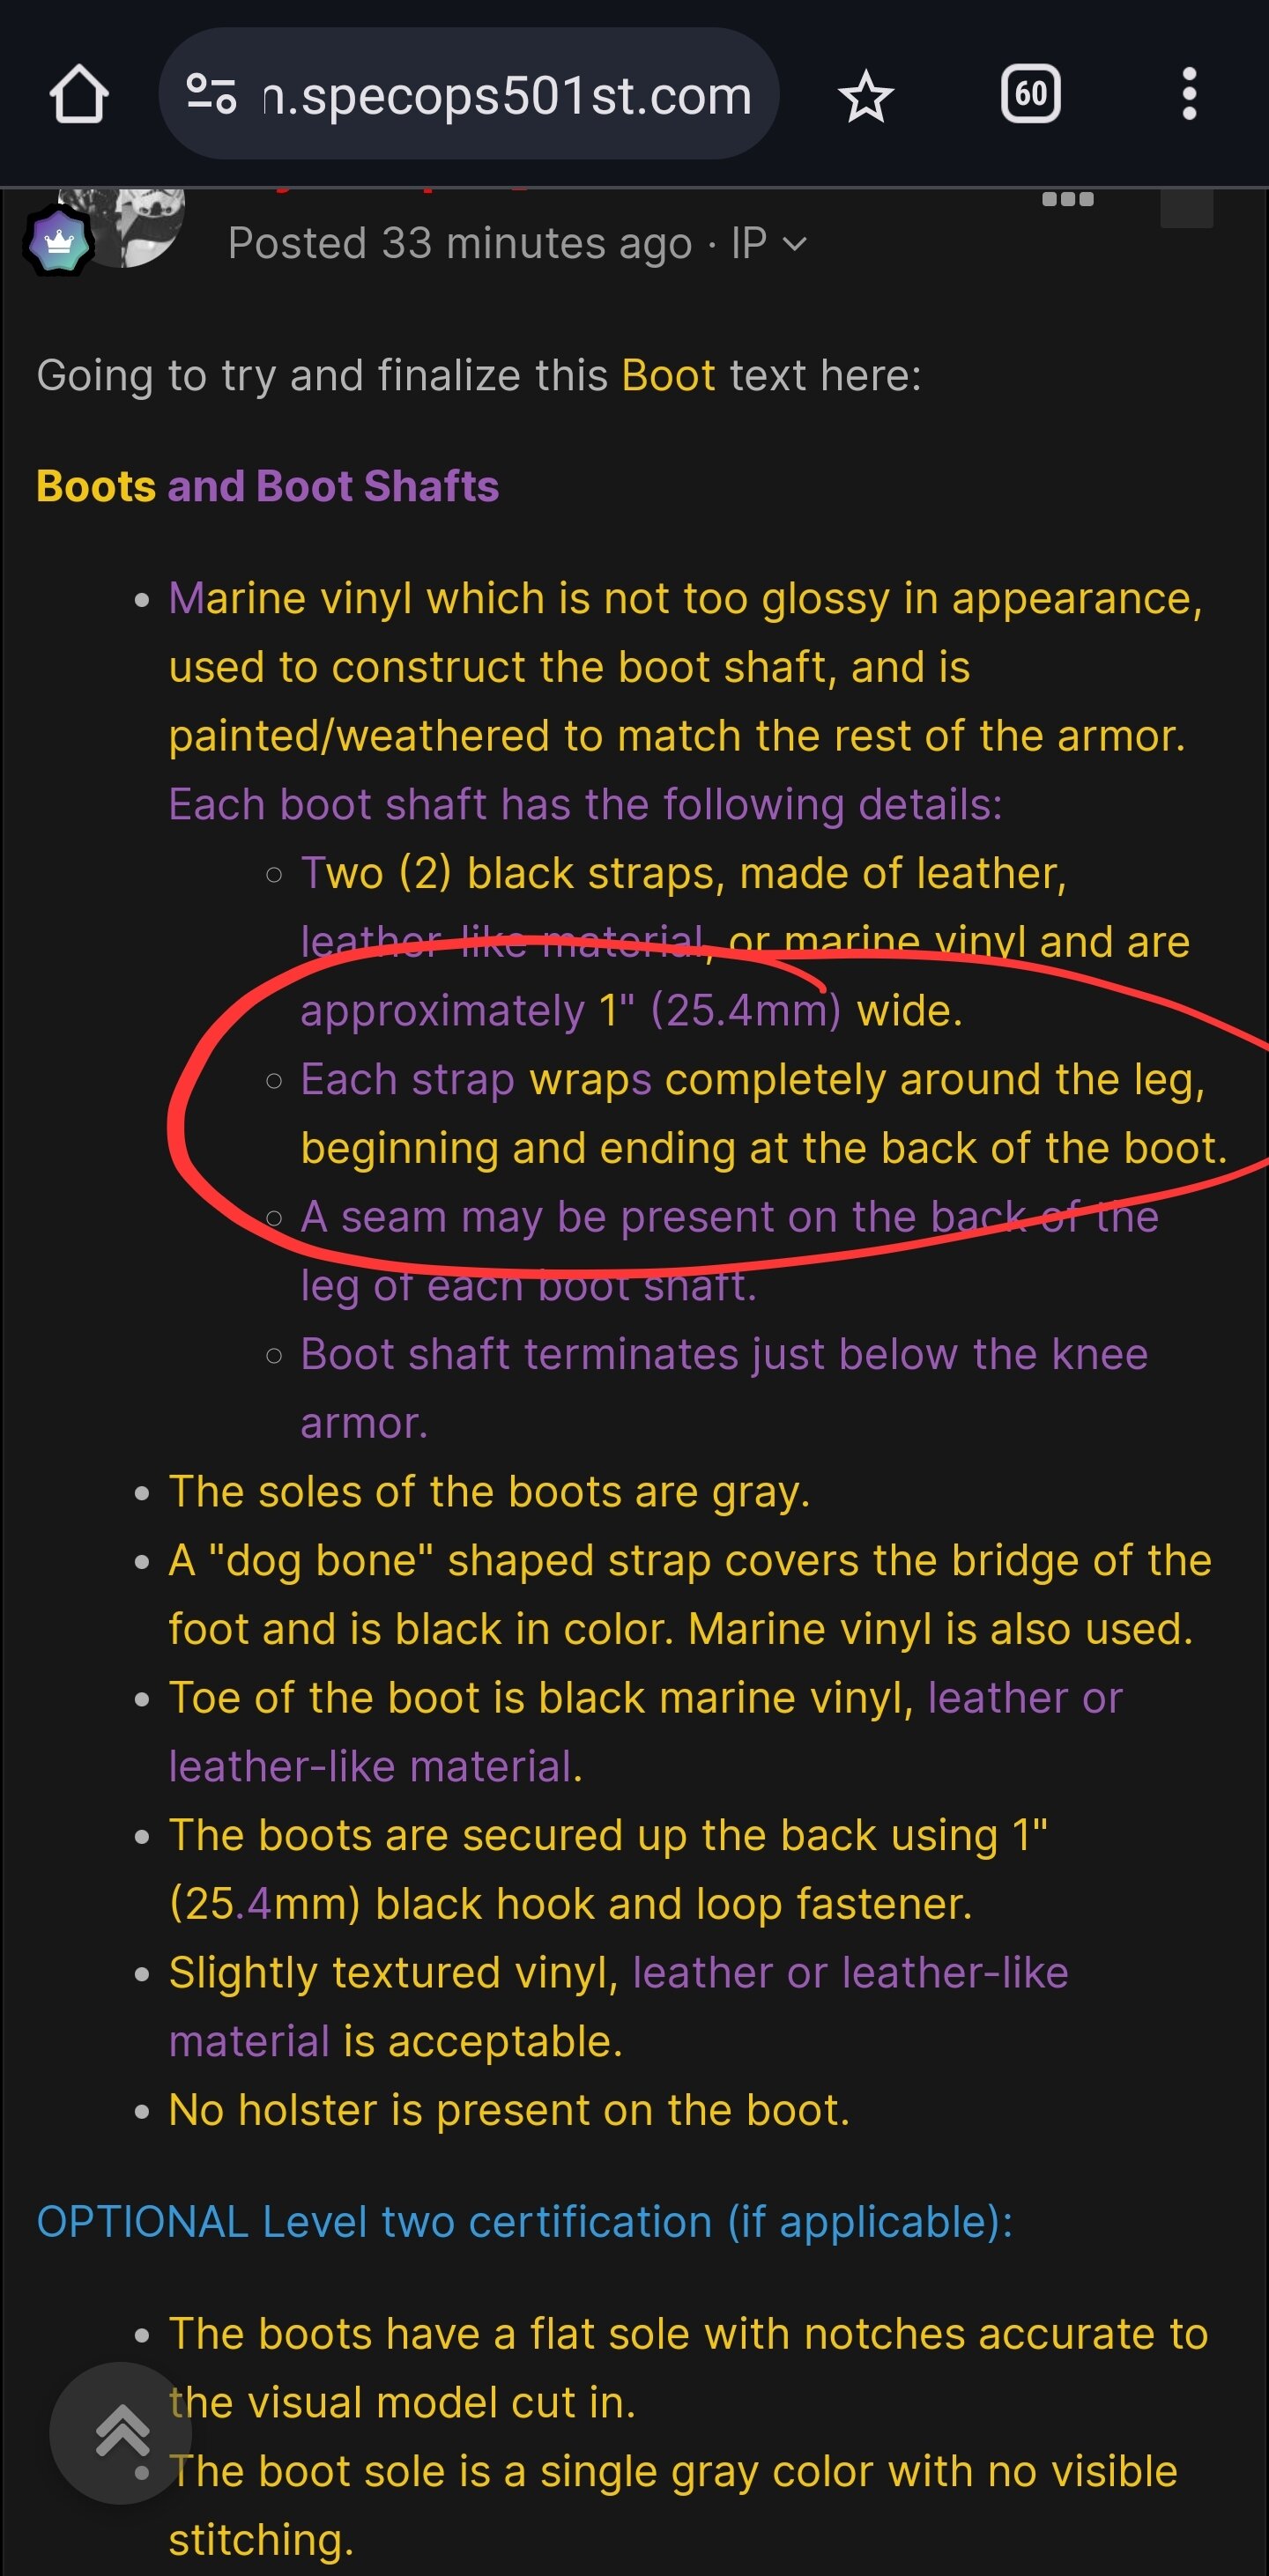
Going to try and finalize this Boot text here:
Boots and Boot Shafts
-
Marine vinyl which is not too glossy in appearance, used to construct the boot shaft, and is painted/weathered to match the rest of the armor. Each boot shaft has the following details:
- Two (2) black straps, made of leather, leather-like material, or marine vinyl and are approximately 1" (25.4mm) wide.
- Each strap wraps completely around the leg, beginning and ending at the back of the boot.
- A seam may be present on the back of the leg of each boot shaft.
- Boot shaft terminates just below the knee armor.
- The soles of the boots are gray.
- A "dog bone" shaped strap covers the bridge of the foot and is black in color. Marine vinyl is also used.
- Toe of the boot is black marine vinyl, leather or leather-like material.
- The boots are secured up the back using 1" (25.4mm) black hook and loop fastener.
- Slightly textured vinyl, leather or leather-like material is acceptable.
- No holster is present on the boot.
OPTIONAL Level two certification (if applicable):
- The boots have a flat sole with notches accurate to the visual model cut in.
- The boot sole is a single gray color with no visible stitching.
- Boot shaft closure is inside over outside, opposite of normal scout boots.
- Boots that are constructed too wrinkled (i.e., not stretched/fitted correctly prior to gluing) or poor in appearance will be refused.
- Stitching, if any, used for the boot should be colored or painted to blend in to the area they are used.
This looks good. Only thing is I think the seam for the straps around the shaft are not at the back, but are offset to the back right or back left respectively, if that makes sense. Or at least that is the perception?
-
 1
1
-
Marine vinyl which is not too glossy in appearance, used to construct the boot shaft, and is painted/weathered to match the rest of the armor. Each boot shaft has the following details:
-
Holy crap. That looks absolutely horrible. Why would he even think thats ok to send??? Have you messaged about it? I would definitely recommend Studio Creations if you go a different route. Their kits are top and easy to assemble. They basically come ready to wear.
As far as fixing that helmet. Gonna take a good amount of work. You would need to back that huge hole with something and then fill it, sand smooth, and then paint it. But again, definitely recommend you reach out to the manufacturer and question that
-
6 minutes ago, RAIDER said:
If you'd like to include this in the Special Notes section I suppose you could
may be slightly weathered to look as if white is showing through with minor scuffs/dirt.
I think that still let's white be 100% optional and not restrict what the base absolutely has to be...that's why I lean towards a similar verbiage to the Kashyyyk Trooper CRL which doesn't specify any base and basically says "match the pic" (which just means the CRL model will need to be on point to what the camo look should be.
Definitely like that! Sounds good!
-
3 hours ago, Masek said:
Hi complete newbie to this but highly interested, just a quick question on the camo for the forrest trooper could the armour have camo hydrographics that could be designed specifically for the trooper. Then there will be a uniform camo style throughout.
Thats the beauty about camo, while you can require a consistent pattern, we dont all have to match exactly the same. I would rather not require the use of a singular camo pattern, but instead obtain consistency across the legion. Now developing that would be cool, and being able to offer it as a solution to those that cant paint, or dont want to. But not as a requirement for approval.
-
On 6/7/2024 at 11:50 PM, Chaos said:
Good day all, going to throw my two cents in here simply because I know "camo" 😄 and having worked with many CRL discussions about colors and sheens due to lighting (because opinions are like sphincters, everyone has one). The graphics designers of the game most likely used variants of colors' shading and lighting to give a more realistic appearance. Much like we had with the DT in trying to decide if a color was flat black that looked gray due to lighting, or it was actually gray.
I could go into all the aspects of why certain backgrounds are used in camo patterns etc., but I think the bottom line is the base color could be a really light shade of green, or brown, or even gray. Unless you have the exact color HEX code the designer actually used, you will never know. I think this CRL should not require that the base material or color be of a “specific” color (because we just do not know) but maybe say something like this.
• The costume's armor and hard pieces are camouflaged with "diffused" colors of green and brown in varying shades/tints with a "lighter shade" variant undertone/base. See reference photos.I am a firm believer in the K.I.S.S principle.
Im trying to find it but the material i read on this variant states it is a base biker scout with this paint scheme. My assumption was that it is a white armor scout painted camo. Just as the swamp trooper states that shades of white are seen from under the green, i would assume it to be the same. But again just my opinion. My true hope is for this Detachment to make a call and go with it, so that we can move on with the CRL. Maybe we need to have a vote? Idk. I just dont want this to be a sticking point. I am also a GML and know how people are when it comes to what is and isnt in the CRL. Maybe I am being too particular lol! Either way I am glad to have more input on this, keep it coming!
-
6 minutes ago, RAIDER said:
For me, the white isnt super important…just cause i think the camo is gonna cover up almost all of it (my eyes still dont see it eeek lol).
I good with that then. Ultimately it will be up to the GMLs to determine its validity and maybe leaving out "white base" will allow for a more open perception, while staying consistent with the appearance
-
1
-
-
That sounds good. And i understand now. Ok so that is good.
Any comments on my notation of the white seen on the armor? Or should we just leave it with the camo as it appears on the reference photos?
-
9 minutes ago, RAIDER said:
K just making sure I was on the same wavelength. I think something like that can make for a good L2 req if you want…if someone wanted to transition a scout build to this that would make it a little bit easier to do so. Going L2 would require a whole new boot altogether and then I think it’s reasonable to ask for that extra detail.
I mean it would kinda need a new boot anyway, no? Because there is no dog bone (if we take that out) then it would need a new toe anyways? But I am all for making it a L2 requirement. So normal "standard scout" is acceptable for L1, but L2 the boot must be constructed with an inside over out closure at the back.
I would also like to see that the boot "straps" meet at the outside of the boot, towards the back. So half way between the middle side and the back of the boot?
-
16 hours ago, RAIDER said:
First...it's always great to see an old project resurrected and someone willing to attempt completion. Let's go!
Starting here with the boots since this seems to be where you'll build will start (so don't want to hold that up). My only thoughts:
- I don't see a "dog bone" anywhere. Maybe I'm missing it but it just seems like it's a camo boot w/ a black toe/bridge covering. I would say some verbiage that it should match the reference image shape (to get that "swoop") should probably be included.
-
I noticed throughout alot of the build sections, white is identified as a base. I don't know a ton about camo techniques but my eye doesn't really see white anywhere at least not enough to identify it as a required base.
- The Kashyyyk trooper CRL uses this verbiage "Camo pattern to simulate on-screen troopers."
- In the old CRL topic (we may to dig that up a bit @IcyTrooper) the original people attempting to build had identified some camo patterns/techniques that might be worth looking at.
- And lastly this is more question...do those straps around the calf have notches (side view)?
I was looking at the in game photos again, and if you go and look at the parts, I definitely see white. Specifically looking at the chest. You can see white in the center showing through the green. its on a lot of the edges of the armor as well. I guess that also played into a lot of the "white as a base" as opposed to someone using a black ABS kit and painting over that. but I think I like your wording of "camo pattern to simulate on screen or "in game" troopers"
-
Yes. So on the normal scout boot, its required that the boots close outside over in. But it appears that on this trooper they are opposite, with the inside overlapping the outside.
-
20 minutes ago, RAIDER said:
First...it's always great to see an old project resurrected and someone willing to attempt completion. Let's go!
Starting here with the boots since this seems to be where you'll build will start (so don't want to hold that up). My only thoughts:
- I don't see a "dog bone" anywhere. Maybe I'm missing it but it just seems like it's a camo boot w/ a black toe/bridge covering. I would say some verbiage that it should match the reference image shape (to get that "swoop") should probably be included.
-
I noticed throughout alot of the build sections, white is identified as a base. I don't know a ton about camo techniques but my eye doesn't really see white anywhere at least not enough to identify it as a required base.
- The Kashyyyk trooper CRL uses this verbiage "Camo pattern to simulate on-screen troopers."
- In the old CRL topic (we may to dig that up a bit @IcyTrooper) the original people attempting to build had identified some camo patterns/techniques that might be worth looking at.
- And lastly this is more question...do those straps around the calf have notches (side view)?
Totally agree! And thats what I love about this is the collaboration. I said base is white because its a camo overlay of thr scout. But definitely agree with the "camo matching reference".
Also, i do believe if you look at the reference photos there does seem to be a stitch or some type of "joint" on the black straps of the boots.
It also appears, and would like general consensus, is that the boot gator overlaps from inside to out, opposite the Scout boots
-
13 minutes ago, RAIDER said:
I think this will work. Just so this could be a possible build guide as well, would you share the boot name/brand/etc?
Absolutely. Stand by.
-
On 5/25/2024 at 5:10 PM, Andreas Funk said:
Wow! this is absolutely amazing! is this something you plan to sell as a kit if the CRL is completed?
-
1
-
1
-
-
Found what I will be using for the base boot. The sole will be modified and painted to match reference.

-
2
-
-
Holster
- None is present.
Optional Accessories Items below are optional costume accessories. These items are not required for approval, but if present appear as described below. If adding in an accessory after initial approval, the item still needs to be submitted to local GML for approval before use.
Neck Seal - Black with horizontal ribs, fitted to the wearer, and extending from the base of the neck to the top of the Adam's apple.
OPTIONAL Level two certification (if applicable): - Prohibited for a movie accurate costume.
Hold-out Blaster - Flat or semi-gloss black.
- Blaster does not have any visible trigger.
- Blaster is lightly weathered.
OPTIONAL Level two certification (if applicable): - The scope has lens discs cut into the scope for a more realistic appearance.
- No decals representing cross hairs or similar.
- No drilled barrels. The screen used blasters did not have drilled barrels.
- Kenner toy blasters, modified Kenner toy blasters or resin recasts of Kenner toy blasters are not acceptable due to the fact they are approximately 10% larger in scale than an accurate style blaster.
E-11 Blaster Manufactured by BlasTech Industries, the E-11 is standard-issue for many Imperial troops. Light, compact yet powerful, the E-11 blaster is always in high demand throughout the galaxy.
- Based on a real or replica Sterling sub-machine gun, scratch-built, or a modified commercial toy Stormtrooper blaster.
OPTIONAL Level two certification (if applicable): -
Folding stock.
- Stock does not need to function.
- A real or replica ammo counter - based off of a Hengstler counter - should be present.
- D-ring mounted on the rear.
- Correct style scope.
- Two power cylinders on the magazine.
- Scratch-built, resin cast, Hyperfirm rubber cast blasters should have a total of 6 t-racks on blaster (leaving the lowest row on the Hengstler side un-covered).
-
If using the Hasbro E11 toy blaster, it is modified to have the correct number of T-tracks (6 total), with a lower row of open vent holes on the magazine housing side.
- This is accomplished by covering the pre-existing rows of holes with T-tracks, then grinding off the lower integrated T-track on the magazine housing side, and drilling a new row of holes in its place.
- 3D printed blasters can not contain visible print lines and must be sanded smooth for a more realistic appearance.
DLT-19 Heavy Blaster Rifle Manufactured by BlasTech Industries, the DLT-19 heavy blaster rifle is much more powerful with a much greater range than the E-11 blaster. Because of its powerful, long range capabilities, this rifle is commonly used on Imperial controlled planets with large, clear, open areas.
- Based on a real or replica MG-34 machine gun.
OPTIONAL Level two certification (if applicable): - A DLT-19 is an MG-34 with T-tracks on the barrel, ejection port cover added, and a small disk on left side.
- 3D printed blasters can not contain visible print lines and must be sanded smooth for a more realistic appearance.
DLT-19x Targeting Rifle Manufactured by BlasTech Industries, the DLT-19x targeting blaster was a blaster rifle, and a variation of the DLT-19 heavy blaster rifle. Unlike the DLT-19, the DLT-19x released all of its power in one shot before it would need to cool down. The DLT-19x was a very powerful weapon, and could take down most enemies in one shot. The weapon had a scope which could be zoomed in farther than most scopes. The DLT-19x was a weapon of choice for many snipers, and was very effective.
- Based on a real or replica MG-34 machine gun.
- Real or prop scope.
- Flat or semi-gloss black.
- Blaster is lightly weathered.
OPTIONAL Level two certification (if applicable): - T-tracks present on the barrel.
- Ejection port cover added.
- Real or prop SinglePoint scope with modifications.
- Small disk on left side.
DLT-20a Blaster Rifle The BlasTech DLT-20A blaster rifle was a long-barreled rifle (sometimes referred to as a "longblaster") with a top-mounted rangefinder and electronic sight. It had automatic and semiautomatic settings and a rate of fire very close to that of the DC-15A blaster rifle and other longblasters. This was one of the few blaster models produced with a magnatomic adhesion grip, keeping the weapon firmly in the wielder's grip and making him or her more difficult to disarm. With additional collimating rings and longer conduits of galven circuitry, these rifles have improved consistency in their shots.
-
Based on a real or replica STG-44 machine gun, with parts from the Browning M1919.
- Real or prop scope.
- Flat or semi-gloss black.
- Blaster is lightly weathered
-
Boots - White marine vinyl which is not too glossy in appearance, used to construct the boot shaft, and is painted/weathered to match the rest of the armor.
- Boot shaft has two (2) black straps, made of Leather or marine vinyl and are about 1 in wide, wrap completely around the leg, beginning and ending at the back of the boot.
- The soles of the boots are gray.
- A "dog bone" shaped strap covers the bridge of the foot and is black in color. Marine vinyl is also used.
- Toe of the boot is black marine vinyl.
- The boots are secured up the back using 1" (25mm) black hook and loop fastener.
- The calf of the boot rises to just slightly beneath the knee armor.
- Slightly textured vinyl is acceptable.
- No Holster is present on the boot.
OPTIONAL Level two certification (if applicable): - The boots have a flat sole with notches accurate to the visual model cut in.
- The boot sole is a single gray color with no visible stitching.
- Boot shaft closure is inside over outside, opposite of normal scout boots.
- Boots that are constructed too wrinkled (i.e not stretched/fitted correctly prior to gluing) or poor in appearance will be refused.
- Stitching, if any, used for the boot should be white and painted to blend in, or black when used on the toe area.
-
Knee Armor - Knees painted to match the rest of the armor.
- Black elastic is used to secure the armor around the leg.
-
Knee may have 2 elastic straps securing the knee armor in place, with the top strap being smaller than the bottom, about 1/2 inch (12 mm).
- If a rivet is used to secure the second strap, it must be painted to match the rest of the armor, blending in with the knee paint.
OPTIONAL Level two certification (if applicable): - Knee armor has only one elastic strap measuring 1" (25mm) wide and passes through the bottom of the knee armor.
-
Belt and Detonator - The front and four "boxes" of the belt are made of hard material.
- Hanging from the sides of the belt are hip boxes (drop boxes) connected to the belt by 1.5" (40mm) black textile straps.
- Each drop box strap is threaded behind a black side release buckle centered on the strap.
- Attached to the back of the belt is a rectangular thermal detonator box with short black corrugated hose.
- Accurate thermal detonator greeblies are attached to the box.
- The rectangular part of the thermal detonator greeblie, fixed on the left side of the detonator, is the same as used in the rebel Endor trooper rank badge.
- On the right hand side is the same round greeblie as used on the Scout tank topper.
- See the detonator detail page for a close up image of the greeblies.
- The TD box is secured by one single black tie wrap, with side buckle to fasten belt hidden under the box out of sight, or velcro fastening attached with 2" (50mm) black cotton or nylon belt secured on each end of the belt with a single rivet painted to match the rest of the armor.
- Belt and TD are painted to match the rest of the armor.
OPTIONAL Level two certification (if applicable): - The belt is made from a one-piece construction with no visible gaps, and not separated with fabric in between sections, apart from at the back where the TD box sits. Making any joins in a 3 part belt seamless, is highly recommended.
-
The straps attached to the drop boxes to the belt are made from 1.5" (40mm) black cotton webbing.
- Drop boxes hang the correct distance from the belt.
- Nylon webbing is inaccurate.
- Thermal Detonator end caps to be concave and not flat.
- Optional: Thermal Detonator must have visible black clips attaching it to the web belt.
- Optional: Thermal Detonator tube to be wire wrapped and not ribbed tube.
- Optional: Thermal Detornator may have Hex shaped cap with a center "nipple" detail.
-
Cummerbund - Made from black fabric.
- Closes in back with 2" (50mm) hook and loop fastener.
- Extends from just under the chest armor down to the waist.
- There is no gap between the belt and cummerbund.
- Cummerbund should be made of same or similar fabric to the vest.
- Has a tapered cod section with inverted curve sewn in detail (not a chevron).
- Cod is dark green in color and made of the same type of fabric/material as the cummerbund.
- Connects between the legs to the back of the cummerbund by a 2" (50mm) black elastic strap.
- Front of cummerbund has 5-6 equal ribs stitched, centered between the two black fabric pouches.
- Ribs are of equal width.
- Ribs are completely visible between the pouches.
- Cummerbund touches the bottom of the chest armor.
- Cummerbund slightly overlaps the belt.
OPTIONAL Level two certification (if applicable): - Made from the Cummerbund tutorial page.
- The cummerbund is separate from the flight suit and vest.
- There is no visible external edge stitching on the cummerbund, the cod or pouch flaps.
- Pouches are made from a matte black heavy cotton or canvas like material.
- Bottom edge of the pouch flap must be less than half the overall width of the pouch.
- Pouch size to conform to individual size; should fit in gap between chest armor and belt with minimal overhang.
- Codpiece must conform to shape pictured in the CRL and source art.
- Cod strap runs between the legs, but attaches to the flightsuit or some other area under the butt flap, and does not show overtop.
- Codpiece must not have excessive bunching around groin area.
- Optional: Codpiece is separate from the cummerbund and attached to either the vest or the flight suit.
-
Back Armor - The back armor has a center tank attached.
-
The top of the tank is flat with a detail piece painted black.
- Top detail piece uses the same greeblies as seen on the screen-used ROTJ Biker Scout armor.
- Top detail piece is painted matte black.
- The tank has black stripe detail.
- Back and Tank are painted to match the rest of the armor.
- Optional: Additional "rank indicators", present on the right side of the tank, can number between 0 to 7 stripes.
OPTIONAL Level two certification (if applicable): - Back and Tank must be two separate parts, no single part back/tank plates will be admissible.
- Has 7 stripes details on both sides on tank.
- Bullet tank on the back armor has NO tank topper greebles detail.
- Rear tank has properly placed pin striping and a single bottom attachment rivet, painted to blend in with armor.
- Blinking lights or LED's on the bullet tank are not acceptable.
-
Chest Armor - There is a recessed rectangular area present over the right breast that must be painted black.
- The chest and back armor join together over the shoulder and the gap covered with a loop of olive-green fabric.
- The sides of the chest armor are attached to the back armor with black webbing or elastic.
- Chest is painted to match the rest of the armor.
OPTIONAL Level two certification (if applicable): -
Shoulder bridge covers, covering the join between the front and back of the armor, are made of olive-green fabric.
- Nylon webbing is inaccurate.
- Side under arm chest/back straps are made from 1.5" (40mm) black webbing or elastic strap.
-
Gloves - Black leather and gauntlet length.
-
Detailed gloves include:
- Black suede or faux suede patches on top of the middle finger, index finger, and thumb.
- Four tightly spaced ribs that span the knuckles.
There are no labels/logos, clips, or external straps.
OPTIONAL Level two certification (if applicable): - Suede or faux suede padding on fingers and inside of thumb and correct gauntlet stitching.
Same vest, for consistence
Vest - Made out of black fabric.
- Sleeves are padded and contain ribbing similar to the front of the cummerbund.
- The sleeves are just slightly longer than the bottom edge of the shoulder armor.
- Vest has a much wider neck opening than the flight suit.
- Secured at the back using 2" (50mm) black hook and loop fastener.
- Vest should be made of same or similar fabric to the cummerbund.
OPTIONAL Level two certification (if applicable): - The vest is separate from the flight suit and cummerbund.
- Made using the Vest tutorial.


Forest Trooper - CRL Discussion
in Forest Trooper
Posted
Im good with that!