

BigJasoni
-
Posts
126 -
Joined
-
Last visited
-
Days Won
6
Content Type
Profiles
Forums
Events
Everything posted by BigJasoni
-
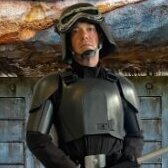
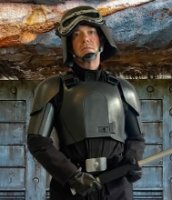
Imperial Army Trooper - Andor - CRL Discussion
BigJasoni replied to nanotek's topic in Imperial Army Trooper - Andor
100% agree. None of these details should come into play until a person is looking for Specialist. However, the magazine greeblie and butt stock detail both seem like very deliberate additions that should be added. Also, good catch on the Mimban TKs, I've never caught that before. Regarding the stock: I should have clarified what I was saying; the HK416 stock is clearly attached with the retaining nut/ adapter similar to this one here: I won't name vendors here, but for those who have been lurking around the Spec Ops detachment for a while, you likely know where these pics came from. Also, regarding the actual butt, the shape of the one pictured is what we should be looking for, but again, the rear is not ribbed and has the pill shaped detail. I mentioned the MIL-1913 rail because I couldn't find a good name for this particular style of Picatinny. But, I did call out that it's likely a stock adapter due to it's shape. Again, this really isn't an issue for basic approval; the inclusion of a picatinny rail should be fine for that, but for Specialist, I think the proper shape should be specified. Here's a picture of the two I printed out during the blaster design phase: Again, nothing official here; these are merely resin prints, but the design on the left came up from reference photos we were provided in a blaster build group. I believe I already posted one of the pics above. Regarding the scope, the serial number isn't anything that we've held against people in the FISD; however, we currently only have 2 EIB ROTKs and one Centurion. Of note, our lone Centurion has a scope that was custom cast from an original 1943 model with the correct serial number. One interesting piece of information here: for the film, our "intel" indicates that the props department actually used resin cast scopes provided by Doopydoos, hence the known serial number. Unfortunately Doopydoos is no longer making props, but the files are out there: Absolutely! It's definitely on there, but what I can't find in the references is how it mounts to the bottom of the blaster. Neither of these pictures show the actual sling, but you can see the two variations of the ring. This picture shows the sling and also shows a great shot of the rear butt stock detail: Ok. I think I've officially belabored the blaster. I'll start chiming in with anything I find on the armor next. -
Imperial Army Trooper - Andor - CRL Discussion
BigJasoni replied to nanotek's topic in Imperial Army Trooper - Andor
I agree entirely. Also, I think it's prudent to actually post a picture of this so you guys don't think I'm out of my mind: So, the far left is the eagle logo found on the Rogue One blaster and the other two were used interchangeably in the OT. This picture is courtesy of TK-80421 over at the FISD forum. If you'd like to see a great analysis of the Rogue One E-11, which is the base of all these Anthology/ New Generation weapons, check out his write up here: https://www.whitearmor.net/forum/topic/41271-rogue-one-e-11-blaster-reference/#comment-553353 I've referenced this post so many times in my blaster builds that I have it saved in my favorites. I hope it does help; I'll post a few more below. Chris did a great job of quickly putting this blaster together, along with a couple others we're currently working on. This one is a remix of Sean Fields' E-10, so for anyone familiar with that, you'll know that there are a few imperfections, but they're minute and very worthy of a basic approval build. I think the major things that should be considered for basic level approval is the correct shape of the scope, and butt stock, the magazine greeblie, Rogue One style power cylinders, and for all things that are holy... please ensure you're using a blaster modeled from the airsoft rifle, not the original Sterling. Disassembled. Folding stock not pictured Assembled raw print: I didn't print this Hengstler in resin, so the eagle isn't showing. Assembled: Please keep in mind that nothing's definitive; this was an early prototype. HK-416 Stock Adapter Correct shaped bayonet lug Details on rear of stock Good shot of rail, scope, power cylinders and hengstler -
Imperial Army Trooper - Andor - CRL Discussion
BigJasoni replied to nanotek's topic in Imperial Army Trooper - Andor
All, I thought I'd chime in here because I'm well on my way to making this costume. Honestly, I really wanted to throw in some blaster stuff. Everyone's been citing the E-10 blaster, i.e. E-10.5, but I think we've overlooked some of the more obvious differences. Getting the OxProps blaster is an option, and David did a great job of putting his together, but there's a few little things that need to be addressed. I'll reach out and see if he's making those changes. Additionally, @Bozzy will be making this available soon on Thingiverse. This is a very raw print I threw together back in October and we've continued to refine it since. I would post new pictures, but I've completely disassembled the weapon and am prepping it for paint. Additionally, I'm working on another version using my actual S&G Sterling Airsoft, extended barrel, an HK-416 Stock with modified butt and a couple other added items. I'll keep everyone updated before I start casting the final product. If you do decide to print one of these blasters, please keep the following details in mind. These are all seen on screen and shouldn't be overlooked: Magazine top detail Hengstler has accurate eagle logo seen on all RO E-11 variants. The Eagle should be smaller than the recessed screw holes above and below it. Additionally, designers typically use the Hengstler font and Eagle from the older ANH variant which is incorrect. Look for the "blocky" eagle. Collapsing stock is an HK-416 model, with adapter similar to the Deathtrooper, but has different details on the butt. My only guess is that they didn't want to cast the ribbed rubber rear butt that we've seen previously. Rogue One variant blasters use a cast of the M38 1943 scope, serial number 110332 The serial number shouldn't matter since we don't see it here, but the shape and size of the scope does. I believe the Picatinny rail they used on this blaster is actually a stock adapter for an HK-416. Look at the 1913 adapter as an example. Power cylinders are the Rogue One style cylinders, not ANH. Ensure proper placement of the inner cylinders and correct shape of the foot. I will continue to study this blaster and note anything that comes up. We have an excellent start with the Muddy E-10, but just need to ensure everything that was deliberately changed is accounted for. -
Ok, that helps. I do need to go get properly measured though; my Armorsmith avatar is shaped like Brock Lesnar, but I'm definitely a larger distance runner. I have a feeling this is why I'm making extra weird adjustments. Thanks again for the assistance
-
That shirt is great. I love it. I started playing around with the files in Armorsmith and was getting some crazy results. I was scaling the chest and back to 110% in the X and Y axis, but 120 in the Z. This didn't seem right at all, but my avatar in armorsmith also doesn't look right, so I may have to go get resized if I want to put this together. I'll play around with it a little more, but I'm not sure how this is going to work. Oh yeah. The helmet I printed is pretty cool. I was just doing it for something to put on my shelf, but I really like it. However, 100% probably isn't going to work on that one either; it was real tight on the top of my head if that makes sense.
-
Lol. Well, this one might be a while. I'm intrigued though.
-
Allan, Thanks for the quick reply. So I just tried on the head I printed and it'll definitely need to be scaled up a little bit. Lol. Of course, I was just printing this one for fun. So, I guess the question for you is, what did you scale everything up to. This definitely sounds like a job for Armorsmith, but I'm just trying to get a good estimate. Also, I watched Gordon Tarpley's suit up video but am curious how it is for you to get dressed? Also, how has the kit held up? I saw that you sliced it into several parts, but if I do this, I'm printing everything in big pieces on my CR-10 Max. Has it broken apart at all? David, That's a great picture. I'll search around a little bit, but I am glad to hear there may be more out there.
-
Hey all, Yesterday I looked over at my 3D printer station and realized that I had about 8 "remnant rolls" of filament. You know, when you only have about 150g left on a spool and take it off the printer before bed... yeah, a bunch of those. So, I decided to print a C3-PO head just for fun. I sent a picture of it to my friend and he said "oh. Now you can join the Rebel Legion." Now, no offense to any of my fellow Legion members who dabble a bit with our Rebel cousins, but the thought of this kind of made me sick. However, being a loyal member of the Spec Ops detachment, with another costume coming in the next couple months, I thought "what about 000?" However, I'm not exactly Anthony Daniels or Gordon Tarpley here. I am 6' and anywhere between 185-190 lbs. depending on what I had for dinner. So, what I want to know is: Are there any examples of bigger guys dressed as 000? I saw @Allan1313's build where he opened by saying that he's 6'2" 195 lbs, so I know it's possible, but other than the 3 builds on the forum, do we have pictures of anybody out there in the wild? The 501st Holocron only shows 2 approved, so I'd love to know. For now, I'll continue working on my Deathtrooper, but I'm a little curious about this costume.
-
Ok, I laid down some paint and am pretty happy with how it turned out. And I was able to squeeze out the last of my 433U for the blue-grey details. So I should be set for a while. Fortunately, I'm doing the final walkthrough of my house in less than 2 weeks which means I'll be done with this "paint booth" soon. For the rest of my time in the apartment, I don't have much more planned for the swampy. Maybe prep some of my other armor pieces, but my guess is that this project may be on hold for a bit. Additionally, one of my first orders of business when I move into the new house is getting the Outer Rim Exchange back up and running. That means that my next updates will likely be a lot of sewing; cummerbund, cod, flightsuit modifications, and flak included. I'll post those updates when I fire up the machines. Thanks again for viewing For now, I do want to say thanks to everyone for getting me on my way. This is turning out to be a pretty fun little project.
-
Thanks. I did notice in that one that it says "blue-grey." Also, now that I look at them, the standard color of the bolts is more of a grey-grey, so I'll figure something out. However, it also just dawned on me that I still have some Pantone 433U from my Mudtrooper build. That'll probably work as a nice blue-grey.
-
I must have missed that one. Was there a discussion about the bolts. I wasn't even planning on painting mine.
-
Lol. I just noticed in the game pic that there appears to be a black outline around the elevator bolts. Hmmmmm...
-
Ok guys, thanks for clearing some of this up. Going off of the game pic, I don't think any of us are ready for a swampy with a full "grill" for the nose detail. Lol. I'll stick to the smaller one with 5 stripes. Of course, I'll only be using the black lines, I put the gray one up as reference. @Bfkn, I've been trying to decide whether I need a Cricket or not, this is another one for the "pro" column. My mother-in-law actually made me a sheet of scout decals, but I may have to ask nicely for a few more black ones. So it sounds like black nose details, number of stripes is up to me... make it look good. And yes to outlining the snout. ONWARD!!!
-
Ok, I'm running into a decal issue. The CRL for basic approval states that "Helmet has scout detailing in black." Additionally for level 2 it states "Details are the correct color and placed as shown," and "Scout style details are present, either painted or decals." The issue I've ran into is that I've got a set of accurate Scout details, but they're different than the CRL picture. Additionally, though one of the specialists is retired, the two approved on the main Specialists page have different crescent moon shaped nose details. Let me show what I'm talking about: Accurate scout nose decal on top, black "nose stripes" on bottom Accurate Scout nose detail is gray with 5 black stripes. Accurate Shadow Scout nose detail is 5 black stripes Swamptrooper CRL shows 8 black stripes Here's the other issue I'm having. Every other scout has black detailing around the snout including the retired specialist which is shown below: Again, basic approval states "Snout is gray with black details," and specialist states "Accurate snout detail and aerator with accurate parts, mounted onto a plate and painted gray with black details." Now, one could assume this means the aerator is black, but from looking at other build threads, it seems like others are interpreting this as the area around the snout is black as well which would meet the level 2 requirement that "Scout style details are present." I chose to emulate the CRL paint and love how it looks. Thanks again for the tips! But, I'm thinking that the decals should closer resemble the Scout Trooper CRL, but in black. Basically, from reading the CRL, it sounds that for level 2 I should be using Shadow Scout decals and outlining the snout area. Am I wrong? Here's my helmet with the unpainted snout. This shows the areas I'm requesting help with: Thanks in advance for the help
-
Ok. So I discussed previously that I'm kind of doing this as a fun little thing for St. Patty's day, but now that I've got things going, I'm loving it. Here's my update to finish off the weekend. So I've mentioned this in other forums, but I'm currently waiting for my new house to be finished, which should happen next month. As a result, my typical costume building routine is really thrown off as I've been left to doing whatever work I can do out on a tiny balcony. It's working out... kind of, but it's also interfering with my ability to get a lot done. Additionally, I've been having to find odd locations to do all my painting. For this little project, I found an old parking lot at the edge of the forest and got to work. This was after my first full layer of filler sandable. It was really starting to look smooth, so I sanded it down, added some Bondo Glazing and Spot Putty and continued the cycle. At this point, I also decided to spray the inside of the helmet with truck bed liner which has become a little bit of a tradition for my builds. Honestly, this step is probably unnecessary, but I just like how it looks. After I got it where I wanted it, I threw a layer of white 2X Primer on the bucket and let it cure overnight. I also took the opportunity to try wet-sanding primer which I've never done before. I typically leave wet-sanding for my final gloss coat, but if I'm going to be honest, I simply left the helmet on my balcony for a few hours and it got rained on. I didn't think it would hurt anything, so I just went for it. After the wet-sanding I was left with an incredibly smooth surface which almost made me nervous that I would run into paint adhesion issues. Regardless, I took it out to the forest with two broomsticks and a piece of aluminum I found next to a dumpster and set up a little paint rack. I laid down 2 thin "dust" coats, and 1 wet coat all separated by 10 minutes. After the first two thin coats, the paint was tacky enough that I didn't get a single run when I laid down the thick wet coat. Here's the shots: After that final wet coat, I let the paint dry for 30 minutes then moved it back to the apartment to cure for 24 hours. Here's a decent shot of the truck liner interior. And finally, I cut out a green lens from my left over Mudtrooper grinding shield which fit perfectly into the lens recess. I also dug out my snout greeblies (which I'll paint tomorrow) and taped them into place to see how the almost complete helmet will look. The last couple pieces of this build will be the decals and elevator bolts. I have some scout trooper decals, but will have to change out the nose, forehead, rear traps, and squared emblem for black ones. My "bar code" will work fine. I'll figure out a way to make these work. So overall, I love this helmet and I'm pretty sure this will be one of my favorite costumes. Also, I want to send a big shout out to @Bfkn for steering me towards the Meadow Green Rust-Oleum 2X. I know people have issues with Rust-Oleum, but I've had pretty good luck with their 2X brand. When I saw how this stuff looked on the helmet, I knew I made the right choice. I also sent these pics to a friend and he immediately bought some for his build, so thanks again for the recommendation. It'll probably be a while before I update this thread, but if I'm able to do some small pieces while I'm still at the apartment, I'll post the pics. Thanks for viewing
-
Again, this is perfect; thanks for the help. I must have overlooked the special notes, but everything sounds good and I'm going to go hunting for paint tomorrow. Thanks again
-
David, Thanks for the assist. I was looking at @Bfkn's specialist application earlier today and caught that. I am curious why there's not a Pantone "guesstimate" in the CRL though. I know matching from a video game is difficult, but I'm starting to notice a few different takes on color and weathering. My assumption is for a specialist application, there shouldn't be significant weathering. Am I right or does it matter? Thanks again!
-
Jan, That's perfect, thanks! I was just looking at your Specialist application earlier. This might actually be a good option for me since I've already been loading it up with Rust-Oleum primer. Is that semi-gloss?
-
Hey all, The Spec Ops detachment is in my blood now. Thanks to all those who lured me in. So, I'll start with a little story and then request some help. A little over a year ago I was thinking about doing a Mandalorian Remnant Scout trooper, but of course I got sidetracked with other projects. But, in March of this year, my garrison squad leader posted this pic and challenged someone to build one for a potential St. Patty's day parade next year. I'm sure someone can tell me where this came from, because I have no idea.--EDIT-- I just figured out that this is one of the Walt's Trooper Factory stickers. Lol. I must be getting lazy. Regardless, I said "why not?" and agreed to do it. So, here's the beginning of this little project: Here's where I need some help/ guidance. I challenge anyone to search this forum and come up with a solid paint recommendation; I can't find anything. I found a few people reference the Krylon brand, but no color. Honestly, only one person (Neoakaj) mentioned a color; Krylon Fusion Satin Hunter Green. However, this color looks very dark. The other color someone told me about is Boston by Montana Gold. I love working with Montana Gold and wouldn't mind using it, but after looking at the CRL and the two Swampys on the Specialist page, it really seems like this should be more of an Apple Green color. Also, I may be a little biased since I'm originally from Oregon, but this is the color I'd like to look for: Yes! I finally figured out a way to put the Ducks in a 501st thread. Lol. Anyways, I need some help. Can someone please push me towards the right color. Thanks as always, and I'll keep this WIP updated periodically. TX-51923
-
Cummerbund and Soft Parts Source
BigJasoni replied to Luthien's topic in Armor/Soft Parts and Where to Find Them
Lol. I understand completely. My son has asked me for a costume and I don't dare make it his size. He's 13 years old and almost 6' tall. God knows he'll probably be 6'5" next year. -
Cummerbund and Soft Parts Source
BigJasoni replied to Luthien's topic in Armor/Soft Parts and Where to Find Them
Luthien, Recently I've received a few requests for scout cummerbunds, but unfortunately my industrial sewing equipment is in storage while I wait for my new house to be finished. I'm not sure what your timeframe looks like, but if you haven't found anything by late October, hit me up. If you're curious, you can see my Mando cummerbunds on my Outer Rim Formal Wear Facebook page. I'd love to help if you're still looking then. -
That's pretty impressive. Lol. I love seeing these 000 builds come together. Maybe if I lose another 30lbs I can do one that looks somewhat presentable. This is an awesome costume I can't wait to see it finished. The paint looks phenomenal.
