
TookBreaker
-
Posts
91 -
Joined
-
Last visited
-
Days Won
5
Content Type
Profiles
Forums
Events
Everything posted by TookBreaker
-
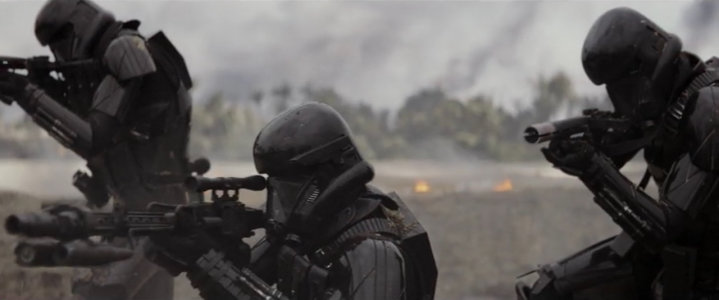
TookBreaker's Death Trooper - COMPLETED
TookBreaker replied to TookBreaker's topic in Imperial Death Trooper
Thank you all! I just used a felt liner to back those areas now it is not see through! Good catch and much appreciated. -
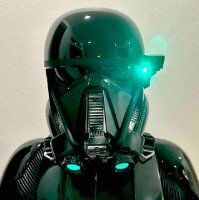
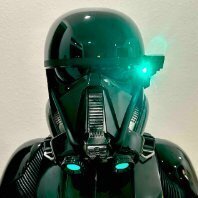
TookBreaker's Death Trooper - COMPLETED
TookBreaker replied to TookBreaker's topic in Imperial Death Trooper
Thanks @Chaos. I did back the vents with steel mesh and mosquito netting. The below picture shows the vents: -
TookBreaker's Death Trooper - COMPLETED
TookBreaker replied to TookBreaker's topic in Imperial Death Trooper
Brief update: Wrapped pretty much everything up, re-adjusted strapping (mostly thighs as they are in motion). Submitted my application two days ago. First test run today for Halloween to see what else needs some "tuning", all seems to be good, a little bit the thigh clips and better nose padding in the helmet. But am pleased and can't wait to have it official. -
TookBreaker's Death Trooper - COMPLETED
TookBreaker replied to TookBreaker's topic in Imperial Death Trooper
It has been a while since my last post. I am in final stages of my armor parts after a good friend completed the paint work. Waiting for my undersuit to be trimmed down by a tailor and then I should be ready to submit my DT. Just need to mount the belt boxes, get the snaps right for the thighs, and fit the shins (had to remove all the foam padding of my boots as they eat up a lot of space. A few photos of my helmet: NSM: With a couple of optimizations: Covered all contact points with FlexSeal as it scratches the helmet over time. Installed a Switch to turn on/off the LED light Attached with magnets -
DoggyDoc’s Jimmiroquai Imperial Death Trooper Build Thread
TookBreaker replied to DoggyDoc's topic in Imperial Death Trooper
Good luck! Looking really good and you shared an amazing build documentation. Respect. -
DoggyDoc’s Jimmiroquai Imperial Death Trooper Build Thread
TookBreaker replied to DoggyDoc's topic in Imperial Death Trooper
Same here. BTW, I see your rubber band gribblies on the armor are shiny. I think they are supposed to match the rubber band matte black color. There is nothing specifically mentioned in the CRL though. -
DoggyDoc’s Jimmiroquai Imperial Death Trooper Build Thread
TookBreaker replied to DoggyDoc's topic in Imperial Death Trooper
Looks good, but will your amor be weathered as well? -
TookBreaker's Death Trooper - COMPLETED
TookBreaker replied to TookBreaker's topic in Imperial Death Trooper
Thank you all! This is helpful. -
TookBreaker's Death Trooper - COMPLETED
TookBreaker replied to TookBreaker's topic in Imperial Death Trooper
Thank you and I wanted to use the same approach to glue them on those marked points to give flexibility to slide my hand through. What I cannot see on the pictures, how did make the rubber bands sit flush with that greeblie already on the armor? Did you cut the front edges thinner so it blends in? -
DoggyDoc’s Jimmiroquai Imperial Death Trooper Build Thread
TookBreaker replied to DoggyDoc's topic in Imperial Death Trooper
Yes, I ordered the 3cm round ones and if you cut cautiously they work well. -
TookBreaker's Death Trooper - COMPLETED
TookBreaker replied to TookBreaker's topic in Imperial Death Trooper
After a pause from building, thanks to a friend, I finished the arm armor pieces (bell, biceps, and forearms). Now, as it relates to the forearm pieces, I have to sand down/PlastiDip the part where the rubber bands have to attach, but am looking for ideas on how to attach them so it looks as one. Any ideas? I did cut off the clip portion of the rubber band to make it fit. Also, I will probably use black JB Plastic Weld to ensure that the band attaches correctly and long term as I used the clamshell method to wear these, meaning the rest has to be loose so I can put it on. Thanks -
DoggyDoc’s Jimmiroquai Imperial Death Trooper Build Thread
TookBreaker replied to DoggyDoc's topic in Imperial Death Trooper
Interesting that they did not fit. Which El Panel's did you order? The round ones? For the current setup, maybe you can test it with so called Gel Filters in green (on Amazon). Never tested it, but read in the forums some using it to diffuse the light and cover up a bit the center light of the bulb. -
TookBreaker's Death Trooper - COMPLETED
TookBreaker replied to TookBreaker's topic in Imperial Death Trooper
Question to the group: I have my shins ready, left a paintless stripe to have better adhesion for the Velcro in order to close the shins as a clamshell. Here is the challenge I see: Wearing the boots, the panel to cover it all, the closing becomes pretty tight, especially with the foam around the ankles of the boot itself. I could close it perfectly well with all underneath, but I am pretty sure, once you walk, the velcro will not hold well. Picture from CRL: Did you just keep the shins at the lower end wider (I trimmed it with booth and underarmor, but it may be tight now) or have other tricks to keep it closed and in place? I was thinking to remove the foam from the ankles of the booth, maybe even cut off the pull tab on the heel. Any ideas? -
TookBreaker's Death Trooper - COMPLETED
TookBreaker replied to TookBreaker's topic in Imperial Death Trooper
Thank you very much, @Chaos! -
TookBreaker's Death Trooper - COMPLETED
TookBreaker replied to TookBreaker's topic in Imperial Death Trooper
Question regarding the side buckles: There is supposed to be a triangle at the upper end of the rubber piece. Does it have to be lower than the other 4 rectangles? I saw both versions, but mostly it looks like it is lower. Any advice? -
DoggyDoc’s Jimmiroquai Imperial Death Trooper Build Thread
TookBreaker replied to DoggyDoc's topic in Imperial Death Trooper
Same here: -
TookBreaker's Death Trooper - COMPLETED
TookBreaker replied to TookBreaker's topic in Imperial Death Trooper
A few more updates and learned a bunch from @DoggyDocBuild, who was also kind to share with me his 3D STL files for the Belt Pouch Plates, Magazines for the chest rig, and the Thermal Detonator brackets. Everything is painted and clear coated except helmet, forearms, biceps, bells, and pouch plates, which is in progress. Here are some insights how I glued smaller parts on the thighs, but also strapping and any other optimizations for ideal fitting. Legs: Right thigh: Filled this part with JB Weld, then a piece of black ABS with a Chicago Screw glued on it as there is not much adhesion surface. Left thigh: Filled the small three boxes with foam. Primed: Painted: Shoulder straps As mentioned before, I used Paul Shoretrooper's brackets and shoulder straps. I needed to shorten these to fit better and leave enough length to slide in the back and be secured. I decided to screw the buckles to the chest armor with one screw. For this, I used similarly to @DoggyDocsuggestion a self-tapping screw, in this case into the belt buckle. Being paranoid about scratches, I added a little felt to the front. This way any scratching or noise should be eliminated. The screw holds really well and is strong. At the sliding end, I had to sand the rubber down so it can slide easily to the back armor and again used a bit of felt so the rubber strap is not visible from the side. Initially, I planned to use strong magnets for the loose end so they can snap to the back armor once slid in, however I forgot about the angle on the back and it did not work out. Changed from magnet to Velcro. Once slid in, they are velcroed and stay in place. Experiment with Magnet (definitely a no go): Velcro is the better option and the shoulder strap sits really flat. Overlapping Armor Parts: This applies to Chest/Back armor overlapping with abdomen and back, but also bells on bicep armor pieces. In order to avoid scratches on the paint as well as potential squeaks or other noises that overlapping armor parts could create while in motion, I tried out felt lining. I did not like it as it did not sit well, difficult to get a smooth surface, and requires gluing. I changed to FlexSeal rubber paint, which was easy to use and really created a soft surface. Felt lining: FlexSeal painted: Other photos of my build: Harness-based lower body armor pieces: Belt boxes I printed based on an online available 3D STL file, where the lid can be secured with a magnet: Next steps: Get the rest painted Have to find a better 3D STL file for the NSM range finder. The one that came with Jim Trippon's kit is not ideal. Undersuit pants are with tailor because of too much excess. Side buckles to be attached to chest armor. Strapping of thighs, velcro for shins (clamshell). Try on to test body armor and legs to check fitting. And there are for sure still some more work items. (I know this was a long post, but wanted to get it out there). -
TookBreaker's Death Trooper - COMPLETED
TookBreaker replied to TookBreaker's topic in Imperial Death Trooper
Question to the group: Does the inner part of the neck (of the back armor) has to be gloss painted? As you know, the Jimmy Trippon kit is fiber resin and not smooth on the inside. I did not see anything specifically called out in the CRL, hence the question here. The Reference photo in the CRL is glossy, but the armor is a different vendor. Can it just stay plain matte black? Does it have to be smooth as the outside? -
DoggyDoc’s Jimmiroquai Imperial Death Trooper Build Thread
TookBreaker replied to DoggyDoc's topic in Imperial Death Trooper
Looks correct to me. Did you use magnets? Or permanently glued? -
I was debating on this back and forth. I did apply PlastiDip on all parts to cover it as much as I can and it created a good protection against the itchiness. I tried the felt as well for the chest/back armor piece that overlay on the abdominal/back plate to avoid scratches but also noise while being in motion. My concern was that in the Florida heat, this may be less than ideal but also very cumbersome to apply with glue, cutting, etc. I decided to use FlexSeal , a rubbery paint you can brush, roll, or even get a spray of it. It created a nice rubbery layer, which works well. You could cover in thin layers if PlastiDip does not work. Some photos from before and after: Felt: Flexi Sealed to protect the underlying body parts:
-
TookBreaker's Death Trooper - COMPLETED
TookBreaker replied to TookBreaker's topic in Imperial Death Trooper
Next small steps as the sanding and painting of the other armor parts are ongoing. Worked a bit on the chest/back armor connection brackets from Paul's Shoretrooper. Used the following approach: Pre-drilled a hole on the back armor shoulder for one Chicago screw on each side that goes through the bracket and gets fixated from the inside. In order to eliminate the need to glue to keep it in position, I decided to use velcro, which should keep it in place alongside the Chicago screw. Installed snaps on the front side of the bracket through velcro to create the anchoring point for the chest armor. The velcro is glued with E6000. Covered the underside of the front bracket with self-adhesive velvet fabric to not only hide the aluminum bracket, but also create a softer surface. Next step it to connect the chest armor to test it out in order to determine if further trimming is needed. Photos: Chicago screw attached to back armor shoulder for bracket mounting: Gluing velcro, installing snaps for chest armor attachment: -
TookBreaker's Death Trooper - COMPLETED
TookBreaker replied to TookBreaker's topic in Imperial Death Trooper
Long due update... 🙂 It has been a while and I was able to make some progress on strapping, trimming, and getting ready for some paint work (through a friend). I will post strapping photos, once I have all complete as some of it are prepared, but wanted to wait till paint work is done. Painting preparation and paint: After my friend looked at the parts, we could clearly see many scratches and uneven spots including air bubbles that are not coverable by primer, meaning all parts had to be treated with Bondo first to ensure a smooth surface (after wet sanding it). Some parts needed Bondo twice before primer was applied. See below pictures. Primer and Paint used: Primer: Krylon COLORmaxx Flat Gray Spray Paint and Primer In One Paint #1: Rust-Oleum 7578838-6PK Professional High Performance Enamel Spray Paint Paint #2: Tamiya Metallic Black TS40 Clear Coat: Spray max USC 2k High Gloss Clearcoat Aerosol Applying Bondo - First batch: Priming and Painting: After clear-coating: Now to more Bondo, wet-sanding, and priming... 🙂 -
DoggyDoc’s Jimmiroquai Imperial Death Trooper Build Thread
TookBreaker replied to DoggyDoc's topic in Imperial Death Trooper
Looks nice. Based on the CRL, they seem to be: Metallic black or weathered silver colored cylindrical detailed parts shall be evident on the left forearm. -
DoggyDoc’s Jimmiroquai Imperial Death Trooper Build Thread
TookBreaker replied to DoggyDoc's topic in Imperial Death Trooper
You can use these too. They work well enough to keep things in place: https://www.amazon.com/gp/product/B0883CBC7Z/ref=ppx_yo_dt_b_search_asin_title?ie=UTF8&th=1 -
DoggyDoc’s Jimmiroquai Imperial Death Trooper Build Thread
TookBreaker replied to DoggyDoc's topic in Imperial Death Trooper
I got mine two days ago and they work well too. I ordered the round ones as I wanted to keep the cutting to the minimal. Will try later on and will follow yours too! 🙂
