TookBreaker
-
Posts
91 -
Joined
-
Last visited
-
Days Won
5
Content Type
Profiles
Forums
Events
Everything posted by TookBreaker
-

DoggyDoc’s Jimmiroquai Imperial Death Trooper Build Thread
TookBreaker replied to DoggyDoc's topic in Imperial Death Trooper
Yes, you are right. Depending on the length I need, I thought maybe carving it out to fit a flat magnet into the strap, but a metal piece could work too as in both cases it has to fit through the opening. Did not think about the elastic band as I would like be able to wear it by myself as much as I can. -
DoggyDoc’s Jimmiroquai Imperial Death Trooper Build Thread
TookBreaker replied to DoggyDoc's topic in Imperial Death Trooper
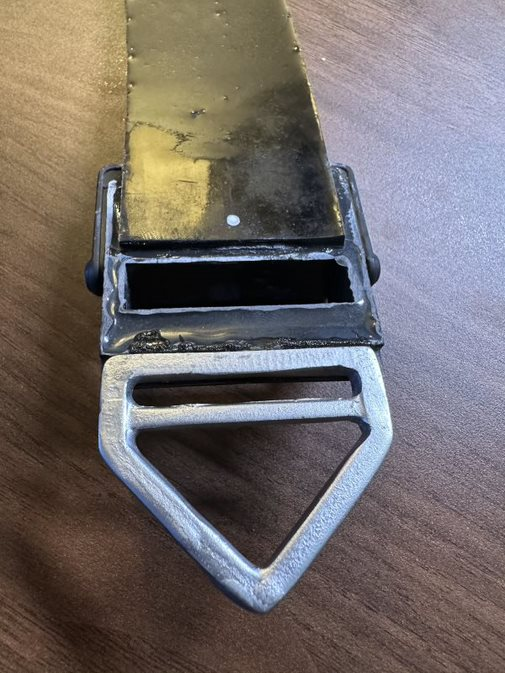
Thanks and this is helpful! I wonder if the straps will stay in place once tucked into the openings as you move around. Therefore, I was thinking to maybe use magnets to keep them in place. I did use JB Plastic Weld (black) to glue the triangle buckle to the main buckle as I think this is the strongest bond to have some strength in case I attach the specialist rig (did sand it down a bit to have a proper angle to glue them together). I then used Bob Smith Maxi-Cure Extra Thick for gluing the shoulder strap and the buckle. I purposely left part of the rubbery part underneath - not only to have more adhesion surface, but also avoid scratching and squeaking once permanently attached to the chest piece (with screws - the white dot is where I will connect it).
-
DoggyDoc’s Jimmiroquai Imperial Death Trooper Build Thread
TookBreaker replied to DoggyDoc's topic in Imperial Death Trooper
Looks nice! I am getting there too! 😉 How did you insert the metal plates into the support? Any ideas how you plan to secure the shoulder straps in the slots? I was considering gluing magnets on the back plate and also on the strap itself. Once inserted through the slots, the magnets could keep it in place. -
TookBreaker's Death Trooper - COMPLETED
TookBreaker replied to TookBreaker's topic in Imperial Death Trooper
Interesting idea and makes me thinking now. 🙂 I used a harness style for the lower body armor so I the chest/back plate have more movement option. Let me check and appreciate the idea and the documentation! -
TookBreaker's Death Trooper - COMPLETED
TookBreaker replied to TookBreaker's topic in Imperial Death Trooper
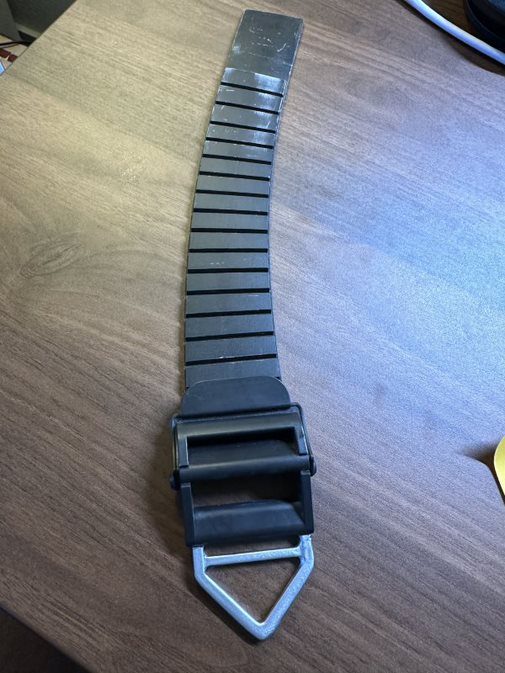
Time for another round of updates. Making slowly progress as I have to get the painting started soon. There were a lot of good insights in the forums and most recently following @DoggyDoc build, which is in the same stages as mine. Current progress: Trimmed pretty much all parts to fit me. Most challenging were forearms and the shins. Anything else fits me pretty much out of the box. Used all suggestions from @Chaos to use Plastic Weld (JB and Devcon). What a powerful adhesive! Was able to close many big gaps, but still used Bondo to smooth it out. Prepared the chest and back armor to be connected with Paul's Shoretrooper's strapping and brackets. Primed chest, back, and abdomen armor parts and used PlastiDip for all parts. I did this after the strapping was set to ensure proper adhesion as PlastiDip may not provide enough grip. For areas I did not prepare the strapping, I left those spots out for later. Thanks for the side straps STL file, @Chaos! Have to get to a tailor to get the undersuit fitted better as it has a lot of excess. Debating how to diffuse the helmet hovi tip lights - either by adding a diffuser paper in front of those or use EL Panel: https://elwirecraft.co.uk/product/6cm-or-10cm-diameter-round-el-panel/ A few photos below: Shoulder straps front buckle triangle hook had to be sanded down a bit to fit flush with the buckles, painted all triangle hooks, clear coated, and used JP Plastic weld to glue them to the buckles, straps are also glued to the buckle. Will attach them with glue and screw to the chest armor once done. PlastiDip time: Taped the edges to avoid PlastiDip on areas that need to be painted. -
DoggyDoc’s Jimmiroquai Imperial Death Trooper Build Thread
TookBreaker replied to DoggyDoc's topic in Imperial Death Trooper
Looks great. I do not have the options to re-print the straps, hence will work what I have now from JimT and Paul's Shoretrooper build, but my question is how did you attach the buckles to the side straps? Did you cut a portion to fit it snug? -
DoggyDoc’s Jimmiroquai Imperial Death Trooper Build Thread
TookBreaker replied to DoggyDoc's topic in Imperial Death Trooper
@DoggyDoc, I am still building mine and based on your photos, I think the shoulder straps may be 1-2 ribs too long, but will leave it to the experts. In my case, I cut the openings for the straps on the backplate. This way I can slide them in and adjust the length to be glued later. Regarding the bells, they look a bit low to me, but hard to tell from the pictures. How did you attach them to the back armor? -
Death Trooper Upper/Lower Torso and Arm Armor Rigging
TookBreaker replied to Chaos's topic in Imperial Death Trooper
Hi @RobC_TX1138, I assume you refer to this build: https://imgur.com/a/xaRbyZg I used Paul's Shoretrooper metal plates for the shoulder (still in works) and created a harness to keep abdomen/thorax in place, but the chest/back afloat on it. Gives more room to move. For example the TK armor is all connected and limits you in movement. -
DoggyDoc’s Jimmiroquai Imperial Death Trooper Build Thread
TookBreaker replied to DoggyDoc's topic in Imperial Death Trooper
I kept it all matte black. -
TookBreaker's Death Trooper - COMPLETED
TookBreaker replied to TookBreaker's topic in Imperial Death Trooper
Good idea! -
TookBreaker's Death Trooper - COMPLETED
TookBreaker replied to TookBreaker's topic in Imperial Death Trooper
Superb! I was considering Epoxy as well as it seems the best suited option for this, but was curious what all others did. Thank you @Chaos -
TookBreaker's Death Trooper - COMPLETED
TookBreaker replied to TookBreaker's topic in Imperial Death Trooper
It has been a while that I was able to carve out some time for my DT (was busy with Count Dooku AOTC, Fennec Shand), but here I go. I decided to make the armor wearable first before starting any paint job on it. I was able to plan out how the strapping should be done, have it done for these parts: Harness approach for lower armor parts to give some mobility. Chest/Back will be connected with Paul's Shoretrooper solutions on the shoulder Belt almost done. Thighs planning to connect with a belt to the pants, not decided yet. I had to do some trimming of thighs, shins, and forearms as they are a bit too long (an inch for the thighs). As I went through the trimming and sanding of the shins and forearms, I ran into a question how to create a proper adhesion surface for those using the clamshell approach. The issue I see is that shins and forearms connection area are not level and needed sanding to create a straight surface. The issue I see is: Sanding loosens the fiber (see picture) The connection point is a curved area not providing sufficient adhesion surface Any recommendations? Photos: Not leveled connection areas that I sanded afterwards: With the result that some areas of Fiber create gaps: Missing proper adhesion surface because of curved surface: -
DoggyDoc’s Jimmiroquai Imperial Death Trooper Build Thread
TookBreaker replied to DoggyDoc's topic in Imperial Death Trooper
@DoggyDoc great build to follow as I am in the same boat with the Jim Trippon kit. Today, I went through my trimming of thighs, forearms, and shins. One area I need some insights is how did you ensure sufficient adhesion surface for the shins and forearms to glue them together in a clamshell approach? The edges were not really well-leveled in my case, which is why I sanded the connection areas, but the surface is curvy and I doubt it will consistently glue together as it leaves many gaps. Did you use anything else to create a good adhesive surface for forearms and shins? Thanks -
TookBreaker's Death Trooper - COMPLETED
TookBreaker replied to TookBreaker's topic in Imperial Death Trooper
Update: After over 9 months of waiting to make some progress and changing plans to another supplier for the armor, in this case to Jim Trippon, I received my main parts today (updated original posts for parts received today). Let the work begin! ? PS: Ignore the gym items, they do not belong to the kit! ? -
Requesting information on linked site
TookBreaker replied to Tiderion's topic in Imperial Death Trooper
Looks like this shop has moved to England if I am not mistaken (independent of the helmet not being CRL compliant). -
Thank you, @Chaos. It was me and the document was helpful. If I summarize your findings, the Cyber Craft could be CRL compliant with the modifications you listed out. But at the same time, it looks like that an Anovos DT helmet is much closer to be CRL compliant. Would that be correct assessment of your findings?
-
That is correct. I am not a big fan of the fiberglass as it is more difficult to work (I think). There are 850 Works and KB Props too, but KB Props has only one in white. Did not check 850 Works.
-
Nice! Can't wait to see the pictures and great you found someone. Do you have more of these sources? ? I cancelled my ASP as well.
-
TookBreaker's Death Trooper - COMPLETED
TookBreaker replied to TookBreaker's topic in Imperial Death Trooper
Just an update on the Armory Shop Props order for my armor parts and accessories. I tried to get hold of Denis on several channels without success. I know the situation is dire and unfortunate. Also, I read so many good things about Denis and Team, wish I could really wait and feel confident to get it at some point, but had to file a dispute on my payment as over 7 months passed with no progress and complete silence since March/April. Will re-consider which other builder I may use. Based on my Squad's feedback, good options are 850 Armor Works or KB Props. Will keep this post updated as I progress. In the meantime, I have a AOTC Count Dooku ongoing as my spouse is now a 501st member with Asajj Ventress Nightsister. -
MKE-Trooper – Rogue One Death Trooper WIP
TookBreaker replied to MKE-Trooper's topic in Imperial Death Trooper
Thank you for the PayPal buyer protection window. I think I ordered January 8th, which is now close to 6 months. Will check with ASP again, but I am in the same status as you are. -
MKE-Trooper – Rogue One Death Trooper WIP
TookBreaker replied to MKE-Trooper's topic in Imperial Death Trooper
Was your ASP order still in processing or already cancelled? I am still hopeful it may go through as their most recent video of shipping their goods outside of US mentioned completed Armor Kits, which weren't shipped yet due to DHL limitations in Russia. I will give it a bit more time and then reconsider. -
therealtotty Death Trooper WIP
TookBreaker replied to therealtotty's topic in Imperial Death Trooper
Looks amazing! Can't wait till I get mine going. -
therealtotty Death Trooper WIP
TookBreaker replied to therealtotty's topic in Imperial Death Trooper
Looks pretty good! -
Thank you for the update. I did not receive anything yet. When was your order placed?
-
TookBreaker's Death Trooper - COMPLETED
TookBreaker replied to TookBreaker's topic in Imperial Death Trooper
Appreciate everyone's perspective and this is helpful. If you say Jimmi, I assume you mean Jim Tripon, right?