

PiotrRasputin
-
Posts
103 -
Joined
-
Last visited
-
Days Won
5
Content Type
Profiles
Forums
Events
Everything posted by PiotrRasputin
-
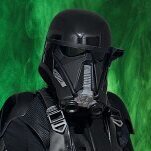
PiotrRasputin's Death Trooper WIP
PiotrRasputin replied to PiotrRasputin's topic in Imperial Death Trooper
Well...it's been over a year since I started...but I just finished building the helmet today. Added the helmet liner insert and tactical pads to stop bobblehead movement and it fits comfortably with room for fans and power packs! I will do a full suit up tomorrow, January 5th, to get this groups' CDA's consensus before submitting for approval to my GML. Can't wait! -
PiotrRasputin's Death Trooper WIP
PiotrRasputin replied to PiotrRasputin's topic in Imperial Death Trooper
Well, I managed to buff out the excess clear coat yesterday thanks to @Chaos's advice. I ended up having to use the rubbing compound on a sponge drill attachement to knock it down. You would have to get VERY close to it to see any resemblence of what was there. Before After With that done, I was then able to attach most of the face and visor I cut out to the dome. Taking the top part of the face to a garrison members place to finish painting it as it's too cold to use the Tamiya spray cans in my unheated garage. Fits great on my large noggin'. Just need to work on getting the helmet liner installed to prevent bobblehead. Already put the power pack/controller for the tusk lights inside, holding it in place with velcro. Also got all the vinyl stickers on the blaster. This is also coming with to get painted for the scorched barrel end. So close, I can taste it! Hoping to get everything done before our big convention in April! -
Hi Matt. I ordered a Jim Tripon undersuit as a two piece set and all the gaskets are included: elbows, knees, shoulders, neck...everything. From what I remember, his suits should be approvable to Level 2.
-
PiotrRasputin's Death Trooper WIP
PiotrRasputin replied to PiotrRasputin's topic in Imperial Death Trooper
Picked up the rubbing and polishing compounds over the weekend. Going to attempt the clear coat fix this weekend when i'm officially on vacation. In the mean time, I grabbed some Tamiya Gloss Black airbrush paint for the last part of the face to paint with a fellow garrison member at his place. Another member was kind enough to print out the vinyl E-11D decals and will be shipping them to me. Big thanks to @Chaos for the files. Which leads me to my next question: what paints did any of you use to get the scorched look on your blasters? -
PiotrRasputin's Death Trooper WIP
PiotrRasputin replied to PiotrRasputin's topic in Imperial Death Trooper
Which type of cloth should I use to hand buff it out? I have a sponge drill attachment, but last time I tried buffing it out, I burned the clear coat. -
PiotrRasputin's Death Trooper WIP
PiotrRasputin replied to PiotrRasputin's topic in Imperial Death Trooper
So before we got to freezing temperatures, I tried my last bit of painting the top most face piece, and a section of the main helmet that needed to be sanded and redone because the clear coat formed visible drip marks. I masked off the good areas and just repainted and clear coated the area I needed (ignore the dust on the helmet, it came off after the picture was taken). Is there a way to buff this out, or am I just going to have to sand it down with high grit sand paper again and repaint/clear coat it? Also, while trooping our Thanksgiving Day parade in Downtown Chicago, a fellow garrison member told me he has a full paint booth setup at his home, so we are going to set up time in late December to paint the the face piece the gloss black that it needs. I'm also bringing my 3D printed E-11D blaster to paint the scorched end of it as he is really good with airbrushing. Which brings me to the meat of the update. Been working on the belt to more properly secure the boxes in place. I assume the placement looks good? I just need to secure the left most box, the leather pouch and attach the hidden 2" plastic clip on the other end to make it a functional belt. -
Death Trooper building in Germany (Jim Tripon kit)
PiotrRasputin replied to Deathwatch's topic in Imperial Death Trooper
Hi Ben, When I was using 2K clear coat, I did the following: -followed the amount of time to shake before, and after activating the can -had a warm, but not too humid day -used a small, portable spray tent with a filter and fan -did 2 light coats about 12 inches away, waiting 15 minutes between them, then did a wet coat (did a 2nd wet coat on areas that didn't look so good) -after waiting 15 minutes from the last wet coat, I moved the parts inside where it was consistently 68 degrees F with low humidity and let it sit for about 48 hours. I did let it sit for a week before doing anything else with it, but it turned out pretty good. Maybe humidity was your issue? -
PiotrRasputin's Death Trooper WIP
PiotrRasputin replied to PiotrRasputin's topic in Imperial Death Trooper
Small update: -Helmet: its been raining a lot up here so I haven't been able to apply the 2k clear coat on the areas I had to fix up. Hopefully this week will be less humid. -Belt: after taking a look at the belt I received, I just wasn't happy with how it was set up. So I bought a small roll of the ribbed rubber mat and cut it to the correct amount of ribs and am following the Jolly Rodgers build guide here: https://www.jollyrogers1942.com/death-trooper-build-reference.html Mainly, I didn't like how flimsy the pouches were attached to the belt, as well as the location of where to clip it together around the armor. I did craft inserts for the 3 pouches to make them look full out of spare corrugated plastic sheeting I had. -Blaster: I received the 2 missing parts from a friend in my garrison that 3D printed the inserts that were to go behind the yellow counter window and Hengstler Window. Unfortunately, while attaching the Hengstler window panel, I accidentally broke the Hengstler bracket, so now I need that reprinted. -Posterior/Cod piece armor: Finally got the right 1" elastic band to attach snaps to hold the two parts together. That's all for now, hopefully will get pictures in the next update. -
New Member - Death Trooper Soft Parts help
PiotrRasputin replied to itskub's topic in Imperial Death Trooper
Hi Jakub! Good choice with MCM files for 3D printing as many people have used those for their builds. Regarding the soft parts, have you looked over the CRL for everything? It looks like the "ribs" for elbows, poncho, neckseal/apron, abs, shorts and knees have this stated: "measure approximately 3/16" to 1/4" (5-6mm) wide." The bias tape you shared looks like it could work, as there is a video showing the actual pipe to be about 1/4" wide, though its a bit hard to tell. The main thing with the whole undersuit is it is very tedious sewing to do. Have you considered reaching out to Jim Tripon on facebook for the undersuit? It could free up time for you to work on other parts of the suit if that is a factor. Also, if you take good measurements in centimeters, his suits are very reasonably priced. I got mine done by him as a 2 piece and fits me great. It took slightly less than 2 months to get it from him. -
PiotrRasputin's Death Trooper WIP
PiotrRasputin replied to PiotrRasputin's topic in Imperial Death Trooper
@Chaos I'm getting those parts this Saturday at a troop from a garrison friend that 3D printed them for me. In the meantime, I managed to get the EL panels and controllers from EL Wire Craft today and managed to cut the panels into shape to fit inside the "tusks". I already put in a dark green lens I cut from a safety visor, and decided to try the panels instead of LEDs for a more uniform look. Took me about an hour to get it all done: https://www.instagram.com/reel/DBcth3sMPv8/ That glow is pretty spectacular! -
PiotrRasputin's Death Trooper WIP
PiotrRasputin replied to PiotrRasputin's topic in Imperial Death Trooper
I double checked the zip file, there's neither of these in there. Not sure why they weren't included. -
PiotrRasputin's Death Trooper WIP
PiotrRasputin replied to PiotrRasputin's topic in Imperial Death Trooper
While waiting for good weather and low humidity, I kept working on the E-11D Blaster and I have I would say, 99% of it assembled! Anyone know what kind of black paint should be used for it (matte, flat, etc.)? The only parts I'm stuck on and need advice are for 2 sections where you could light them up. I am going the vinyl sticker route as I don't have the time or patience to do a light up blaster. This is an MCM Blaster print, but apparently, there are inserts or something that is supposed to fill the "windows" so the vinyl stickers can be added to. Unfortunately, I do not see the parts for these 2 sections in my zip file that I got when I purchased the plans. Any suggestions on what I can put in these areas so I can add the vinyl stickers? -
WIP - From Vader to Death Trooper
PiotrRasputin replied to Catalyst1945's topic in Imperial Death Trooper
If you have an imgur.com account, you can upload the pictures there, then copy the "Direct Link" and paste it in the forum to have bigger pictures without using up your forum space. -
PiotrRasputin's Death Trooper WIP
PiotrRasputin replied to PiotrRasputin's topic in Imperial Death Trooper
Small-ish update. -I got the snaps installed on the armor, just need to buy the 1" elastic for the cod piece to attach to the posterior armor. -I've also wet sanded the helmet again with 1000 grit sandpaper as I wasn't totally satisfied with the clear coat and slight orange peel look it still had. Will do the painting on the dome this Sunday since the weather looks good. I'm also waiting for a resin re-print of the Front Insert (or top most angular part of the face) as I noticed a defect on a section that didn't come out right. Once that is in my hands, and painted, I'll 2K Clear coat that and the helmet the same day. In the mean time, i've secured the middle section of the face and installed the tubes. So close to getting to wear it! -
PiotrRasputin's Death Trooper WIP
PiotrRasputin replied to PiotrRasputin's topic in Imperial Death Trooper
Well...it's been a minute! I haven't forgotten about you Spec Ops or my Death Trooper build. Just was focused on getting stuff done for DragonCon and now that it is done, here's an update of what's happened since last time. So back in May, I was painting the helmet parts to get the gloss black look. After still getting the orange peel look, my garrison had an armor party in June. I brought my kit and talked to more experienced troopers and they told me straight up to ditch the Rustoleum and either use Duplicolor (which I now have), or Montana Gold. I also have acquired the 2K clear coat. When I wet-sanded it and applied the Duplicolor and 2K, I got myself a spray tent and fan and had a very cool/low humidity day to try my hand at it. There was noticeable improvement, but I didn't give the 2K enough time between coats (only 5 min. as opposed to 15 min.) Since we are in the high 60s/low 70s now in Chicago, I'm going to take another attempt at painting the helmet and other parts before winter. But today was another big step. I met up with my GML and brought everything over for a proper test fit and to get the strapping down. I had already connected the shoulders to the biceps and did the cording for those, so we set the snaps in place for the shoulders to the back plate near the neck. I also practiced walking with my Crowprops shoes, shins and thighs. I can move pretty comfortably in everything. My next bit of homework is attaching the snaps for the kidney armor to the back armor. We think where we held it in place with duct tape for now is a good spot. If consensus agrees, i'll add the snaps for it it. Then the butt armor will be added next,as we were referencing the Jolly Rogers 1942 Build guide, and attach it to the cod piece. Then the belt afterwards. Overall, I asked my GML what he thought, and encouragingly, he said, "You're close to being done." That was such a morale boost. Any feedback is welcome! -
C’mon! Let’s make that Death Trooper Kmon. WIP
PiotrRasputin replied to Kmon's topic in Imperial Death Trooper
Dremels are the way to go. Just be sure you have a diamond cutting wheel for it. A box cutter with carbon blades can be useful for doing slow, light carving as well. Just as important, you need to think safety. When stuff goes flying, you will need eye protection and some gloves that can resist cutting wouldn't hurt. But more importantly, the clothing you wear will protect you from getting burned by the very hot plastic you just trimmed. I would also suggest a respirator with filters that are good for toxic fumes if you can't work outside while cutting. -
You could try using a contour gage to press against your armor, then use that to trace the pattern against the bracket. https://www.amazon.com/Feeke-Adjustable-Measurement-Woodworking-Construction/dp/B08GC48QXP/ref=asc_df_B08GC48QXP/?tag=hyprod-20&linkCode=df0&hvadid=693660084959&hvpos=&hvnetw=g&hvrand=1599112101708622892&hvpone=&hvptwo=&hvqmt=&hvdev=c&hvdvcmdl=&hvlocint=&hvlocphy=9021571&hvtargid=pla-1559652326350&mcid=bc2828a7af6b324f8adbc6cac0de8d23&gad_source=1&th=1
-
Congrats sir!
-
This is really encouraging to see! I'm getting the "orange peel" look on my helmet at the moment too. I just got 800, 1000 and 2000 grit sandpaper at the store yesterday. I'll be wet sanding it on Sunday before attempting another paint job. Great work!
-
PiotrRasputin's Death Trooper WIP
PiotrRasputin replied to PiotrRasputin's topic in Imperial Death Trooper
I did use the Appliance enamel to give the outside more strength per your experience. So basically, light coat it with the enamel paint, wait less than 30 minutes, spray again, repeat until glossy? Can I recoat it with the enamel paint at this point to fix this, or would I have to use the primer/filler to coat it all over, and resand it before trying again? Since I sprayed it before the 4th, I'll wait until Sunday before trying again. In the mean time, i'll be getting my snap button kit for the armor by Wednesday, so I'll start connecting the shoulder and biceps together. -
PiotrRasputin's Death Trooper WIP
PiotrRasputin replied to PiotrRasputin's topic in Imperial Death Trooper
So after letting the 2nd coat dry while I was out trooping for May the 4th events, I checked the dome out in the sun today and I'm still seeing the haziness when I initially saw clear, smooth coats after applying it. I'm also noticing specks every so often. Not sure what I'm doing wrong. I'm starting the spray before going over the dome, and hitting it lightly, with multiple passes. As this point, should I just consider priming it white and start over? This is the last part I need to paint before I can truly assemble the helmet. -
PiotrRasputin's Death Trooper WIP
PiotrRasputin replied to PiotrRasputin's topic in Imperial Death Trooper
So I decided to try a 2nd coat of the gloss enamel spray paint on a small area of the main helmet I already sprayed 2 days ago to see if that would help with the haziness, and that seemed to do the trick in terms of making it have that smooth, glossy look. I'm at work right now, so I'll post a picture later tonight. -
PiotrRasputin's Death Trooper WIP
PiotrRasputin replied to PiotrRasputin's topic in Imperial Death Trooper
Happy 501st Day! It's been a long month of sanding the helmet, followed by lining the inside with UV resin to add strength. But I'm pushing forward and was happy enough with the smoothness to give the dome a coat of the gloss black paint yesterday. Checked on it this morning, and while it is very smooth to the touch, it has a hazy look to it. This is the Enamel Gloss Appliance Spray from Rustoleum I used. Not sure why it came out this way. It has been over 60 degrees up here around Chicago the past week with not too bad humidity. In other updates, I attached the "nose grill" and updated the smaller vent grills on the side. And just to change things up, I tried on my Jim Tripon leggings with CrowProp boots to give the shins a walk test around the house. It was a pretty comfortable walk and I didn't fall down. I do think some trimming on the top back area is in the future, but I'm not focusing on that right now. More so want to get the helmet done than anything. -
Have you measured the diameter of your forehead? That's one of the more important factors I would be concerned with. Though their site says it fits a 25" circumference forehead. If you are under that size, you should be ok. The other option would be to get MCM's 3D Print files and print/assemble the helmet yourself. It's more time intensive, but these are the best files. I have bought them myself because I am in Club Big Head and am actively filling and sanding my helmet at the moment.
-
As someone who is also on their Death Trooper journey, welcome to the club! I've seen threads before where some of the best advice is to start off getting the soft goods, then work on the armor. Jim Tripon's undersuit is the way to go. Just be sure you have a helper take good measurements in centimeters. Endor Finders Gloves are also great! These are both part of my build. I can't speak for KeepTrooping, but heard good things. I just recently got my boots from CrowProps because KT only go up to size 12.5 and I wear size 13 US. Good luck!

