

PiotrRasputin
-
Posts
102 -
Joined
-
Last visited
-
Days Won
5
Content Type
Profiles
Forums
Events
Everything posted by PiotrRasputin
-
PiotrRasputin's Death Trooper WIP
PiotrRasputin replied to PiotrRasputin's topic in Imperial Death Trooper
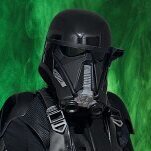
Small but important update! Got my custom boots in from Crowprops in a day early! They fit perfectly! Now all soft parts are done! -
PiotrRasputin's Death Trooper WIP
PiotrRasputin replied to PiotrRasputin's topic in Imperial Death Trooper
Thanks @Chaos, removing them now. Edit: Done! -
PiotrRasputin's Death Trooper WIP
PiotrRasputin replied to PiotrRasputin's topic in Imperial Death Trooper
Had the day off from work, so I was able to attempt the dome repair. Cleaned up the seams that split slightly with a dremel sander for a straight clean surface and applied CA glue and held it in place for a good minute. Most areas took it well, so I added more on the front and back sides of the seams, wiping them down for a clean fill. Once those held, I reinforced those areas with bondo and am currently letting it cure. 2 part epoxy will be applied after I give the bondo a light sanding on the inside. While that is going on, I also finished up weathering the silver parts thanks to the feedback on the blackwash mix I made. And to the wrap up this update, I cut and put in the wire grill under the side grill pieces with E6000. Will put the weed guard cloth underneath it when the adhesive cures. -
PiotrRasputin's Death Trooper WIP
PiotrRasputin replied to PiotrRasputin's topic in Imperial Death Trooper
While waiting for the CA Glue to arrive, I whipped up a batch of blackwash paint for weathering the silver parts. I just used the Rustoleum Flat Black, sprayed it in a disposable cup, and mixed in a generous amount of water and mixed thoroughly. Gave it a test run on the underside of the side grill as those won't be seen. I applied it lightly with a sponge brush then wiped with a shop rag I had. Thoughts? Definitely cuts down on the metaliacity as @DoggyDoc coined the term. -
PiotrRasputin's Death Trooper WIP
PiotrRasputin replied to PiotrRasputin's topic in Imperial Death Trooper
My garrison helper got back to me and did inform me the seam was held together with CA glue. So I'm actually going to keep the parts that are still attached intact and order what he used from GlueMasters to reconnect the seams after cleaning them up slightly. Then I'll get the 2 part epoxy mix to line the inside of the helmet for additional strength. In the mean time, I'll start the blackwash of the silver parts tonight to give them their weathered look. -
PiotrRasputin's Death Trooper WIP
PiotrRasputin replied to PiotrRasputin's topic in Imperial Death Trooper
Had bit of an accident today. My main dome fell off my workbench and split from most of the seam. This is the filament part my garrison member printed for me. I'm reaching out to him to see what he used to hold the pieces together. Honestly, I am disappointed this happened, but also, kind of glad it happened now and not during a troop. I knew I needed to reinforce the bonds between the parts, this just all more confirms that suspicion. My plan of attack is as follows: 1. Release the last section that is still holding together so I can apply the same steps to all the same areas. 2. Buy some Scotch-Weld PR40 Glue to tack the two pieces together. OR 2a. Use a soldering Iron with a knife tip to heat and weld the two pieces together. 3. Coat the inside with a 2 part epoxy mix to strengthen it. 4. Use bondo or plastic wood filler to refill the seams on the outside. Then sand smooth and coat with the 2 in 1 Rustoleum Primer/Filler. If anyone has any experience with putting 3D printed parts together, any advice would be appreciated. -
PiotrRasputin's Death Trooper WIP
PiotrRasputin replied to PiotrRasputin's topic in Imperial Death Trooper
Sanded the smaller parts of the dome with 600 grit sandpaper after curing a full day. Gave them their respective coats of paint and letting them dry. Thoughts on the Metallic Silver I used? -
PiotrRasputin's Death Trooper WIP
PiotrRasputin replied to PiotrRasputin's topic in Imperial Death Trooper
Back from my Garrison's Formal party, we celebrated our 25th Anniversary this year, and I was the Master of Ceremonies, so yeah...I've been in the bacta tank all weekend. I did manage to stop by the store to pick up some spray paint so here is what I have for the helmet and would like to see what you think. Keep in mind that the helmet is 3D printed with a mix of filament (the main dome, emitter side pieces, 2 bottom layers of the face) and the rest is resin printed. Everything was primed with Rustoleum 2 in 1 Primer Filler. I will sand all the pieces with 600 grit sand paper over the weekend before attempting to paint. Gloss Black - Took @Chaos's suggestion and got the Rustoleum Appliance Epoxy Enamel. The price couldn't be beat as my store had a sale on them for $7.50/can. Flat Black - Found I already had nearly a full can of Rustoleum 2x Flat Black, so YAY to saving some money. Metallic Dark Grey - Still had pretty much a full can of Tamiya TS-40 Metallic Black left over from when I painted my PhoenixProps metal impellers. Will this be an issue, or should I stick with Rustoleum? If so, which color would be closest? Weathered Silver - Another find in my box of spray paints I had, Rustoleum Silver Metallic paint. Wasn't sure if this would fly or not, as all I found reference was Tamiya X-11 Chrome Silver, but I don't have an airbrush. So I'm holding off on these parts till I can get confirmation on the color. Also, since my helmet is from MCM's files, I saw on the back that there are 6 slots on the sides of the middle section and 2 smaller squares that need to be painted flat black. However, these aren't in the files. Am I to assume to just use some spare ABS plastic, paint it the flat black and glue it in place? (I haven't attached the middle section just, just held it in place for reference.) -
That is the EXACT scope I bought for mine! Pro tip, don't paint it until you adjust the mounting brackets and secure it to the barrel. Otherwise, the spray-paint may make it difficult to adjust them to stay in the right spot. And if you have a hard time finding the screws, like I did for the Cheesehead slotted handle screws, I ended up using https://belmetric.com/ to not only get those, but the right taps to thread the holes correctly.
-
PiotrRasputin's Death Trooper WIP
PiotrRasputin replied to PiotrRasputin's topic in Imperial Death Trooper
Ok, so since I've already used Rustoleum's 2 in 1 Primer/Filler on other parts of the helmet, I'll use it on the resin printed parts so everything on the helmet has the same base primer layer and let that cure. The filament parts I already have I already sprayed with this and have them sanded and set to the side. Which now brings me to my question: the helmet color scheme. Looking for paint brand suggestions for the Flat Black and Weathered Silver areas. I already have the Tamiya Metallica Black TS40, as I used that on my left forearm impellers from PhoenixProps. @Chaos, can the Rustoleum Appliance Epoxy Enamel Spray in Gloss Black you mentioned work on top of the Rustoleum 2 in 1 Primer/Filler after rigorous sanding? -
PiotrRasputin's Death Trooper WIP
PiotrRasputin replied to PiotrRasputin's topic in Imperial Death Trooper
I've been using the Rustoleum 2 in 1 Primer Filler at the moment since that what my garrison member who printed my dome uses on his 3d filament prints. He warned me about the need to constantly sand, spray, and repeat many times to hide the lines. Since the resin prints don't have the lines like filament, should I use the same type of primer on them prior to painting? -
PiotrRasputin's Death Trooper WIP
PiotrRasputin replied to PiotrRasputin's topic in Imperial Death Trooper
Picked up the last two 3D resin pieces on Sunday, the Front Grille and Front Insert. Everything fits perfectly! I also did a quick test of the visor after cutting it out from a dark green safety visor I ordered off Amazon. The garrison members I showed it to said they couldn't see my eyes which is exactly what I needed to hear, as it is required in the CRL. Still need to fill in that vertical line, slightly tightened a visor screw 1 turn too many, but I'll just fill it with Bondo and sand it down. But now that I have all the pieces, I assume it would be best to prime and paint them individually before assembly? What paint would be best to do the priming? Keeping in mind some parts are resin and others other filament. -
PiotrRasputin's Death Trooper WIP
PiotrRasputin replied to PiotrRasputin's topic in Imperial Death Trooper
Replacement boots ordered with Crowprops yesterday. Got the form to submit photos for sizing today sent. Also got my undersuit back from my seamstress friend. She ended up having to take off about 4-5 inches of excess fabric from the calves and now they fit great! The forearms were taken in too a bit. Both now have elastic strapping for easy of pulling them through their respective pieces. -
You'll want to setup an imgur account to upload your pictures there. Then, you can copy the Direct Link and paste it on the forum posts and it should automatically show the picture. Here you go: https://cults3d.com/en/users/MCM_Design/3d-models
-
Have you considered MCM's files for your build? I'm currently in my build process and chose those files, so far just the helmet, but have heard only good things about them.
-
PiotrRasputin's Death Trooper WIP
PiotrRasputin replied to PiotrRasputin's topic in Imperial Death Trooper
Well, it's been a productive month! First up, dropped off my Jim Tripon undersuit to a seamstress friend to take in the forearms and calves and add the elastic straps for the heels and around the thumbs. Second, finished putting together my SE-14R from PremierProps! Just waiting on an actual 4x20 scope to arrive from Amazon Wednesday. Will give it a hit of the same spray paint to blend it in. Those Cheese Head screws were IMPOSSIBLE to find in stores, so I had to order everything online. Next, got a majority of the more detailed parts from my fellow garrison member printed in resin. He got busy so I am waiting for the Front Grille and Front Insert to be printed this week. Should be done by this Sunday. All parts were scaled up correctly since the dome was upscaled to fit my big head. Quick shot of the partially assembled helmet with the front manifold. I just hit the helmet with a coat of 2 in 1 Rustoleum Filler/Primer and am waiting for it to dry before sanding again. Will work on filling that vertical line after it dries. Lastly, my helper accidentally printed a grill at 100% instead of the 109% I needed. Since I use the MCM files, I decided to grab it from him to see if anyone on this forum might want it for their build if they are using MCM's files. The 100% scale is the one on the bottom. That's all for now! -
Polarmuffins DeathTrooper build WIP
PiotrRasputin replied to PolarMuffin83's topic in Imperial Death Trooper
Hey @PolarMuffin83! What files did you use? I'm working on my own build at the moment, had to upscale MCM Design's files (Previously known as Tom's files) on the helmet since I have a big head. -
PiotrRasputin's Death Trooper WIP
PiotrRasputin replied to PiotrRasputin's topic in Imperial Death Trooper
Ahhhh! I haven't printed those out yet! A garrison member is printing those in resin for me next week. Thanks for the clarification! -
PiotrRasputin's Death Trooper WIP
PiotrRasputin replied to PiotrRasputin's topic in Imperial Death Trooper
Doesn't look like it. The lens uses M3 x 5mm screws. This one is an M3 x 8mm. I took off the faceplate to see if there was a hole for that 8mm screw on the inside of the helmet, but nothing. -
PiotrRasputin's Death Trooper WIP
PiotrRasputin replied to PiotrRasputin's topic in Imperial Death Trooper
Helmet progress! My garrison's Din Djarin stopped by and dropped off the biggest pieces of the upscaled Tom's file helmet he 3D printed for me. Here's a shot next to the 850 Armorworks helmet that is too small for my head. I will probably sell it if and when I get approved with everything. For now, it will be filling, sanding, filling sanding, etc. for some time. Right now its about 10 degrees in Chicago, so I'll need for things to warm up above freezing as I don't have a heated or insulated garage. The printed one fits me MUCH better and after running to the hardware store to get most of the screws to hold the pieces in place, I found the issue of the 850 one pressing against the bridge of my nose completely gone, and I can easily take the new one off my head now. I did have one question though about the screws. On the inside, there are 4 M3 x 8mm screws in the cheek area. Just wondering, what is purpose of the screw in the area I circled? The screw isn't grabbing onto anything as there. -
PiotrRasputin's Death Trooper WIP
PiotrRasputin replied to PiotrRasputin's topic in Imperial Death Trooper
Yep, definitely will do that! -
PiotrRasputin's Death Trooper WIP
PiotrRasputin replied to PiotrRasputin's topic in Imperial Death Trooper
Well the long wait is over and today I received my 2 piece undersuit from Jim Tripon! I think I'll need to take in the area around the calves a bit as I did a test fit with the shin armor and there was bit much fabric left over. Also, I think I will have to trim the ends of the forearm armor as the have a slight curved, inward lip that is catching on the sleeves. Would a dremel cutting tool be best for this? Otherwise, VERY happy with the end result! Now to pay some bills and move on to getting the boots next. I wanted to get in on the January wave from KeepTrooping, but they only went up to size 12.5 US and I wear size 13. If I don't see them in that size in February, I might just go with CrowProps instead. -
PiotrRasputin's Death Trooper WIP
PiotrRasputin replied to PiotrRasputin's topic in Imperial Death Trooper
Treated myself to something fun today for Christmas and purchased the SE-14R from PremierProps already 3D printed. Just need to assemble and paint it when it arrives. -
PiotrRasputin's Death Trooper WIP
PiotrRasputin replied to PiotrRasputin's topic in Imperial Death Trooper
Small update: Messaged 850 Armorworks about the thigh sizing and the owner said to send them back with my measurements so he can refit them for me. I'll be shipping them out this week. They will also be getting work on the replacement posterior armor piece that cracked in shipment to me in January when they start another run of Deathrooper orders at the same time. Additionally, my Din Djarin managed to print off the biggest part of the helmet for me, scaled up a bit, so we are going to coordinate a meetup and see how it fits before printing the rest out. -
PiotrRasputin's Death Trooper WIP
PiotrRasputin replied to PiotrRasputin's topic in Imperial Death Trooper
So it just so happens that my garrison's Din Djarin has a 3D printer and lives pretty close to me. We just had a troop this past Saturday and brought the current helmet I have with and showed him the issue with it. Fits him fine as expected since his head is smaller than mine. I sent him the files for the helmet and gave him my forehead circumference in centimeters, so he will do a scale up slice print and let me know when its done to see how it would fit. I also mentioned to him there are files out there to 3D print calipers for properly measuring heads if he wants to try that.
