

WickerMan
-
Posts
164 -
Joined
-
Last visited
-
Days Won
4
Content Type
Profiles
Forums
Events
Everything posted by WickerMan
-

Wickerman Imperial Navy Commando Build
WickerMan replied to WickerMan's topic in Imperial Navy Commando
Right boys, I've kept you in suspense long enough. Now that Celebration Europe is out of the way (& fantastic it was!), I've cracked on with the Navy Commando! Helmet is now done, finished it today. Couldn't resist painting in some details to see the final look (you'll have to excuse the rushed job round the frown ha ha) & did a test fit yesterday, all that is left to do now is to add the ankle spats (which I did today) then weather the greaves, finish the E-11 & buy/make a white half size MP-40 Ammo pouch for the right hip! Then, after all that work, what else is there to do but relax with a Barbeque & enjoy a bottle of Trooper beer!!! Gonna scour the forums for that pesky Arc Trooper ammo pouch (which I'll paint white ha ha), then it's submission time & pray the GML's smile on me!!! -
Wickerman Imperial Navy Commando Build
WickerMan replied to WickerMan's topic in Imperial Navy Commando
Got the white pleather to make the half size hip ammo pouches for the Navy commando today, that's the last element to complete the armour build. Helmet is just about done, (with my UKG mate for some final tweaks before casting), then we can think about taking the pre-clearance submission photos -
Wickerman Imperial Navy Commando Build
WickerMan replied to WickerMan's topic in Imperial Navy Commando
Right boys...popcorn at the ready? The Chest plate Back plate Then the lid Built out the snout detail to get the angular look (rather than the smooth curves of a TK) Consolidated the face & built in the sunken cheeks Then after some sanding, we have a Gilette smooth chin on our Navy Commando Just need to add a trim round the eyes & we are about ready for a casting session!!!! -
Wickerman Imperial Navy Commando Build
WickerMan replied to WickerMan's topic in Imperial Navy Commando
Much more progress has been made on these guys, been trooping lots so not had time to update you all After a mini Armour Party (basically 4 of us at a mate's house ha ha, so I had access to the skills & facilities of an experience prop builder) the helmet is fully consolidated. I added some extra details to the snout after getting some sharper ref pics from the Wii version, built in the sunken cheeks, added the mini 'teardrops' & filled & sanded smooth the entire lower face. I've also completed and weathered the chestplate and attached the MP40 pouches & E-11 holster On top of that, I now have the elbows All is looking rosy..pics to follow -
Wickerman Imperial Navy Commando Build
WickerMan replied to WickerMan's topic in Imperial Navy Commando
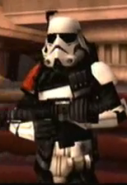
Part 2- The Armour Dremelled out the chest vents & Painted in the Unit markings stripe Then- Drumroll....... The Test Fit 'This area is off limits by order of the Emperor, return to your ship immediately!' Can't wait to get this finished, its such a comfy costume after lugging Cody around for 12 months!!! -
Wickerman Imperial Navy Commando Build
WickerMan replied to WickerMan's topic in Imperial Navy Commando
OK then, some pics (This will be a whistle stop tour, otherwise I'll overload the site ha ha) First: The Helmet Mando Sensor eyes More destruction, the sensor strip Painted up Then some more facial reconstructive surgery (ready to consolidate with putty ready for casting) -
Wickerman Imperial Navy Commando Build
WickerMan replied to WickerMan's topic in Imperial Navy Commando
First up: The draft CRL Draft CRL Description: Imperial Navy Commando Prefix: TX Detachment: Special Ops Context: Star Wars- The Force Unleashed (PSP & Wii only) Navy commandos were lightly armored soldiers that were trained for patrol, guard and monitor duty. At least some commandos were trained in piloting All Terrain Scout Transports, as one was seen during the Battle of the TIE Fighter Construction Facility. They were typically stationed at key Imperial facilities where they provided accurate covering fire for other units. Squads consisted of five to seven commandos and a sergeant, and sometimes an officer or a medic Source references; The Force Unleashed (PSP & Wii versions only) Battlefront 3.75" Action Figure Force Unleashed Version Custom helmet ( Galactic Marine or Snow-clone cowl; with modifications, heavily modified TK faceplate or scratch-build) Balaclava- A balaclava is a black head sock/hood that is worn under the helmet and is used primarily to hide any view of the wearer's skin and/or facial hair. TK Neckseal Black Scout or Tie Pilot flightsuit (with padded thigh ammunition pockets). The undersuit is a one or two-piece black textile suit, such as military flightsuits, motorcycle racing suits, industrial work clothing (Dickies), or similar suit modified appropriately. Suit must not have any visible labels, logos or zippers (including built in flight suit pockets). Galactic Marine Chest-plate (modified with TK ab detailing). White U-Shaped gasket should be present around neck, arm openings & edge of chest plate. 1" wide grey unit stripe detail should be present around all edges of the chest plate apart from the bottom, inset ½" from the edge. Galactic Marine Back-plate (indented modified Clone insert). Insert must be grey. White U-Shaped gasket should be present around neck, arm openings & bottom edge of back plate. Level 2- Back-plate insert should have up-lighters to match the visual references TK Shoulder straps Scout Trooper Shoulder plates. Shoulders should be padded to 'float' above the shoulders like a Clone Galactic Marine elbows TK forearms re-cut to match shape of clone forearms ANH hand-plates Animated Clone belt 2x Black MP40 style Ammunition pouches (one on left chest, one on left side hip) 1x White MP40 style Ammunition pouch (on right hip) 2x TK Thermal Detonators (One at back of belt, one on front left hip) Level 2- Front hip TD to be half sized with a single control button TK Cod/Butt ROTJ E11 Holster (on right hip side) TK Greaves (Widely spaced with 2" cover strip at front) Custom Knee plates on both knees. Knee plates are directly attached to the greaves (in a similar fashion as the TK Sniper plate) Energy Sink ankle spats Clone Trooper boots Level 2- Clone boots should have black soles E11 Blaster Level 2 Armour should be weathered like a Scout or 'Battle Worn' but not weathered like a Clone or Sand Trooper Optional Field backpack (Cut down/stylised version of a Sand-trooper pack, to match visual references) E11 Blaster Laser guided Sniper Rifle Officer Variant (as above with the following differences) Comms antenna on Right temple (use CC Bacara as ref) Command Pauldron (custom shape- Red in colour) Black MP40 Ammunition pouch replaces white hip pouch on the grunt Field backpack (Cut down/stylised version of a Sand-trooper pack, to match visual references) – compulsory for officers Battlefront Version- Differences Standard TK faceplate with Clone style sunken cheeks Snow-Trooper or CC Bacara Cowl/Dome Snow-Trooper chest plate Movie Clone-Trooper Backplate Animated Clone-Trooper belt boxes in place of white MP40 pouch & second TD -
Wickerman Imperial Navy Commando Build
WickerMan replied to WickerMan's topic in Imperial Navy Commando
Phew- been a while since I last updated this thread. Done loads more work. Helmet is almost done, nearly finished putting it back together ready for casting. Forearms are done, Chest & backplate are 80% there, legs are done. flight suit adjusted- just need to add the thigh pockets. I'll post up the update pics tomorrow (including the test fit), so you can all see where the build is at Just need to sort the Clone elbows (a UKG buddy is making those for me), thigh pockets (as above), ROTJ E-11 holster & a white MP-40 pouch for the right hip and we are done I've also drafted up a CRL, which I'll post for comment too -
Wickerman Imperial Navy Commando Build
WickerMan replied to WickerMan's topic in Imperial Navy Commando
Thanks Izzi -
Amen to that
-
Wickerman Imperial Navy Commando Build
WickerMan replied to WickerMan's topic in Imperial Navy Commando
There was weeping mate, ha ha. Every cut is followed by an 'Oh my god, what have I done?' moment!! When it starts going back together, the anxiety lifts a little ha ha -
Wickerman Imperial Navy Commando Build
WickerMan replied to WickerMan's topic in Imperial Navy Commando
Happy New Year guys After the festive lull and some repairs to get my Cody ready for the 2013 Trooping season, it's all hands to the pumps to crack on with the Navy Commando I now have all the pieces I need to complete this build barring an E11 & holster. I have kicked off with trying to finish the helmet, need to change the profile from a TK to a Navy Commando. First, cut off the 'nose', Navy Commando has a longer snout so will be adding shims to extend the snout by about an inch Then cut a large portion of the aerator bulges away, the aerators need to be set further back & face slightly outwards The excess bulge residue was then cut free from the aerators and repurposed as a shim to sit behind so the new position of the aerators has a good solid surface to bind to After the snout extender shims had dried it was time to add the 'Nose' back on. Extra inch of snouty goodness..sorted! Then to add the aerators back on in their new position set an inch and a half further back than they were originally Profile looking much more like a Navy Commando now. Aerators set back & facing slightly outwards (rather than forward & inward like a TK) with snout and vocoder protruding past them. Not long now before I can try & get a cast off this & try a test fit of all the pieces together -
Wow, Pep sure does generate fast results!! Looks awesome mate
-
I'm liking the look already!!!
-
Wickerman Imperial Navy Commando Build
WickerMan replied to WickerMan's topic in Imperial Navy Commando
More progress Been adding to the shimming of the helmet but not finished (having to do it in small strips to keep the contour of the lid), so no photo of that as it's not much advanced from last time!! Where there is nice progress is the legs. I engaged the services of one of my UKG buddies to build me some custom knees (I drew up orthographic views & measurements for him) & boy did he deliver. They turned out great. So, after completing assembly of the TK greaves I test fit the knees & they fit perfectly So after a couple of coats of white gloss, I attached them & they truly are a thing of beauty I've ordered the remaining TK parts & am waiting for my other buddy to deliver some Clone Elbows, then the parting out is complete The backplate will be done this week, then I can strap up the Chest & Back & concentrate on the Lid!!! -
Wickerman Imperial Navy Commando Build
WickerMan replied to WickerMan's topic in Imperial Navy Commando
As promised Izzi, here are the progress pics Making the cut for the shimming The 'OMG What have I done?' moment!!! Initial Shimming to add a half inch extra across the dome (will be adding the rest of the base reinforcement, then filling the gap with bondo) Then temporarily attached the faceplate to check the shim width, no more squeezing distortion..liking the look now Then tried it on again (have to twist the helmet while putting it on like a TK ha ha) More progress pics next week (I want to beat the FISD guy who is also making one of these so we can grab it for Spec Ops !!) -
Wickerman Imperial Navy Commando Build
WickerMan replied to WickerMan's topic in Imperial Navy Commando
Yup, 4 buttons in total (& the top one in the main strip looks larger & square, but that might just be limitations of the graphics). The holes in the ab detail were pre-drilled but I'll be covering them before adding the buttons. I didn't like the distortion of the faceplate in the test fit (the Snowclone cowl was a bit too narrow at the crown), so over the weekend I cut it in half so I could add a half inch shim. I then retested the faceplate and Bingo, no distortion!! I need to fill & reinforce the shim now & engrave the detailing of the traps etc. TK shins are done, with a 1.5 inch coverstrip (the ref pics have a wide coverstrip), the cod/butt connectors are done so I have a lovely pair of ABS Speedos!!!! Next weekend is the backplate insert, complete the shimming of the lid & start modding the vocoder & aerators, strap up the Shoulder Bells I'll add this weekends photos to Photobucket, then post them up here!! -
Wickerman Imperial Navy Commando Build
WickerMan replied to WickerMan's topic in Imperial Navy Commando
Oh yeah, the orange peeling on the backplate is as it's a bad pull that I got free (seeing as I was gonna butcher it anyway!!) I will be smoothing it out with filler then spraying with white gloss to regain the shine!! -
Wickerman Imperial Navy Commando Build
WickerMan replied to WickerMan's topic in Imperial Navy Commando
As promised, some more WIP pics First up, the helmet As previous, I wasn't happy with the cut of the eyes, so I recut to match the ref pic better. Next steps are to sort the aerators & Vocoder so the Vocoder protrudes past the aerators and the aerators slope outwards (per the ref pic) I test fit the pieces of the Chest plate so it matches the ref pics, see what you guys think Then I marked out & cut the backplate. The NC has a pseudo Clone backplate panel but the details are slightly different so Im adapting a resin spare I got hold of. & together More updates next week (may even try a test fit, see how its coming together) -
Wickerman Imperial Navy Commando Build
WickerMan replied to WickerMan's topic in Imperial Navy Commando
Been a while since the last update, still moving on this. I'll post up some more WIP pics soon I've been adjusting the chestplate after attacking a TK abs plate with my dremmel, so the GM chestplate is now a Navy Commando chestplate!! Just need some Ab buttons to complete the look (probably grab some Chicago screws unless anyone has a better alternative?) Been chatting with a buddy over here about some aspects of the armour that could get lost in the details. Most notably, the sunken detail of the backplate has 2 weak uplighters (similar to license plate illumination). You can clearly see it in some of the reference pics. Ergo, I have been looking at LED mounting methods etc Anyhoo, more WIP pics at the weekend!!! -
Wickerman Imperial Navy Commando Build
WickerMan replied to WickerMan's topic in Imperial Navy Commando
Thanks, it seemed appropriate ha ha -
Wickerman Imperial Navy Commando Build
WickerMan replied to WickerMan's topic in Imperial Navy Commando
Progress update: Started on the helmet. Trimmed the excess & faceplate off the Snowclone (no pic as thats the boring bit ha ha!) Cut out the eyehole to match the Navy Commando profile Then cut out the cheeks, need to insert Clone style sunken cheeks to match the reference pics Then, couldn't resist a quick test fit. I attached the 2 pieces with Sellotape. Some distortion of the faceplate due to the Sellotape not holding as tightly as E6000 would ha ha, but you should get the general idea. Loads of vision with this lid!! After-which I rechecked the ref pic, need to cut a bit more from the eyes to get the right angle at the front edge More progress after my Hols!!! -
Wickerman Imperial Navy Commando Build
WickerMan replied to WickerMan's topic in Imperial Navy Commando
Armour progress so far Got both parts of the helmet now, so will be attacking them with the Dremel shortly to turn a Snowclone & a TK faceplate into a Navy Commando!! -
Well guys, while waiting for funds to carry on with my Evo Trooper build (Five-Zero's helmet is lonely without the armour!!), I have cracked on with my other project the Navy Commando!! So far I have collected together: TK Shins/Calves GM Chest/Backplate CT Backplate insert detail TB Shoulder Bells TD MP40 Ammo Pouches I have ordered a Snow-clone helmet to base the lid on. It has good shape & thickness and has the right flared wings to match the in-game references. I had looked at Snowtrooper & GM lids but the flare was too shallow & the lid itself too thin. I will then adapt a TK faceplate to the correct angles etc for the Navy Commando. For the undersuit, I was thinking a TB flight suit with sewn on thigh pockets/pouches, complemented with a cummerbund for the horizontal ribbing. What do you guys think? I'll post up WIP pics when I make a start on the lid conversions (as we all love WIP pics eh? ha ha),
-
Any news on when the lids will be available bud?, Im drooling over here!!