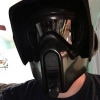
Apophis[501st] Posted October 26, 2016 Share Posted October 26, 2016 Hey everyone, it's finally time to start lurking in the shadows... Thought I would start a build thread since I'm too tired to actually work on it tonight... Boots ordered from Chris... Looking to source the vest and bund/pouches (Who's reputable?) I'm sure I could sew them, just too much going on right now to take the time and get it right since I'm a newbie with a sewing machine.... Have a Hyperfirm blaster... Modified RedKap overalls.... (Still need to add the Tandy suede and elastic around the leg). Received my SC Kit yesterday.... I plan to do this build in two phases... Phase I will be basic approval with all flight suit mods.. Phase II will be getting everything accurate for specialist. It was late yesterday, but I had to do a rough trim of the eyes and get an idea of how my AFX Mirrored lens would look... and I must say.... Kind of badass... That's all for now... Hopefully I have time in the next day or two to really sink my teeth into it and make some progress. Link to comment
Force Crush[TX] Posted October 26, 2016 Share Posted October 26, 2016 How big is that AFX visor? Small? Where did you bought it? Link to comment
Force Crush[TX] Posted October 26, 2016 Share Posted October 26, 2016 Where did you bought the boots from? Sorry for all the questions. I'm trying to build a Shadow Scout costume myself Link to comment
Apophis[501st] Posted October 26, 2016 Author Share Posted October 26, 2016 How big is that AFX visor? Small? Where did you bought it? Side to side it's really big... It fits top to bottom, but because of a hole at the top of the lens it's a tight squeeze. I found it on ebay here. I think I got the last silver mirrored he had, but should show you what to look for. Where did you bought the boots from? Sorry for all the questions. I'm trying to build a Shadow Scout costume myself No worries... I'll answer as best as I can... I have made TB boots before and it really isn't hard... I'm just being lazy this time around I guess... ANYWAY... I ordered from the pinned post in the personal trade area of the boards. chrisx909x does awesome work, and is really fast at replying to PM's.... If I find someone on these boards for the bund/pouches I'll let you know... *EDIT to add content* You can also buy silver mirror tint to go over the standard welding lens (as well as shadow scout decals) from TrooperBay. Link to comment
Forest Ranger[501st] Posted October 26, 2016 Share Posted October 26, 2016 Check out Chef from the UKG, he made my cummerbund/pouches for my TB, and I highly recommend his craftsmanship. You can find him on the Pathfinders forum, and here on Spec Ops. Link to comment
Force Crush[TX] Posted October 26, 2016 Share Posted October 26, 2016 Does he have a website to order his merchandise? Link to comment
Apophis[501st] Posted October 26, 2016 Author Share Posted October 26, 2016 Check out Chef from the UKG, he made my cummerbund/pouches for my TB, and I highly recommend his craftsmanship. You can find him on the Pathfinders forum, and here on Spec Ops. Awesome thanks! I had a PM out to Marcel, but haven't heard back... PMing Chef now. Link to comment
Apophis[501st] Posted October 28, 2016 Author Share Posted October 28, 2016 Well, got the back of the helmet E6000ed to the top (per SC's instructions to do that first). Got E6000 everywhere, which is worrying, but it's on straight-ish (Straight compared to the two back indentations, not the sides that aren't glued yet... any wonkiness in the sides will be fixed tomorrow when this has cured). Hoping I don't screw this up.... Link to comment
Force Crush[TX] Posted October 28, 2016 Share Posted October 28, 2016 What size are those magnets? Can I find them on Ebay? The bucket looks nice! Link to comment
Apophis[501st] Posted October 28, 2016 Author Share Posted October 28, 2016 They're 1/2 inch (Maybe 1/4 inch) neodymium magnets from Home Depot... You can find them at Lowe's, Home Depot, Amazon, Ebay... really anywhere. Link to comment
Force Crush[TX] Posted October 28, 2016 Share Posted October 28, 2016 Thanks Apophis! 1 Link to comment
Apophis[501st] Posted October 30, 2016 Author Share Posted October 30, 2016 Alright... Update time..... The top has been glued to the back and sides.... Checking the fit using a rivet and the pilot holes (don't mind the mess in the background). Looks a little low and forward.... Now the preassembly of the visor and faceplate (there's about 12 clamps in the back... made sure to line up the back of the visor with the back of the face)... Visor and Faceplate glue has set.... SC's Bolts installed (I will scuff them up and paint them later.... Phase II will be getting the accurate bolts). Pads and visor installed!!!! (And that visor was a pain... Took HUGE globs of hot glue and is really ugly on the inside) I know I still need to cut the ears... install the aerator and chin cup... cleanup... polish... and put decals on.. After examining and re-examining... It looks like the right side is a little lower than the left... I haven't decided if it's bad enough to be addressed... Feedback welcome and appreciated... Link to comment
Force Crush[TX] Posted October 30, 2016 Share Posted October 30, 2016 Is that the AFX visor you talked me about? Size small? Link to comment
Apophis[501st] Posted October 30, 2016 Author Share Posted October 30, 2016 Is that the AFX visor you talked me about? Size small? Yes Link to comment
Apophis[501st] Posted November 8, 2016 Author Share Posted November 8, 2016 Been a while without an update (had a couple troop requests the past couple weekends)... OK... Helmet is 100% complete... I know the CRL says that a plain helmet is acceptable, but I don't like the idea of a plain bucket... Seems really unfinished to me... I ordered a set of decals from TrooperBay (they accidentally left out the accurate stinger, but quickly fixed the issue... Highly recommended). I also painted the bolts... My only concern is that maybe the black on black isn't contrasting enough... Advice appreciated... 100% complete helmet with chin-cup (well, 100% complete provided no one points out any issues...) I LOVE this thing... Even though it's hard to get good pictures since the details get washed out. Again, any advice from the more experienced shadows would be appreciated... After pricing some bunds, and speaking with some friends... I decided it would be better to learn how to make a bund/pouch set rather than purchasing one... More skills can't be a bad thing right? So here's the body of the bund with the velcro sewn into it (didn't think to get pics through the whole process)... Please pay no mind to the dirty second hand cow chairs... Marking off the the vertical ribs.... I measured the length of the whole thing, marked the center line and marked the first two seams 1/2 inch on either side of the center.... I went 1" out for each subsequent seam. Took a couple tries to get them as vertical as possible... I don't know if the ribs are really visible.... Black wash-out issue again... First try on... It's a little tight... Instead of remaking it, I'm hoping it'll be a motivation to lose 10-15 pounds... I put this on by myself, so it looks slightly crooked... But I'm happy with it for my first attempt ever... Again... I doubt the ribs will show... Goal for this coming weekend is the COD, Flightsuit mods, and start the armor build... Thanks for looking and any feedback is appreciated... Link to comment
Force Crush[TX] Posted November 8, 2016 Share Posted November 8, 2016 Looking good! Do you have photos from the inside of the helmet? Link to comment
Apophis[501st] Posted November 8, 2016 Author Share Posted November 8, 2016 Sure... It's nothing special and ugly as hell... 3 pads and the chin cup... For the chin cup, I folded over the ends of the elastic and sewed them, them punched holes in both sides and just used the bolts as an attachment... Here's a pic of the globs of glue.... I may redo it to secure it better... But with the lens being barely big enough for the eyes it was a pain to hold it in place while I glued... Had to reglue a few times... Fun fact, Isopropyl Alcohol around the edges of hot glue will remove it from EVERYTHING... Link to comment
Force Crush[TX] Posted November 8, 2016 Share Posted November 8, 2016 Visor fitTed nicely! Where are those pads from? Link to comment
Apophis[501st] Posted November 8, 2016 Author Share Posted November 8, 2016 Condor pads Amazon... Great pads... Use them for my TK too... These Link to comment
Chef[501st] Posted November 8, 2016 Share Posted November 8, 2016 You're always going to get washed out details on the Storm Commando, the whole black on black thing does take it's toll. But then you are supposed to hide into the shadows! I found using a satin paint job for the main armour and gloss detailing with the pin stripes, snout and decals helped a little bit. Not a huge amount, and they are still difficult to see unless you look closely, but it gave a little bit of a contrast. Same goes for the bund/pouches. Try to use a different material between the two, one with a heavier weave or different surface texture. This will help create contrast and depth to your costume. And for the suit and boots... The changes between the suede and cotton on the flight suit, the elastic straps, and the vinyl on the boots all add in these tiny details which stop the costume being a two dimensional black void. It's all very subtle on the Commando, but that subtlety can really make or break it. They are without doubt the meanest trooper around. It's funny, when out, even with BlackHole troopers, I get the "look, shiny black stormtroopers!... but I don't like that one... he looks evil!" (win!). 2 Link to comment
Apophis[501st] Posted November 10, 2016 Author Share Posted November 10, 2016 Look what came today! chrisx909x does great work... Highly recommended... All for now.... I'm off to think about finishing the bund.... or putting the suede on the my flight suit.... Link to comment
Force Crush[TX] Posted November 11, 2016 Share Posted November 11, 2016 Hell yeah! They look nice! 1 Link to comment
Apophis[501st] Posted November 15, 2016 Author Share Posted November 15, 2016 I have a question... Or 50... How high up should the belt be? I've read that the top should be around your naval... Then I've also read that makes the cod look more like a diaper and to wear it on your hips where you normally wear belts... Also, how tall should the bund be (going from where to where)? Again, I've read contradicting things... Some say from nipples to naval, some say hips to just under the bottom of the chest armor... OH, and where do I find the cotton strapping for the drop boxes, belt, and shoulder bridge? I haven't really inspected the strapping that came with the SC kit, but they looked like nylon. Any help would be appreciated. Update on progress: Armor hasn't been touched... Still working on the bund... Made a cod the other night... it was too long, and I used 1/2" foam inside it and that just doesn't sit right... I was also really tired, just wanted it done... in my haste I sewed the cod to the top of the bund... I'm frustrated enough that I am going to commission my soft parts as an upgrade, but will continue working in the meantime... Hoping to do well enough for basic approval right now... Link to comment
Chef[501st] Posted November 15, 2016 Share Posted November 15, 2016 The belt sits high... Usually around your waist (which is near navel level) and not down on your hips where most modern trousers seem to rest. The bund goes from just under the chest (which should be about an inch above the bottom of the chest plate) down to the top of the belt (or just below the top of the belt). The cod section then goes down from there to the crotch. It doesn't go 'under' the crotch as this is what usually causes the dreaded toe. Webbing for the drop boxes, eBay. 40mm cotton black (2mm thick). Same stuff to be used on the chest/back joins on the sides. Shoulder bridges, just use some of the same material you used for your bund. Belt, 50mm Poly Webbing (eBay again). 1 Link to comment
Apophis[501st] Posted November 15, 2016 Author Share Posted November 15, 2016 Awesome... Thanks Chef Link to comment

Recommended Posts
Create an account or sign in to comment
You need to be a member in order to leave a comment
Create an account
Sign up for a new account in our community. It's easy!
Register a new accountSign in
Already have an account? Sign in here.
Sign In Now