bensid39999[501st] Posted February 24, 2018 Share Posted February 24, 2018 Hey guys! Figured I'd finally put up a WIP thread for my Imperial Army Officer. So far I have most of the goods and just need to catch up with some photos. I have alot of other things on my plate but am looking forward to completing this early March. So far I have: Olive officer hat from Gina (Runya Jade) Jack boots from my TI/IC Black Leather wrist gloves from line officer Metal Captain rank bar from Tiggwolf Olive pistol belt with green buckle long MOLLE pouches in olive including 3 mag, handcuff×2, and 3rd long pouch like in CRL picture 2 inch OD strapping and hooks from strap works WTF Army patches Converted Disney parks E-11 Last part I'm waiting on is olive CDCR jumpsuit 2 Link to comment
Blackwatch[CMD-DCA] Posted February 25, 2018 Share Posted February 25, 2018 Can you expand on the CDCR jumpsuit? I need one as well. I looked into dying a suit and I have a white cotton suit on hand, but dying a suit is always my LAST resort due to how it comes out and immediately starts fading when washed. Link to comment
abigdog1976[TX] Posted February 26, 2018 Share Posted February 26, 2018 I purchased the CDCR suit as well after Sebastian recommended it. It's very nicely made. I wear a 60 but needed the 66 to actually fit me. I'm fairly big 6'0 even 330lbs. I got the legs long in order to attempt the mandarin collar. It has straps, for lack of a better word, on the shoulder that I think need to be removed, but that's the only modification I can actually see. 2 Link to comment
pm07[TX] Posted February 26, 2018 Share Posted February 26, 2018 The CDRC is what I went with also. 1 Link to comment
Blackwatch[CMD-DCA] Posted February 26, 2018 Share Posted February 26, 2018 I purchased the CDCR suit as well after Sebastian recommended it. It's very nicely made. I wear a 60 but needed the 66 to actually fit me. I'm fairly big 6'0 even 330lbs. I got the legs long in order to attempt the mandarin collar. It has straps, for lack of a better word, on the shoulder that I think need to be removed, but that's the only modification I can actually see. Ok so you had to order six sizes up to get this to fit you? I cant find a size chart on the site. Are these like those Garrison shirts that dont fit? Ive ordered two of those that I cannot wear because the stated size was much smaller in real life. Im a weird shape and I normally wear a 56. Ive had to buy and ship back way too many things in the last ten years, would you suggest I get like a 62? Link to comment
pm07[TX] Posted February 26, 2018 Share Posted February 26, 2018 The CDRC suits are based on chest size. I went up a couple of inches due to my bigger size. Link to comment
bensid39999[501st] Posted February 27, 2018 Author Share Posted February 27, 2018 I was thinking of ordering a 56 as well, maybe ill do 58 Link to comment
Blackwatch[CMD-DCA] Posted February 27, 2018 Share Posted February 27, 2018 My waist is bigger, i had better order up. 2 Link to comment
bensid39999[501st] Posted March 1, 2018 Author Share Posted March 1, 2018 Here is my equipment. I assure you it is all olive green, the light in my house is terrible. I have jackboots, officer hat, wrist leather gloves, pistol belt, correct Condor MOLLE pouches, the foam I'm going to use to fill them, and my converted Disney Parks E-11 I've used over at IOC. I also have a leather holster for it, not pictured. Here are my patches and harness making materials. I have 25 feet of OD 2" web, I've already started making them for friends at 30 a piece. I ordered my CDRC olive jumpsuit in 58, hope it fits. I will probably document the modification process for posterity. 1 Link to comment
bensid39999[501st] Posted March 7, 2018 Author Share Posted March 7, 2018 Ok, I got my jumpsuit in, and i'm very pleased with it. This is the Elbeco new pattern CDRC jumpsuit. With CA tax it came to just under a hundred bucks for a large size. Corrections officers are complaining about this design because of the increased weight of the material, but I think it serves our purposes well. The last model had all zippered pockets, which would have to be covered; I found one at a local Military Surplus store but it was too small. This one is nice as it has all pocket flaps. The collar is generous and will be easy to modify. The only other thing to do is hem the legs and carefully remove the epaulets. THE FIT So the fit on mine turned out perfect, and I ordered a size 58, I usually wear a 54. ORDER 2 SIZES UP! I am over 300 pounds but am 5'9" with short legs, so I can easily hem 4 inches off a regular (see below). IF YOU ARE BELOW 6 FEET TALL, ORDER REGULAR! I'm starting with the hemming today and will be finishing this jumpsuit this week. 1 Link to comment
Blackwatch[CMD-DCA] Posted March 8, 2018 Share Posted March 8, 2018 Good intel, thank you!! 1 Link to comment
bensid39999[501st] Posted March 8, 2018 Author Share Posted March 8, 2018 HOW TO HEM FOR YOURSELF So if you are an experienced seamstress, just hem your jumpsuit, pay no mind to this post. If you're confidant on a sewing machine but need some direction, this is for you. If you want to learn machine and have access to one, you can save a lot of money on tailoring. Measuring Put on jumpsuit normally, roll left leg up until you find a comfortable length. When standing the left cuff should rest on top of the foot. Pin it twice, one at each seam. Go ahead and take pants off. Here is the pinned, measured leg compared to the right side unfinished leg length. Matching the length So here's why we only did one leg. You're gonna match that length on the correct side for sewing by following these instructions. Take right leg, turn inside out Now, take right leg and roll fabric to matching width of left leg. Pin at seams. Now, unpin left leg, roll fabric down, turn inside out. You then roll cuff up towards wrongside to match the right leg! Pin it at seams. Now the lengths and legs are matching, you're ready to sew. Link to comment
bensid39999[501st] Posted March 8, 2018 Author Share Posted March 8, 2018 If your machine has a box on the sewing surface, remove it, just like you would to work on a sleeve. Set your foot a quarter inch from the cuff fold, sew all the way around. Once you have both seams finished, before you cut anything, turn jumpsuit legs right side out and try on to double check your length. If you're happy with your work and length is correct, take off and turn legs back inside out. Trim excess material up to 1 inch from seam, you should have plenty of material left. You'll need that for the collar. Link to comment
vonmoen[501st] Posted March 8, 2018 Share Posted March 8, 2018 Great sewing tutorial, thanks for posting, Ben. 1 Link to comment
bensid39999[501st] Posted March 9, 2018 Author Share Posted March 9, 2018 REMOVING THE EPAULETS This turned out to be more annoying than I thought. Removing the button and loosening the strap with the seam ripper is fairly straight forward. However the base of the epaulet is double stitched into the shoulder seam, so you need to seam rip on both sides. Use caution, I already had to make a tiny patch for my jumpsuit on the back of the shoulder! Once you've got the epaulet pulled out of the seam and clean up all the tiny threads, you should have a clean 3" hole to sew up. Next week i'll be posting the collar conversion and finishing up the suit. 1 Link to comment
abigdog1976[TX] Posted March 10, 2018 Share Posted March 10, 2018 This is great. I am going to start modifying mine, but I'm concerned about making the collar. Looking forward to your tutorial! 2 Link to comment
bensid39999[501st] Posted March 10, 2018 Author Share Posted March 10, 2018 This is great. I am going to start modifying mine, but I'm concerned about making the collar. Looking forward to your tutorial! I'll go step by step, I've pared the process down to about 25 pictures lol. We'll all get through this together! 1 Link to comment
Blackwatch[CMD-DCA] Posted March 11, 2018 Share Posted March 11, 2018 This is great. I am going to start modifying mine, but I'm concerned about making the collar. Looking forward to your tutorial! if you want to go whole hog and get a second coverall to use as the materail (so it matches) for the collar, pockets and flap on the chest pocket Ill be happy to send you my collar template. Its been a resource for the JRS for many years and Ive sent my tutorial parts to JRS cadets around the world. 1 Link to comment
bensid39999[501st] Posted March 14, 2018 Author Share Posted March 14, 2018 Making the Mandarin Collar-PIC HEAVY!! This is not the only way to do a collar. You could use your spare material and a pattern and make one from scratch. What I like to do is, it is less work, is to convert the existing collar. That way you waste less material, and half the work is done for you because it's already attached to the suit. Looking at the CRL and my own suit, I have decided I want my banded collar to be 1.5 inches wide. Let me show you what I did: First thing I like to do is square the collar tips off. I could just cut them, but then i'd have these ugly open seams to deal with, so I am going to fold them back. First step is to use a seam ripper and open up the leading edge of the collar tips. There's a plastic stiffener in there, remove it. The ripstop material is thick when doubled, especially when there's also interfacing, so on the wrongside of the collar, cut a triangle out so that the outer material can easily fold in. Pin it. Now sew up on the leading edge. Cut off excess material, repeat other side. Now your collar edges are square. Now I fold my collar over to the inside, measure the outside band to 1.5 inches, pin, and sew 1/8th inch from the top. Here's what it should look like on the outside when you're finished, nice and square. If you're happy with it, turn to the inside and unpin, cut off excess. You should now have a banded 1.5 inch collar. Next we'll make the collar tab. 1 Link to comment
bensid39999[501st] Posted March 14, 2018 Author Share Posted March 14, 2018 Here's the banded collar, now the tab. I measure the opening to the length of tab I want. You want to have enough tab to stitch down and be able to comfortably wear it velcroed down. I went with 6 inches. I grab some of the spare material from the ankle and measure out 6 inches After I cut the ends, I have a piece about 3 1/4 inches wide. Perfect. I fold to the middle to make a band 1.5 inches wide. I then stitch both long sides. Now, fold two corners in (like a paper airplane) and sew flat. 1 Link to comment
bensid39999[501st] Posted March 14, 2018 Author Share Posted March 14, 2018 Before we attach the collar tab, sew on the fuzzy side Velcro. You always want the loops to face the skin, not the hooks. Now it's ready to attach. I pin it to check length, and then measure the 'landing zone' on the jumpsuit, so I can add the hook side Velcro. Pin the Velcro in place. Sew. Now notice, I have pinned my collar tab so that it folds over the raw edge when worn. Stitch it down. This is what it looks like done! At this point, before I add the patches, I wash the suit. I will go back later and add a rivet for a snap. 3 Link to comment
nrisvang[501st] Posted March 15, 2018 Share Posted March 15, 2018 excellent tutorial. Well done trooper..... Now to get one of those sewing machines..... 1 Link to comment
bensid39999[501st] Posted March 16, 2018 Author Share Posted March 16, 2018 I love my Singer Heavy Duty, well worth the cost. I've been using this one 6 years. I had to give it a tune up after doing pleather armor, but it can take lots of punishment. Link to comment
bensid39999[501st] Posted March 17, 2018 Author Share Posted March 17, 2018 FINISHING UP To help keep the collar straight when closed, I added a snap Here I sew on the patches by hand, which I prefer to the machine, adding them one inch from the shoulder seam. Here is the jumpsuit finished. I adjusted my web gear belt so that it naturally covers the elastic waist. I then use tape measure and have my wife measure over my shoulder and across my shoulder blades to make the harness. I decided to make it exact to measure and not adjustable. I have since finished the harness, filled the pouches with foam, and taken submission pictures! When I get those back, I will add them. 3 Link to comment
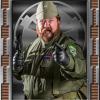
bensid39999[501st] Posted March 19, 2018 Author Share Posted March 19, 2018 Just got approved! Got this great picture back from my GML, so stoked! I hope to most more of the pictures from that shoot soon! It's a fun one to wear, probably going to unveil it at a troop soon! 4 Link to comment

Recommended Posts
Create an account or sign in to comment
You need to be a member in order to leave a comment
Create an account
Sign up for a new account in our community. It's easy!
Register a new accountSign in
Already have an account? Sign in here.
Sign In Now