mr0072003
-
Posts
257 -
Joined
-
Last visited
Content Type
Profiles
Forums
Events
Everything posted by mr0072003
-
How To - Make a SNAP Base and Strap for your TX or TK
mr0072003 replied to mr0072003's topic in Miscellaneous Tips and Tricks
Great tips xanthis02! -
How to make a SNAP Base and Strap. This Tutorial will help you get the idea of how to make a SNAP if creating your own SNAP belt/suspender and or Garter system. This is not a tutorial to help you create your actual Belt/Garter system, but to teach you the basics of how to make a snap base and the snap strap. Tools you will need. 1. Snaps with Snap Tool Kit 2. Hammer 3. 2 inch Webbing / or small bits of ABS 4. Scissors 5. Exacto Knife 6. 1 inch Elastic Webbing REFERENCES - I would like to thank TK300 for his awesome write up on how to make a full suspender system using the snap system. He has an actual web page with this Tutorial. Although this page meets and exceeds the requirements for 501 spec ops Tutorials, it still not an official 501specs created one and could one day just disappear and we would be lost for a bit. So I have decided to break this up in sections and create one specifically for TX style troopers. Here is the link to the page that I am using as reference. TK300 How to Snap System Part - 1 Creating the Snap Base 1. What we first want to create is a base for snap system. This can be used for any part of the build, so here is how to create one. You will need to make many of these. TK300 has provided a great illustration of what we are trying to replicate. [/size] In the above illustrations he is using small bits of squared off ABS plastic, and you can do the same, but it just takes a bit more work. (Drilling holes and cutting small parts if ABS plastic). The method I am going to provide will be using 2inch black webbing and 1 inch elastic webbing.   2. So let's cut out a square piece of the 2 inch webbing like so: (excuse my gross finger nail) 3. Now is a good time to seal the edges from the fray created when you cut the webbing. Use a lighter to melt the edges to prevent future fray. 4. Next create a hole in the center of the webbing using your exacto knife. Not too big though, like the size of a large pen tip. 5. Now that the hole is created grab your snaps. 6. Place the male part through the hole in the webbing. (Just like TK300's illustration). 7. Place the female portion of snap on top like so.... 8. Next, using the base that was in the SNAP TOOL KIT. (the flat side of the base) 9. Place the base underneath like so to the webbing we just created. 10. Now using the snap tool post, place in the center of the snap and using a hammer, give it a good couple of whacks! Once you're done, it should look like this! The back That's it, the snap base portion has been created! Step 2 - Creating the Snap strap section. Again I am going to use on of TK300's great illustrations of the Snap strap we are trying to create. This part is called the strap, because we will use this side to strap other parts of our armor together using these snap straps to connect them. 1. Using some 1 inch elastic webbing like so: We will basically repeat steps 1 - 9 to create this section, but using the female part of the snaps, and 1 inch elastic webbing. (Please note that this is going to show how to create a basic strap. This is not for any specific part of the armor, it's just to familiarize yourself with the differences between the snap base and snap strap.) 2. Make your pen tip size hole in the elastic webbing.. 3. Pass the male part of snap through... 4. Place female part of the snap on top, and using the OTHER side of the black base in section one (the side with the rounded out part) to hammer in place.. (please reference sections 5-9 from part 1 to complete the rest of this) Sorry forgot to take pics of this part. When you're done, here are both pieces side by side.
-
Love Love Love!.. Great work and Congrats..
-
too cool mang.. if my kid would like this stuff I woud be all over a kit like this. Great Stuff!
-
I used a Sealing Iron to mold it back..... Basically creating my own returm edge. There is a good Link on FISD on how to do it...Let me dig!
-
Here is the paint tut for your Pauldoron http://forum.specops501st.com/index.php?/topic/2037-how-to-paint-your-pauldron-black-or-any-other-color/
-
NOw this is a great question.. I never thought about this before... Most people use E6000 on thuis type of Hips, I just (IMO) is not strong enough, but it has proven to be a tried and true glue for HIPS. anyone else have thougths on this. FYI as the Forarms go, I had to cut of from the front as well, I am a shorty, and then used a sealing iron to taper the edge.
-
Awesome news... Start here http://forum.specops501st.com/index.php?/forum/39-armor-tips-tricks-and-tutorials/ Read this http://forum.501stsp...c/2160-how-tos/ and old and until I transfer and or make new ones, this thread has a few good links left. http://forum.501stsp...ps-and-how-tos/
-
Yup Black Zip ties... they are greatr and hide very well!
-
I really must have been buried under a Rock... This is Great news (im way behind)... The build looks great so far. Fianlly get to see one of these kits put together... if I go anythign else, it will be a TD.
-
Too Cool. That last pic is great!
-
How to - Add Rear Drop Box Covers to you TX Armor
mr0072003 replied to mr0072003's topic in Armor Assembly and Trimming
Thanks Team. Going to work on transition Tuts next! -
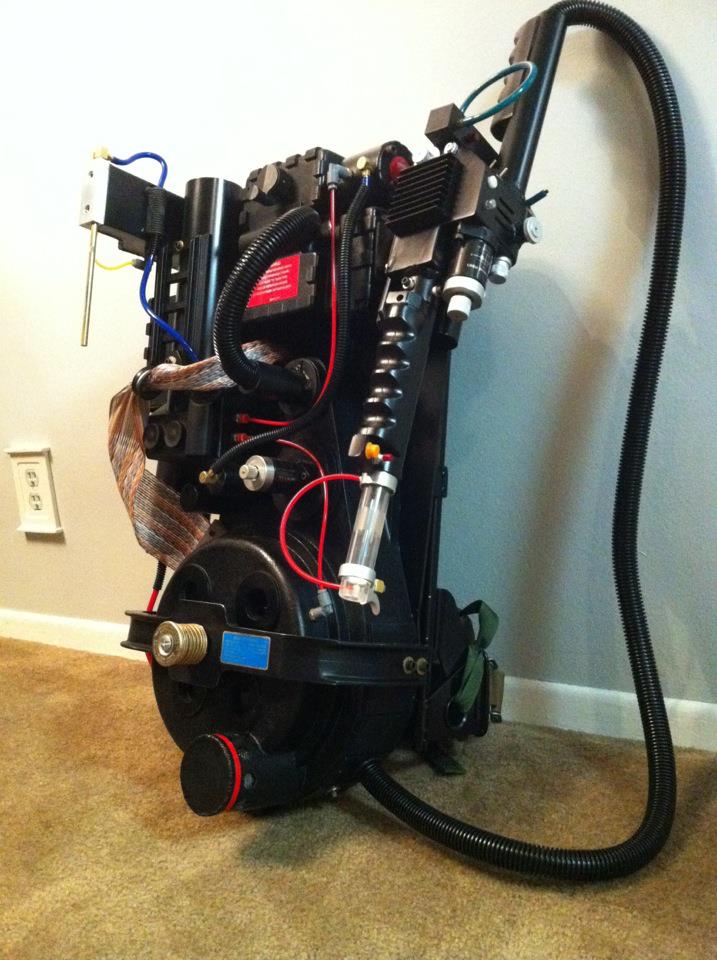
Ghost Busters Nuclear Acclerator Wand Build
mr0072003 replied to mr0072003's topic in Non-TX and Custom Creations
I saw this posted on GBfans.. Loved it, too bad it was not really used on AIR!.... -
Dizzy's CAP-W bucket Restoratation and Build
mr0072003 replied to DizzyStormtrooper's topic in Helmet Assembly
HOLY SMOKES MAN! That Paint Job is great. ..... ::SNIFF SNIFF:: Do I smell another TUT I can add to the Collection. How to Spray Paint your Bucket. Now thats one I have not really seen out there. Great Stuff Dizzy! -
How to add Shadow Trooper/ Storm Trooper Rear Drop Box Covers Things you will need 1 – Front Cover Drop Boxes (come with your Kit) 2 – Drop Box back Covers – You can get them here! - http://www.whitearmo...ner-drop-boxes/ - They are sold by trusted seller KWDESIGNS. 3- 1in Black elastic straping. 4 – E-6000 or 3M Super Adhesive glue 5- Dremel tool with Cutter and Grinder / Or cutting tool of some sort! Step 1 - Ok so you just got your backings for the drop boxes from kwdesigns as you want to take the next step to making your Armor to next level and need to add them to your drop boxes. Here is what a back drop box cover looks like next to the front one. AS you can see in the pics above, I have already used my super adhesive to connect a strap to the front box. I was not planing on using Drop Boxes at first, so thats I why I did that. (Sorry I did not take pics of that, but working on getting some.) Well I hcanged my mind and that Its not very hard, Step 1 - Center the strap on the middle of the drop box (the front ones, from the back) and glue in place. I would leave the strap a bit long at this point so that you can trim later to fit your needs as needed. If you leave to short, and its not right; trying to take the glue off is almost impossible. (Skip this step if you want the straps glued on the BACK of the Rear Drop Box and not the front ones like in the pic above. Step 2 – Ok now test fit your back cover to the front cover. (Note the back cover lips go on the INSIDE of the front cover lips). The thing you will notice from the start is two things. The new rear drop box Flares out from the back and has a lip. This is so that they can be trimmed to fit any style of Drop box from any kit, except for RT kits. Step 3 – Once you have determined what you want to cut off, then we can go ahead and start to mark the areas we want to cut. I used blue painters tape to make my marks easier to see. Using a dremel or cutting tool cut of the areas not in blue tape. Step 4 - Now after we cut the excess fit, make sure fitment is good. You may notice that the strap gets in the way. So at this point you may want to cut a part of the top part of the back cover to allow the strap to slip through both boxes once they are connected. Like so. If you have not glued the straps on first, (Skiped step 2) then your Rear Box should fit like the pics below. Note if you go this route, you will glue your strap to the back part of the rear Drop Box (from kwdesigns) and will need to center it from there. Remember to leave enough strap to have enough to length for your fitment of how low you want the drop from your Belt. (if anyone out there reading this has a pic of this set up, please PM me so I can add to this TUT. You will of course get credited for your assistance.) Step 5 – Now lets test the fitment of how far we want the drop boxes to fall down from your Ammo belt. Here I am looking at where the best place to put my boxes and how long I want them to drap down. Step 6 - Once you find your spot, glue in place. Use Glue on the Strap and place on the ABS belt and hold in place. Repeat on both sides and you are done. You may want to scuff the ABS a little to help the glue stick on a bit better. I hope this helps others out there. This is one thing to you can do to your armor and get it the next level.
-
Your Left Shoulder bell needs to be closer to your body, and the it seems that there may need some more space needed between your fron and back plate
-
How To - Make a Quick and Dirty E-11 Holster
mr0072003 replied to mr0072003's topic in Miscellaneous Tips and Tricks
Thanks ELP, It has been buried on page 3 in our Tips and Tricks. I also added this to our new how to secion. -
Team this is great How to created by our very own ELP. Here is his original Post. ELP Original Post All of this write up is his, I just added the "Things you will need" section as well as the Blue Prints as the old links were broken. VERY PIC HEAVY - Sorry. Also I'm going to edit / add to the initial post so troopers don't need to scroll through posts to find my next step. _____________________________________________________________________ Hi All, I've never done this before but I thought I'd share either my sewing triumph or proof that I need to be a bit more patient. Cause frankly I've gotta do something while the E6000 on my TX fully cures. For this attempt I'm going to follow the pattern without changing or adding anything. I'll probably make a few suggestions at the end as I'm thinking the addition of sewn in ABS straps would add some extra rigidity ... but we'll see. All alterations from the plan will be listed here, and in the corresponding step. Things you will need: Vinyl Hole Punch Snaps amd snap kit Rivets and washers Sewing Machine and or Sew by hand Black Sharpie Razor/exacto or Scissors Hole Punch Ruler Fixes / Adjustments: Step 5.3: Shows the back of the blaster holster for a Hasbro Mod should be about an inch longer. Step 6.1: Extended the belt attachemnt straps from 4 to 10.5 inches. _____________________________________________________________________ 1st Step: Download Troopermaster's (thanks for this where-ever you are) holster Blue Prints : 2nd Step: Read control info regarding Holster " HOLSTER: made of black leather or leather like material, worn on the left ". Note: Worn on left is very important as it will determine how the Vinyl is put together. See later on (Step 4.4: Test Fit). I bought material ($14 / yard - enough for ~4 - 5 holsters or 4 - 5 big mistakes). There was about 7 types of black vinyl to choose from but I settled on one with a medium shiny appearance, and a simulated leather finish: 3rd Step: Transfer the Blue Prints. My wife said "it's called a pattern", I said "it's Star Wars ... It's a Blue Print". The key here is to make sure your "blue print" starts with a 90 degree corner. This will ensure your drawing will be squaire. Now you'll notice these lines don't exactly match the 'blue print'. That's because I want all black vinyl on every outer surface - even if people won't see it. So the two bits get sandwiched together and then the holster will get built. Look at the lower pictures ... It'll make sense I promise. Total Time: 40 Minutes. Next Step: Cutting, Sewing and Swearing. 4th Step: Cutting. This was as easy as it sounds. Just cut out the "Blue Print". 4.1: Trimmed I trimmed off the outside area leaving only the rectangle of fabris I will use. 4.2: Split and more trimming I cut the piece in half and then trimmed out the inner cut. 4.3: Sandwich Test I've put the Vinyl 'sandwich' together to show how the two parts will go together. Also here I'm going to trace one half of my Vinyl Sandwich to use as a template should I make more of these down the line (much easier to trace a form then create the blue print from scratch.) 4.4: Test Fit My personal preference is for the scope to be worn forward, my mag holder to face out and the fold in the material of the holster to be forward; so as the holster is to be worn on the left my mock up looks like the above. What's the difference? Have a look at the control pics for the BlackHole and you'll see the holster is on the left but the scope faces the back, and the mag is either pointed inward, or it has been removed for the pics. Again just a personal preference. Everything fits, it needs a trim in a few areas, but we're good to keep going. Total Time: 45 Minutes. Next Step: Sewing ... Oh boy. 5th Step: Sewing This wasn't to bad actually. And it was pretty quick. 5.1: Vinyl Sandwich Both sides were sewn together and then the little bit of trimming needed, as noted in step 4.4, was done. You'll notice that every edge here was sewn. There seems to be a bit of extra fabric (holster doesn't lay perfectly flat)but I'm ok with that. 5.2: The Fold The piece was folder over and sewn along a portion of one edge to create the actual holster. The bottom is left open. So far so good ... I hope the blaster fits. 5.3: Test Fit The blaster fits, but it looks like the back needs to be about an inch longer. I'll make a note of that. Now to cut and add the strapping to attach to the holster to the belt and another to keep the E-11 securely in the holster. Total Time: 1 hour 10 minutes 6th Step: Rivets, a snap and straps. This was all pretty straight forward. I needed to attach 3 rivets: 2 on the top of the holster for belt attachments, and one to secure the "safety strap" to the back of the holster. I also needed to put a snap on - Female end on the holster and male end on the safety strap. 6.1: Strapping I made 3 straps. 2 for looping over the belt and 1 for keeping the gun in the holster. I adjusted the length of the holster / belt straps as I wanted to loop the holster over the belt. The "blue print" calls for 4" straps - I made 10.5 inch straps. The other I left at the original length. 6.2: Hole Punch I punched 3 holes for rivets. Two in either upper corner and one for the safety strap to attach to. Here is an example of one: 6.3: Riveting I put in the top 2 rivets with a piece of ABS on the back of the holster for more rigidity. You can see in the picture the order of the parts used. The washers are exactly that, only specifically for attaching rivets to softer material. 6.4: Attachment Locations Here are the locations of the snaps and the rivets with everything attached. 7th Step: All Done. I've still got to colour the backing of the vinyl but aside from that “ C'est Fini†! Iz, thanks for the suggestion about spray paint, but my wife has said "Don't you dare paint the oven again" so I'm using a "Sharpie" marker - permanent, non-toxic, flat black, and best of all it will only leave tiny marks on the oven. Total cost of materials = $6 (Vinyl =$5, Snaps, Rivets and washers = $1) Total Time = 1 1/2 hours. Special Equipment Used(already had) = Sewing Machine with Vinyl Needle, Rivet Gun, Black Sharpie, Fabric Cutting Board & Wheel and Beers. Final Thoughts: Not bad, overall I think it's a bit small. It fit's my Hasbro Mod E-11 but the scale seems a bit off, especially when compared to my wife's big sturdy leather holster (from Anrev on the FISD boards - It's Really Nice, but costly in comparison)... My wife chuckled and asked "Does that mean you've got a case of Holster Envy? Are you going to make jokes about the size of my holster and then say that 'you're fine with yours and wouldn't know what to do with that much holster anyway', or maybe 'It's not the size of the holster but how you wear it'. " Ahhhh, good times. I'd never done this before but I'm sold on doing this again. It's dead easy. And I did this post as I went. I didn't take pictures and then put everything together afterward. Any comments or suggestions are welcome
-
If you keep searching the bay, they will pop up now and then for cheap. I got mine for 8 bucks and 8 shipping. 16 total, and that was not long ago, (4 - 5 months). Also try typing in blaster toy, star tours gun, and you may have a shot. I have never seen one on the shelf, but I have heard they do exist out there. FYI - Doopys is a great kit. They take a while to ship, but a good kit. There is also a very nice How To Convert your E-11 with Doopys in our new How To Section.
-
Cutting the Cod should I, shouldn't I, and if so How
mr0072003 replied to Tekket's topic in Armor Tips, Tricks and Tutorials
Cut it mang. Its makes a world of differnce from what Im told. nodoner told me that when he did not, mobility was minimized big time. -
Ghost Busters Nuclear Acclerator Wand Build
mr0072003 replied to mr0072003's topic in Non-TX and Custom Creations
Anytime Brotha!!! -
Yeah if you use my helpful HOW TO make your Shins not shift, we can take care of the yellow writing on the boots. Good Find, what Brand are they?
-
Ghost Busters Nuclear Acclerator Wand Build
mr0072003 replied to mr0072003's topic in Non-TX and Custom Creations
Nice video Muppet. I would be scared as heck to dance with my pack, but then I again I just created it, so im totally babying it right now. -
Yup.. the return edges on this kit are big... Here are the best pics I could find of showing this... Dont worry I have an armor party coming up on the 6th of April and I will get as many pics as I can.
-
Ghost Busters Nuclear Acclerator Wand Build
mr0072003 replied to mr0072003's topic in Non-TX and Custom Creations
Ok guys a little update on the pack the the thrower... I have been MIA from the site for a few weeks now, because I have been working on this...