mr0072003
-
Posts
257 -
Joined
-
Last visited
Content Type
Profiles
Forums
Events
Everything posted by mr0072003
-
aghh I see.. Yah the fronts are glued using e6000... and now with the other reference pic, I can cut of the excess in the back too. Great stuff. thanks Brotha! BTW - I added the item to my watch list. I will be getting one soon
-
Would this work? http://www.ebay.com/itm/FASHION-WOMEN-BELTS-BEAUTIFUL-DESIGNER-LIKE-/400285655763?pt=US_Women_s_Belts&var=670030097605&hash=item5d32e262d3
-
Toddo thanks for the great advice. I will be checking on this now. What I did was used a small black Zip Tie to hold the back in place. I to did not like the way it sat, but thought the "Float" in the description is what the meant (as to ok the looseness look of it). I wanted to just Glue it on, but thought that may be frowned apon. I then thought of rounding off the corneres to "Eat away" at the extra, but Im not sure if that was ok. The good news is that its NOT glued and can be adjusted of needed. I am hoping for another armor party and have some of the real pros, help me maybe redo the back. (I sort of left a lil extra) in case that happend. Man I just submitted.... but I will check the bay and start to look for this. I was not totally happy with how I made the first belt anyways, so this may be a good reason to get a new one.
-
UDPATE Everyone. Well after all the talking and waiting. I have finally submitted to my local GML for approval. Lets see what happens. I submitting the following pics for submission.
-
This is Crazy, I think I may have actually bought from this guy. The box is the same and everything you mentioned. The only reason I never really new where it came from was cuz my buddy "nodoner" here onthe spec ops forum, new a guy that knows him, and thats how me and another friend (not on the boards) got our kits. Now the story of where the kit really came from (I had my doubts for a sec) has come full circle. I think I will hit him up. Funny how we went from He is a Child Porno guy to hey I got my Kit from him too. Again another reason this site is great.....
-
HOW TO - HASBRO E-11 Build with Doopy Doos Kit
mr0072003 replied to mr0072003's topic in Blasters/Weapon Mods
I aint going nowhere guys... Your stuck with me forever now! -
Ghost Busters Nuclear Acclerator Wand Build
mr0072003 replied to mr0072003's topic in Non-TX and Custom Creations
VERY COOL MUPPET.... Why do I get the biggest smile when I see videos of Proton Packs fully working... Its like it get all gitty... My guess is the ABS one is the one in the middle. You can see some softness on the Cylytron Rings... but honestly I was LOOKING for it, had I not known, I would not be able to tell. Intresting info on the Throwers.. but good info.. I think I will be going with one of Nicks Proton pack shells. I have spoken to him vie e-mail and its looking like around 600 for the full pacakge all parts included.. I just have to piece it together... I will be broke on the side of the streets begging for money.. BUT HEY... I will have a proton pack. -
Ghost Busters Nuclear Acclerator Wand Build
mr0072003 replied to mr0072003's topic in Non-TX and Custom Creations
Hey muppet and others. thanks for the info and glad to hear there are more ghostheads around. As for the Pack, I am still looking for a shell. No one is selling one right now, so its hard. I have thought about getting the VAC Shell from Studio Creations, but not sure. Its my first build and thought the VAC Shell would be more forgiving, and I would not feel as bad if I mess up versus a 400 FG shell. Whats your thoughts on it. Do you have any pics for us to see. As for Electronics and sound I am going with CRIX (Heavy Props) Pack and Wand Lights as well as his sound board. Apparently its all plug in play, so we will see. I will be getting that before the shell as he is offering this month and taking payment like tomorrow. -
Ghost Busters Nuclear Acclerator Wand Build
mr0072003 replied to mr0072003's topic in Non-TX and Custom Creations
thanks everyone. I will post some more pics soon... the rest of the bits are coming in the this week.. As for lights and sounds... O YEAH.. in fact I will be purchasing the kit this Tuesday or Friday. Depends on the sellers needs. But its happening. I will be going more of a GB1 style pack, but a few GB2 parts or ideas may sneak in. The V-hook for example. No worries on the thread bi off topic, it not that hat is right one topic. The only thing I have learned about the GB world is not to buy from some Guy called Video Bob (tcbtexas) on the bay, as apparently he is a know recasters and blacklisted. So aside from that, I have used gbfans as my source for all info and some ebay for parts. -
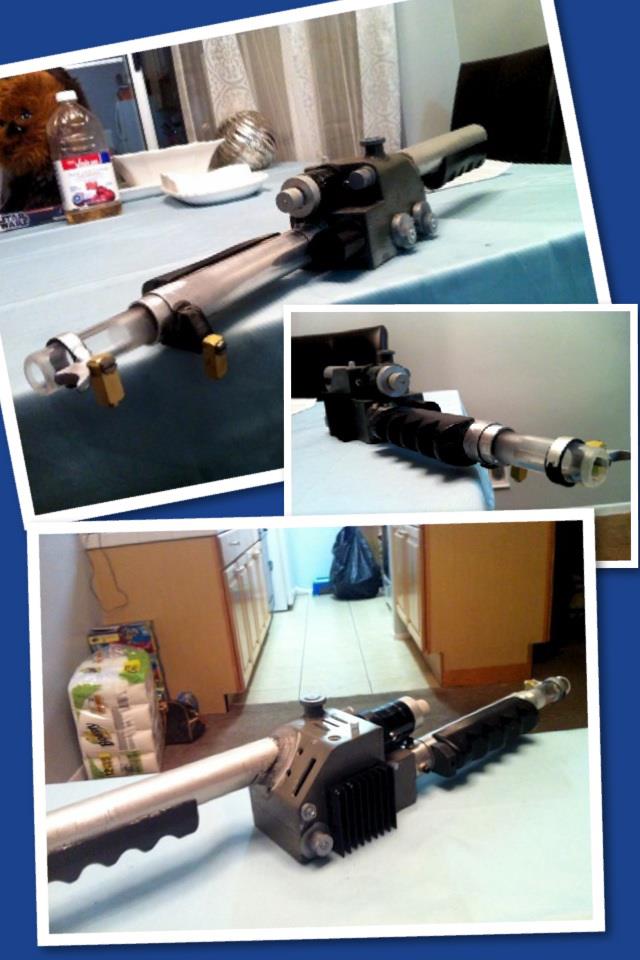
Hey Guys, well since I have jumped into the world of costuming and making cool props, I thought to myself why not build one of my favorite things from the 80s... a Proton Pack.... well i have researched and OMG its another world, but its a good time to get in and so I did... Getting a right pack (not from ebay) is hard as they legit makers (not recasters) are in limbo as its winter and too cold to mold or make anything.... so for now, I started with the the Gun of the pack.. the neutrona wand!!!! Well this is as far as I got. I got it some cool SoCal guys. THe parts have been sources from everwhere though.

-
Fivezero's '71 Chevelle Project
mr0072003 replied to Fivezero's topic in Non-TX and Custom Creations
LOL. about your pops... Great car and awesome work. My dad is a mechanic and that is some hard work you pulled of. Nice Job! -
hmmm very intresting... I may have to think about this!.. Dont worry I will be black for a while. I like that we are like the seals of the TKs......but a TK is just still cool..... now my site are set on something else (proton pack) and may ditch the idea of getting a another AM kit and just repaint this when I and if I change my mind.
-
Can you paint these kits White? I have thought about that, and for the price worth it. I love the AM kit is STRONG in construction. The HIPS stuff looks way to flimsy, but uch more scren accurate. Depends, but would like to know anyone has painted these White and go TK with it. No waiting.
-
master I dont thingk they do. I was just checing for you and all I can find that is close was Dessert Sand and Tuner Yellow.
-
Things you will need 1. 1 Pleather / Vinyl Pauldron 2. Painters Tape 3. Old News Paper or Paper Towels 4. Dupli Color Vinyl and Fabric Spray Paint - Gloss Black 5. Black Elmer's Painters Pen Step 1. So you have a Pauldron that is the wrong color and need to change it up. For a TX you will need to have it black. I was fortunate enough to get a free pauldron with my AM order. It was grey and would not go with my black TX, but it was free. So first thing to do is to mask of all the parts you do not want painted. Using your painters tape and news papers/paper towels mask it off like so. Step 2. Now that it's all taped off, we can't start to paint. Finding an open area and using Dupli-Color Vinyl & Fabric Paint (note use this type of paint as it's meant for this type of material and should not crack like normal spray paints will do.) I used Gloss Black, but you can use whatever color you want, but make sure it's for Vinyl and Fabric. Lets start with a our first Coat. Don't go to crazy just a quick spray. (note I wiped the pauldron down before painting) A few minutes later the next coat. (Don't forget to get under the leather tabs with rivets) the 3rd and Finally the 4th coat and set to dry Step 3. Now that it's all dried we can remove the tape and paper off and check it out. First thing that I noticed that even after taping that there was some grey showing through the edges like so. So get out your Elmer's Paint Pen and run it down the entire seems. Press down hard so the paint can seep into the crevasses of the stitching like so. Repeat to both sides if needed. Step 4 - You're all done - Let it dry for a day. This paint is pretty strong so let it air out if you can. Here it is on my TX Armor. Enjoy!
-
LOL thanks guys... Yeah a little showing off, but had to get your guys input to make sure it was good. I am soo proud of my suit, I have never really done anything like this, and thank my good buddy nodoner for getting me started. AS far as submission pics, I will submit to my SOCAL garrison and go from there. I have more pics, as my wife took some with better pics, but I will wait, I have been posting to many pics.
-
Congrats!
-
Congrats jeepgrrl. Im sure you will have no problem getting after your fixes.
-
Thank everyone. Well I have been an obsessed man the last 2 weeks, but here is the last update. I hacked off 1/2 an inch from the bottom of the Chest plate, I trimmed off 1inh and 1/2 on both sides of my abe peice. ( I have to be the skinniest trooper EVER), and molded in the edges of both the front and back plates to contour my bdoy better and WOW what a differnce. I also afixed (glued) the ribbed straps to my fron chest peice. I re-did my holster and moved them to the correct place and used Chicago Screws instead of Jean Rivits, so that I can remove it later. I even put my AKER System in this, and no issues with bulgin out or anything. Once my bucket comes from Chris (Poland) I will be submitting for 501. which leads me to my next question. Who do I -email for my pre-submission pics. Should I have a mentor? I am lost in the applications process!
-
I will talk to nodoner and see if he will apply and use the SS as reference. I hope so, his work is really good, trust me iv seen up close.
-
You got it Cap!...I am hacking now!!! (Scared as heck to do it) but i know it needed it, and you just confirmed it.
-
Thanks everyone. So I am like OBSESSED with my Build and everything 501 right now. I have been at work for like 14 days straight working like 10 -12 hr shifts, so I just surf the 501 boards and been READING and RESEARCHING when its free around here (which the last few days it has been). I still have managed to miss things in my research and its cost me time and many trips to JoAnns for Snaps . I have been working like a mad man to get all the tweaks worked out. I want to be like "ITS Done!" but everyime I take pics I can see things. So the pics I just posted were from last night. The PICS I am about to post are from TODAY in the daylight outside for better vision. In this fitting I was trying to eliminate the back flaring out by cutting my ties from the middle of my straps (like noted in the pics above) to the back connecting more towards the back with the back plate, as well as to put more Velcro on the front portion of the straps connecting to the chest plate. I know about the shins, I just am not clamping them anough. I have more play to do so, so hopefully on my submissionpics that will be addressed. THIS was what made the differnce and now both my back and straps sit MUCH better and more flush to my armor. I want to say its done, but I still need your opinions on the sides of my CHEST and BACK plates. I think they may be flared out to much and I may need to form "Contour Them more to my body or CUT them shorter. Am I experienceing the first AM Chest is not totally accurate moment?
-
OK I so I have test fitted once more since the pictures below so fitment is even better, but these pics are better than those as far as quality. I have since then been able to fix many problems. My back issue was because I was tieng down the wrong part of the shoulder srtaps. This Pics shows my side flaring out now. I think it needs to be formed better, with a heat Gun, but not sure. What do you guys think? An angle shot of my Belt (Formed with blowdryer to fit better) I also was able to cut the edges as well. Here you can see that I have tied down the wrong area of the shoulder straps. ( Another test fit with these moved back proved to fix my problem with flaring) You can see all my suspender system exposed on the side. I was trying a differnt way to put them on, and obvious FAIL! Close up of my AB and Chest peice. Are the AB Buttons good to go and correct in Size and color? Also is the chest peice to low?I am short so I was not sure how much should show? Biceps have been lowered down as suggested. Some Front Thigh Action ONe of things that I noticed is that I may need a better neck Seal THe Cloth that runs down is not long enoug in the back and leaves much to be exposed. Close up of my Bells and Biceps Back of the thighs... IM thinkning I need to form my Butt peice more into my crotch. Looks like I took a Dump or something. What do you think? Forarms and Hand Plates witih Gloves. Here is a side view of my TD, and Holster placment. I am almost sure that I may have placed the hOlster to far back and should have been right nect to the ABS part of the Belt. And the worst pic, the back. YOu can see straps, my TD is not on correclty and becuase my straps started to fall to the side, by rear kidny peice is hanging incorrectly exposing me. ... sigh. but here it is
-
HOW TO - HASBRO E-11 Build with Doopy Doos Kit
mr0072003 replied to mr0072003's topic in Blasters/Weapon Mods
Part 5 - Detailing Metal chamber Things you will need 1 - Silver Elmers Paint Pen (Fine gauge) 2 - Painters Tape So this will be the last detail, to add. We need to paint the Chamber Silver. As its black right now. So this will be the last detail, to add. We need to paint the Chamber Silver. As its black right now. Step 1 - Tape of the chamber with Painters Tape as we do not want to get paint all over the place and keep our lines straight Now begin to paint with the pen like so Let the paint Dry and remove the tape and you should end up like this. Thats it your done. Thats it Folks your Done. Hope this helps out other out there. -
HOW TO - HASBRO E-11 Build with Doopy Doos Kit
mr0072003 replied to mr0072003's topic in Blasters/Weapon Mods
Part 4 - Doopy Doos KIT ADD ON - Painting Things you will need 1 - Doopy Doos Kit 2 - E-6000 Glue 3 - Primer Grey, Silver (optional), Bronze (optional). Black (Flat or Semi Gloss) Its your preference for the shade of black or check with your Garrison for specifics. 4 - String 5- Dremel with Cutting Bit/ Grinding Tool/Grinding BIT 6 - Rubber Bands / Painters Tape 7- 14 Gauge Black Wire 8 - Crazy Glue Step 1 - OK now that your Gun is ready for the DOOPY DOOS kit, There is one optional thing you can do. One of things I read in my research on the Doopys Hasbro build, as the sounds can get drowned out because the Counter covers some of the holes that allow the sounds from the outside to come out. So I thought this was something I could to take a swing at. Sadly I did not take more pictures, but you can see what I did. What I did was to dril out holes near the speaker with a Dremel cutting bit. These were solidly filled in. WIth them drilled out, it's will allow for better and louder blaster sounds. I used a file to clean up the holes I made to even out the edges. (sorry no pics of that but later pics will show this) Step 2 - Now it's time to get your Doopys Kit checked out and ready for glueing. Something that I did not see in other builds was that I had lots of return edges left on my fins. I broke some of extra peices off, but had to use a Dremel with Grinder bit to clean it up. Next was to begin useing your E-6000 glue and begin to glue the peices together. It's pretty Self explanatory, but check out some other build threads (many out there) that go through that process. For now you will have to settle for pictures of my Doopys kit all glued together using Painters tape to hold certain parts down while the glue Hardened. One of things I noticed was that the under sling was not aligning correctly. I tried to dremel out some of the screw post on the bottom of the barrel and it seemed to work. But its not perfect. With everything all glued together and taped up, let it settle over night. Please be careful that your tape/Rubber Bands do not shift any of your parts. I had not noticed this and one of my fines was slightly shifted because the rubber band had shifted it up . I decided to leave it as is, but do it right the first time and you shall be fine. Step 3 - Now that the Doopys Kit is glued on, and any fixes or shift in parts are fixed (if any), now we can begin to start to Paint. First find a good area to paint that is free flowing with air. Also lets get some string and tie it up to something so that you can paint it nicely. Once you do this you can start with a coat or 2 of the Grey Primer. Don't go to heavy, as you do not want to lose details on your gun. You still have more layers of paint to go. Next was to add a coat of Silver. This is an option as many like to have a weathered look and having a coat a silver underneath the black (which we have not painted yet) and then you can later lightly sand it to give it the weathered look. NOw that the silver is added. You can add some Bronze to only your Scope part. I did do this part, but was not happy with it, and did not even take a pic. Again this is an options if you want to sand down to give it a weahtered look and want to expose a little of the Bronze to give it an authentic look. Once you are done with all the painting of the Silver and Bronze, we can now begin to add the Black paint. Ok so here is where I got a little confused. I started with a FLAT Black, using Primer Flat Black Spray Paint OK So I decided to go with the Semi Gloss paint, as my wife put it "It will look dumb if your Gun is Dull while you are shiny Black." So you know the Saying "Happy Wife = Happy Life". Sadly I had painted first with flat black and then moved to the Smei Gloss. I have no pictures of that process. I have pics of the gun painted, but not from the jump, but you get the point. Step 5 - Lets add the wires to our Power Cylinders. Since the only reference pics of this that was in ANH, is so small and you really dont get a good reference. So after much researching I was able to come up with what I think these wires should go. Some people call it Greebies First thing I did was to determine where to make the holes for my 14 Guage wire would fit. So after much research I wipped out my old dremel with Grinding BIT. So on the MAG Counter there are 3 like prongs that stick out. Well I dremeled out the two outer ones using a small Grinder bit. Now with the holes drilled out I was able to see of the 14guage wire would fit. It did. Note that all you need to do with the Black 14 Guage Electrical wire, is wrap it around a Pencil and it will coil around and stay that way holding its form. Repeat for the other side. Next was to drill holes on MAG portions of the Cylinders. This was where most reference pics were non existant, so again I just went for where most pics showed it went. I used each end of the cylinders on the MAG and drilled a hole at the tip like so Now with the holes drilled in both sides and wires coiled. We can add Crazy Glue to the end of the wires and stuff them in the holes.